CAMPAIGN: VEHICLE ANTI-THEFT SYSTEM-NO START CONDITION

Models: 1988 Chevrolet Corvette and Pontiac Firebird GTA
TO: ALL AFFECTED DEALERS:
CONDITION:
--------- General Motors of Canada has determined that an intermittent no-start condition may occur on certain 1988 Corvette and Firebird GTA only with RPO UA6. An inadequate wire connection in the lock cylinder can cause the Vehicle Anti Theft System (VATS) module to sense an incorrect resistance. This causes the VATS to start a four minute lock-out timer during which any further attempt to start the vehicle resets the timer. Most vehicles will start on the next attempt, provided the four minute lock-out timer has completed its cycle.
To correct this condition, Dealers are to inspect the lock cylinder connector for the presence of soldered terminals. I f the terminals are not soldered (crimped only) the lock cylinder is to be replaced.
VEHICLES INVOLVED:
Involved are certain 1988 Corvette and Firebird GTA only with RPO UA6 produced within the following VIN breakpoints:
Plant From Through ----- ---- ------- Chevrolet Bowling Green J5110100 J5116700 Pontiac Van Nuys JL217583 JL246000
All affected vehicles have been identified by the VIN listing provided to involved Dealers with this bulletin. Any Dealer not receiving a listing was not shipped any of the affected vehicles.
DEALER CAMPAIGN RESPONSIBILITY:
Dealers are to service all vehicles subject to this campaign at no charge to owners, regardless of mileage, age of vehicle, or ownership, from this time forward.
Whenever a vehicle subject to this campaign is taken into your new or used vehicle inventory, or it is in your Dealership for service in the future, you should take the steps necessary to be sure the campaign correction has been made before reselling or releasing the vehicle.
Owners of vehicles recently sold from your new vehicle inventory are to be contacted by the Dealer, and arrangements made to make the required modification according to instructions contained in this bulletin.
CAMPAIGN PROCEDURE:
Refer to Section 4 of the Service Policies and Procedures Manual for the detailed procedure on handling Product Campaigns. Dealers are requested to complete the campaign on all transfers as soon as possible.
OWNER NOTIFICATION:
All owners of record at the time of campaign release are shown on the attached computer listing and have been notified by first class mail from General Motors. The listings provided are for campaign activity only and should not be used for any other purpose.
PARTS INFORMATION:
Parts required to complete this campaign should be ordered through regular channels, as follows:
Part Number Description Quantity/Vehicle ----------- ----------- ----------------- 26009609 Lock, Steering Column Cylinder Set 1 As Required
26012101 Key, Ignition (Codes #1 - #15) 3 Of Proper Through Code As Reqd. 26012115
PARTS AND LABOUR CLAIM INFORMATION:
Credit for the campaign work performed will be paid upon receipt of a properly completed campaign claim card, RAPID terminal or DCS transmission in accordance with the following:
Repair Code Description Time Allowance ----------- ----------- --------------- 1A Inspect Lock Cylinder Wiring .4 Terminals Only 2A Replace Lock Cylinder (Chevrolet) 1.3 3A Replace Lock Cylinder (Pontiac) 1.1
Time allowance includes 0.1 hour for Dealer administrative detail associated with this campaign. Parts credit will be based on Dealer net plus 30% to cover parts handling.
SERVICE PROCEDURE:
Inspection
1. Disconnect negative battery cable.
2. Remove hush panel (lower column).
3. Disconnect lock cylinder wiring connector at bottom of steering column.
4. Using a terminal pick, remove one of the lock cylinder wire terminals from wiring connector (step 3) and inspect for presence of solder. If strands of wire are a silver/white colour, terminal is soldered and lock cylinder replacement is not required. Reinstall terminal into connector, reinstall connector, hush panel and negative battery cable. Install Campaign Identification Label. No further action is required. If strands of wire are copper coloured, terminal is not soldered (crimped only) and lock cylinder replacement is required. Replace lock cylinder according to instructions below.
Lock Cylinder Replacement
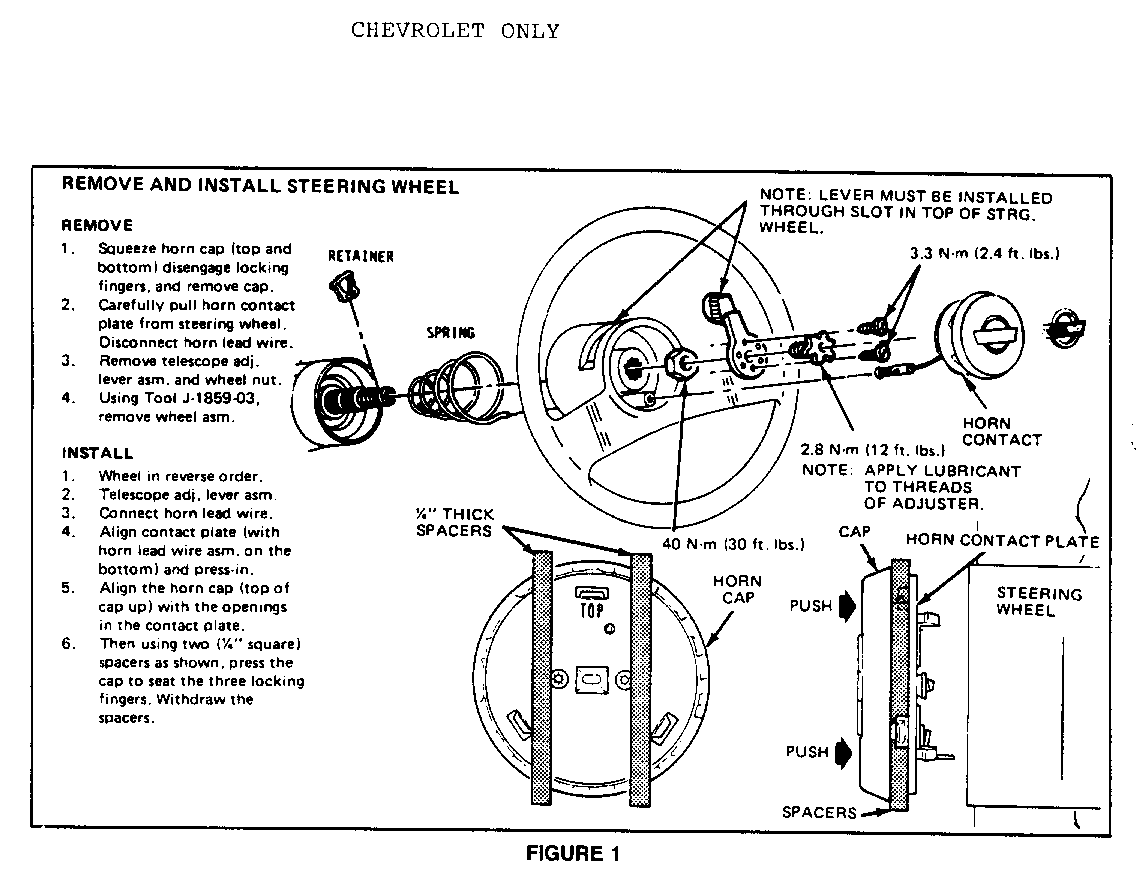
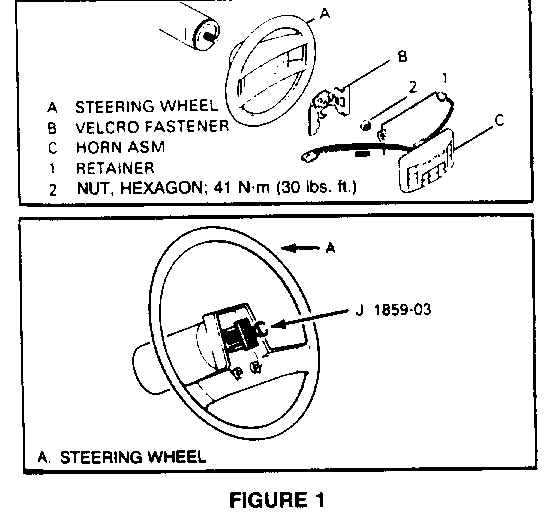
1. Remove steering wheel. See Figure 1.
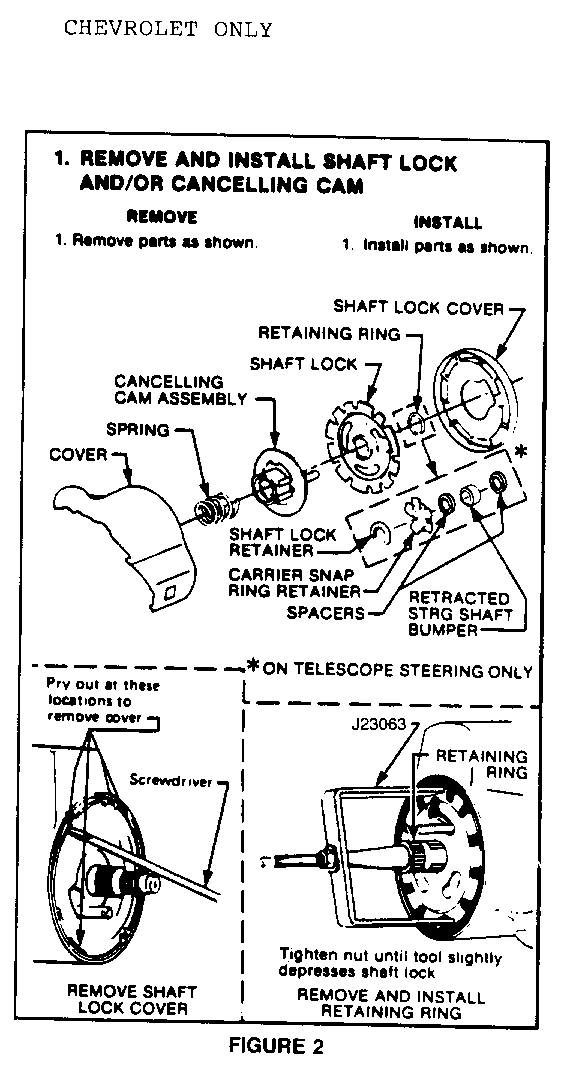
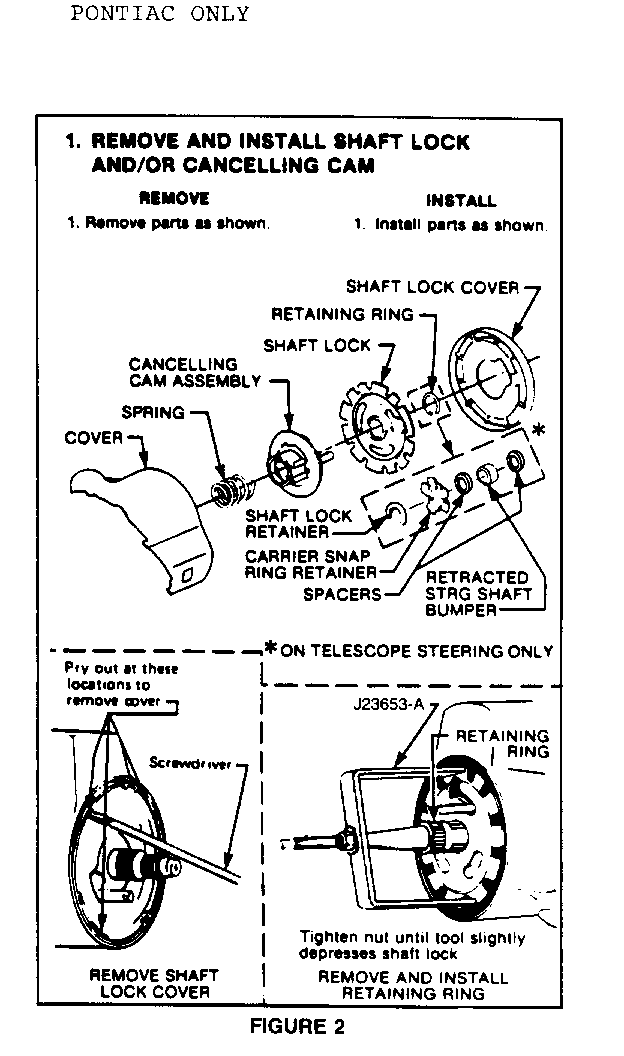
2. Remove shaft lock and canceling cam. See Figure 2.
3. Disconnect turn signal switch harness connector on lower column (extra wire is needed to lift turn signal switch high enough to work around).
4. Remove black plastic turn signal wire protector on underside of column.
5. Remove turn signal switch attaching screws, lift switch enough to work around.
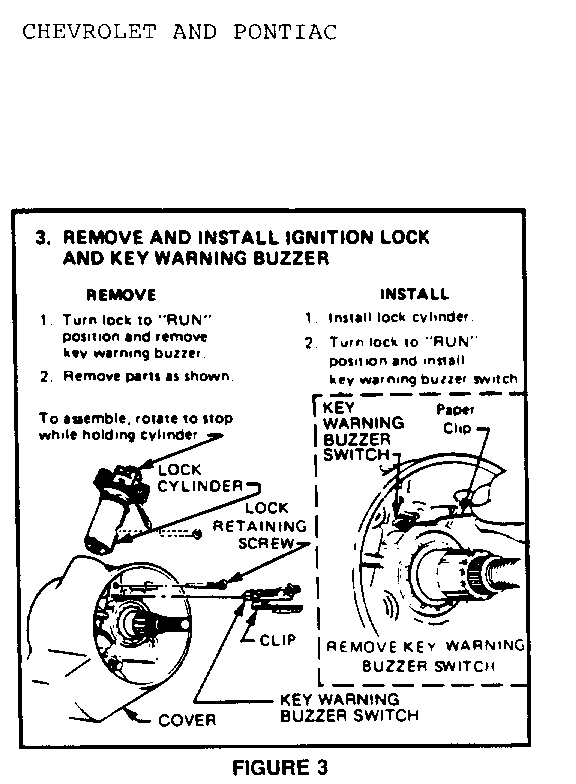
6. Remove lock cylinder. See Figure 3.
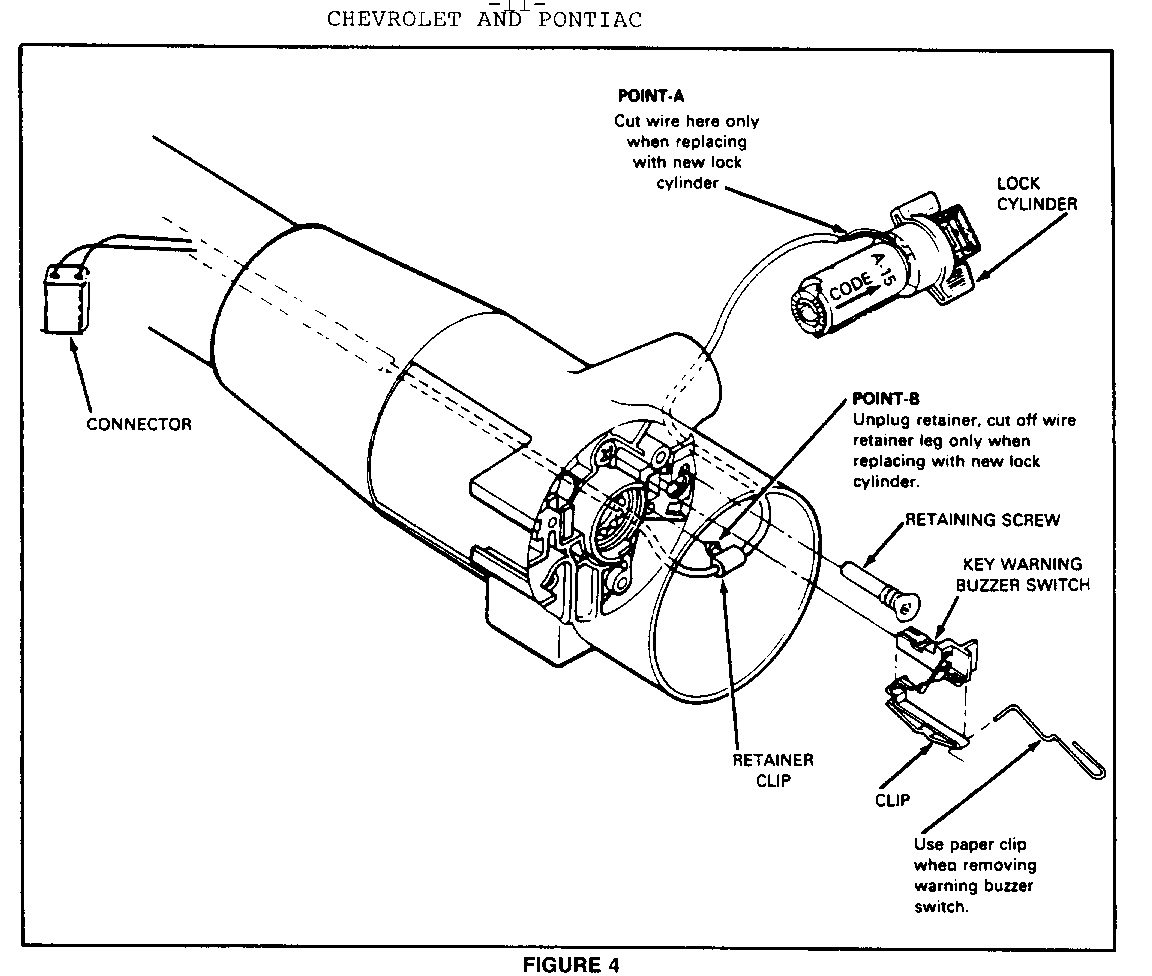
7. Cut lock cylinder wiring and wire retainer leg as shown in Figure 4, Points A & B.
8. Attach remaining wire extending from steering column cover to back of connector body on new lock cylinder. Wrap this temporary connection three (3) or four (4) times with electrical tape.
9. Pull on original lock cylinder wire connector at bottom of steering column and carefully feed new wire through lock cover opening and down through steering column. Connect new lock cylinder wiring connector.
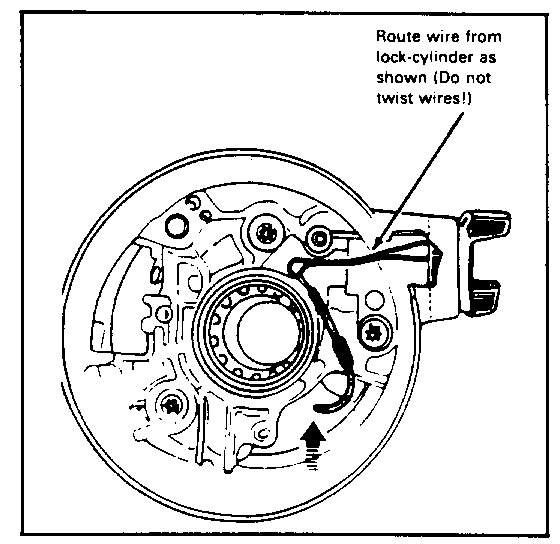
10. Route wire as it originally was and insert wire retaining grommet. See Figure 5.
11. Reassemble by reversing above steps as applicable.
For Pontiac Only:
NOTICE: The shaft lock cover acts as a light shield and must be reinstalled. Failure to do so could result in erratic operation of the steering wheel radio controls in the presence of bright sunlight.
NOTICE: If grease is required to lubricate cancelling cam assembly, grease kit P/N 26001884 must be used. Using the wrong type grease could result in reduced durability.
12. Determine electrical code of owners key by inserting it in key code reader on VATS Interrogator (J35628 or equivalent). Refer to 1988 Corvette Electrical Diagnosis Service Manual Supplement (ST-364-88-EDM) for additional information on operating VATS Interrogator.
13. Cut owner three (3) new ignition keys having same electrical code as original key using blank key supplied with new lock cylinder. Use ignition key P/N's 26012101 through 26012115 only (see Parts Information section of this bulletin).
14. Check all new keys for proper operation both mechanically and electrically.
TEXT ZONE INSTALLATION OF CAMPAIGN IDENTIFICATION LABEL --------------------------------------------- Clean surface of radiator upper mounting panel and apply a Campaign Identification Label. Make sure the correct campaign number is inserted on the label. This will indicate that the campaign has been completed.
Dear General Motors Customer:
General Motors of Canada has determined that all intermittent no-start condition may occur on certain 1988 Chevrolet Corvette and Pontiac Firebird GTA model vehicles equipped with Vehicle Anti Theft System (VATS). An inadequate wire connection in the lock cylinder can cause the (VATS) module to sense an incorrect resistance. This causes the VATS to start a four minute lock-out timer during which any further attempt to start the vehicle resets the timer. Most vehicles will start on the next attempt, provided the four minute lock-out timer has completed its cycle.
To prevent the possibility of this condition occurring on your vehicle, your Dealer will inspect the lock cylinder, and if necessary replace it with a newly updated version. This service will be performed for you at no charge.
Please contact your General Motors Dealer as soon as possible to arrange a service date. Instructions for making this correction have been sent to your Dealer. The labour time necessary to perform the inspection is approximately twenty (20) minutes. If replacement of lock cylinder is necessary, approximately one (1) hour and fifteen (15) minutes will be required to service your vehicle.
Please ask your Dealer if you wish to know how much additional time will be needed to schedule and process your vehicle.
This letter identifies your vehicle. Presentation of this letter to your Dealer will assist their Service personnel in completing the necessary correction to your vehicle in the shortest possible time.
Further assistance, if required, may be obtained from the General Motors Zone Office nearest you. Your vehicle Owner's Manual provides the location and phone number of each respective Zone Office.
We are sorry to cause you this inconvenience; however, we have taken this action in the interest of your continued satisfaction with our products.
General Motors bulletins are intended for use by professional technicians, not a "do-it-yourselfer". They are written to inform those technicians of conditions that may occur on some vehicles, or to provide information that could assist in the proper service of a vehicle. Properly trained technicians have the equipment, tools, safety instructions and know-how to do a job properly and safely. If a condition is described, do not assume that the bulletin applies to your vehicle, or that your vehicle will have that condition. See a General Motors dealer servicing your brand of General Motors vehicle for information on whether your vehicle may benefit from the information.
