FRONT DOOR MAY NOT OPEN USING EITHER INNER/OUTER HANDLE

Subject: FRONT DOOR MAY NOT OPEN USING EITHER INNER OR OUTER HANDLE (REPLACE LOCK) Models Affected: 1993 FIREBIRD MODELS WITH OR WITHOUT RPO AU3
CONDITION:
Some 1993 Firebirds front door may not open when using the handle. This condition may happen on either door.
This information applies to vehicles built before VIN Breakpoints:
With AU3 Option: Without AU3 Option:
P2201819 P2202698
CAUSE:
Door lock (latch) may have broken internal parts.
CORRECTION: Partially remove trim with door closed and latched, open door and replace lock (latch) using the following procedure.
PARTS REQUIRED: For vehicles without power locks: P/N's 16629242/43 (Right or Left)
For Vehicles with power locks: P/N's 16629240/41 (Right or Left)
TOOLS REQUIRED: 1) Medium length screwdriver, 2) medium length #2 pozi-drive screwdriver, 3) long thin ice pick or scratch awl, 4) mirror, 5) flashlight, 6) window handle remover (if manual window equipped).
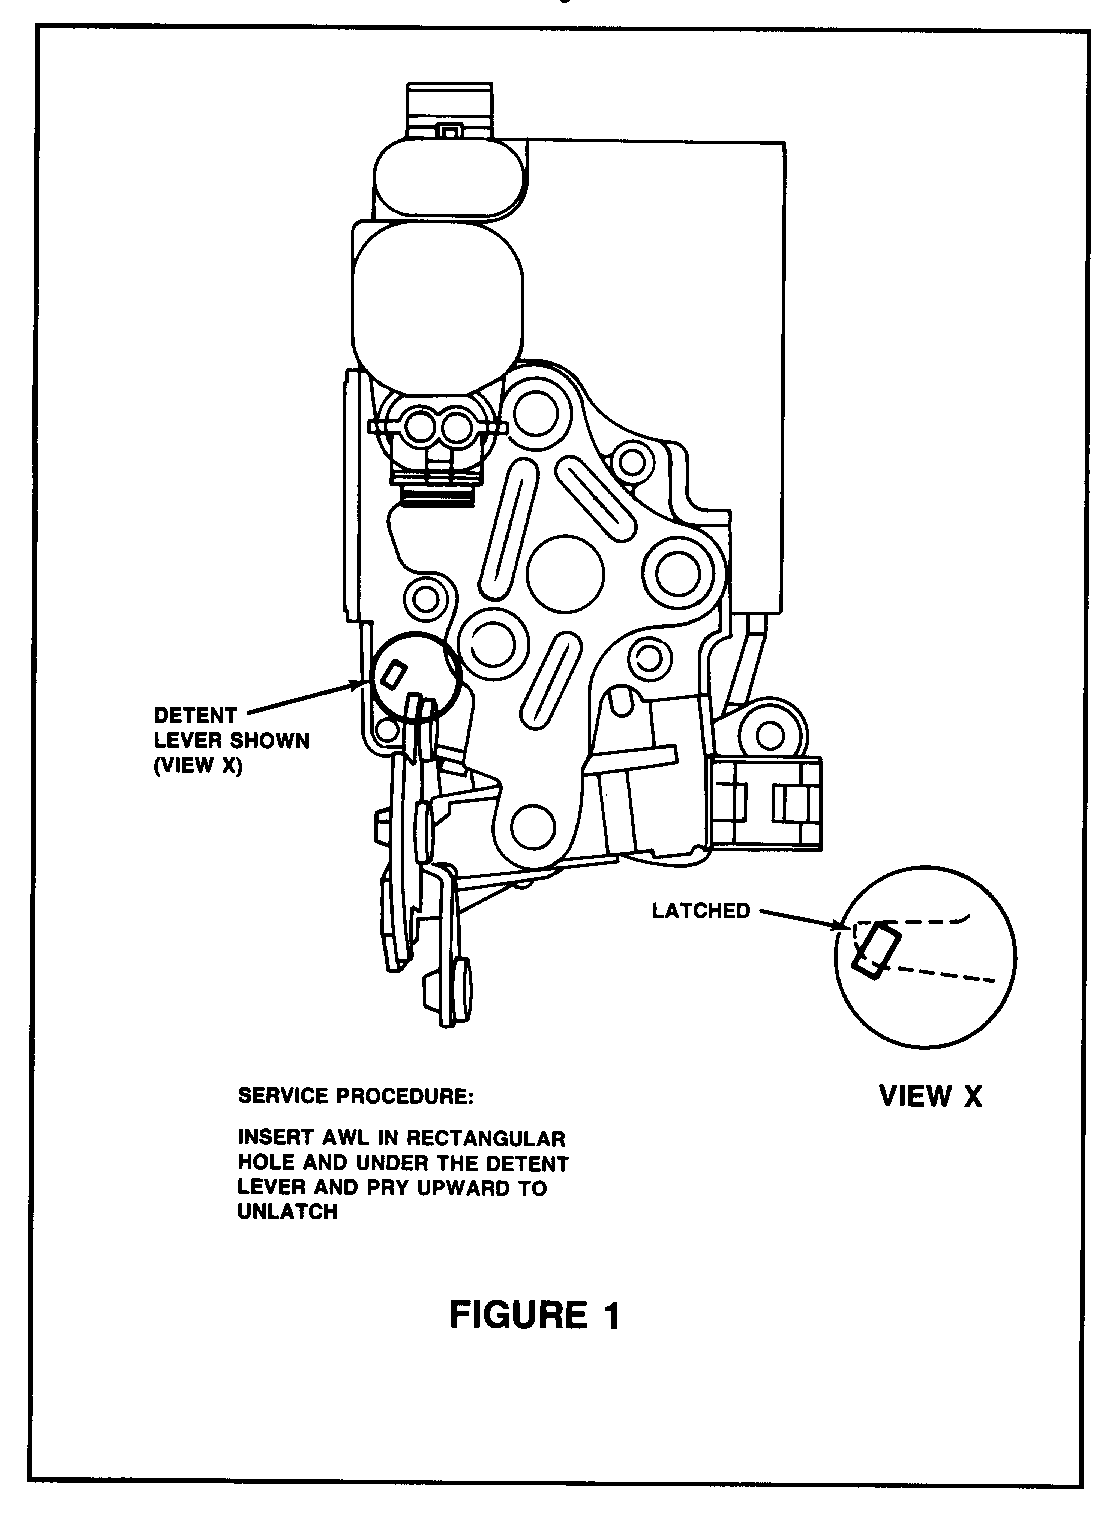
1. Enter vehicle from opposite side door. 2. Lower the door glass. 3. Remove the lock knob by prying the front edge with a screwdriver. 4. Remove the inside handle bezel attaching screws and the bezel. 5. Disconnect the wiring to the switches on the bezel (if equipped). 6. Remove the armrest attaching screws. 7. If equipped with manual windows, remove the window crank handle. 8. Lower the seat back to the fully reclined position. 9. Grasp the rear of the trim panel at the belt opening and pull upward and inward to release panel from the door. 10. While holding trim toward center of vehicle, carefully peel the water deflector from the rear access hole area and position out of the way. 11. Using flashlight and mirror, locate and disconnect inside handle and locking rods from lock. 12. Disconnect inside rods from inner panel rod guide and lower rods to bottom of door. 13. Using light and mirror, locate angled slot on inner surface of lock face (near inner panel side of lock).
NOTE: Figure 1 shows a left side door latch when viewed from inside the door. The slot is on the side near the inner panel surface.
14. Insert ice pick (or scratch awl) in lower end of slot, (See Figure 1, View X) angle tip of tool downward and push tool rearward as far as possible. 15. Push tool handle downward, tripping the lock detent lever to unlatch and open the door. 16. Replace the lock per the instructions in the Service Manual, Section 10-6.
PART AVAILABILITY:
Parts are expected to be available on 3/29/93.
WARRANTY INFORMATION:
Labor Operation: T3308 Labor Time: 0.7 Hr.
NOTE: Time allowance includes procedure to open door when closed and latched as well as replacement of the lock assembly.

General Motors bulletins are intended for use by professional technicians, not a "do-it-yourselfer". They are written to inform those technicians of conditions that may occur on some vehicles, or to provide information that could assist in the proper service of a vehicle. Properly trained technicians have the equipment, tools, safety instructions and know-how to do a job properly and safely. If a condition is described, do not assume that the bulletin applies to your vehicle, or that your vehicle will have that condition. See a General Motors dealer servicing your brand of General Motors vehicle for information on whether your vehicle may benefit from the information.
