|
|---|
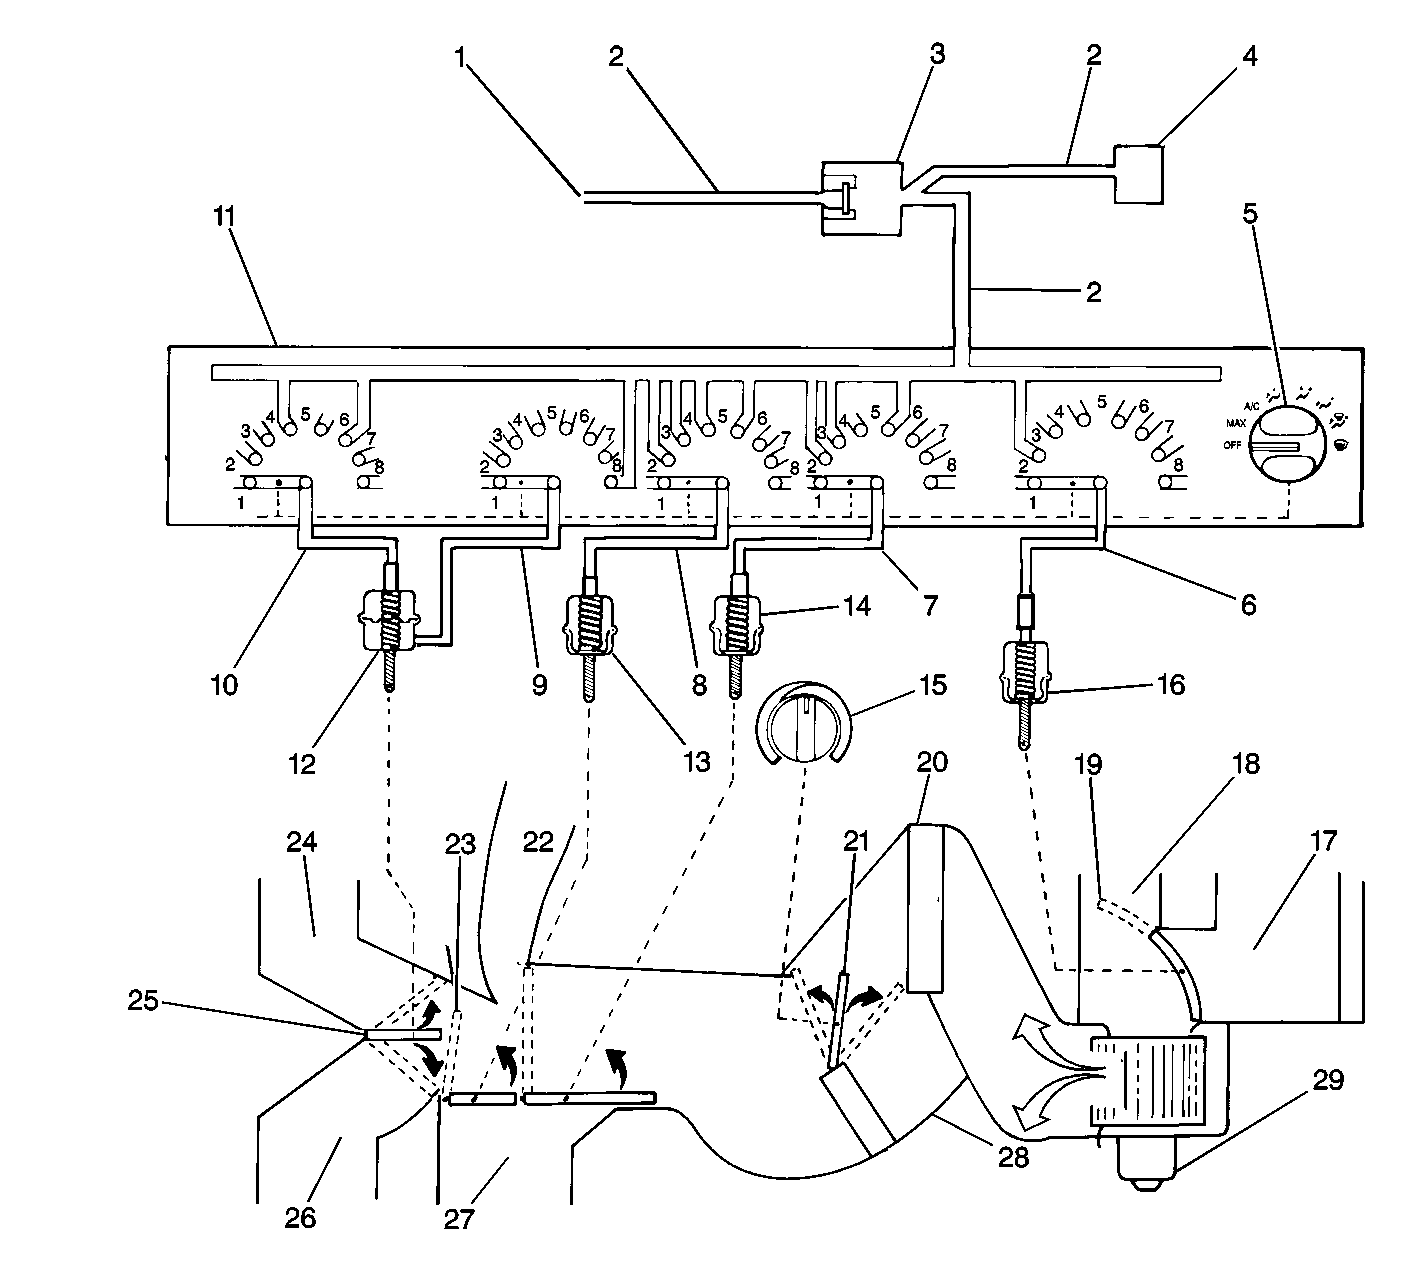
| (1) | Vacuum Source to Engine |
| (2) | Black |
| (3) | Vacuum Check Valve |
| (4) | Vacuum Tank |
| (5) | Control Vacuum Selector Valve |
| (6) | Orange |
| (7) | Red |
| (8) | Purple |
| (9) | Green |
| (10) | Yellow |
| (11) | Control Vacuum Logic Display Mode |
| (12) | Heater and Defrost
Vacuum Actuator |
| (13) | Bi-level Vacuum Actuator |
| (14) | Upper and Lower Mode Vacuum Actuator |
| (15) | Temperature
Control |
| (16) | Air Inlet Vacuum Actuator |
| (17) | From Inside Vehicle (Recirculated Air) |
| (18) | From Plenum Area (Outside Air) |
| (19) | Partially Open (With No Vacuum) |
| (20) | Air Conditioning
evaporator |
| (21) | Temperature Valve |
| (22) | To Side Window Defrost Outlets |
| (23) | Partially Open
(With No Vacuum) |
| (24) | To Windshield Defrost Outlets |
| (25) | Partially Open (With No Vacuum) |
| (26) | To Floor
Outlets |
| (27) | To Instrument Panel Outlets |
| (28) | Heater Core |
| (29) | Blower Motor |
A vacuum operates most of the air distribution system.
Electrical power operates the blower motor.
The vacuum check valve prevents vacuum loss. Heavy acceleration or steep
uphill traveling may cause vacuum loss.
Vacuum applied to a vacuum actuator moves the air door to the air door's
correct position.
Diagnostic Aid
Checks
| Action
|
Apply vacuum to the red vacuum
line.
| Air flow is diverted to the instrument panel outlets only.
|
Apply vacuum to the yellow vacuum line.
| Air flow is diverted to the side
window defogger and floor outlets.
|
Apply vacuum to the purple vacuum
line.
| Air flow is diverted to the side window defogger, floor and instrument
panel outlets.
|
Apply vacuum to the green vacuum line.
| Air flow is diverted
to the windshield and side window defogger outlets.
|
Apply vacuum
to the orange vacuum line.
| Air flow is diverted to the blower motor assembly air noise
increase.
|
Apply vacuum to no vacuum lines.
| Air flow is diverted to all outlets
except the instrument panel.
|
Improper Air Delivery Diagnosis
Step
| Action
| Value(s)
| Yes
| No
|
1
|
- Perform the preliminary inspection.
- Set the mode selector valve in the OFF position.
- Disconnect the vacuum line at the check valve.
- Use a hand vacuum pump in order to apply vacuum to the vacuum
line that leads to the mode selector valve.
Does the vacuum hold?
| --
|
Go to Step 3
|
Go to Step 2
|
2
|
- Inspect the black vacuum line that leads to the mode selector
valve.
- Replace the mode selector valve if the line is connected and working
properly.
Is the replacement complete?
| --
| System OK
| --
|
3
|
- Apply vacuum to the vacuum line that leads to the mode selector
valve.
- Inspect each setting (MAX A/C to DEFROST).
Does vacuum hold in every setting?
| --
|
Go to Step 4
|
Go to Step 8
|
4
|
- Disconnect the vacuum line multi-connector under the right side
sound insulator.
- Turn the ignition switch to the RUN position (engine not running).
- Select the HIGH blower motor assembly speed.
- Apply vacuum to each vacuum line individually (except for the
black and orange lines).
- Inspect the lines for air flow at the proper outlets. Refer to
the Diagnostic Aid Chart.
Does air flow at the correct outlets?
| --
|
Go to Step 6
|
Go to Step 5
|
5
| Repair or replace the actuator linkage and/or air valve
(door).
Is the repair complete
| --
| System OK
| --
|
6
| Apply vacuum to the orange vacuum line.
Does the blower motor air flow noise increase?
| --
| System OK
|
Go to Step 7
|
7
| Repair or replace the air inlet
vacuum actuator linkage and/or air inlet valve.
Is the repair complete?
| --
| System OK
| --
|
8
|
- Disconnect the vacuum line multi-connector at the mode selector
valve.
- Apply vacuum to each line at the multi-connector that is controlled
by the mode selector valve at a setting where vacuum did not hold.
Is a vacuum leak present at one or more lines?
| --
|
Go to Step 9
|
Go to Step 10
|
9
| Repair or replace the vacuum line and/or the vacuum actuator.
Is the repair complete?
| --
| System OK
| --
|
10
| Replace the mode selector valve.
Is the replacement complete?
| --
| System OK
| --
|