Hydraulic Brake System Bleeding Manual Bleed
Notice: If any brake component is repaired or replaced such that air is allowed
to enter the brake system, the entire bleeding procedure must be followed.
Notice: Use only DOT 3 brake fluid from a clean, sealed container. Do not use
any fluid from a container which is wet with water. Do not use DOT 5 silicone
brake fluid. Improper brake fluid, mineral oil or water in the fluid may cause
the brake fluid to boil or the rubber components to deteriorate. Keep all
fluid containers capped to prevent contamination.
Notice: Avoid spilling brake fluid on any of the vehicle's painted surfaces,
wiring, cables, or electric connectors. Brake fluid will damage the paint
and the electrical connections. If any fluid is spilled on the vehicle, flush
the area to lessen the damage.
Notice: Prior to bleeding the brakes, the front and rear displacement cylinder
pistons must be returned to the topmost position. The preferred method uses
a Scan Tool to perform the rehoming procedure. If a Scan Tool
is not available, the second procedure may be used, but it is extremely important
that the procedure be followed exactly as outlined.
Notice: Use only DOT 3 brake fluid from a clean, sealed container. Do not use
any fluid from a container which is wet with water. Do not use DOT 5 silicone
brake fluid. Improper brake fluid, mineral oil or water in the fluid may cause
the brake fluid to boil or the rubber components to deteriorate. Keep all
fluid containers capped to prevent contamination.
The time to bleed the hydraulic system can be reduced if
the master cylinder reservoir is filled with brake fluid and as much air is
expelled before the master cylinder is installed on the vehicle. Pumping the
piston can evacuate the air from the piston cavities.
Power brakes require the vacuum reserve be depleted by applying the
brakes several times with the engine off. Care must be taken to prevent brake
fluid from contacting any painted surface.
- Fill the master cylinder reservoir with
brake fluid and keep the reservoir at least half full of fluid during the
bleeding operation.
- If the master cylinder is known or suspected to have air in the
bore, them it must be bled in the following manner, before bleeding any caliper:
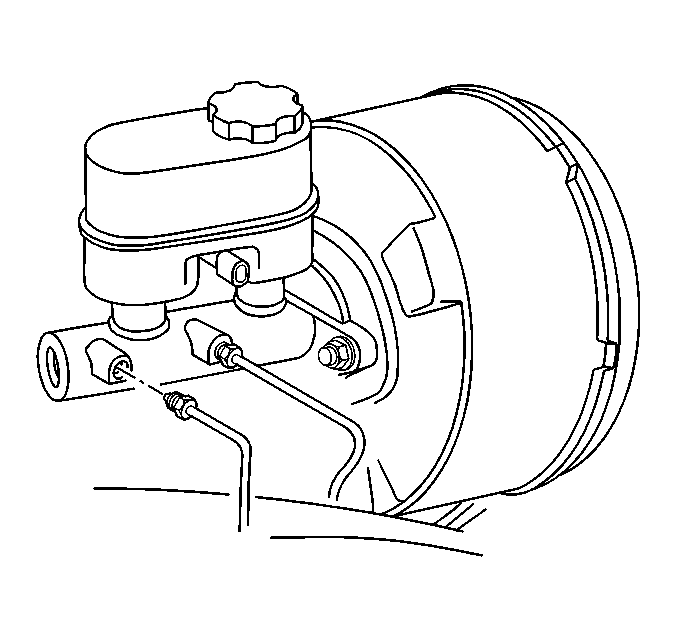
| 2.1. | Disconnect the forward (blind end) brake pipe connection at the
master cylinder. |
| 2.2. | Allow the brake fluid to fill the master cylinder piston bore
until it begins to flow from the forward pipe connection port. |
| 2.3. | Connect the forward brake pipe to the master cylinder and finger
tighten. |
| 2.4. | Depress and hold the brake pedal slowly one time. |
| 2.5. | Loosen the forward brake pipe connection at the master cylinder
to purge air from the bore. |
| 2.6. | Tighten the connection and then release the brake pedal slowly. |
Tighten
Tighten the brake pipe tube nut to 16 N·m12 lb ft).
| 2.7. | Wait 15 seconds. Repeat the sequence, including the 15 second
wait, until all air is removed from the bore. |
| 2.8. | When the fluid flows from the forward connection, repeat steps
1 and 2 to bleed the master cylinder at the rear (cowl) connection. |
- Individual brake calipers are bled only
after all air is removed from the master cylinder. If it is known that the
brake calipers do not contain any air, then it will not be necessary to bleed
them.
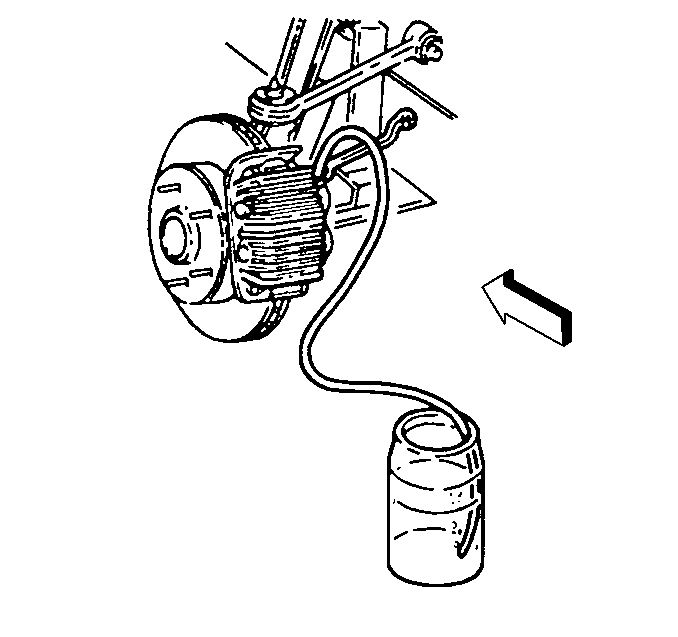
| 3.1. | Place a proper size box wrench, or equivalent, over the brake
caliper bleed screw. |
| 3.2. | Attach a clear tube over the bleed screw. |
| 3.3. | Submerge the other end of the tube in a clear container partially
filled with brake fluid. |
| 3.4. | Depress and hold the brake pedal slowly one time. |
| 3.5. | Loosen the brake caliper bleed screw to purge the air from the
cylinder. |
| 3.6. | Tighten the brake caliper bleed screw and slowly release the brake
pedal. Wait 15 seconds. |
Tighten
Tighten the brake caliper bleed screw to 12 N·m (106 lb in).
| 3.7. | Repeat the sequence (including the 15 second wait), until all
of the air is removed. It may be necessary to repeat the sequence ten or more
times to remove all of the air. |
| 3.8. | If it is necessary to bleed all of the brake calipers, the following
sequence should be used: |
| 3.9. | Test drive the vehicle. Check the brake pedal for sponginess. |
| 3.10. | Ensure that the vehicle exceeds 5 km/h (3 mph) for
ABS modulator actuation (self-test). If after ABS modulation the brake pedal
is spongy or soft, then re-bleed the system until the pedal is firm. |
Hydraulic Brake System Bleeding Pressure Bleed
Notice: If any brake component is repaired or replaced such that air is allowed
to enter the brake system, the entire bleeding procedure must be followed.
Notice: Use only DOT 3 brake fluid from a clean, sealed container. Do not use
any fluid from a container which is wet with water. Do not use DOT 5 silicone
brake fluid. Improper brake fluid, mineral oil or water in the fluid may cause
the brake fluid to boil or the rubber components to deteriorate. Keep all
fluid containers capped to prevent contamination.
Notice: Avoid spilling brake fluid on any of the vehicle's painted surfaces,
wiring, cables, or electric connectors. Brake fluid will damage the paint
and the electrical connections. If any fluid is spilled on the vehicle, flush
the area to lessen the damage.
Notice: Prior to bleeding the brakes, the front and rear displacement cylinder
pistons, on the ABS hydraulic modulator, must be returned to the topmost position.
The TCS hydraulic modulator must be rehomed a minimum of 4 full times. This
method uses a Tech 1 to perform the rehoming procedure. You will not
be able to bleed this system without the Tech 1.
Notice: Use only DOT 3 brake fluid from a clean, sealed container. Do not use
any fluid from a container which is wet with water. Do not use DOT 5 silicone
brake fluid. Improper brake fluid, mineral oil or water in the fluid may cause
the brake fluid to boil or the rubber components to deteriorate. Keep all
fluid containers capped to prevent contamination.
Notice: Pressure bleeding equipment must be of the diaphragm type. It must have
a rubber diaphragm between the air supply and the brake fluid to prevent air,
moisture, and other contaminants from entering the hydraulic system.
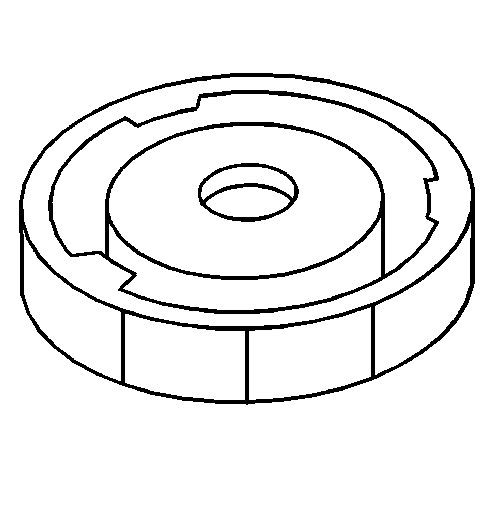
Tools Required
J 35589 Pressure
Bleeding Adapter
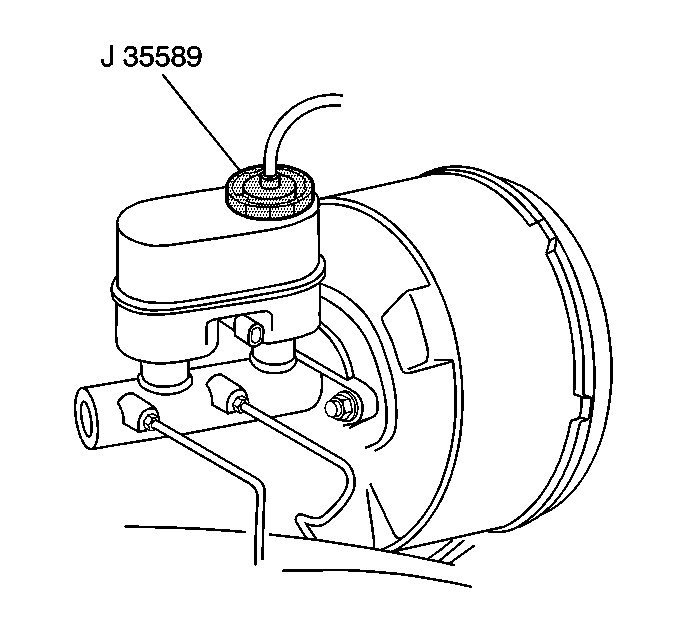
- Clean the fluid reservoir cover and the
surrounding area.
- Remove the fluid reservoir cover.
- Install the J 35589
to the brake fluid reservoir.
- Install the J 35589
to the pressure bleeding equipment.
- Charge the bleeder to 140-172 kPa (20-25 psi).
- Connect the hose to J 35589
.
- Raise and suitably support the vehicle. Refer to
Lifting and Jacking the Vehicle
in General Information.
- If it is necessary to bleed all of the brake calipers, the following
sequence should be used:
- Place the proper size box end wrench, or equivalent, over the
brake caliper bleed screw. Attach a clear tube over the screws and allow the
tube to hang submerged in a clear partially filled with brake fluid.
- Open the brake caliper bleed screw at least half a turn and allow
the brake fluid flow to continue until no air is seen in the brake fluid.
Apply intermittent pressure to the brake pedal while bleeding.
- Close the brake caliper bleed screw.
Tighten
Tighten the brake caliper bleed screw to 12 N·m (106 lb in).
- Repeat steps 6 through 8 until all of the calipers have been bled.
- Lower the vehicle.
- Test drive the vehicle, checking for brake pedal for sponginess
or softness. Ensure that the vehicle exceeds 5 km/h (3 mph)
for ABS modulator actuation (self-test) which will purge any air from the
secondary circuit of the modulator. If after ABS modulator actuation the pedal
is still soft or spongy, then re--bleed the entire system.
- Remove the brake bleeding equipment from the master cylinder.
