Removal Procedure
Caution: Remove the fuel tank cap and relieve the fuel system pressure before servicing the fuel system in order to reduce the risk of personal injury. After you relieve the fuel system pressure, a small amount of fuel may be released when servicing the fuel lines, the fuel injection pump, or the connections. In order to reduce the risk of personal injury, cover the fuel system components with a shop towel before disconnection. This will catch any fuel that may leak out. Place the towel in an approved container when the disconnection is complete.
Caution: Gasoline or gasoline vapors are highly flammable. A fire could occur if an ignition source is present. Never drain or store gasoline or diesel fuel in an open container, due to the possibility of fire or explosion. Have a dry chemical (Class B) fire extinguisher nearby.
Caution: Always wear safety goggles when working with fuel in order to protect the eyes from fuel splash.
Notice: Cap the fittings and plug the holes when servicing the fuel system in order to prevent dirt and other contaminants from entering the open pipes and passages.
Important: Always replace the fuel limiter vent valve O-ring when reinstalling the fuel limiter vent valve.
Important: Always maintain cleanliness when servicing fuel system components.
- Relieve the fuel system fuel pressure. Refer to Fuel Pressure Relief .
- Raise the vehicle. Go to Lifting and Jacking the Vehicle in general information.
- Remove the fuel tank. Refer to Fuel Tank Replacement .
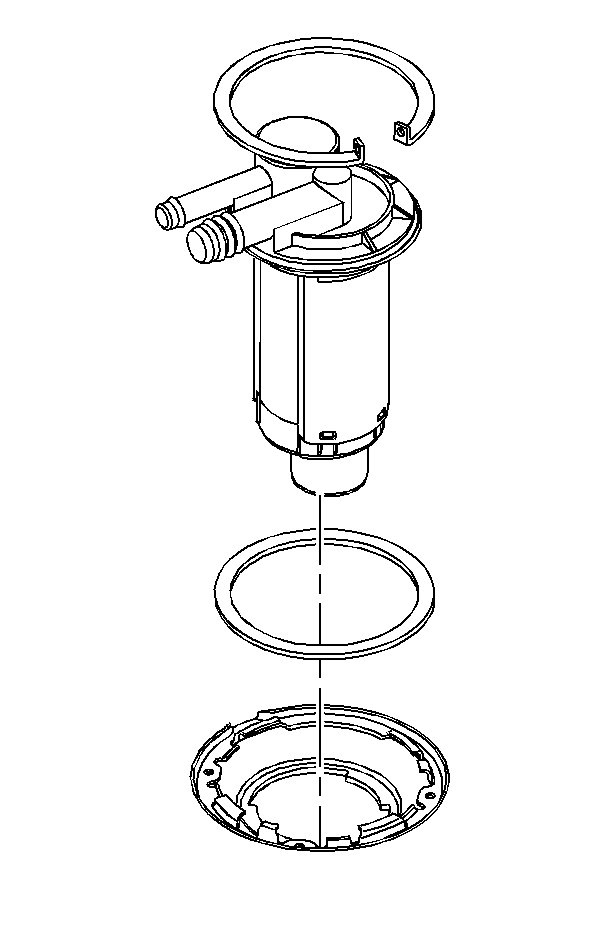
- Remove the fuel limiter vent valve snap ring.
- Remove the fuel limiter vent valve.
- Remove the fuel limiter vent valve O-ring.
- Clean the fuel limiter vent valve O-ring sealing surfaces.
- Inspect the fuel limiter vent valve O-ring sealing surfaces.
- Inspect the fuel limiter vent valve for cracks or damage.
- If the fuel limiter vent valve is cracked or damaged replace it.
Installation Procedure
Important: Be sure that the fuel limiter vent valve retaining snap ring is fully seated within the tab slots on the fuel tank.
- Position the new fuel limiter vent valve O-ring on the fuel tank.
- Install the fuel limiter vent valve.
- Reinstall the fuel limiter vent valve snap ring.
- Reinstall the fuel tank. Refer to Fuel Tank Replacement .
- Lower the vehicle.
- Reconnect the negative battery cable. Refer to Battery Negative Cable Disconnection and Connection in engine electrical.
- Inspect for leaks.
| 7.1. | Inspect turn the ignition switch to the ON position for two seconds. |
| 7.2. | Turn the ignition switch to the OFF for ten seconds. |
| 7.3. | Turn the ignition switch to the ON position again. |
| 7.4. | Visually inspect the fuel system for fuel leaks. |
