Removal Procedure
- Remove the front seat. Refer to Front Seat Replacement - Bucket .
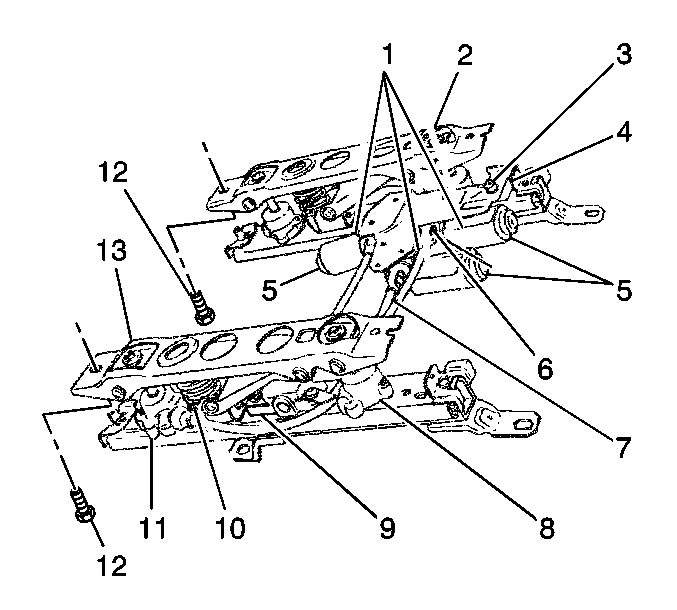
- Remove the drive cables (7).
- Remove the nut (3) that secures the driver seat adjuster motor support (4) with the driver seat adjuster motor (5) attached.
- Remove the driver seat adjuster motor support (4) with the driver seat adjuster motor (5) attached.
- Remove the bolts (12).
- Remove the adjuster (13).
- Remove the adjuster cover bolts, as needed.
- Remove the adjuster covers, as needed.

Disassembly Procedure
- Place the adjuster (13) in a bench vise.
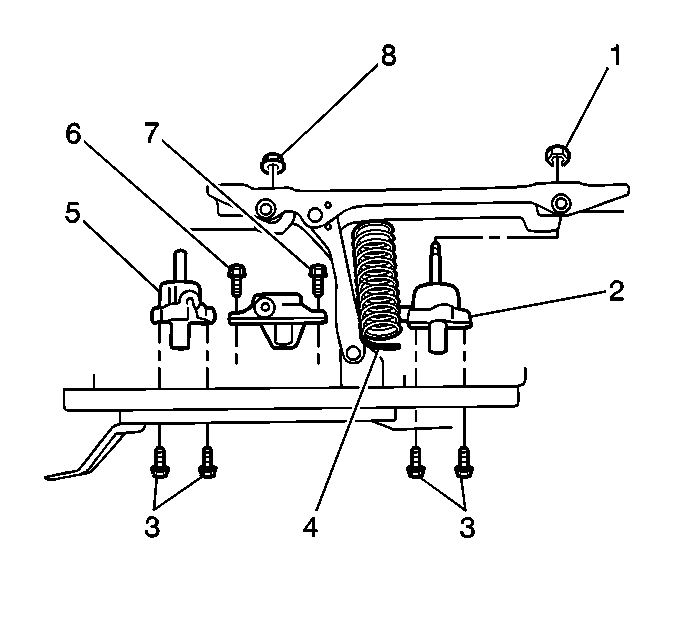
- Remove the rear adjuster (2) nut.
- Open the vise slowly in order to relieve the assist spring compression.
- Remove the adjuster (13) from the vise.
- Disassemble the vertical assist spring (10).
- Remove the front adjuster nut (8).
- Remove the bolts (6) from the adjuster horizontal actuator (7).
- Disassemble the adjuster horizontal actuator (7).
- Remove the adjuster bolts (3).
- Disassemble the rear vertical actuator (2).
- Disassemble the front vertical actuator (5).


Assembly Procedure
- Assemble the front vertical actuator (5).
- Assemble the rear vertical actuator (2).
- Install the adjuster bolts (3).
- Assemble the adjuster horizontal actuator (7).
- Install the bolts (6) to the adjuster horizontal actuator (7).
- Install the front adjuster nut (8).
- Assemble the vertical assist spring (4).
- Place the adjuster (13) into a bench vise.
- Carefully compress the vertical assist spring (10).
- Install the rear adjuster nut (2).
- Remove the adjuster from the bench vise.

Notice: Use the correct fastener in the correct location. Replacement fasteners must be the correct part number for that application. Fasteners requiring replacement or fasteners requiring the use of thread locking compound or sealant are identified in the service procedure. Do not use paints, lubricants, or corrosion inhibitors on fasteners or fastener joint surfaces unless specified. These coatings affect fastener torque and joint clamping force and may damage the fastener. Use the correct tightening sequence and specifications when installing fasteners in order to avoid damage to parts and systems.
Tighten
Tighten the bolts to 2.4 N·m (21 lb in).
Tighten
Tighten the adjuster nut to 5 N·m (44 lb in).

Installation Procedure
- Install the adjuster covers, if previously removed.
- Install the adjuster cover bolts, if previously removed.
- Install the adjuster (13).
- Install the bolts (12).
- Install the driver seat adjuster motor support (4) with the driver seat adjuster motor (5) attached.
- Install the nut (3) that secures the driver seat adjuster motor (4) support.
- Install the drive cables (7).
- Install the front seat. Refer to Front Seat Replacement - Bucket .
Notice: Use the correct fastener in the correct location. Replacement fasteners must be the correct part number for that application. Fasteners requiring replacement or fasteners requiring the use of thread locking compound or sealant are identified in the service procedure. Do not use paints, lubricants, or corrosion inhibitors on fasteners or fastener joint surfaces unless specified. These coatings affect fastener torque and joint clamping force and may damage the fastener. Use the correct tightening sequence and specifications when installing fasteners in order to avoid damage to parts and systems.
Tighten
Tighten the adjuster cover bolts to 1.7 N·m (15 lb in).

Tighten
Tighten the bolts to 24 N·m (18 lb ft).
Tighten
Tighten the nut to 4 N·m (35 lb in).
Motor Removal Procedure
- Remove the front seat. Refer to Front Seat Replacement - Bucket .
- Remove the drive cables (7).
- Remove the nut (3).
- Remove the driver seat adjuster motor support (4) with the driver seat adjuster motor (5) attached.
- Disconnect the electrical connectors from the driver seat adjuster motor (5).
- Remove the driver seat adjuster motor (5) from the driver seat adjuster motor (4) support.

Grind off the ends of the grommet in order to separate the driver seat adjuster motor (5) from the driver seat adjuster motor support (4).
Motor Installation Procedure
- Install the driver seat adjuster motor (5) to the driver seat adjuster motor support (4).
- Connect the electrical connectors to the driver seat adjuster motor (5).
- Install the driver seat adjuster motor support (4) with the driver seat adjuster motor (5) attached.
- Install the adjuster motor nut (3).
- Install the drive cables (7).
- Install the front seat. Refer to Front Seat Replacement - Bucket .

| 1.1. | Use a 3/16 inch drill bit in order to drill out the top end of the grommet. |
| 1.2. | Secure the driver seat adjuster motor (5) to the driver seat adjuster motor support (4) with 3/16 inch rivets. |
Notice: Use the correct fastener in the correct location. Replacement fasteners must be the correct part number for that application. Fasteners requiring replacement or fasteners requiring the use of thread locking compound or sealant are identified in the service procedure. Do not use paints, lubricants, or corrosion inhibitors on fasteners or fastener joint surfaces unless specified. These coatings affect fastener torque and joint clamping force and may damage the fastener. Use the correct tightening sequence and specifications when installing fasteners in order to avoid damage to parts and systems.
Tighten
Tighten the nut to 4 N·m (35 lb in).
