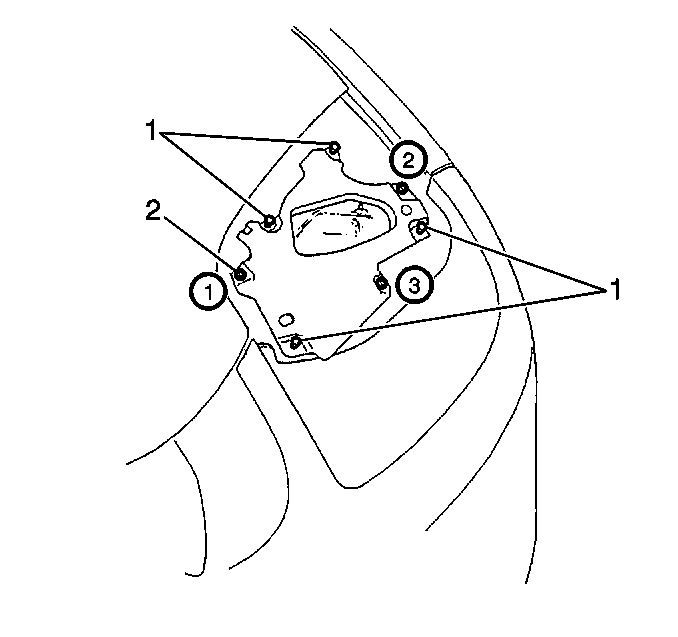
Important: A new headlamp door should be placed on the vehicle without any door
inner adjustment.

- Inspect the headlamp door
for the following:
- To adjust for gap and/or flushness relative to the hood, fascia,
and fender, perform the following:
| 2.2. | Loosen the intermediate bracket to headlamp housing screws (2). |
| 2.3. | Place the headlamp door into position. |
| 2.4. | Check gap and/or flushness. |
| 2.5. | Repeat the previous 3 steps as necessary, until the correct gap
and/or flushness is achieved. |
Notice: Use the correct fastener in the correct location. Replacement fasteners
must be the correct part number for that application. Fasteners requiring
replacement or fasteners requiring the use of thread locking compound or sealant
are identified in the service procedure. Do not use paints, lubricants, or
corrosion inhibitors on fasteners or fastener joint surfaces unless specified.
These coatings affect fastener torque and joint clamping force and may damage
the fastener. Use the correct tightening sequence and specifications when
installing fasteners in order to avoid damage to parts and systems.
| 2.6. | Tighten the intermediate bracket headlamp housing screws (2) in
the sequence shown. |
Tighten
Tighten the intermediate bracket headlamp housing screws to 2 N·m
(18 lb in).
- To adjust the headlamp door height relative to the hood, fascia,
and fender, perform the following:
| 3.2. | Adjust the height by turning the adjustable set screws (1) located
on the four corners of the intermediate bracket. |
| 3.3. | Place the headlamp door into position. |
| 3.5. | Repeat the previous 3 steps as necessary, until the correct height
is achieved. |

