Headlining Trim Panel Replacement 2 Door
Removal Procedure

Caution: Unless directed otherwise, the ignition and start switch must be in the OFF or LOCK position, and all electrical loads must be OFF before servicing
any electrical component. Disconnect the negative battery cable to prevent an electrical spark should a tool or equipment come in contact with an exposed electrical terminal. Failure to follow these precautions may result in personal injury and/or damage to
the vehicle or its components.
- Disconnect
the negative battery cable.
- Using a flat-bladed tool, gently pry off the dome lamp lens (3).
- Remove the 2 dome lamp assembly mounting screws (4).
Lower the dome lamp assembly (2).
- Disconnect the dome lamp electrical connector (1).
- Remove the dome lamp (2) from the vehicle.
- Using a thin flat-bladed tool at the rearview mirror base, gently
remove the mirror from the vehicle.
- Remove the 2 screws that secure each sunshade to the vehicle.
Remove the sunshades from the vehicle.
- Remove the screw that secures each sunshade inner support. Remove
the inner supports from the vehicle.
- Loosen all of the door opening laces from the door openings.

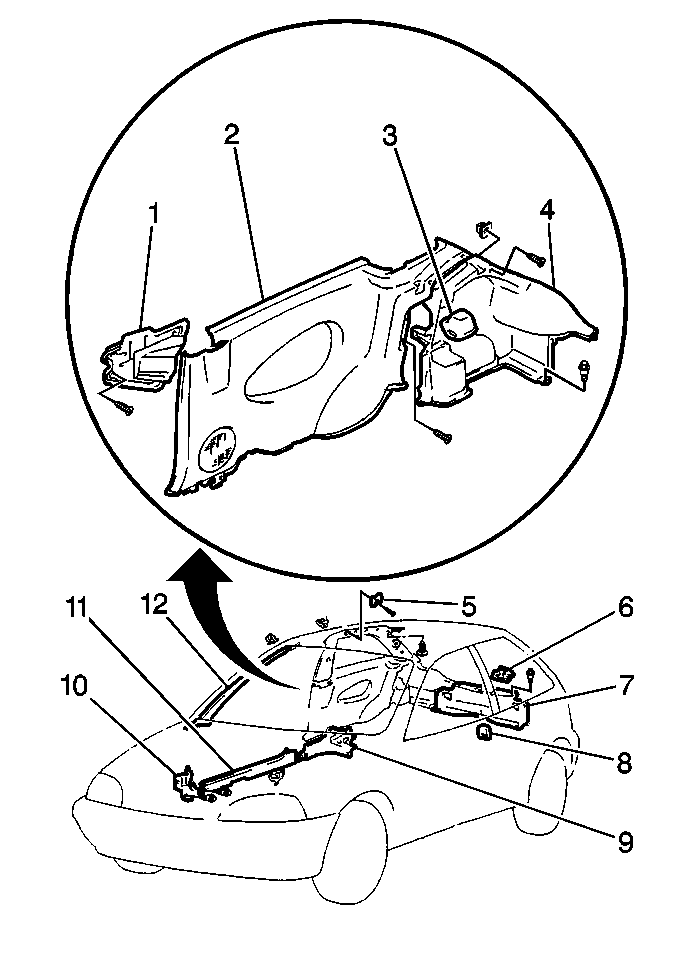
- Gently pry off the windshield
side garnish moldings (12) with both hands. Remove the windshield side
garnish moldings (12) from the vehicle.
- Loosen the liftgate opening weatherstrip along the top edge of
the opening.
- Loosen both rear quarter window interior trim panels (4).
- Remove the pillar upper trim panels from the vehicle.

- Remove the push clips (2)
that secure the headlining (1) to the vehicle roof.
- Slide the front side rib off of the front flanges.
- Remove the headlining (1) from the vehicle by pulling down
on the headlining while cutting the adhesive.
- Position the dome lamp wires (3) through the headlining (1).

- Remove the adhesive tape (2)
from the roof flange.
- Use solvent in order to clean the adhesive residue from the following
locations:
Installation Procedure

Important: Pull the headlining tight. Secure the headlining to the 2-sided bondable
tape on the roof flanges. This will help to eliminate any wrinkles in the
headlining. Eliminate any wrinkles around the center pillars when you install
the headlining material.
- Install 2-sided bondable tape (2,3) to the upper side of each
roof flange. Apply the tape within 10 mm (0.4 in) from the end
of the roof flange.

- Position the dome lamp
electrical connector (3) through the headlining (1).
- Slide the front side rib of the headlining onto the front roof
flange. Secure the headlining (1) with the push clips (2).

- Install the dome lamp
assembly (2) to the vehicle. Secure the assembly with the 2 screws (4).

- Install all pillar upper
trim panels (12) to the vehicle.
- Install the liftgate opening weatherstrip into position.

- Install each sunshade
inner support to the vehicle. Secure the support with 1 screw.
- Install each sunshade to the vehicle. Secure each sunshade with
the 2 screws.
- Snap the inside rearview mirror onto the mirror base.
- Install the dome lamp lens (3) to the vehicle.

- Use an infrared lamp (2)
in order to warm the headlining (1) for 30-60 seconds.
The heat will help to remove any wrinkles that may be present.
- Connect the negative battery cable.
Headlining Trim Panel Replacement 4 Door
Removal Procedure

Caution: Unless directed otherwise, the ignition and start switch must be in the OFF or LOCK position, and all electrical loads must be OFF before servicing
any electrical component. Disconnect the negative battery cable to prevent an electrical spark should a tool or equipment come in contact with an exposed electrical terminal. Failure to follow these precautions may result in personal injury and/or damage to
the vehicle or its components.
- Disconnect
the negative battery cable.
- Using a flat-bladed tool, gently pry off the dome lamp lens (4).
- Remove the 2 dome lamp assembly mounting nuts (3).
Lower dome lamp assembly (2).
- Disconnect the dome lamp electrical connector (1).
- Remove the dome lamp (2) from the vehicle.
- Using a thin flat-bladed tool at the rearview mirror base, gently
remove the mirror from the vehicle.
- Remove the 2 screws that secure each sunshade to the vehicle.
Remove the sunshades from the vehicle.
- Remove the screw that secures each sunshade inner support. Remove
the inner support from the vehicle.
- Loosen all of the door opening laces from the door openings.

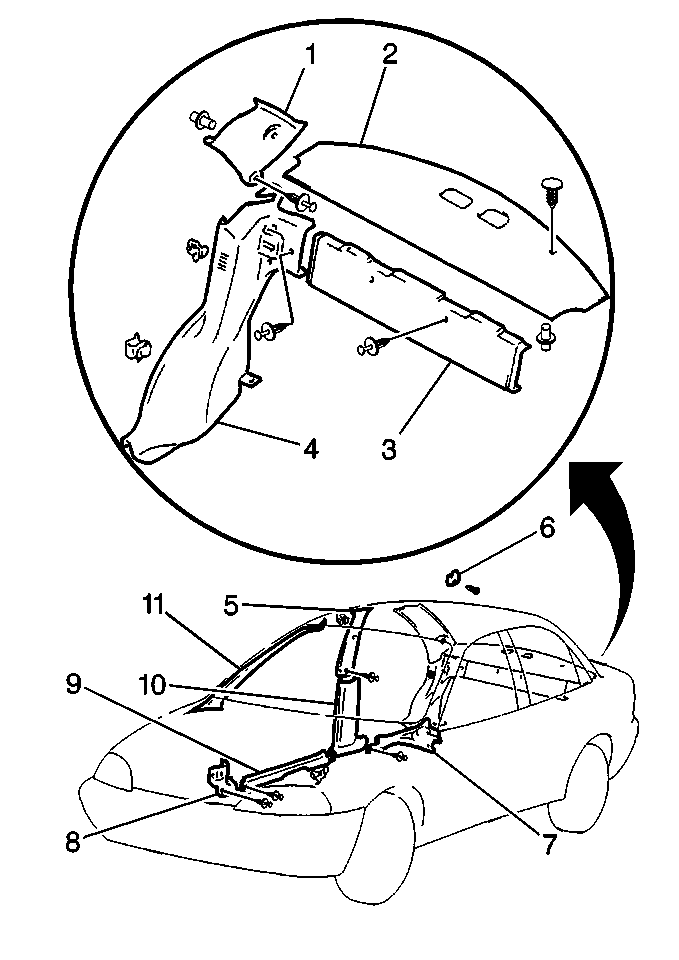
- Gently pry off the windshield
side garnish moldings (11) with both hands. Remove the windshield side
garnish moldings (11) from the vehicle.
- Loosen all of the drip rail weatherstrips along both sides of
the vehicle.
- Remove the following components from the vehicle:
| • | The upper front seat belt anchor covers |
| • | The upper front seat belt anchor bolts |
- Remove the upper center trim panels from the vehicle. Refer to
Center Pillar Upper Trim Panel Replacement
.
- Remove the following components from the vehicle:
| • | The upper rear seat belt anchor covers |
| • | The upper rear seat belt anchor bolts |
- Gently pry loose and remove the rear quarter upper trim panels (1)
from the vehicle.
- Remove the coat hook (6) from the headlining by removing
the screw.

- Remove the push clips (2)
that secure the headlining (1) to the vehicle roof.

- Slide the front side rib
off of the front flanges.
- Remove the headlining (1) from the vehicle by pulling on
the headlining while cutting the adhesive
- Position the dome lamp wires through the headlining (1).
- Remove the adhesive tape (2) from the roof flange.
- Use solvent in order to clean the adhesive residue from the following
locations:
Installation Procedure

- Install 2-sided bondable
tape (2) to the upper side of each roof flange. Apply the tape within
10 mm (0.4 in) from the end of the roof flange.
Important: Pull the headlining tight. Secure the headlining to the 2-sided bondable
tape on the roof flanges. This will help to eliminate any wrinkles in the
headlining. Eliminate any wrinkles around the center pillars when you install
the headlining material.
- Position the dome lamp electrical connector through the headlining (1).

- Slide the front side rib
of the headlining onto the front roof flange. Secure the headlining (1)
with the push clips (2).

- Install the coat hook (6)
to the headlining. Secure the hook with 1 screw.
- Install the rear quarter upper trim panels (1) to the vehicle.
Notice: Use the correct fastener in the correct location. Replacement fasteners
must be the correct part number for that application. Fasteners requiring
replacement or fasteners requiring the use of thread locking compound or sealant
are identified in the service procedure. Do not use paints, lubricants, or
corrosion inhibitors on fasteners or fastener joint surfaces unless specified.
These coatings affect fastener torque and joint clamping force and may damage
the fastener. Use the correct tightening sequence and specifications when
installing fasteners in order to avoid damage to parts and systems.
- Install the upper
rear seat belt anchor bolts.
Tighten
Tighten the upper rear seat belt anchor bolts to 45 N·m
(33 lb ft).
- Install the upper center trim panel. Refer to
Center Pillar Upper Trim Panel Replacement
.
- Install the upper front seat belt anchor bolts.
Tighten
Tighten the upper front seat belt anchor bolts to 45 N·m
(33 lb ft).

- Install the dome lamp
assembly (2) to the vehicle. Secure the assembly with the 2 nuts (3).
- Install all drip rail weatherstrips on both sides of the vehicle.
- Install each sunshade inner support to the vehicle. Secure each
support with 1 screw.
- Install each sunshade to the vehicle. Secure each sunshade with
the 2 screws.
- Snap the inside rearview mirror onto the mirror base.
- Install the dome lamp lens (4) to the vehicle.

- Use an infrared lamp (2)
in order to warm the roof lining (1) for 30-60 seconds.
The heat will help to remove any wrinkles that may be present.
- Connect the negative battery cable.


