Removal Procedure
Caution: Fuel Vapors can collect while servicing fuel system parts in enclosed
areas such as a trunk. To reduce the risk of fire and increased exposure to
vapors:
• Use forced air ventilation such as a fan set outside
of the trunk. • Plug or cap any fuel system openings in order to reduce fuel vapor
formation. • Clean up any spilled fuel immediately. • Avoid sparks and any source of ignition. • Use signs to alert others in the work area that fuel system work
is in process.
Caution: Gasoline or gasoline vapors are highly flammable. A fire could occur if an ignition source is present. Never drain or store gasoline or diesel fuel in an open container, due to the possibility of fire or explosion. Have a dry chemical (Class B) fire extinguisher nearby.
Caution: Always wear safety goggles when working with fuel in order to protect the eyes from fuel splash.
Notice: The fuel tank equipped with ORVR components require special handling. Follow all instructions for servicing the fuel tank as specified in the service procedures. Damage to the fuel system components and the failure to meet the Federal Regulations may result from incorrect servicing of the fuel tank.
- Relieve the fuel system pressure. Refer to Fuel Pressure Relief .
- Drain the fuel tank. Refer to Fuel Tank Draining .
- Remove the rear seat cushion from the vehicle. Refer to Rear Seat Cushion Replacement in Seats.
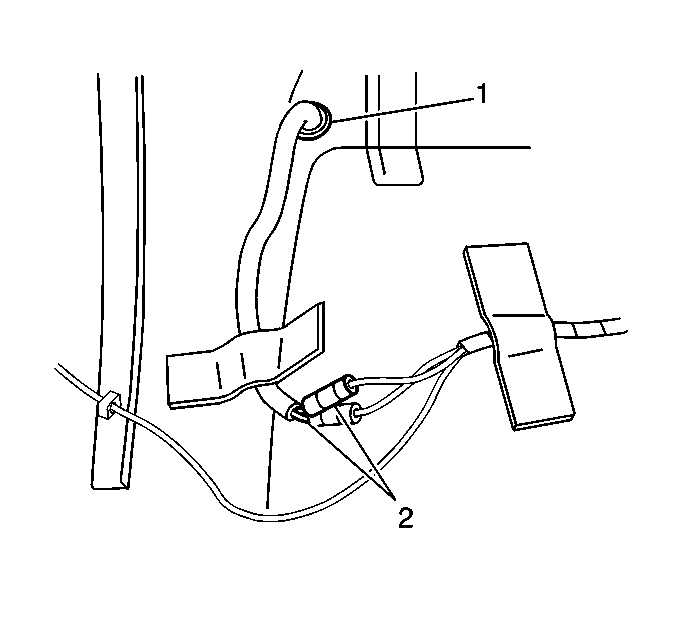
- Disconnect the fuel pump, the fuel level sensor, and the electrical connectors (2).
- Push the electrical connectors through the grommet (1) in the floor of the vehicle.
- Raise and suitably support the vehicle. Refer to Lifting and Jacking the Vehicle in General Information.
- Remove the muffler and the exhaust pipe assembly. Refer to Rear Exhaust System Replacement in Engine Exhaust.
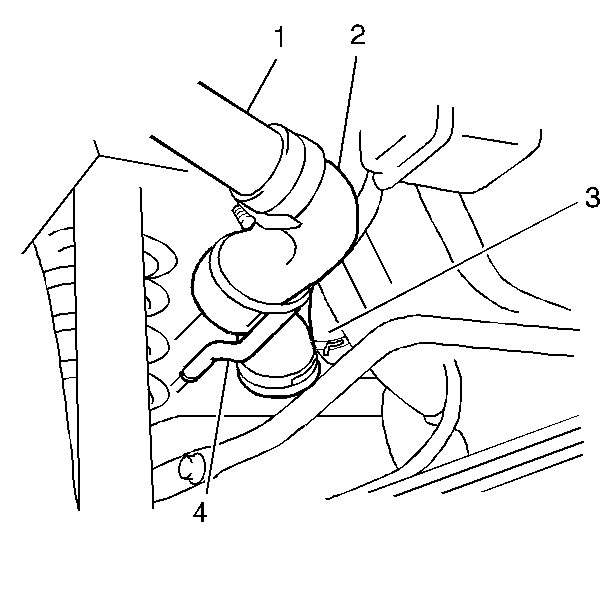
- Remove the clamp and the fuel filler hose (2) from the fuel tank filler neck.
- Remove the clamp and the fuel breather hose (3) from the fuel tank breather neck.
- Remove the clamp and the air inlet hose (4) to the EVAP canister from the canister air inlet pipe, if necessary.
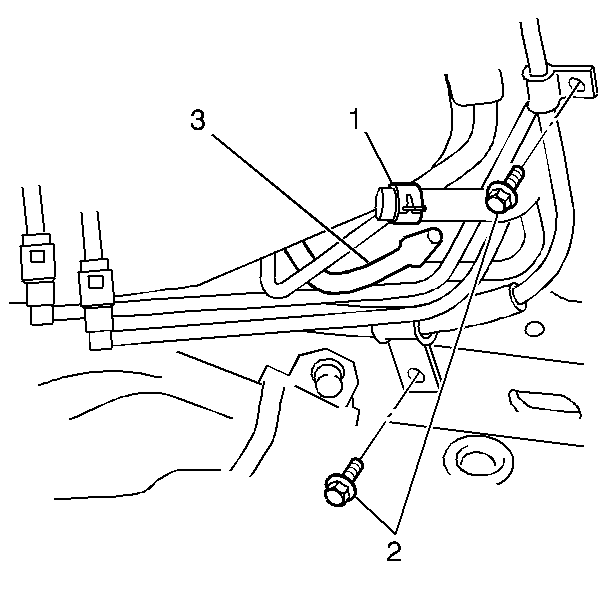
- Remove the 2 bolts (2) from the 2 parking-brake cable brackets on the vehicle underbody. Move the cable to the side.
- Remove the clamp and the EVAP canister vapor hose (1) from the EVAP canister vapor pipe (3).
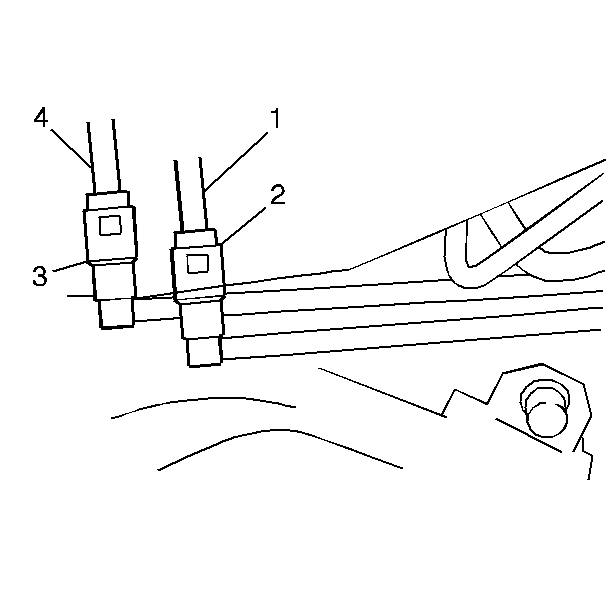
- Disconnect the quick connect line (2) from the fuel feed pipe (1). Refer to Plastic Collar Quick Connect Fitting Service .
- Disconnect the quick connect line (3) from the fuel return pipe (4). Refer to Plastic Collar Quick Connect Fitting Service .
- Remove the 5 fuel tank mounting bolts and the fuel tank from the vehicle underbody.


Installation Procedure
- Raise and suitably support the vehicle. Refer to Lifting and Jacking the Vehicle in General Information.
- Install the fuel tank to the vehicle underbody, and secure the tank with the 5 mounting bolts.
- Connect the quick connect line (2) to the fuel feed pipe (1). Refer to Plastic Collar Quick Connect Fitting Service .
- Connect the quick connect line (3) to the fuel return pipe (4). Refer to Plastic Collar Quick Connect Fitting Service .
- Connect the EVAP canister vapor hose (1) to the EVAP canister vapor pipe (2). Secure the hose with the clamp.
- Align the parking-brake cable brackets and secure the brackets to the vehicle underbody with the 2 bolts (2) .
- Connect the EVAP canister inlet hose (4) to the EVAP canister inlet pipe, if equipped. Secure the hose with the clamp.
- Connect the fuel breather hose (3) to the breather neck. Secure the hose with the clamp.
- Connect the fuel filler hose (2) to the fuel tank filler neck. Secure the hose with the clamp.
- Push the electrical connectors for the fuel pump, for the fuel level sensor, and for the fuel tank pressure sensor through the grommet in the vehicle floor.
- Install the muffler and the exhaust pipe assembly. Refer to Rear Exhaust System Replacement in Engine Exhaust.
- Lower the vehicle.
- Connect the electrical connectors (2) to the fuel pump, to the fuel level sensor, and to the fuel tank pressure sensor .
- Install the rear seat cushion to the vehicle. Refer to Rear Seat Cushion Cover and Pad Replacement in Seats.
- Refill the fuel tank.
- Connect the negative battery cable.
- Turn on the ignition in order to pressurize the fuel system.
- Turn off the ignition.
- Inspect for fuel leaks, and repair any leaks as necessary.
Notice: Use the correct fastener in the correct location. Replacement fasteners must be the correct part number for that application. Fasteners requiring replacement or fasteners requiring the use of thread locking compound or sealant are identified in the service procedure. Do not use paints, lubricants, or corrosion inhibitors on fasteners or fastener joint surfaces unless specified. These coatings affect fastener torque and joint clamping force and may damage the fastener. Use the correct tightening sequence and specifications when installing fasteners in order to avoid damage to parts and systems.
Tighten
Tighten the bolts to 25 N·m (18 lb ft).


Tighten
Tighten the bolt to 15 N·m (11 lb ft).


Tighten
Tighten the terminal retainer to 5.5 N·m (49 lb in).
