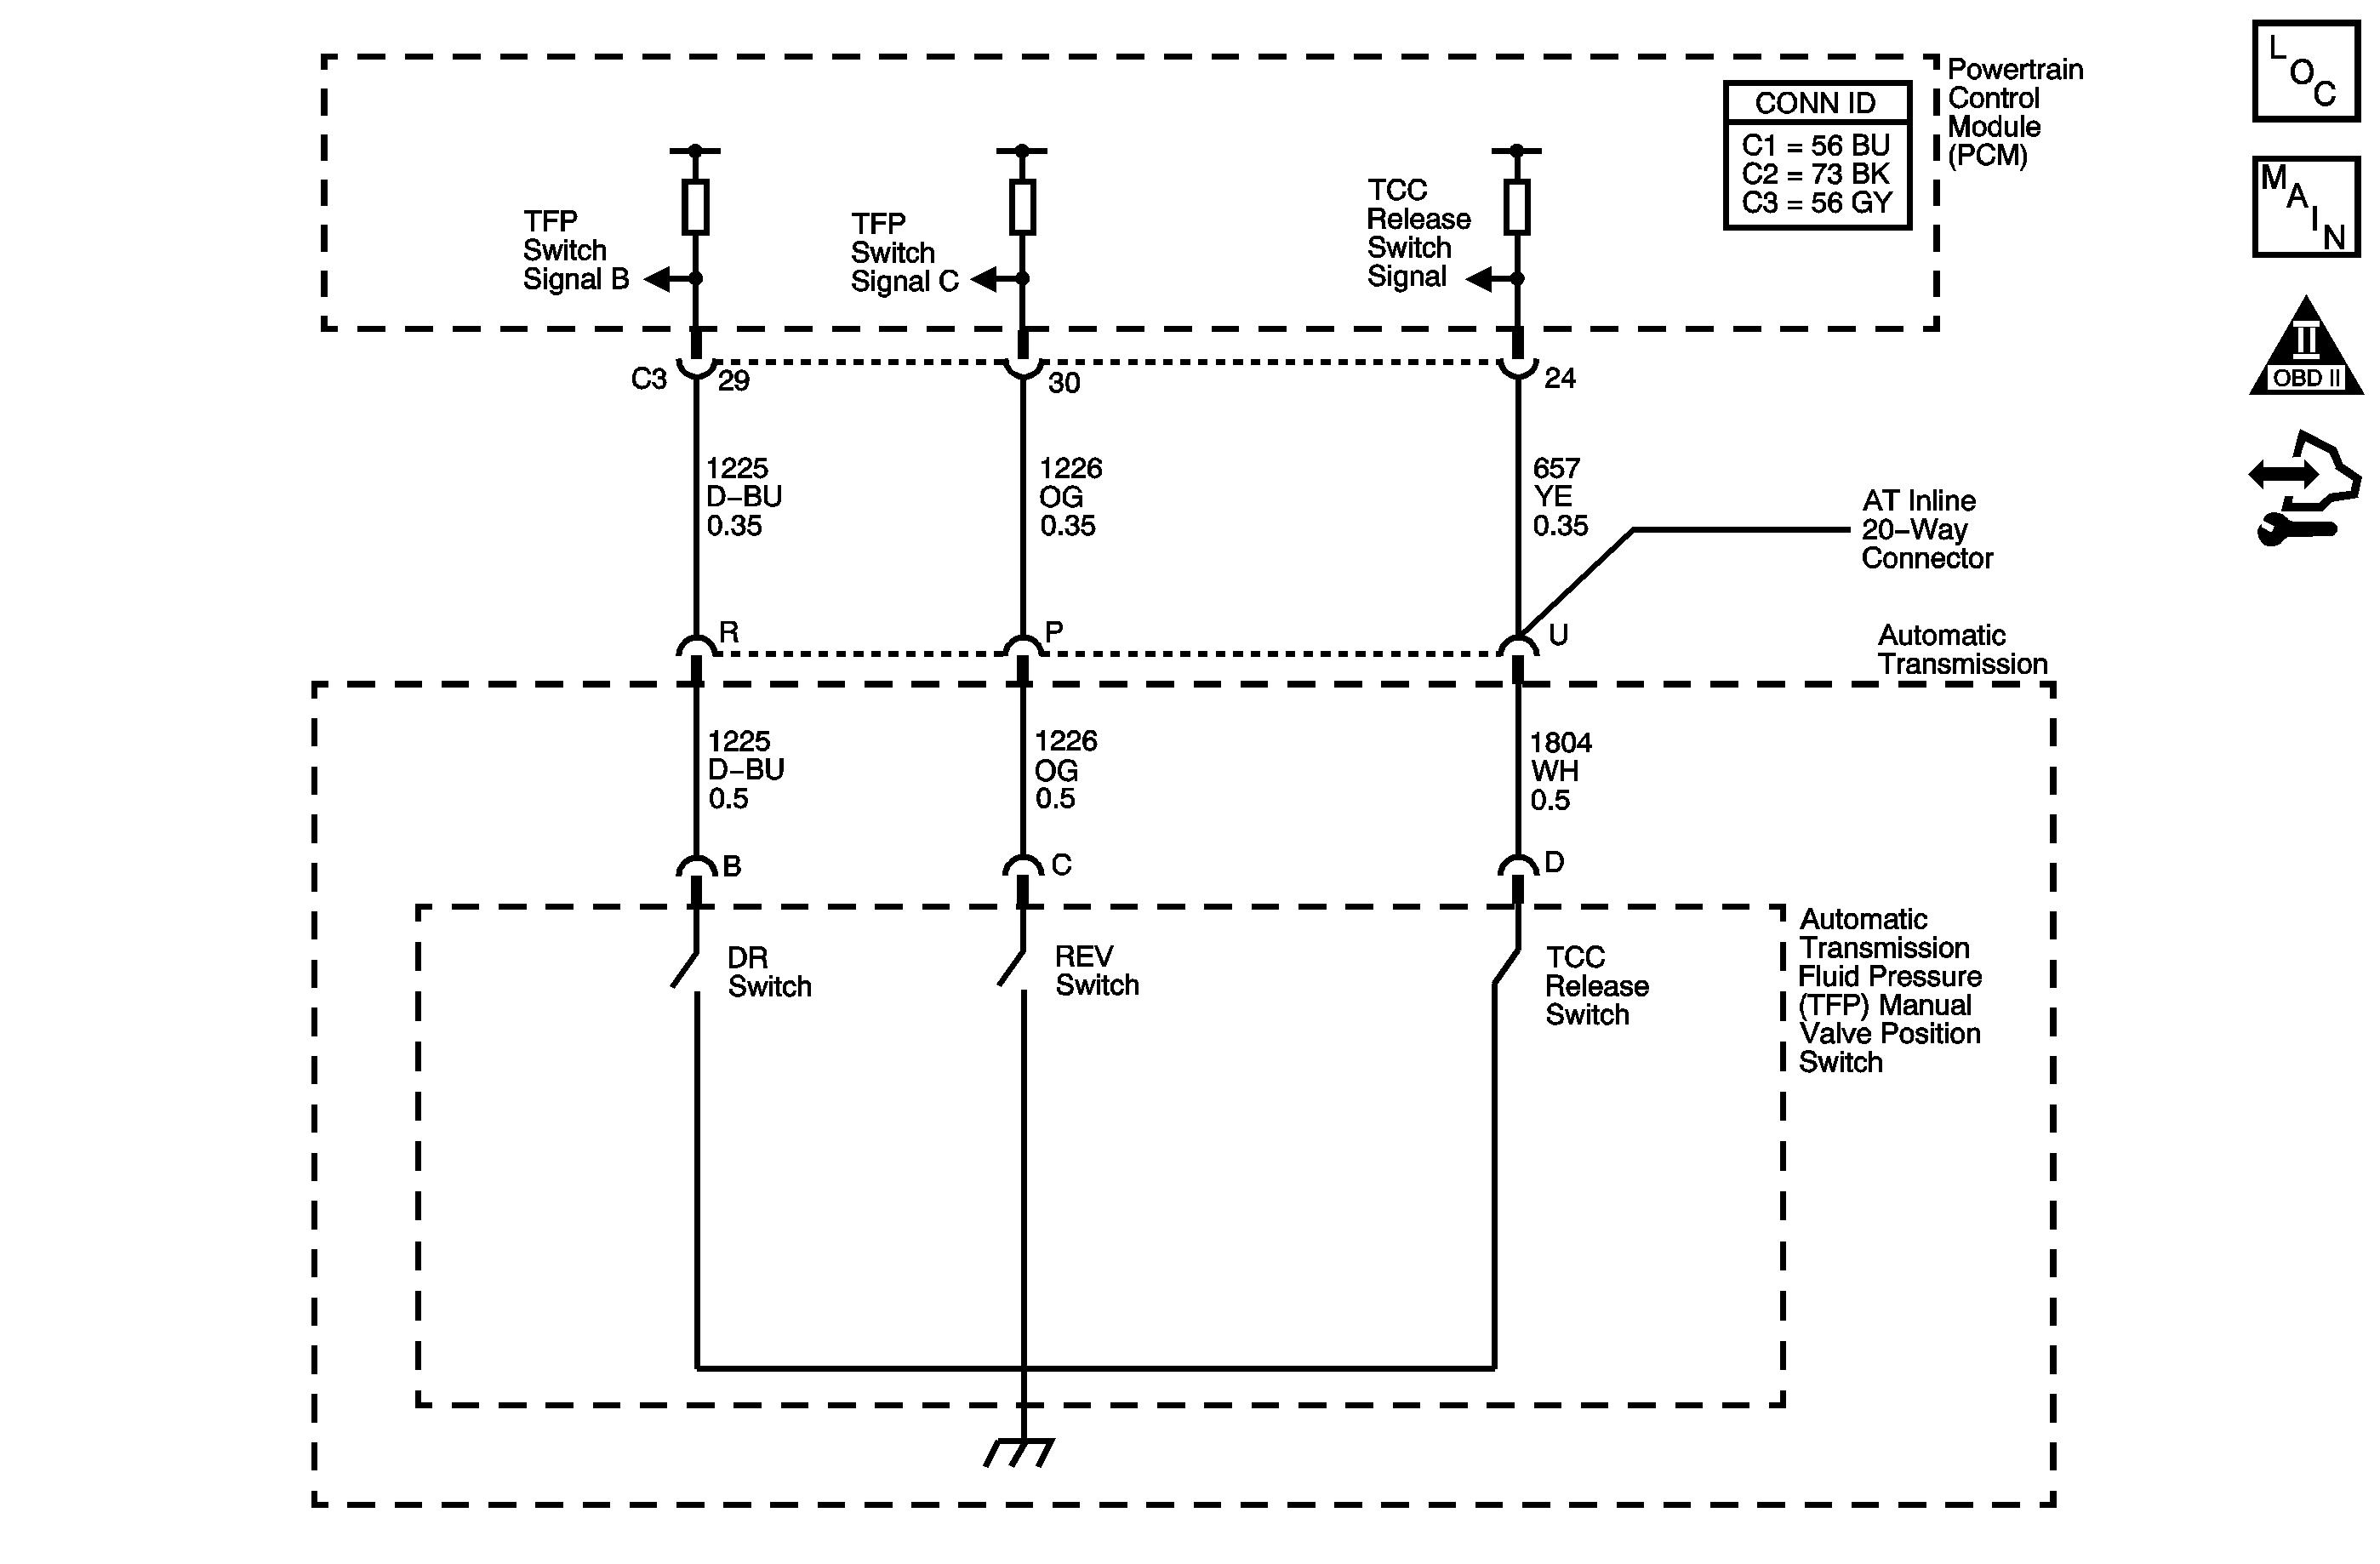
Circuit Description
The automatic transmission fluid pressure (TFP) manual valve position switch consists of three pressure switches. Two of the switches are normally-open, and determine gear range selection. The third switch is normally-closed, and detects torque converter clutch (TCC) release fluid pressure. The TFP manual valve position switch also contains the automatic transmission fluid temperature (TFT) sensor. These components are combined into one unit, attached to the control valve body.
The powertrain control module (PCM) provides battery voltage on the two range signal circuits. By grounding one or more of the switches with fluid pressure from the manual shift valve, the PCM detects the selected gear range. When you disconnect the transmission electrical connector and the ignition is ON, the ground potential for three range signals from the PCM will be removed, and an invalid gear range will be indicated. Refer to Transmission Fluid Pressure Manual Valve Position Switch Logic .
When the PCM detects P/N indicated with a drive gear ratio, DTC P1816 sets. DTC P1816 is a type B DTC.
DTC Descriptor
This diagnostic procedure supports the following DTC:
DTC P1816 Transmission Fluid Pressure (TFP) Valve Position Switch Indicates Park/Neutral (P/N) with Drive Ratio
Conditions for Running the DTC
| • | No MAF DTCs P0101, P0102 or P0103. |
| • | No MAP DTCs P0107 or P0108. |
| • | No PSA DTCs P1810 or P1818. |
| • | The engine is running for 5 seconds. |
| • | The vehicle speed is 5 km/h (3 mph) or more. |
| • | The TP indicated angle is 10 percent or greater. |
| • | The engine torque is greater than 34 N·m (25 lb ft). |
Conditions for Setting the DTC
The PCM detects P/N with a drive ratio for 5 seconds.
Action Taken When the DTC Sets
| • | The PCM illuminates the malfunction indicator lamp (MIL) during the second consecutive trip in which the Conditions for Setting the DTC are met. |
| • | The PCM assumes a D4 shift pattern. |
| • | The PCM commands an alternate coast shift pattern where downshifts occur at higher vehicle speeds while coasting. |
| • | The PCM freezes transmission adaptive functions. |
| • | The PCM disables TAP shift functions, if equipped. |
| • | The PCM records the operating conditions when the Conditions for Setting the DTC are met. The PCM stores this information as Freeze Frame and Failure Records. |
| • | The PCM stores DTC P1816 in PCM history during the second consecutive trip in which the Conditions for Setting the DTC are met. |
Conditions for Clearing the MIL/DTC
| • | The PCM turns OFF the MIL during the third consecutive trip in which the diagnostic test runs and passes. |
| • | A scan tool can clear the MIL/DTC. |
| • | The PCM clears the DTC from PCM history if the vehicle completes 40 warm-up cycles without an emission-related diagnostic fault occurring. |
| • | The PCM cancels the DTC default actions when the ignition switch is OFF long enough in order to power down the PCM. |
Test Description
The numbers below refer to the step numbers on the diagnostic table.
Step | Action | Yes | No |
|---|---|---|---|
1 | Did you perform the Diagnostic System Check - Vehicle? | Go to Step 2 | Go to Diagnostic System Check - Vehicle in Vehicle DTC Information |
2 |
Important: Before clearing the DTC, use the scan tool in order to record the Failure Records. Using the Clear DTC Information function erases the Failure Records from the PCM. Does the scan tool TFP Sig. B/Sig. C parameter indicate HI for both? | Go to Step 3 | Go to Intermittent Conditions in Engine Controls - 3.5L. |
Does the TFP Sig. B indicate LOW? | Go to Step 5 | Go to Step 4 | |
4 | Test the TFP signal B circuit of the TFP manual valve position switch for an open between the PCM and the AT inline 20-way connector. Refer to Testing for Continuity and Wiring Repairs in Wiring Systems. Did you find and correct a condition? | Go to Step 9 | Go to Step 8 |
5 | Test the TFP signal B circuit of the TFP manual valve position switch for an open between the AT inline 20-way connector and the TFP manual valve position switch. Refer to Testing for Continuity in Wiring Systems. Did you find and correct a condition? | Go to Step 6 | Go to Step 7 |
6 | Replace the automatic transmission wiring harness. Refer to Wiring Harness Replacement . Did you complete the replacement? | Go to Step 9 | -- |
7 | Replace the TFP manual valve position switch. Refer to Transmission Fluid Pressure Manual Valve Position Switch Replacement . Did you complete the replacement? | Go to Step 9 | -- |
8 | Replace the PCM. Refer to Control Module References in Computer/Integrating Systems for replacement, setup, and programming. Is the replacement complete? | Go to Step 9 | -- |
9 | Perform the following procedure in order to verify the repair:
Has the test run and passed? | Go to Step 10 | Go to Step 2 |
10 | With the scan tool, observe the stored information, capture info, and DTC info. Does the scan tool display any DTCs that you have not diagnosed? | Go to Diagnostic Trouble Code (DTC) List - Vehicle in Vehicle DTC Information | System OK |
