For 1990-2009 cars only
Removal Procedure
- Remove the fuel filler cap.
- Raise and support the vehicle. Refer to Lifting and Jacking the Vehicle.
- Drain the fuel tank below the level of the fuel filler hose. Refer to Fuel Tank Draining.
- Remove the right rear wheel. Refer to Tire and Wheel Removal and Installation.
- Remove the right rear wheelhouse Liner. Refer to Rear Inner Wheelhouse Replacement.
- Remove the rear bumper fascia. Refer to Rear Bumper Fascia Replacement.
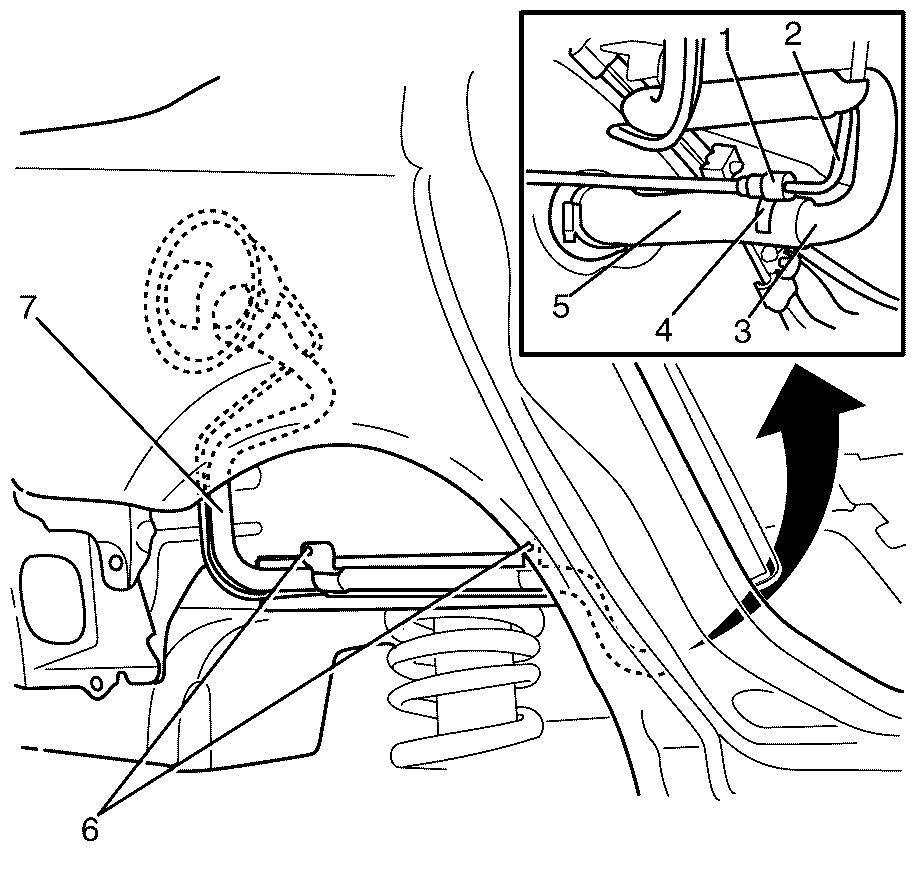
- Remove the filler tube to chassis retaining bolts (6).
- Disconnect the evaporative emission (EVAP) line (2) from the quick connect fitting (1). Refer to Plastic Collar Quick Connect Fitting Service.
- Remove the retaining hose clamp (4).
- Disconnect the fuel filler tube (3) from the fuel filler hose (5).
- Manoeuvre the fuel filler tube (7) and remove from the vehicle.
Caution: Refer to Safety Glasses Caution in the Preface section.
Caution: Refer to Vehicle Lifting Caution in the Preface section.

Installation Procedure
- Install the fuel filler tube (7) to the vehicle.
- Connect the fuel filler tube (3) to the fuel filler hose (5).
- Install the retaining hose clamp (4).
- Connect the evaporative emission (EVAP) line (2) to the quick connect fitting (1).
- Install the filler tube to chassis retaining bolts (6).
- Install the rear bumper fascia. Refer to Rear Bumper Fascia Replacement.
- Install the right rear wheelhouse Liner. Refer to Rear Inner Wheelhouse Replacement.
- Install the right rear wheel. Refer to Tire and Wheel Removal and Installation.

Notice: Refer to Component Fastener Tightening Notice in the Preface section.
Tighten
Tighten the fuel filler tube hose clamp (3)
to 3.5 N·m (31 lb in).
Important: Listen for and audible click to confirm correct installation.
Tighten
Tighten the bolts to 9 N·m (80 lb in).
