Special Tools
Removal Procedure
- Ignition OFF.
- Raise and support the vehicle. Refer to Lifting and Jacking the Vehicle.
- Remove the front wheel. Refer to Tire and Wheel Removal and Installation.
- Remove the front strut assembly. Refer to Strut Assembly Replacement.
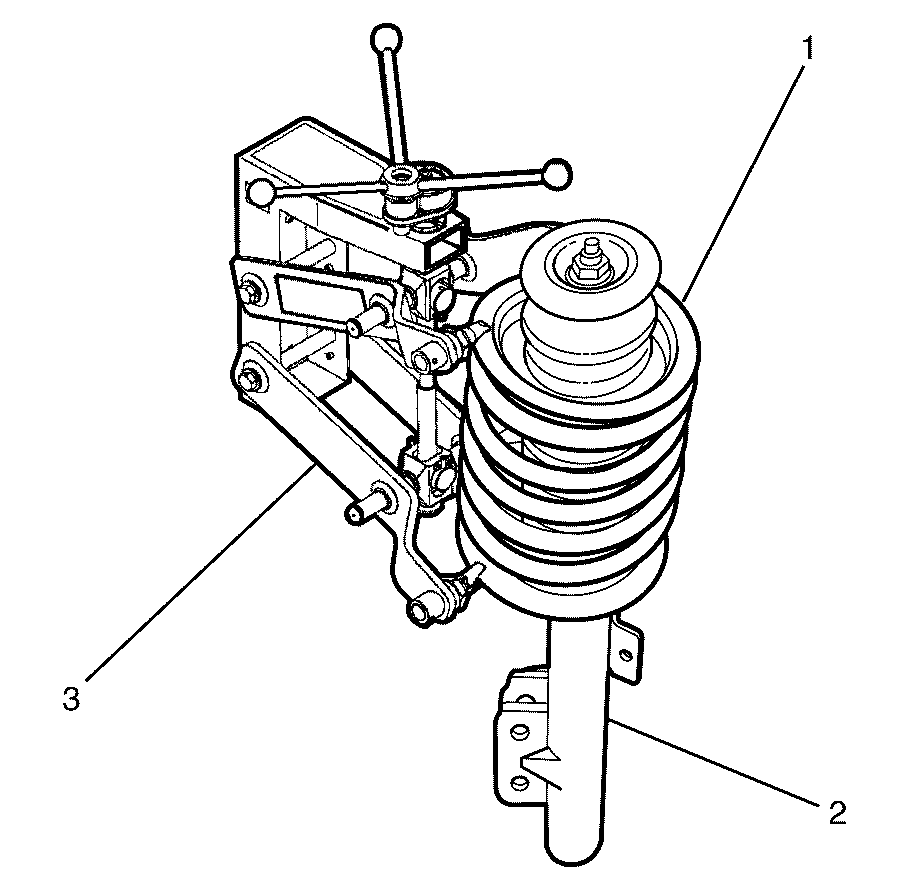
- Support the front strut assembly (2) in a suitable device.
- Install the CH-48845 (3) to the coil spring (1).
- Compress the coil spring (1) using CH-48845 (3) until the front strut assembly (2) is free from the spring tension of the coil spring (1).
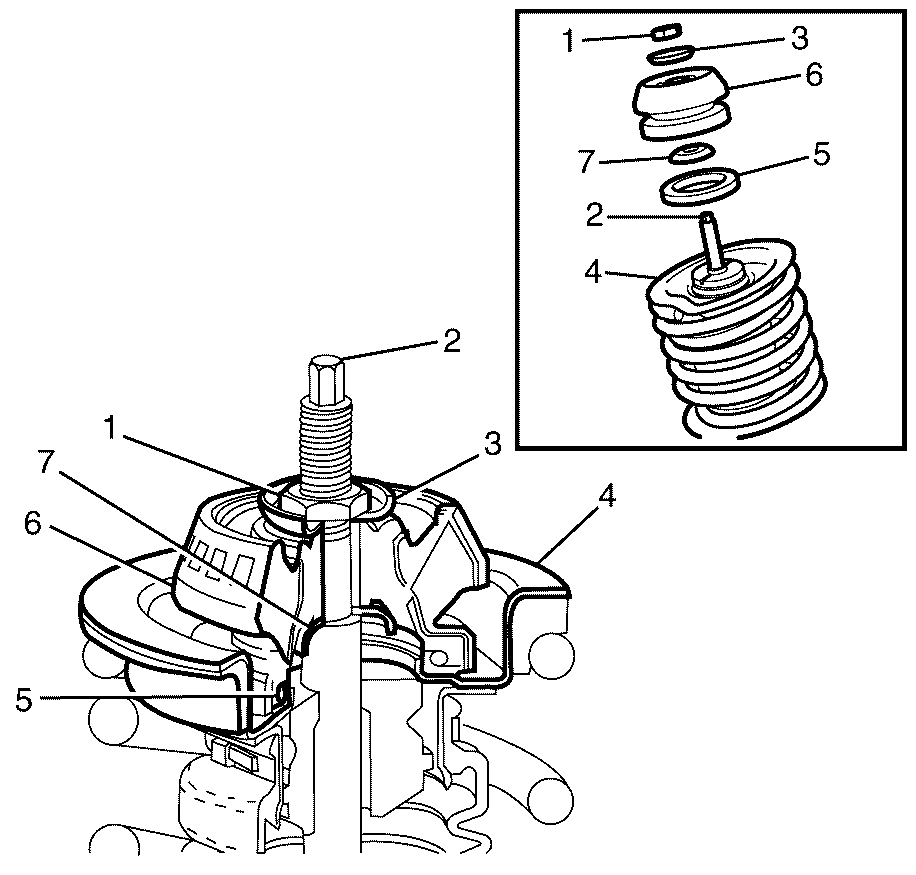
- Using a suitable tool hold the front strut piston shaft (2) while loosening the front strut assembly retaining nut (1).
- Remove and discard the front strut assembly retaining nut (1).
- Remove the front strut assembly cup washer (3).
- Remove the front strut assembly support mount (6).
- Remove the front strut assembly cup washer (7)
- Remove the front strut assembly bearing (5).
Caution: Refer to Vehicle Lifting Caution in the Preface section.
Caution: Refer to Safety Glasses Caution in the Preface section.

Caution: Use only the CH-48845 Spring Compressor when servicing suspension components on this vehicle. Other tools may not be strong enough for the springs on this vehicle and you could be injured if you do not use Special Tool CH-48845. Failure to do so could result in serious personal injury.
Caution: Do not over compress the spring. Severe overloading may cause tool failure which could result in bodily injury.
Caution: To prevent personal injury and/or component damage, use the proper tools to support the lower control arm when removing the coil spring. The coil spring is under extreme pressure and can become a projectile should the spring separate from the lower control arm before all of the tension is relieved.
Important: Only use hand tools to perform the following service procedure.

Important: Note the orientation of the cup washer (3) in relation to the front strut assembly support mount (6).
Important: Note the orientation of the cup washer (7) in relation to the front strut assembly support mount (6).
Important: Note the orientation of the front strut assembly support bearing (5) in relation to the coil spring seat (4).
Installation Procedure
- Instal the front strut assembly bearing (5).
- Install the front strut assembly cup washer (7)
- Install the front strut assembly support mount (6).
- Install the front strut assembly cup washer (3).
- Using a suitable tool hold the front strut piston shaft (2) while installing the NEW front strut assembly retaining nut (1).
- Make sure that the coil spring (1) is correctly positioned to the front strut assembly (2).
- Release the CH-48845 (3) from the coil spring (1).
- Install the front strut assembly to the vehicle. Refer to Strut Assembly Replacement.
- Install the front wheel to the vehicle. Refer to Tire and Wheel Removal and Installation.
- Lower the vehicle to the ground.

Important: The front strut assembly support bearing (5) is a sealed part and is replaced as an assembly.
Important: Note the orientation of the front strut assembly support bearing (5) in relation to the coil spring seat (4).
Important: Note the orientation of the cup washer (7) in relation to the front strut assembly support mount (6).
Important: Note the orientation of the cup washer (3) in relation to the front strut assembly support mount (6).
Notice: Refer to Fastener Notice in the Preface section.
Tighten
Tighten the NEW front strut assembly retaining
nut (1) to 75 N·m (55 lb ft).

Caution: Do not over compress the spring. Severe overloading may cause tool failure which could result in bodily injury.
Caution: To prevent personal injury and/or component damage, use the proper tools to support the lower control arm when removing the coil spring. The coil spring is under extreme pressure and can become a projectile should the spring separate from the lower control arm before all of the tension is relieved.
