Exhaust System Replacement L98
Removal Procedure
- Disconnect the battery ground cable from the battery. Refer to Battery Negative Cable Disconnection and Connection.
- Remove the engine dress cover. Refer to Engine Cover Replacement.
- Remove the sound shield to bulk head retainers.
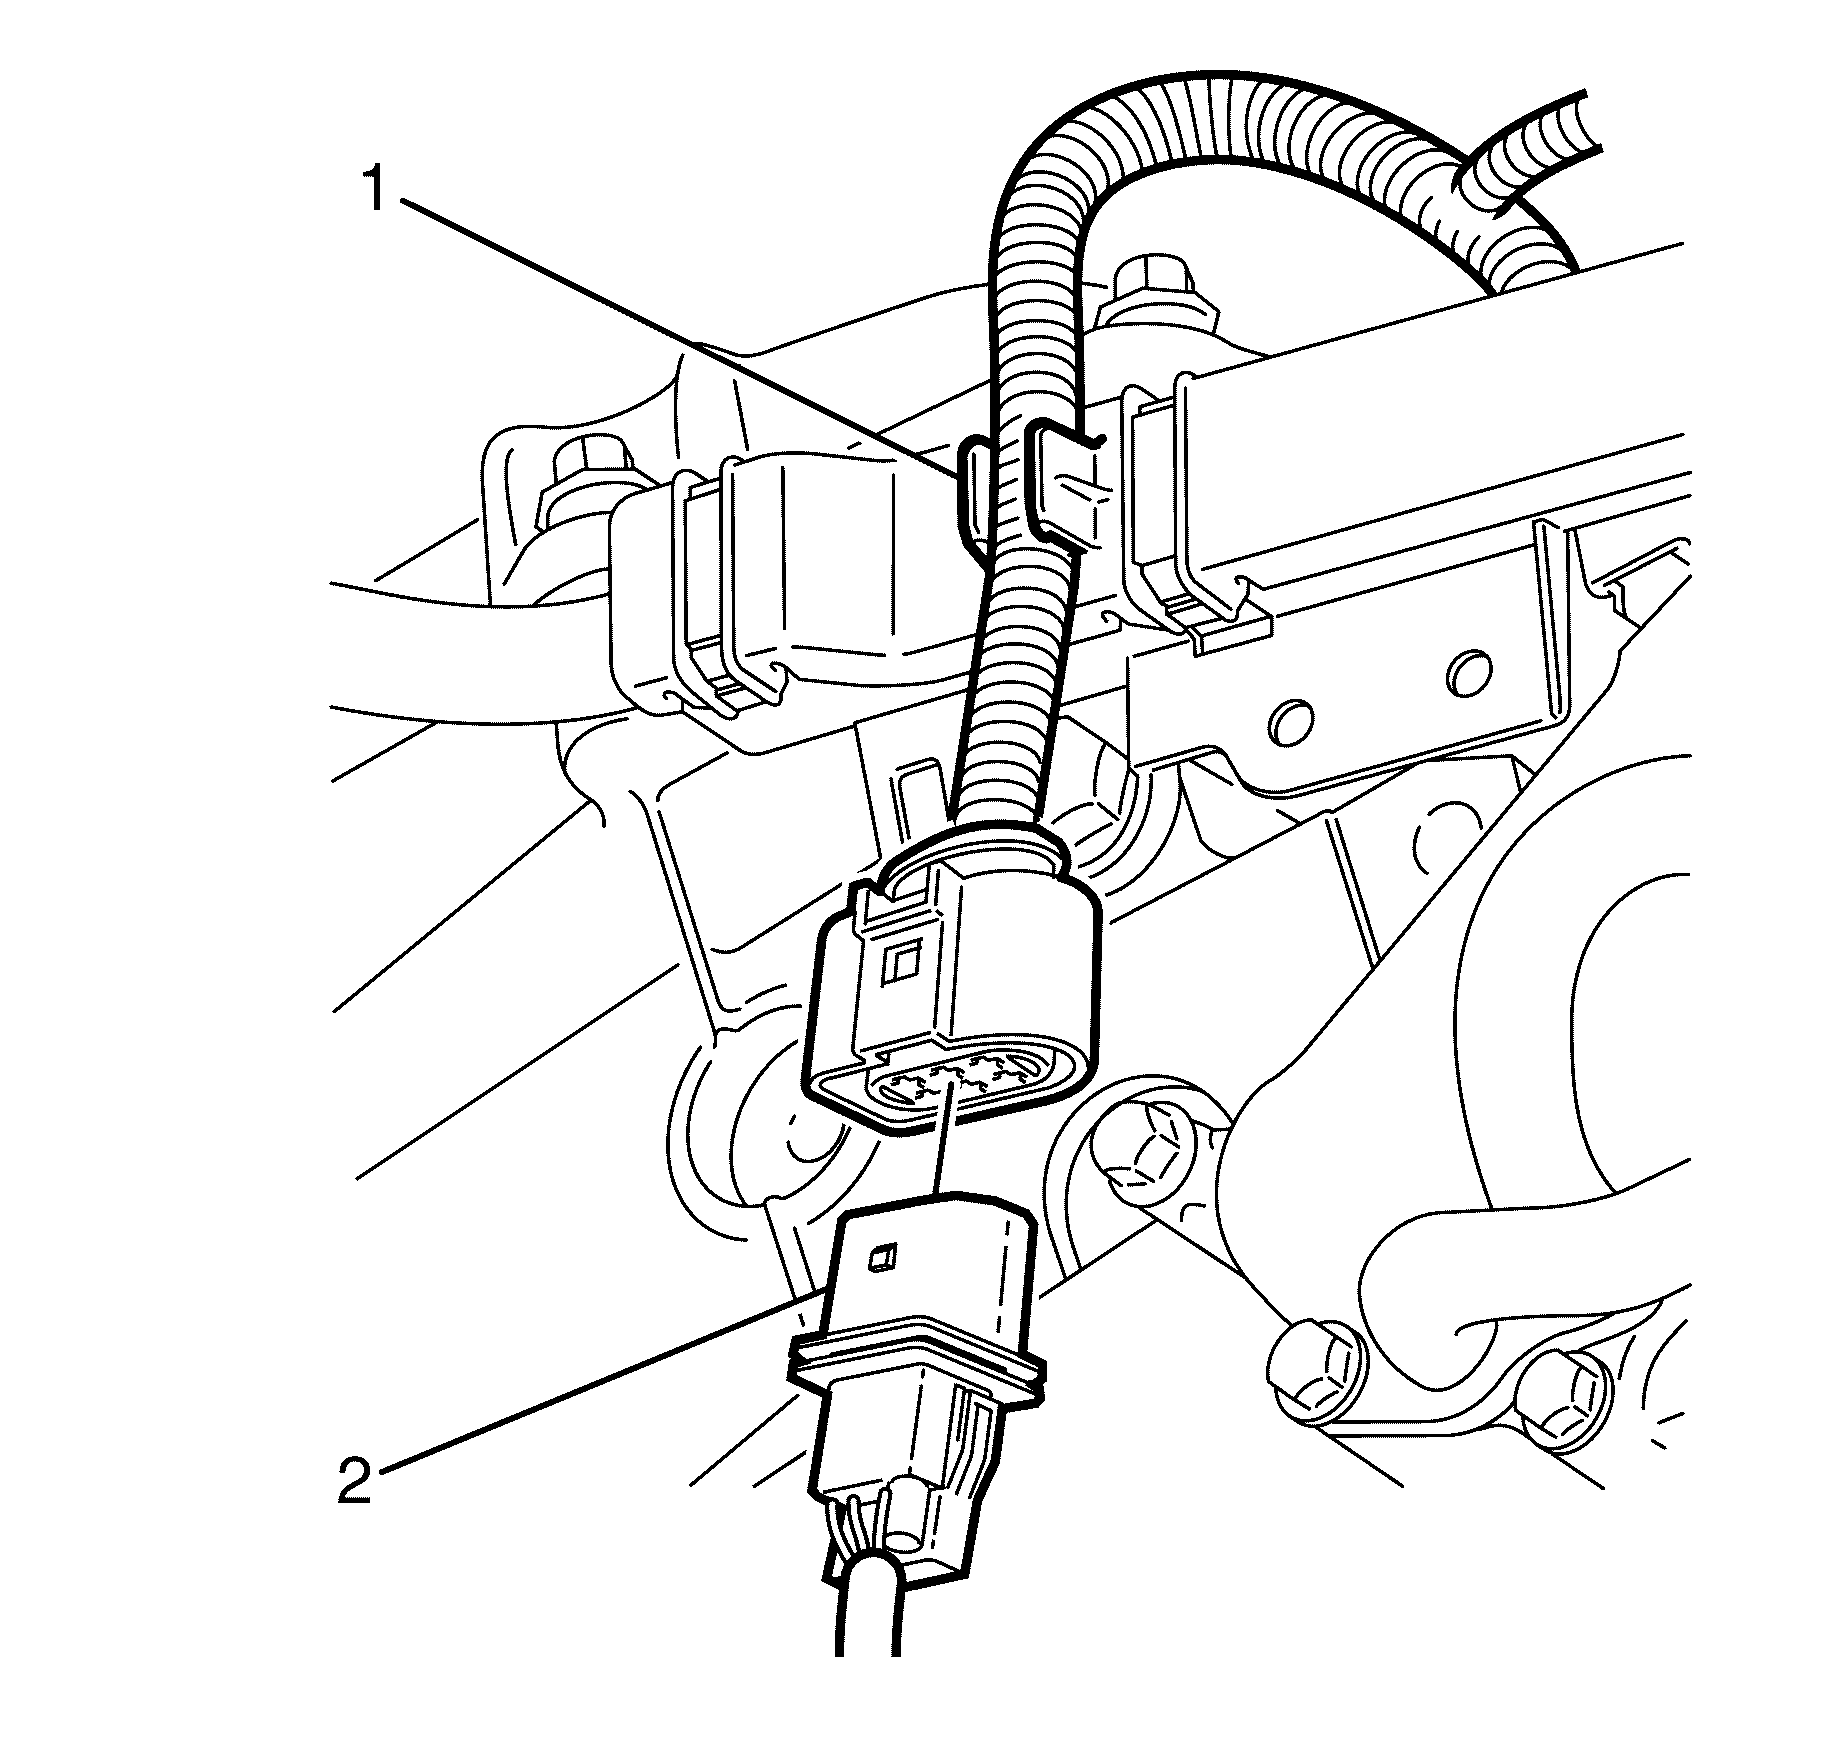
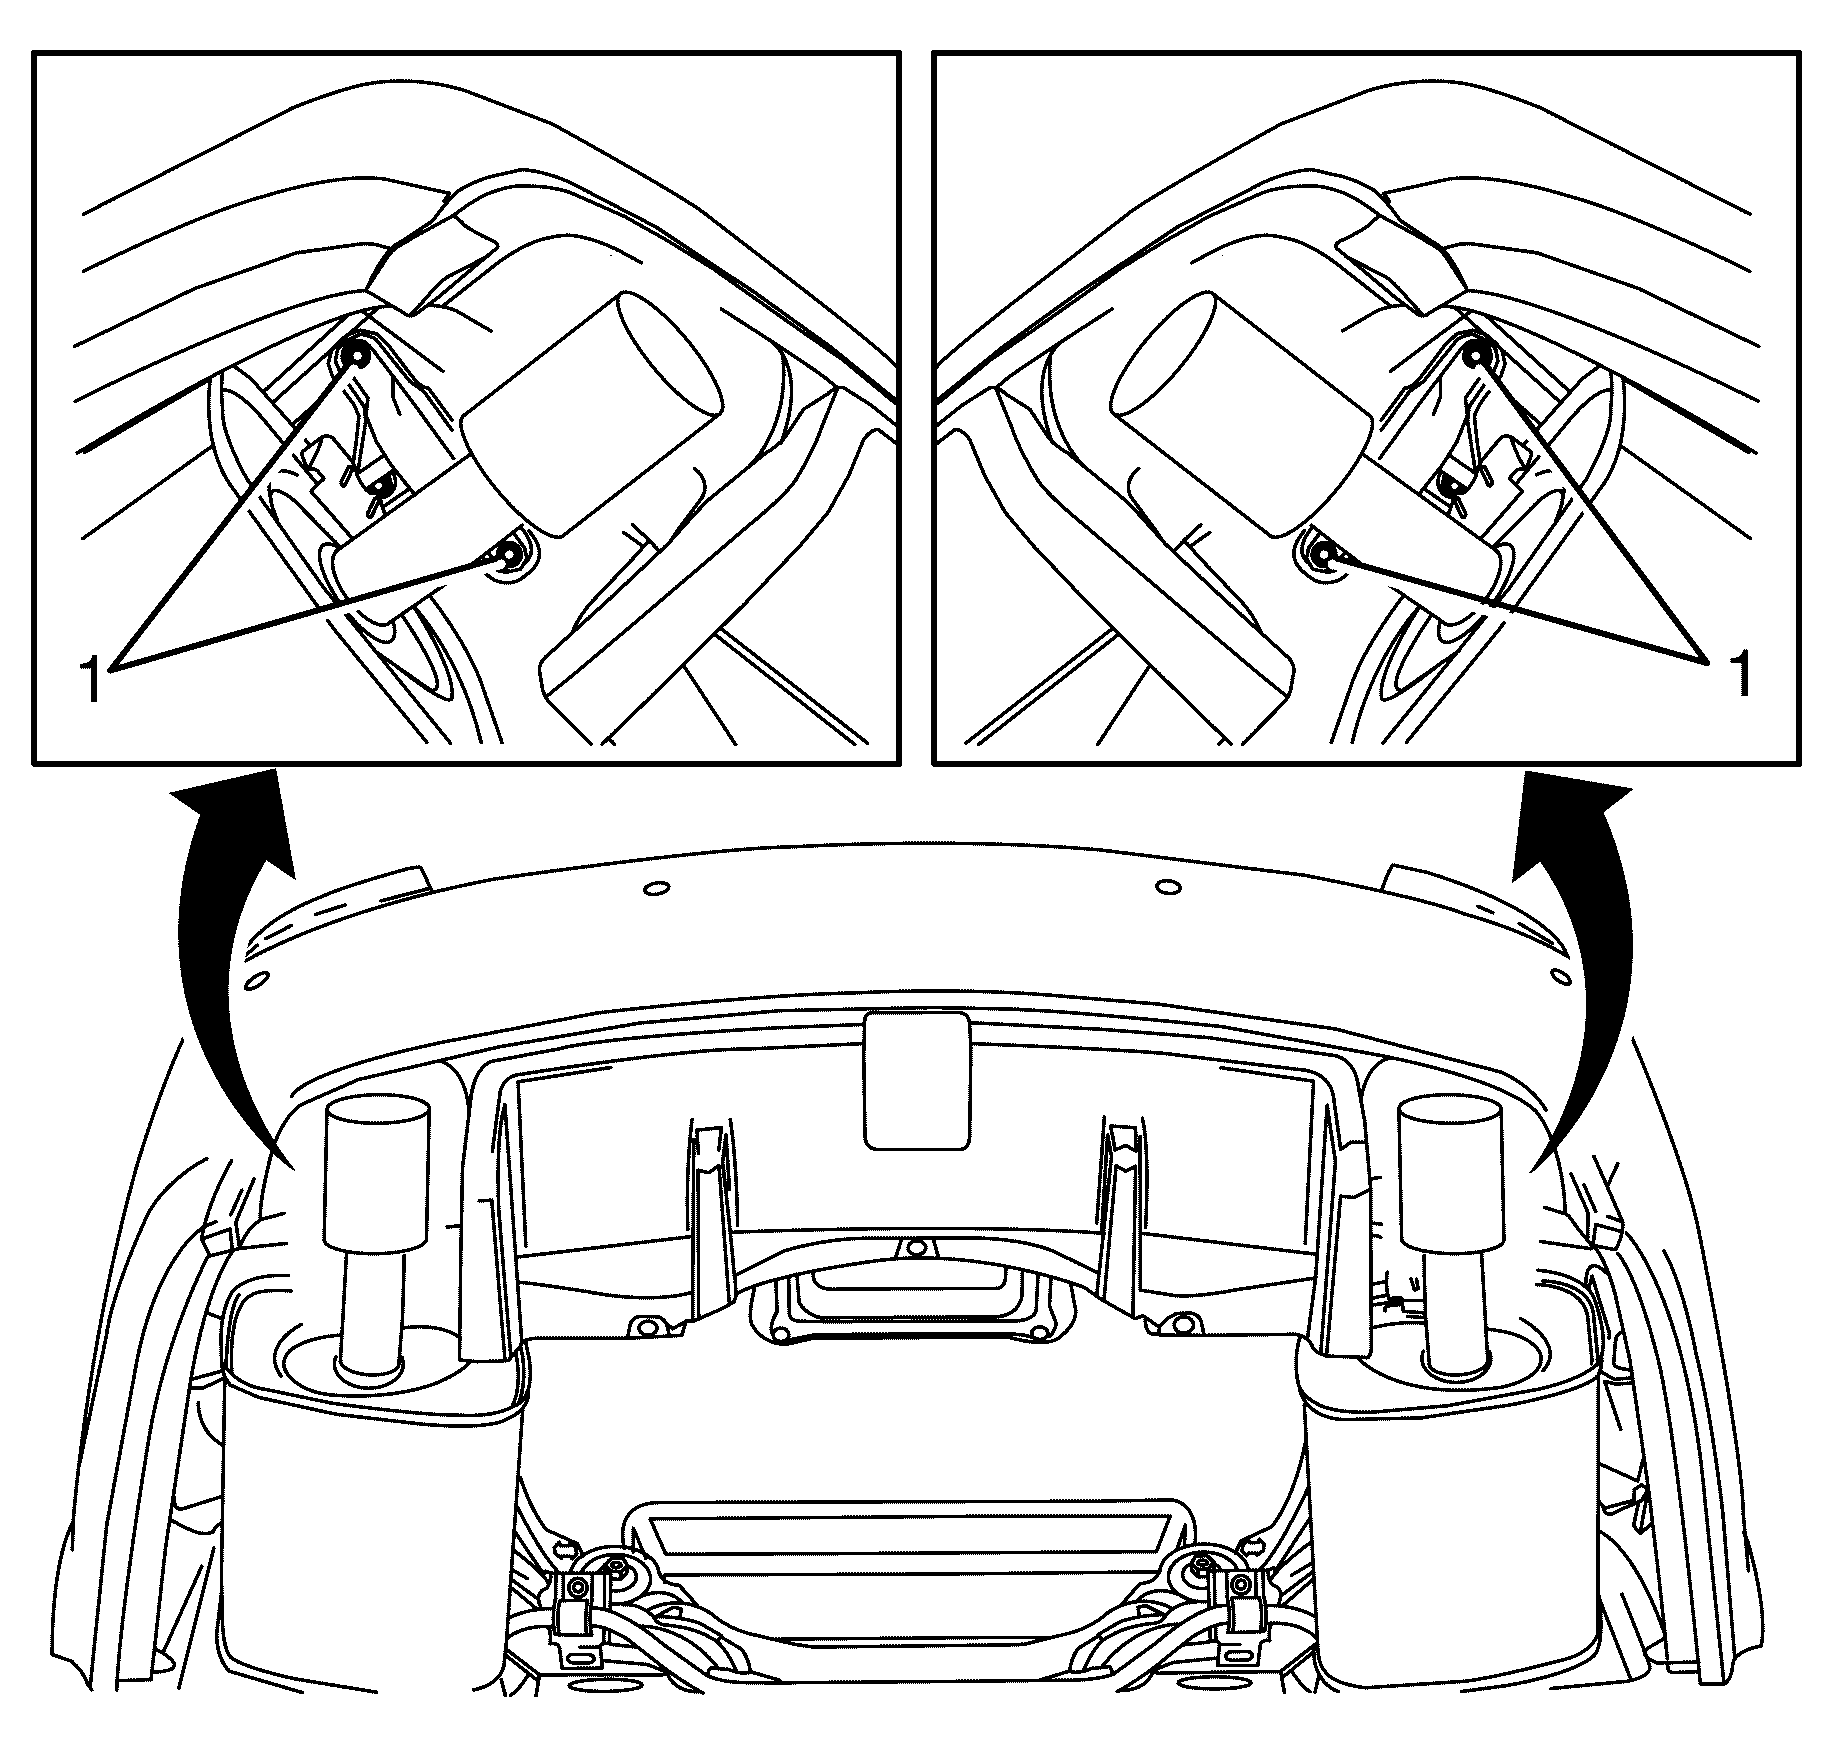
- Remove the left pre-catalytic converter heated oxygen sensor (HO2S) wiring loom from the engine wiring loom retaining clip (1).
- Disconnect the left pre-catalytic converter heated oxygen sensor (HO2S) wiring connector (2) from the main wiring harness.
- Raise and support the vehicle. Refer to Lifting and Jacking the Vehicle.
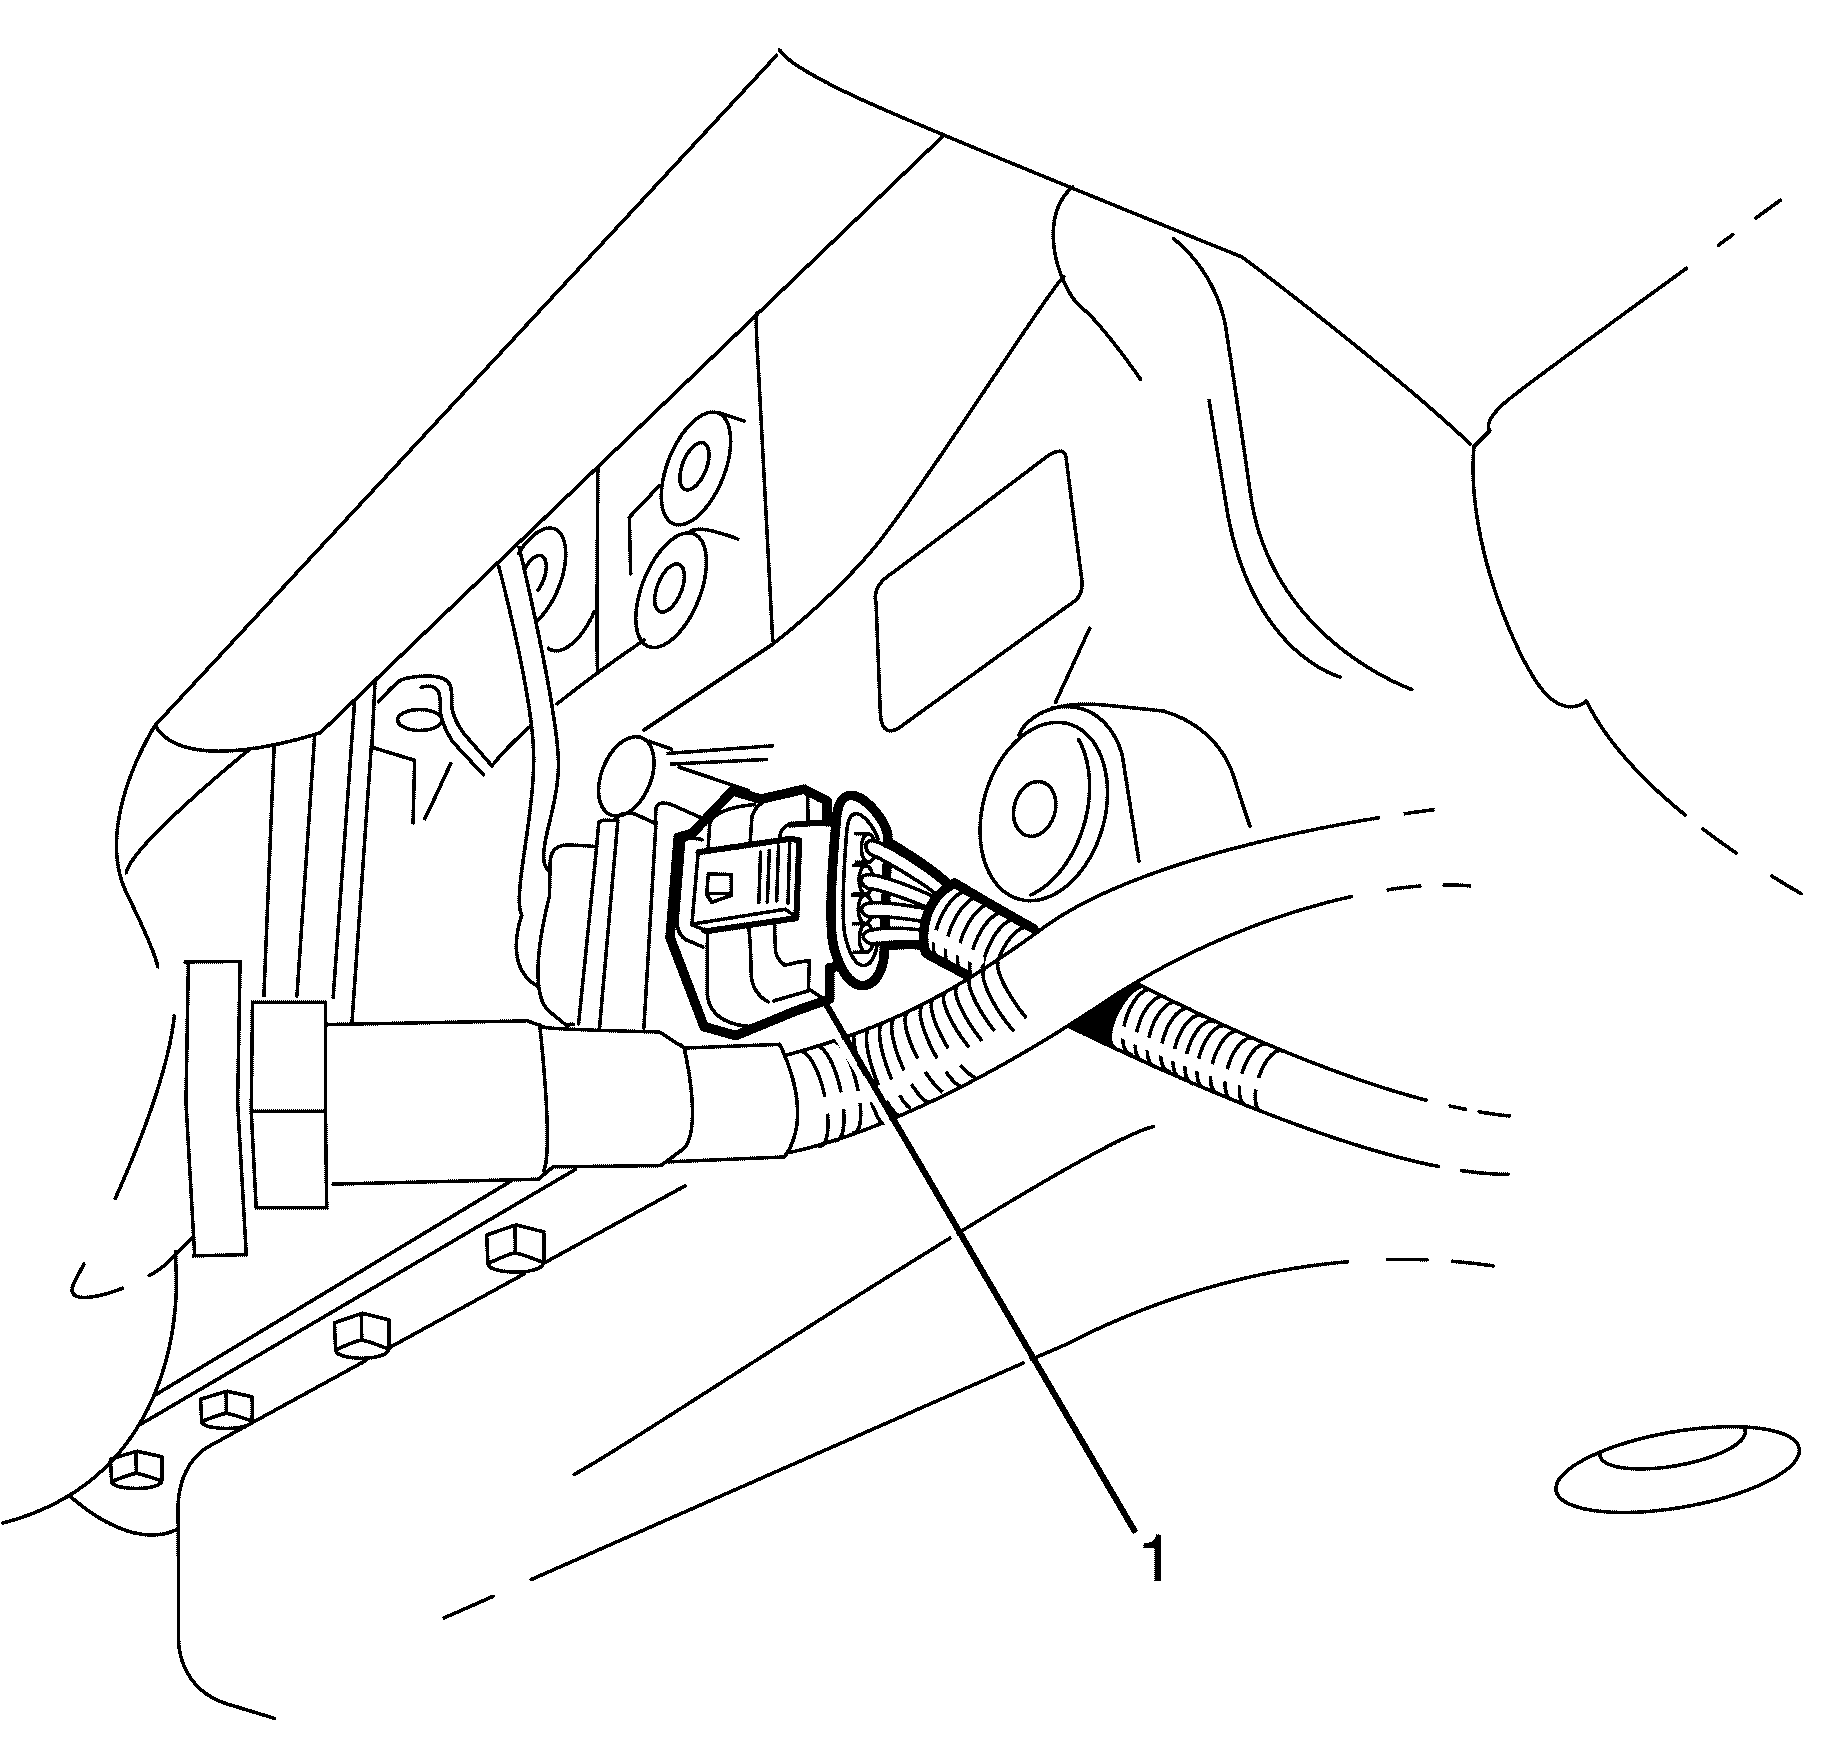
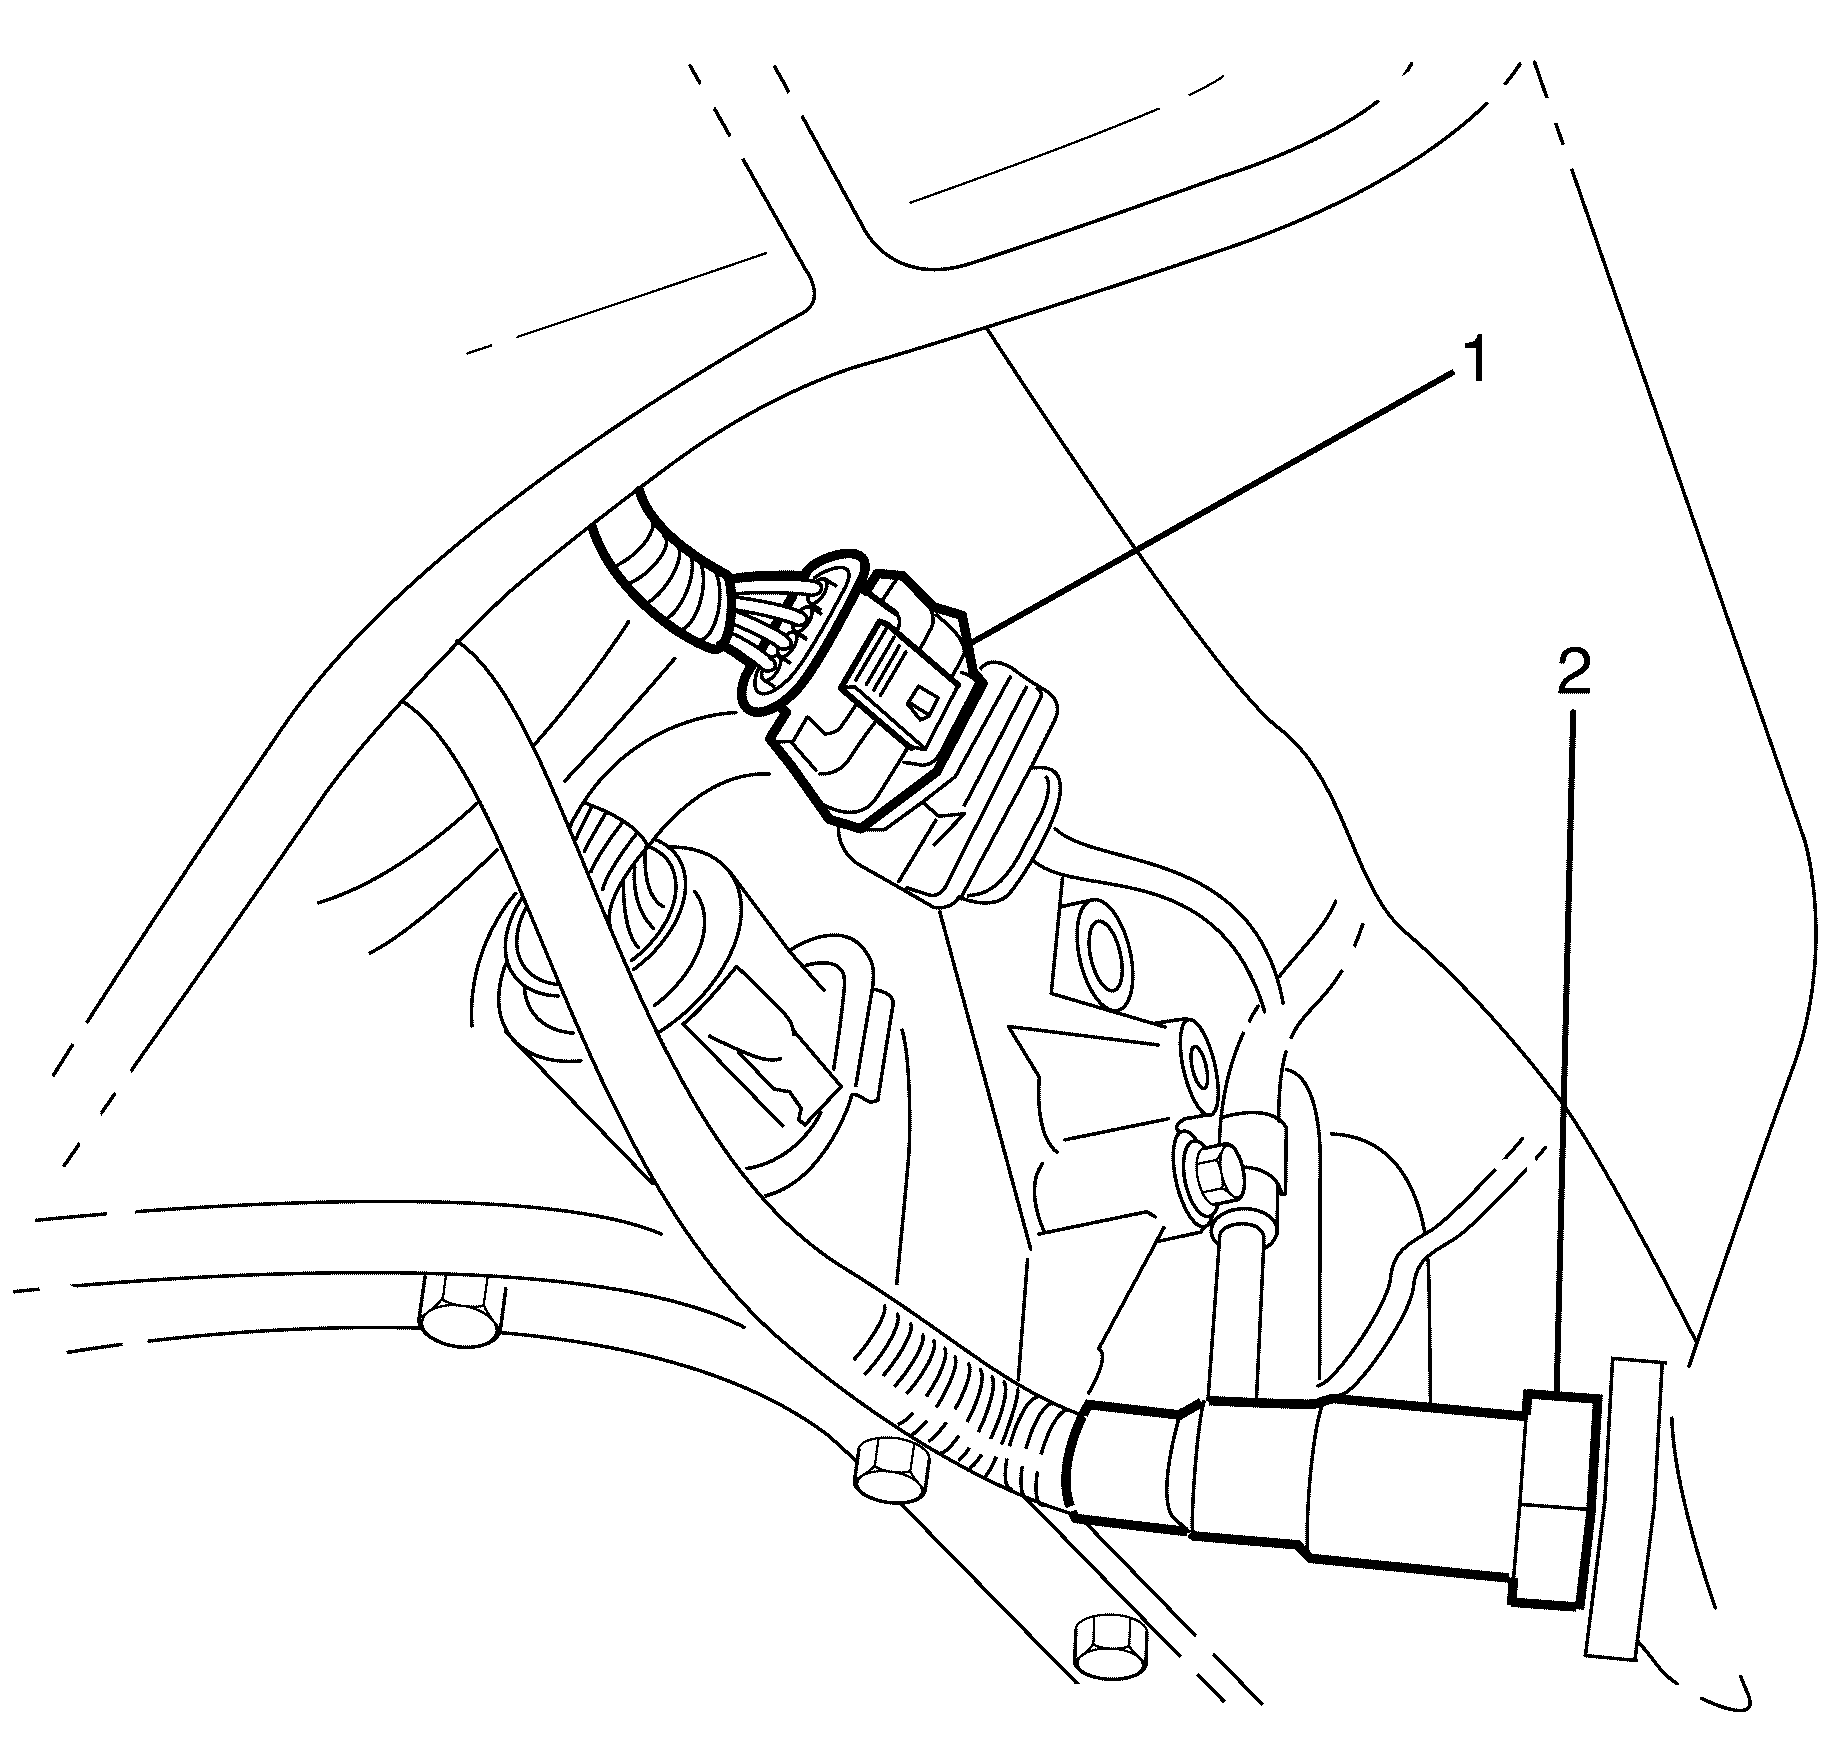
- Remove the right pre-catalytic converter heated oxygen sensor (HO2S) wiring loom from the transmission wiring loom retraining clip (1).
- Disconnect the right pre-catalytic converter heated oxygen sensor (HO2S) electrical connector (2).
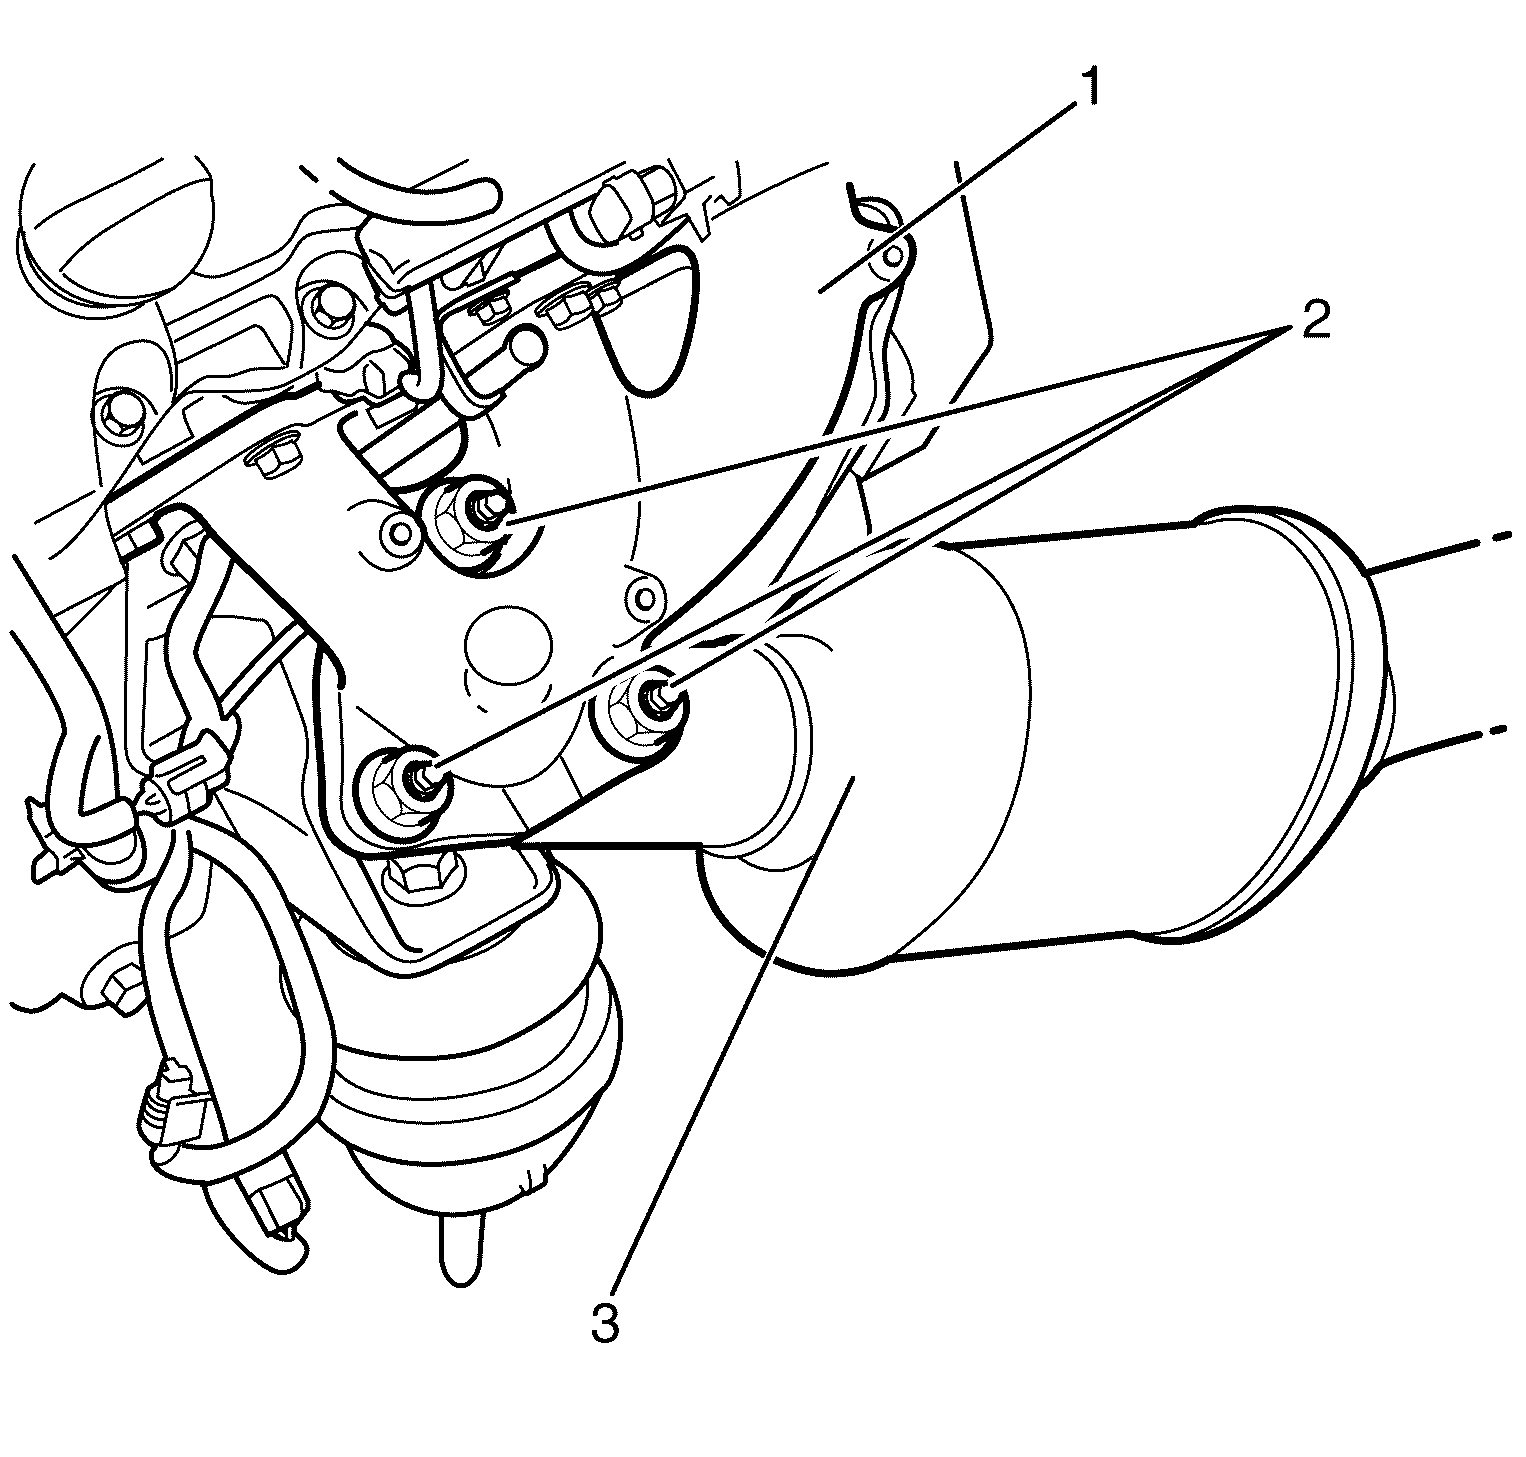
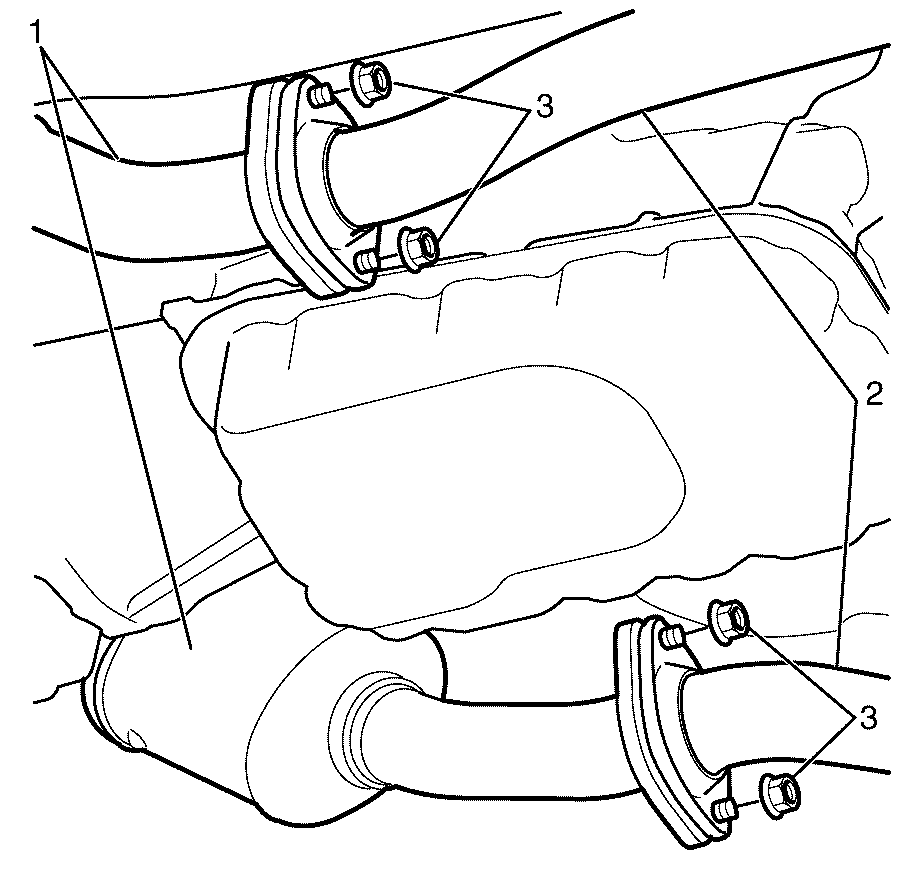
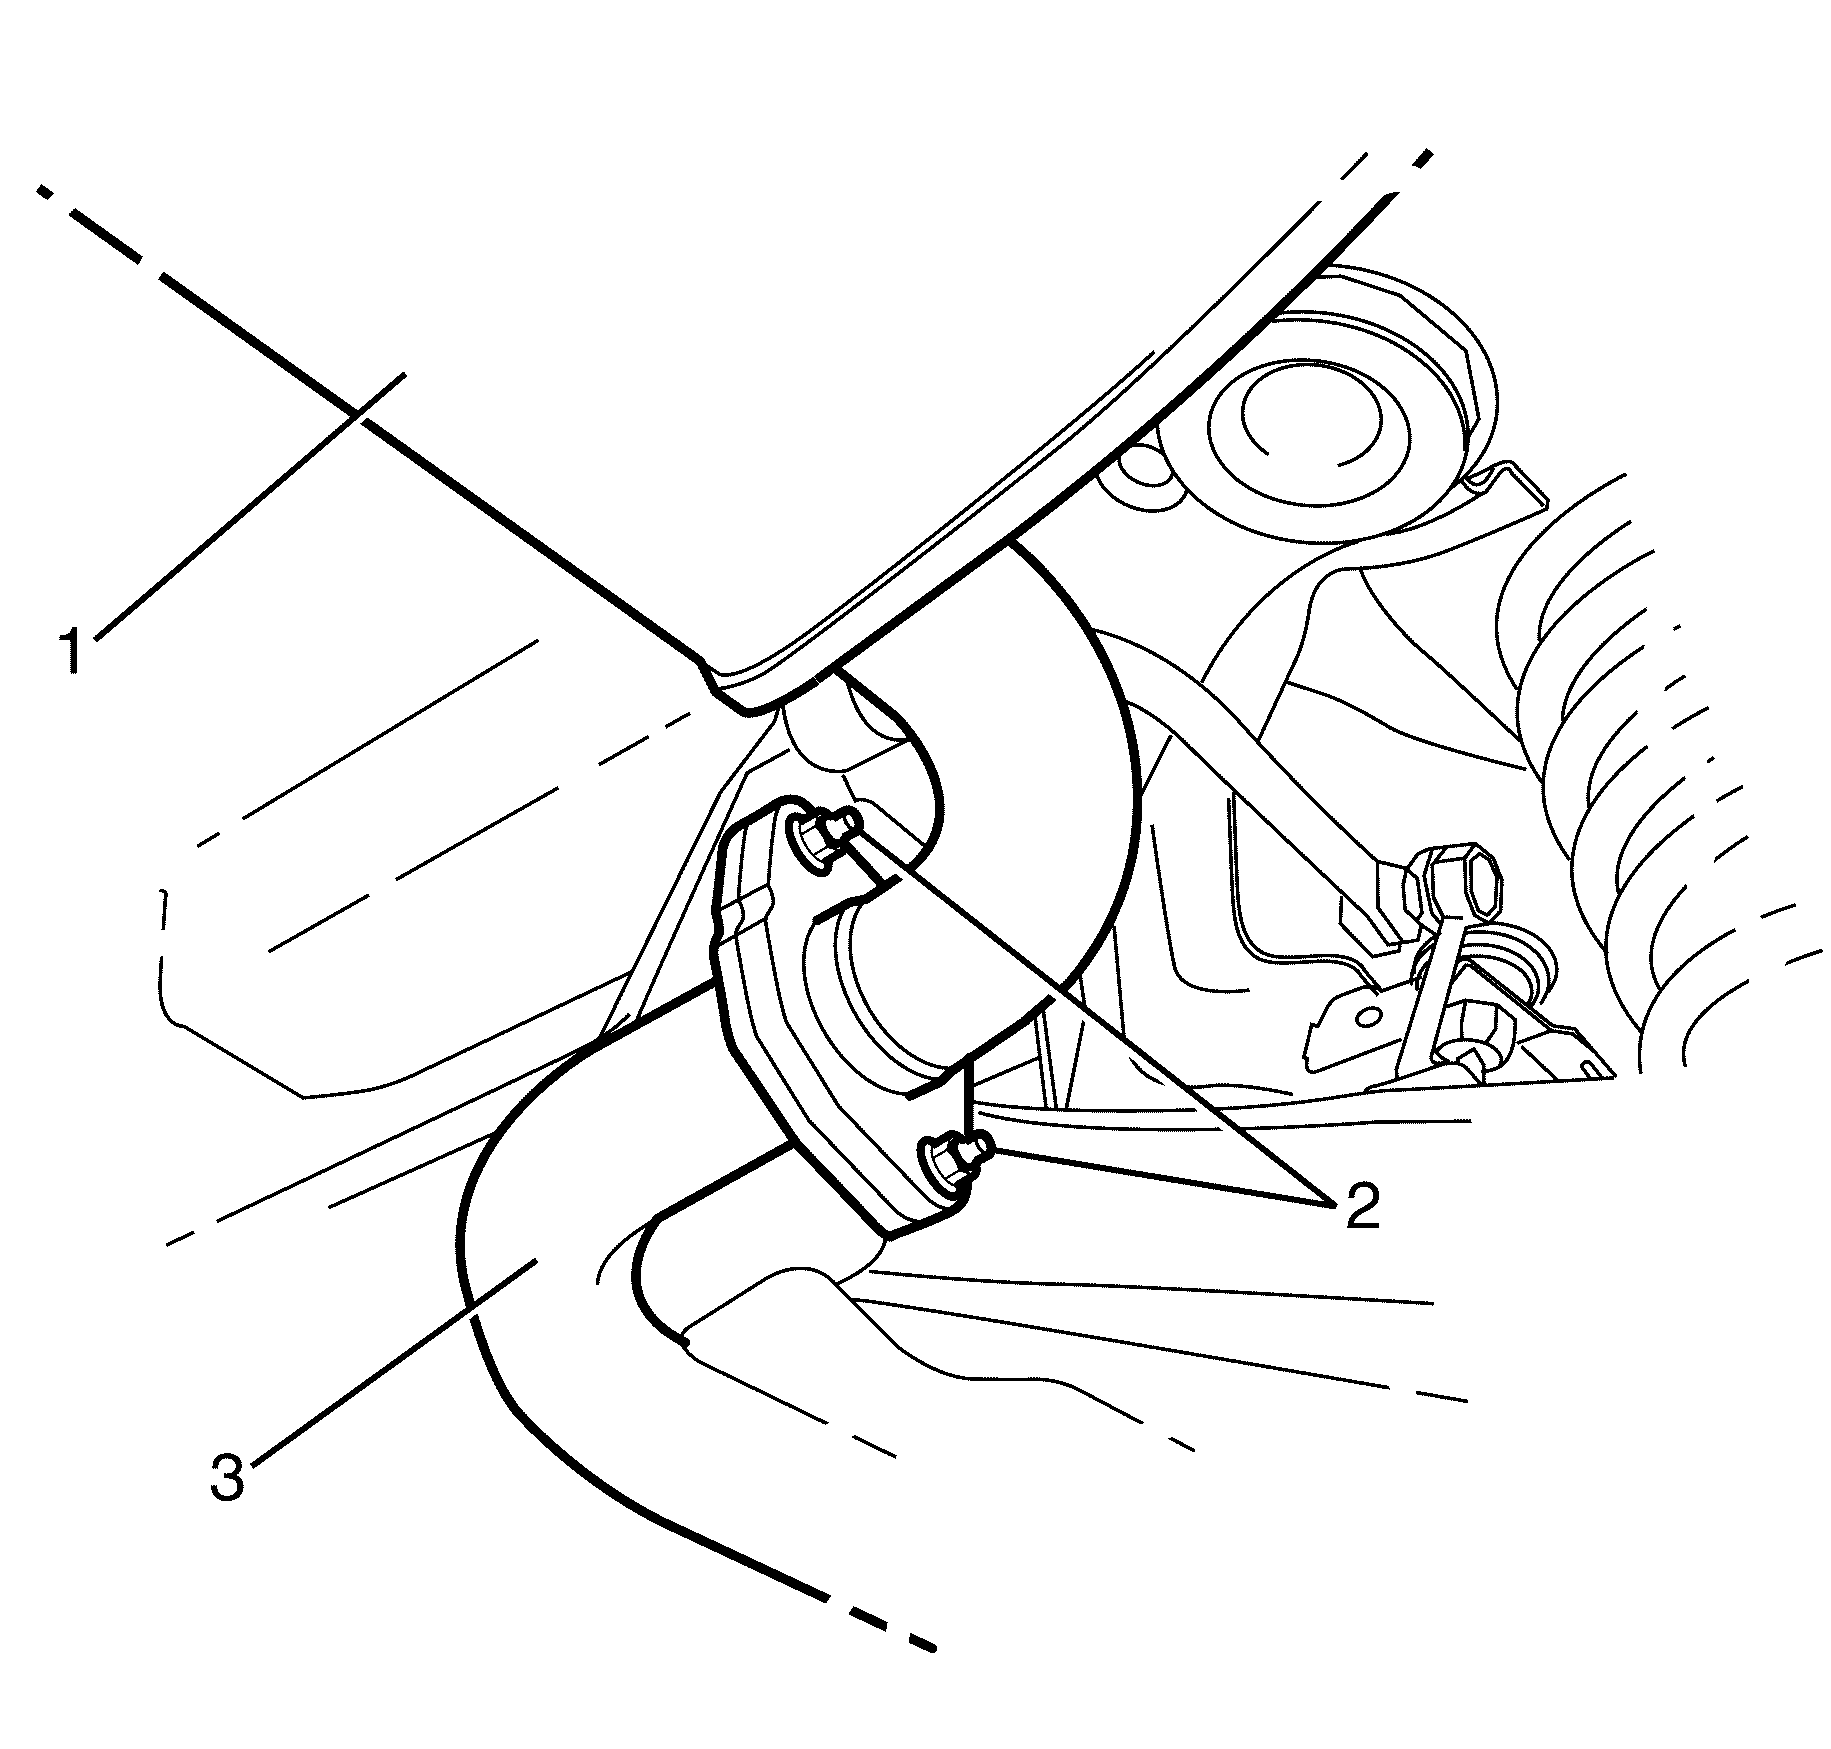
- Remove the left catalytic converter to exhaust manifold retaining nuts (2).
- Pull down and back on the left catalytic converter (3) to disconnect from the left exhaust manifold (1).
- Remove the right catalytic converter to exhaust manifold retaining nuts (3).
- Pull down and back on the right catalytic converter (2) to disconnect from the right exhaust manifold (1).
- Raise and support the vehicle. Refer to Lifting and Jacking the Vehicle.
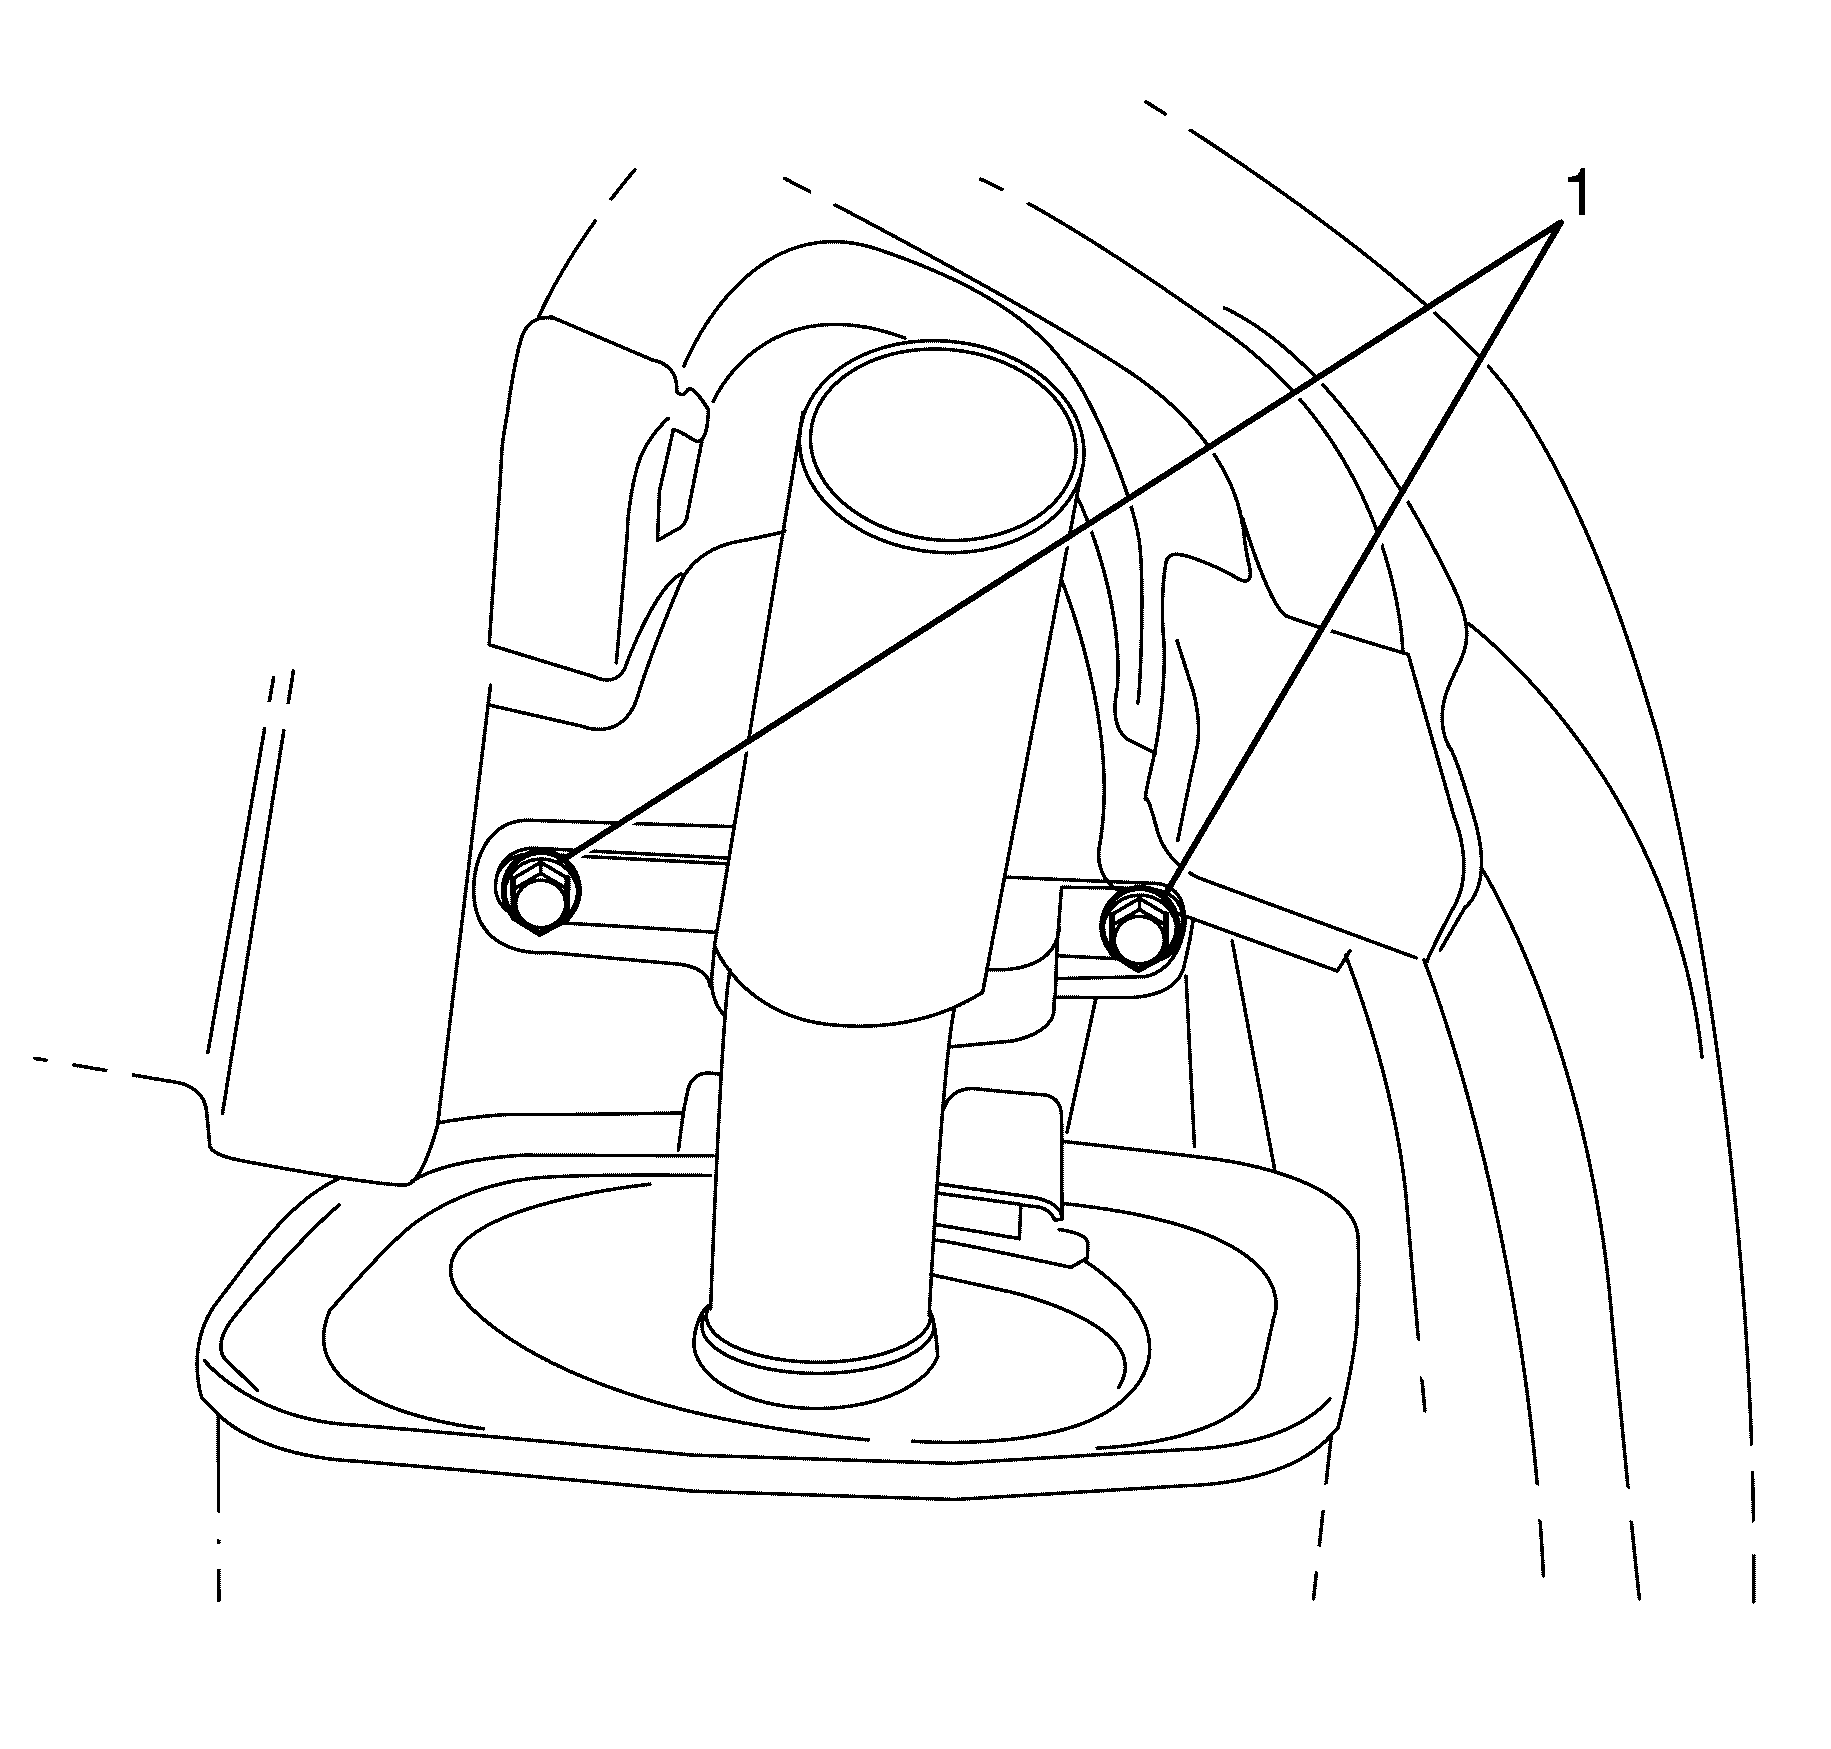
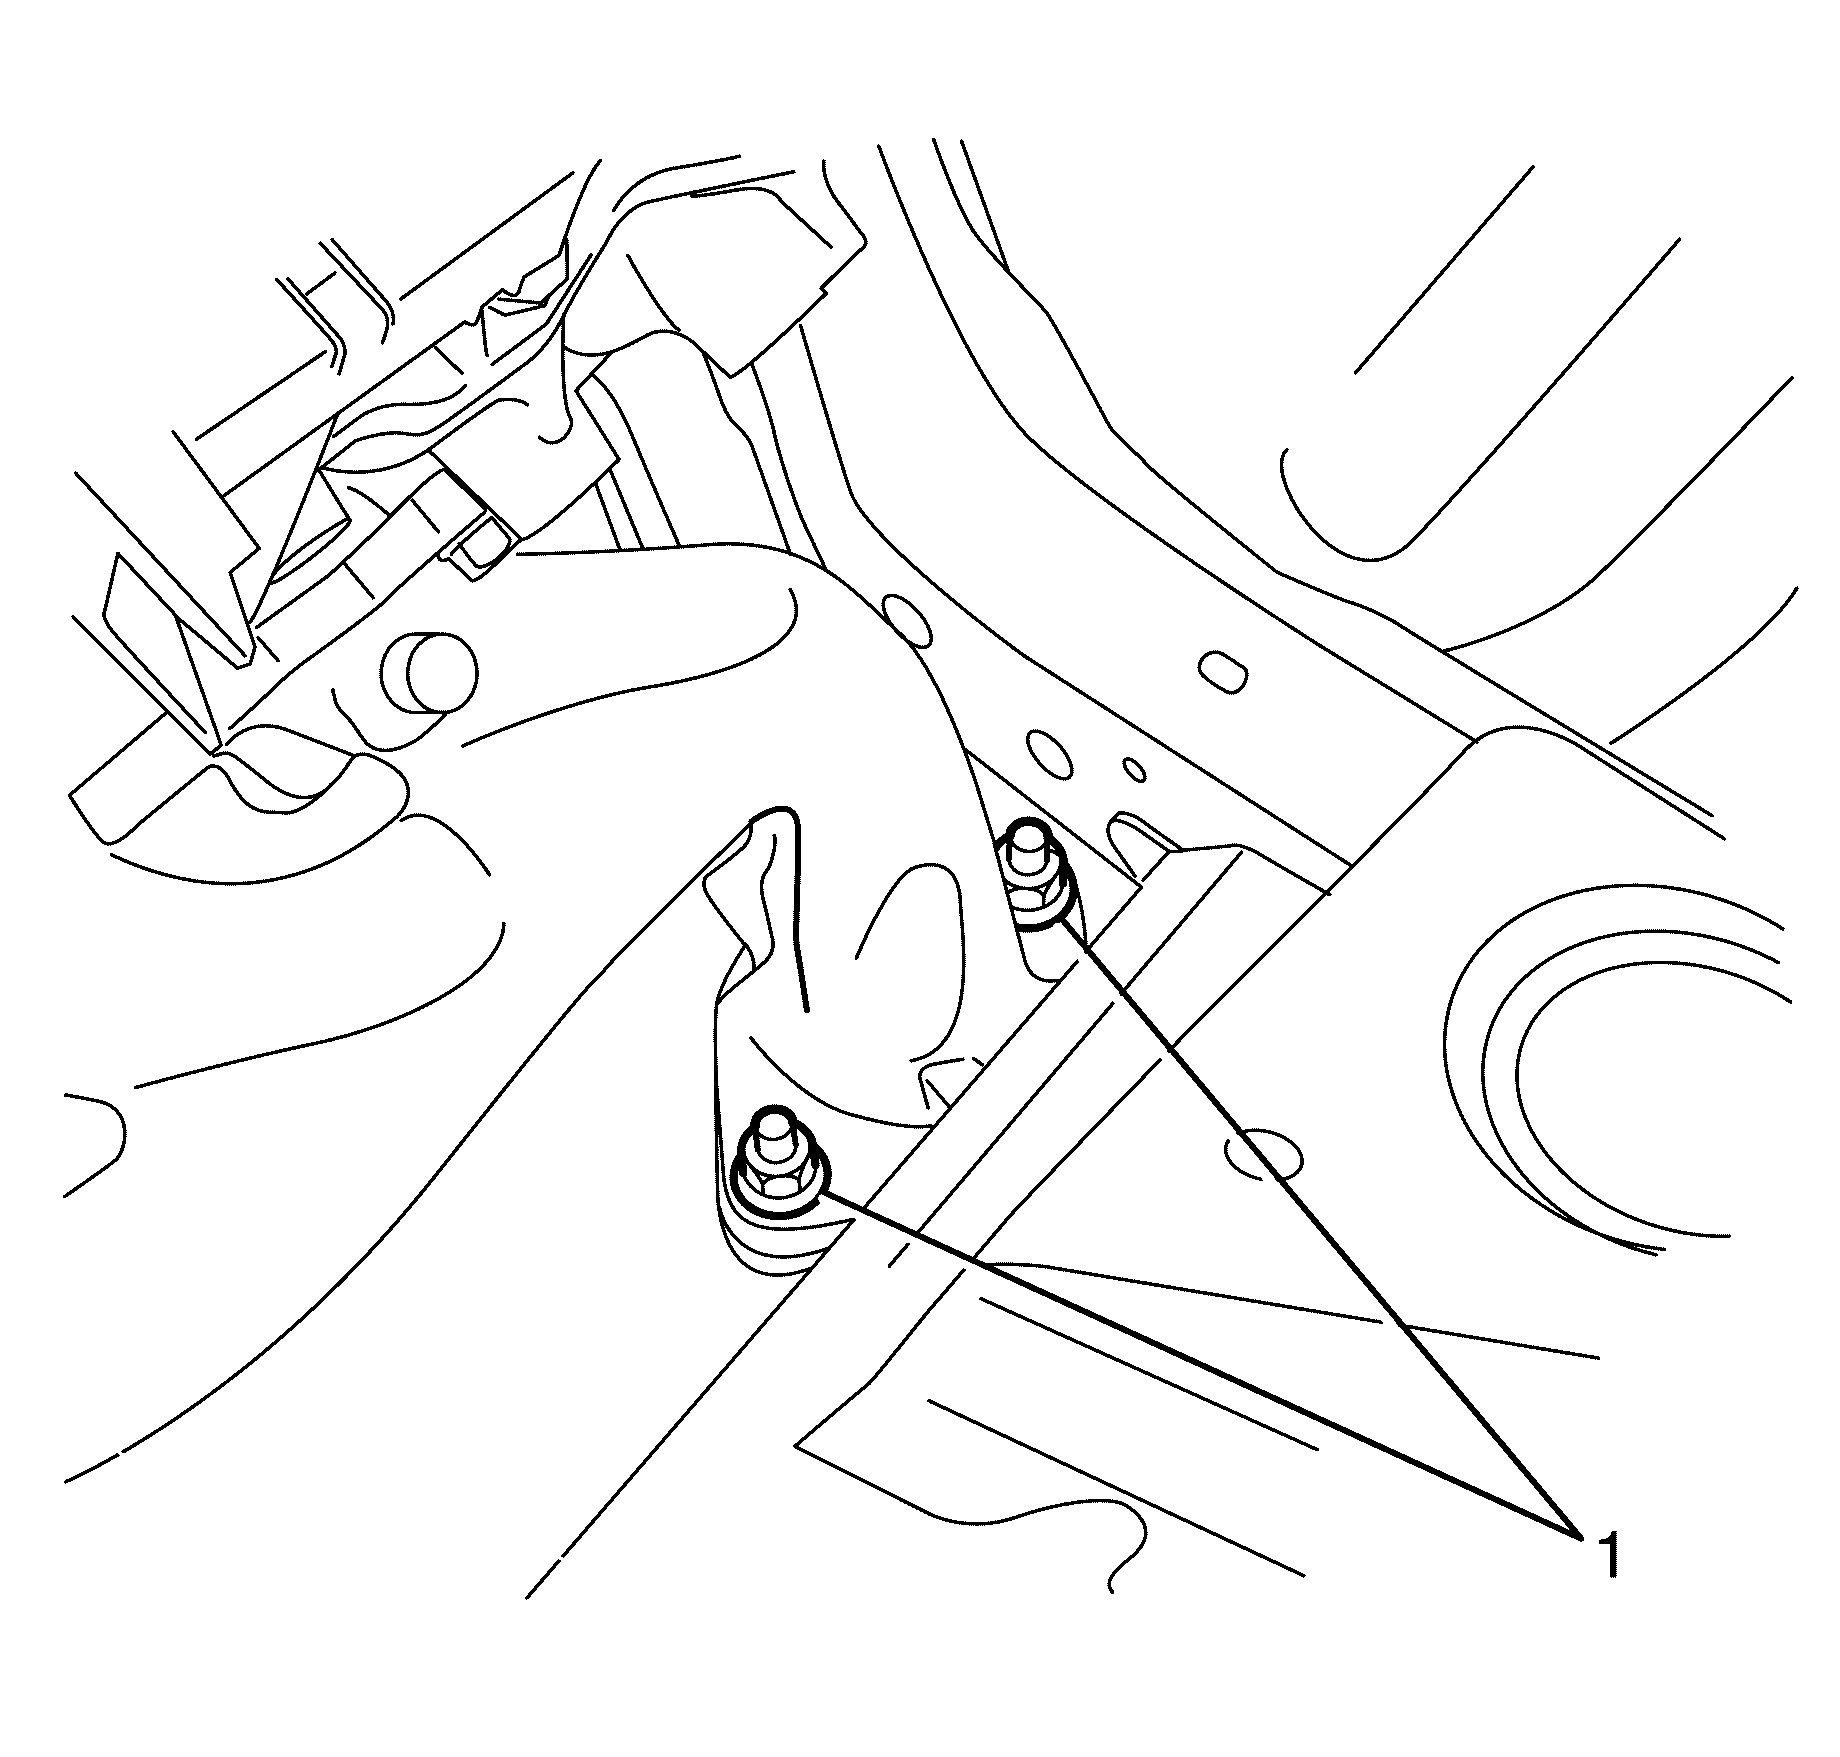
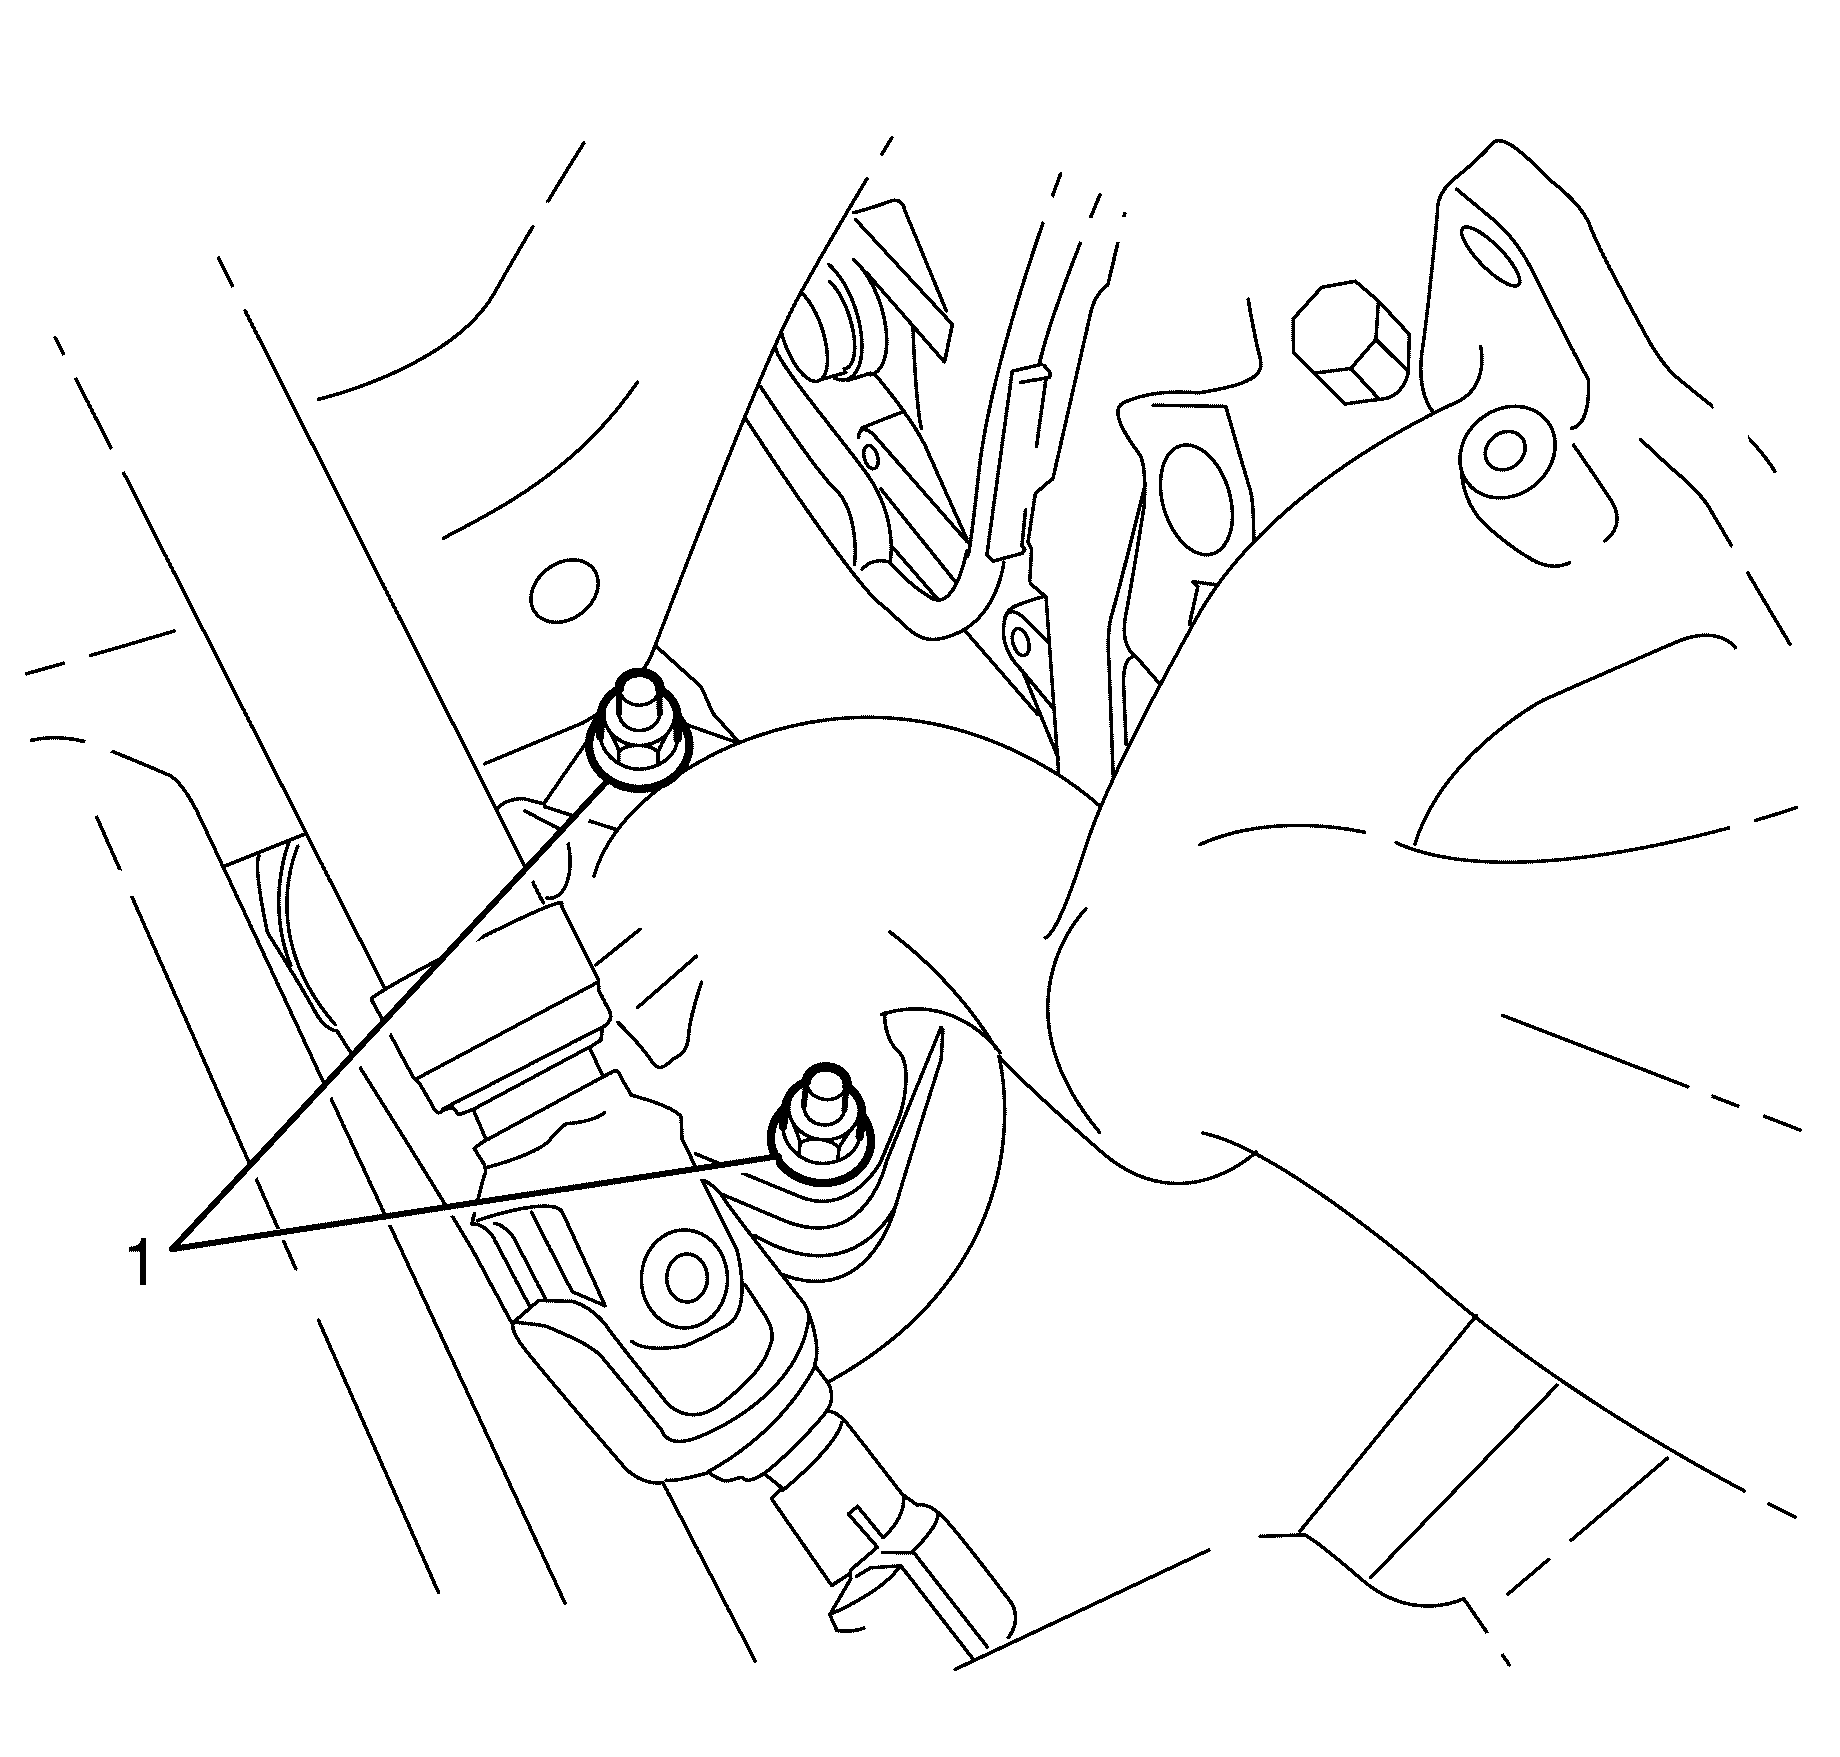
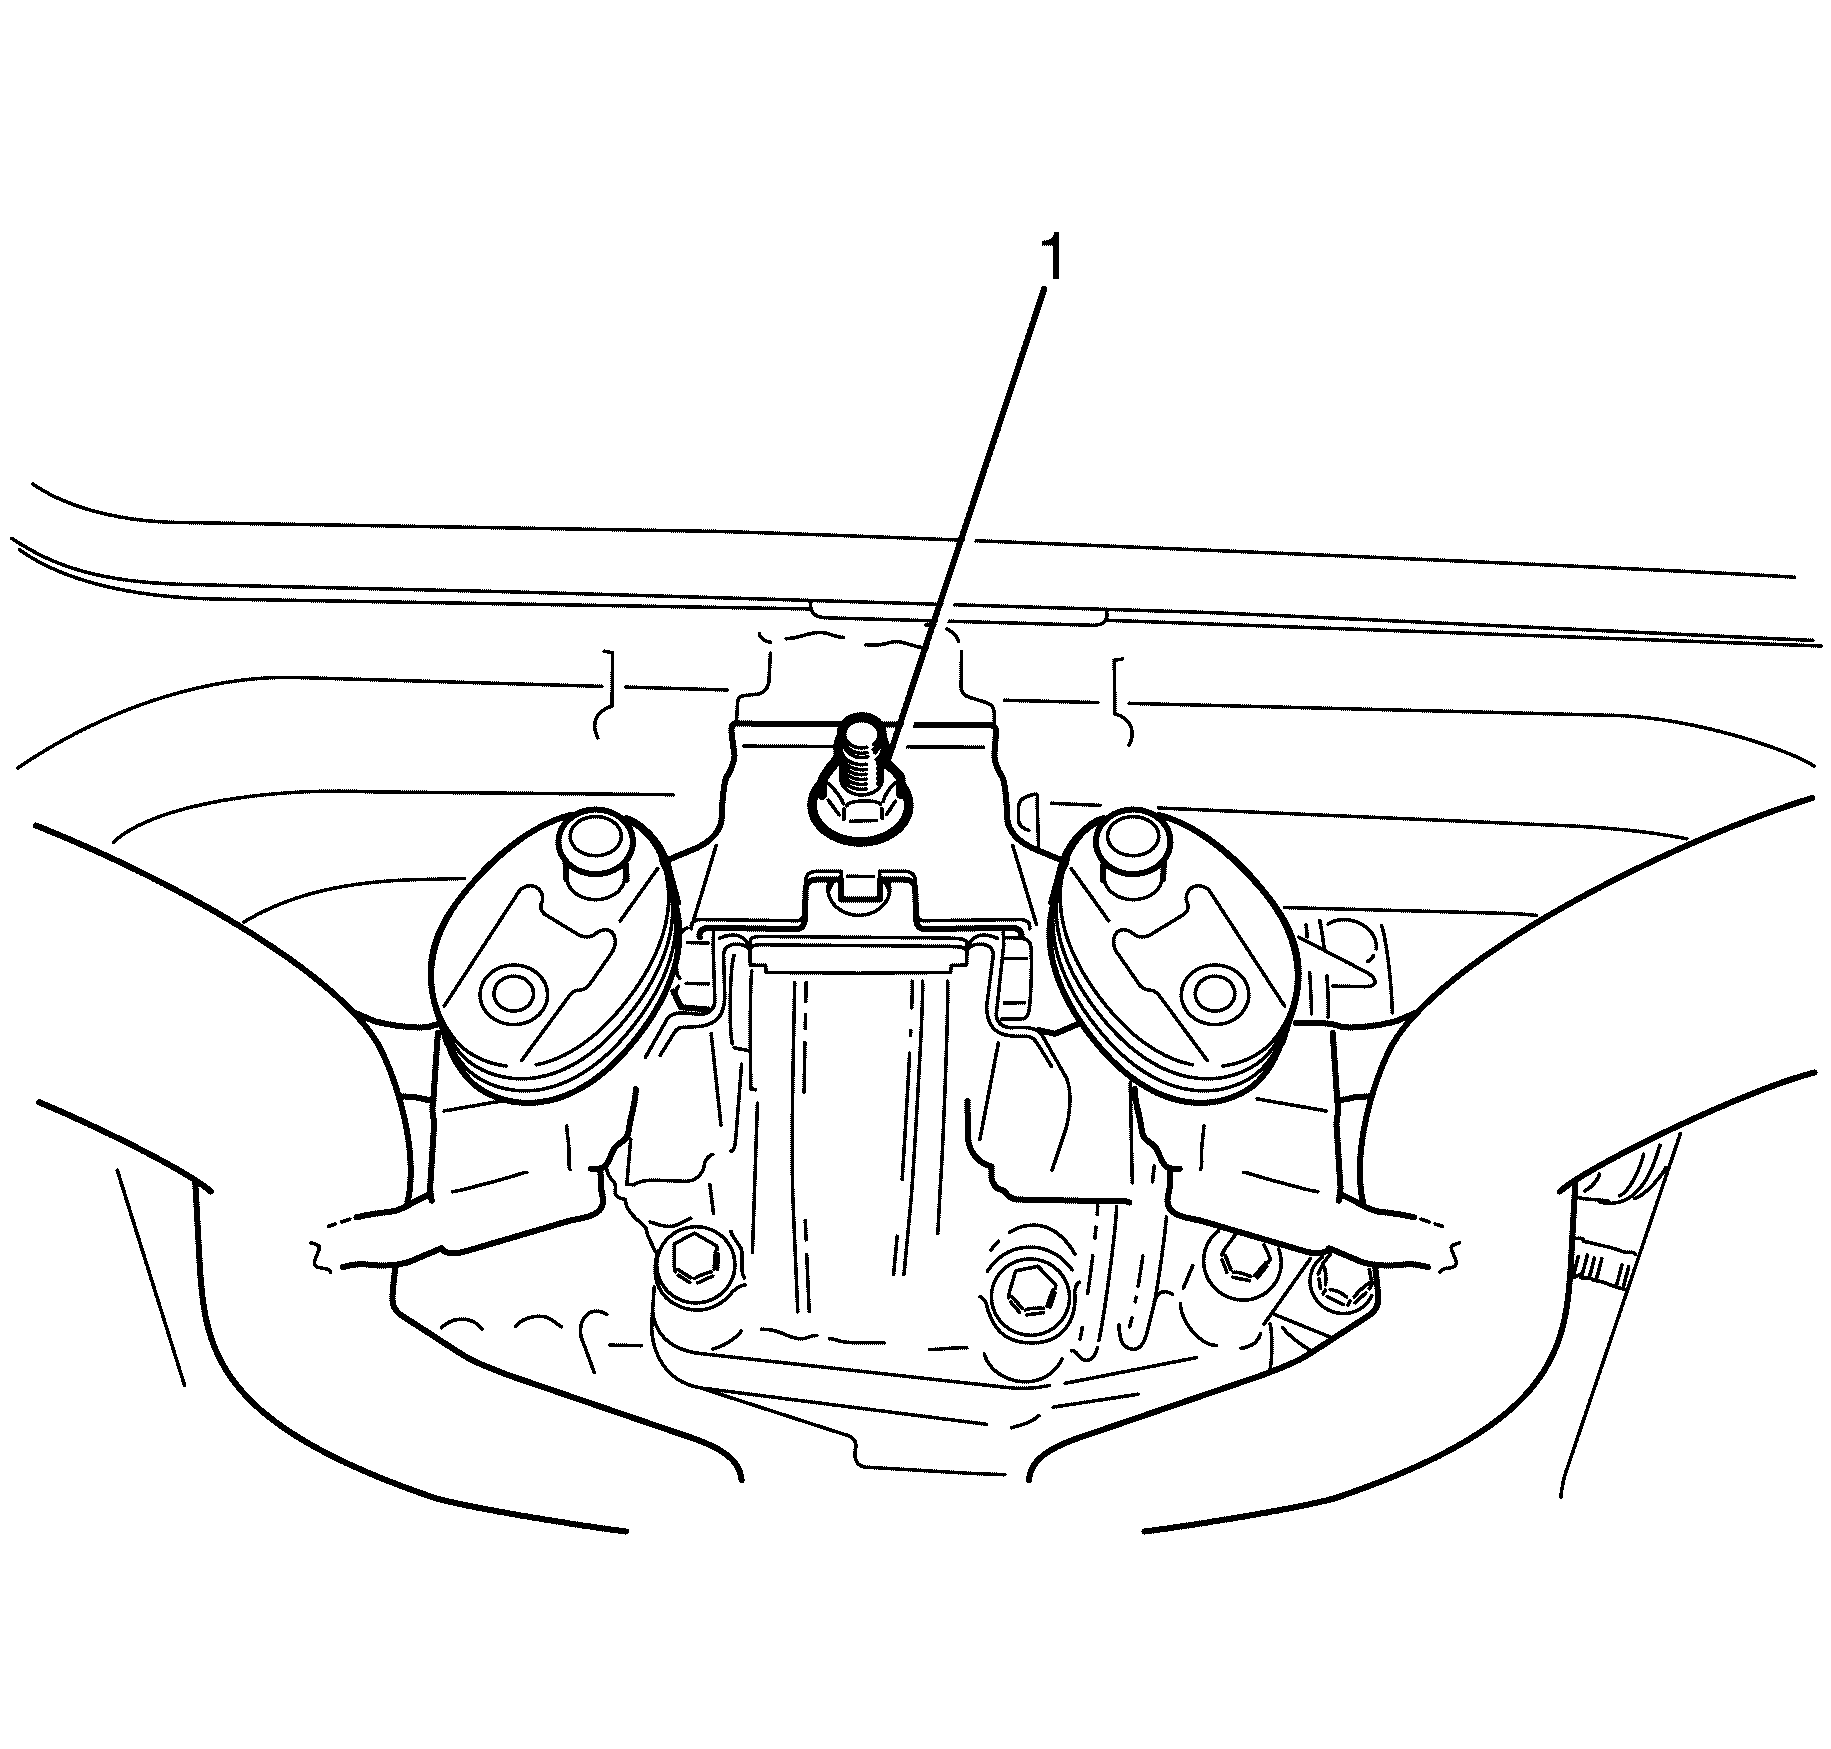
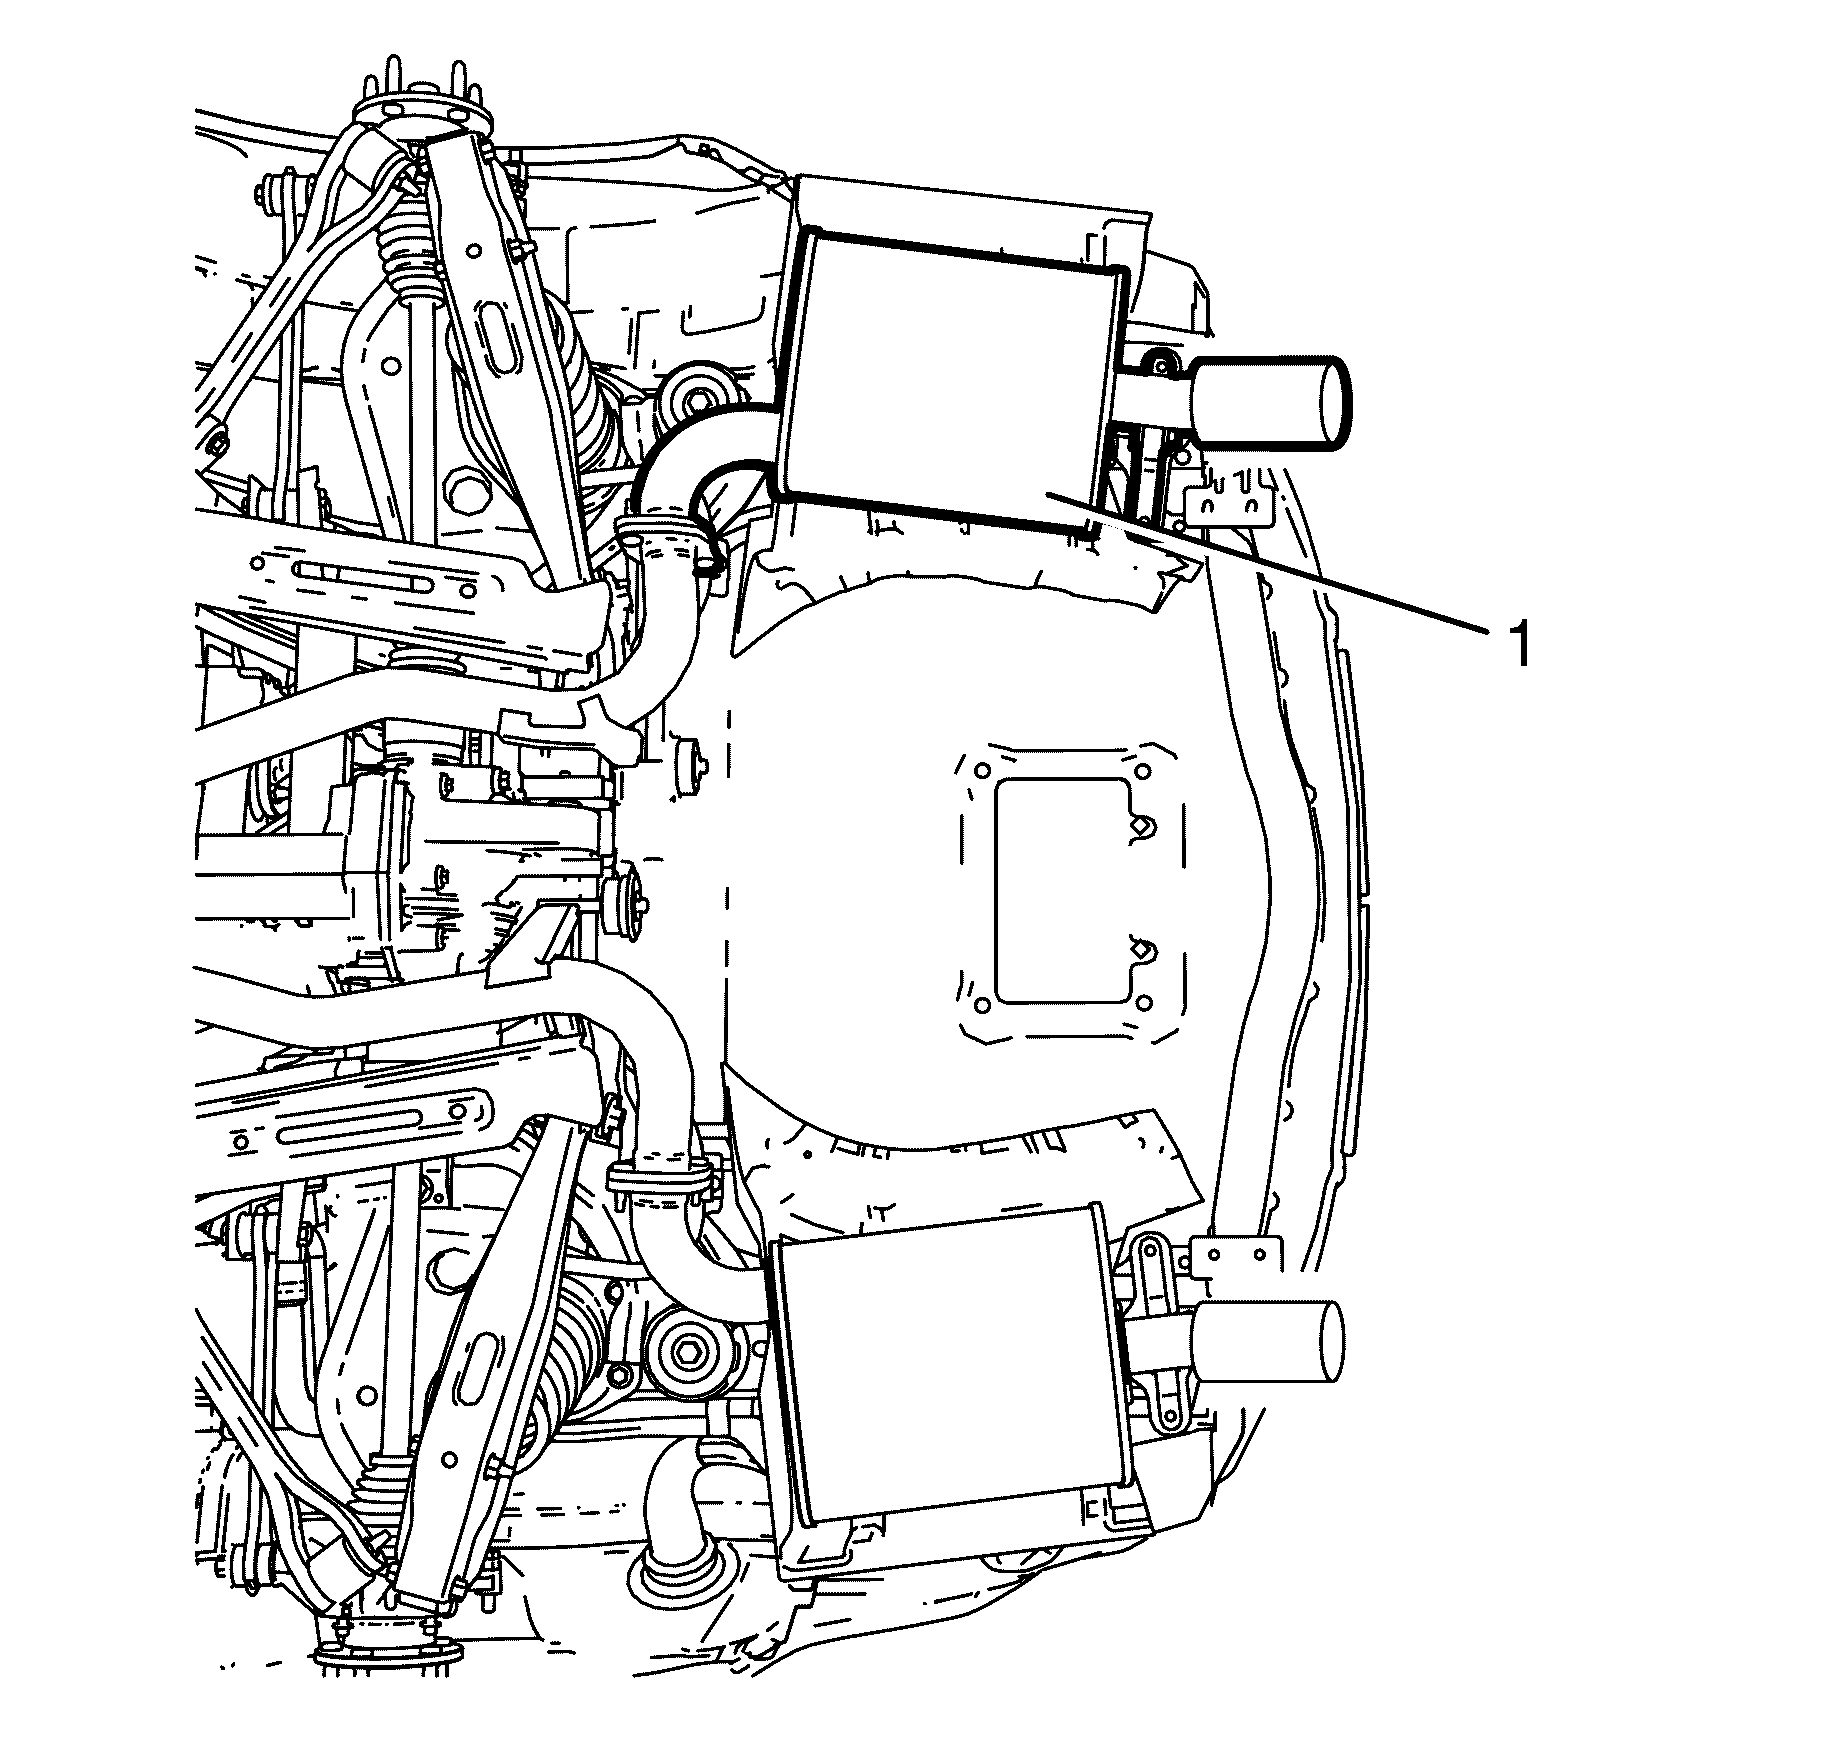
- Remove the transmission tunnel cross-brace to body retaining bolts (2).
- Remove the transmission tunnel cross-brace (1).
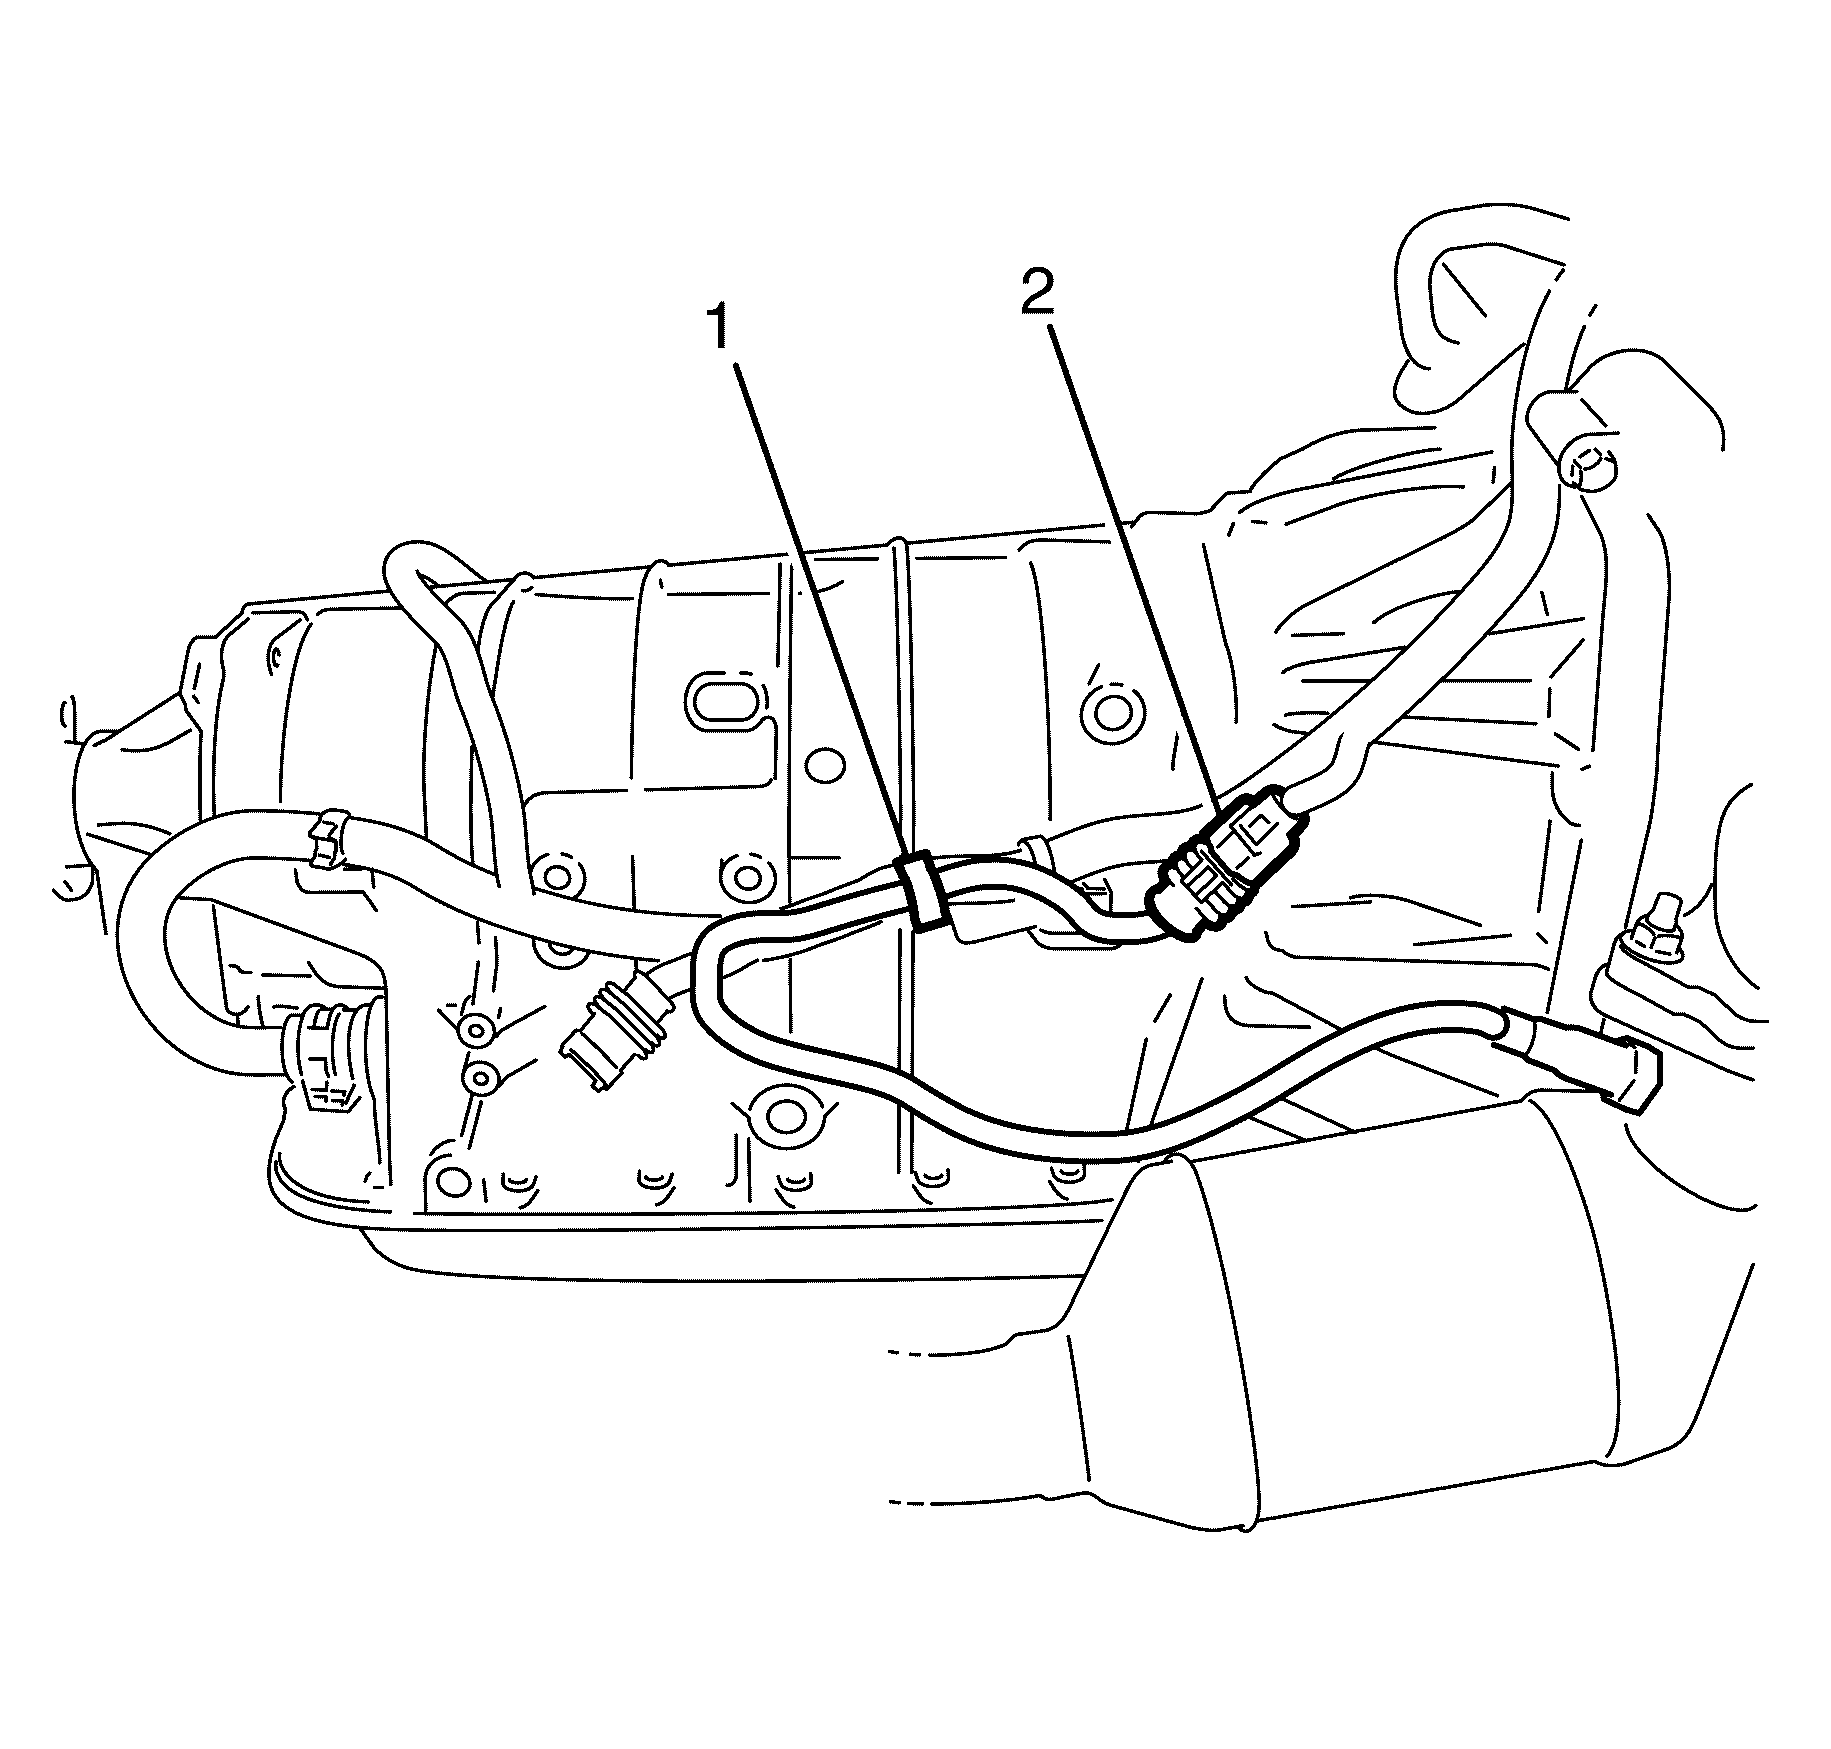
- Disconnect the left post-catalytic converter HO2S electrical connector (1).
- Disconnect the right post-catalytic converter HO2S electrical connector (1).
- Support the exhaust system using a suitable jack.
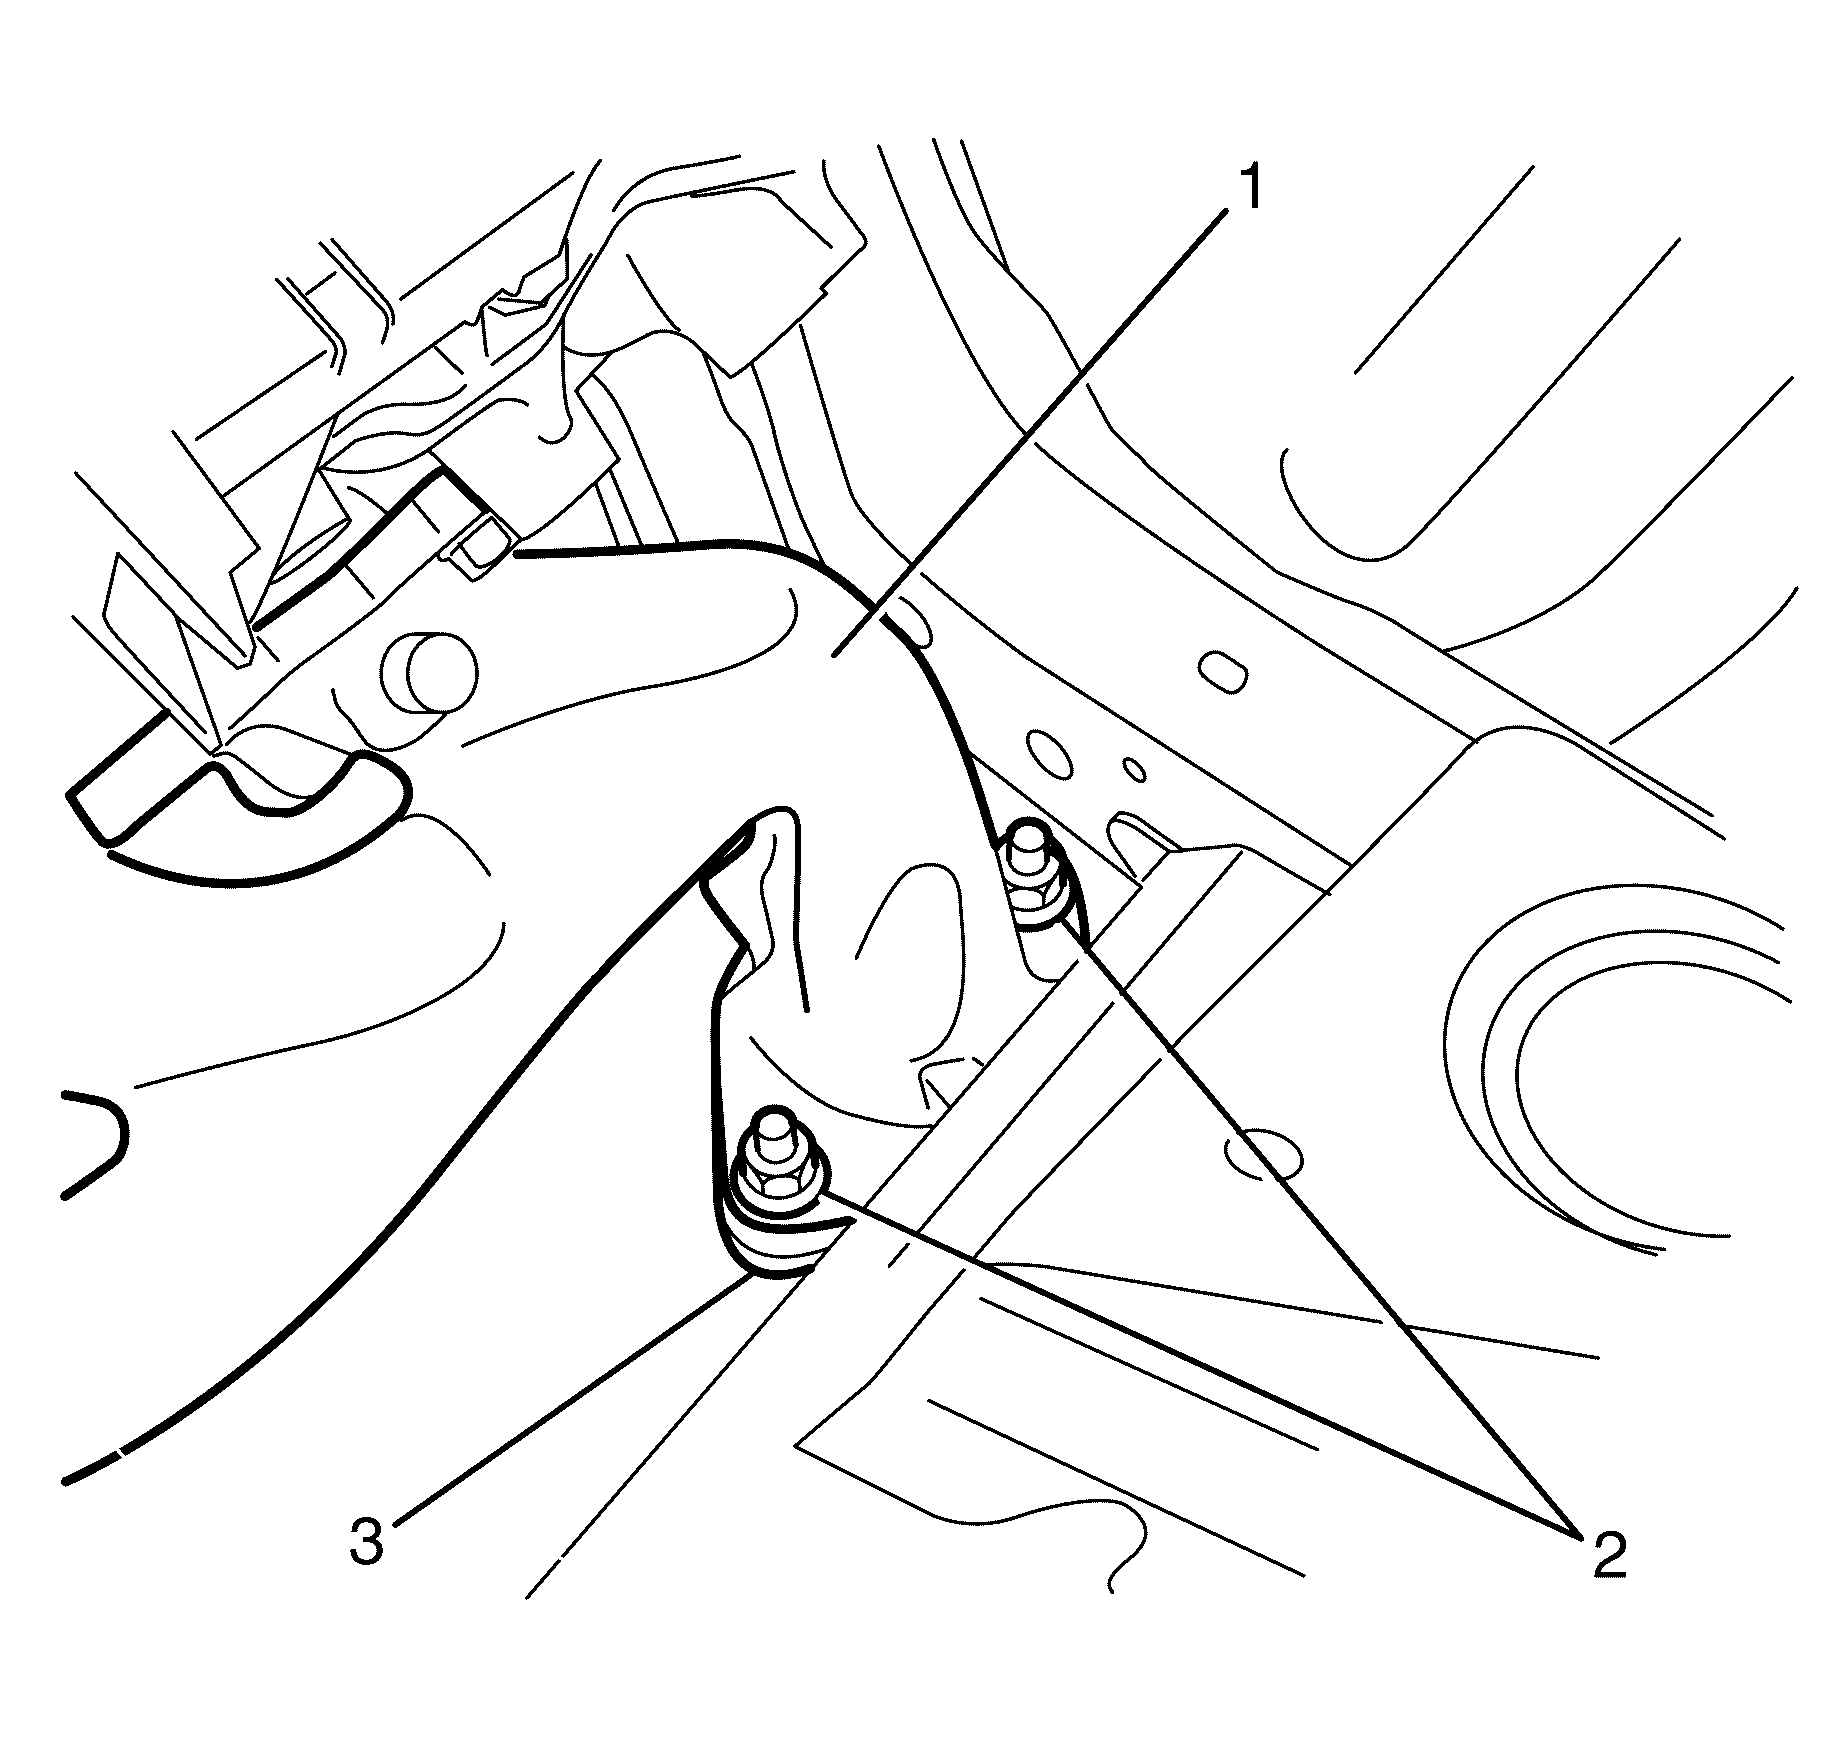
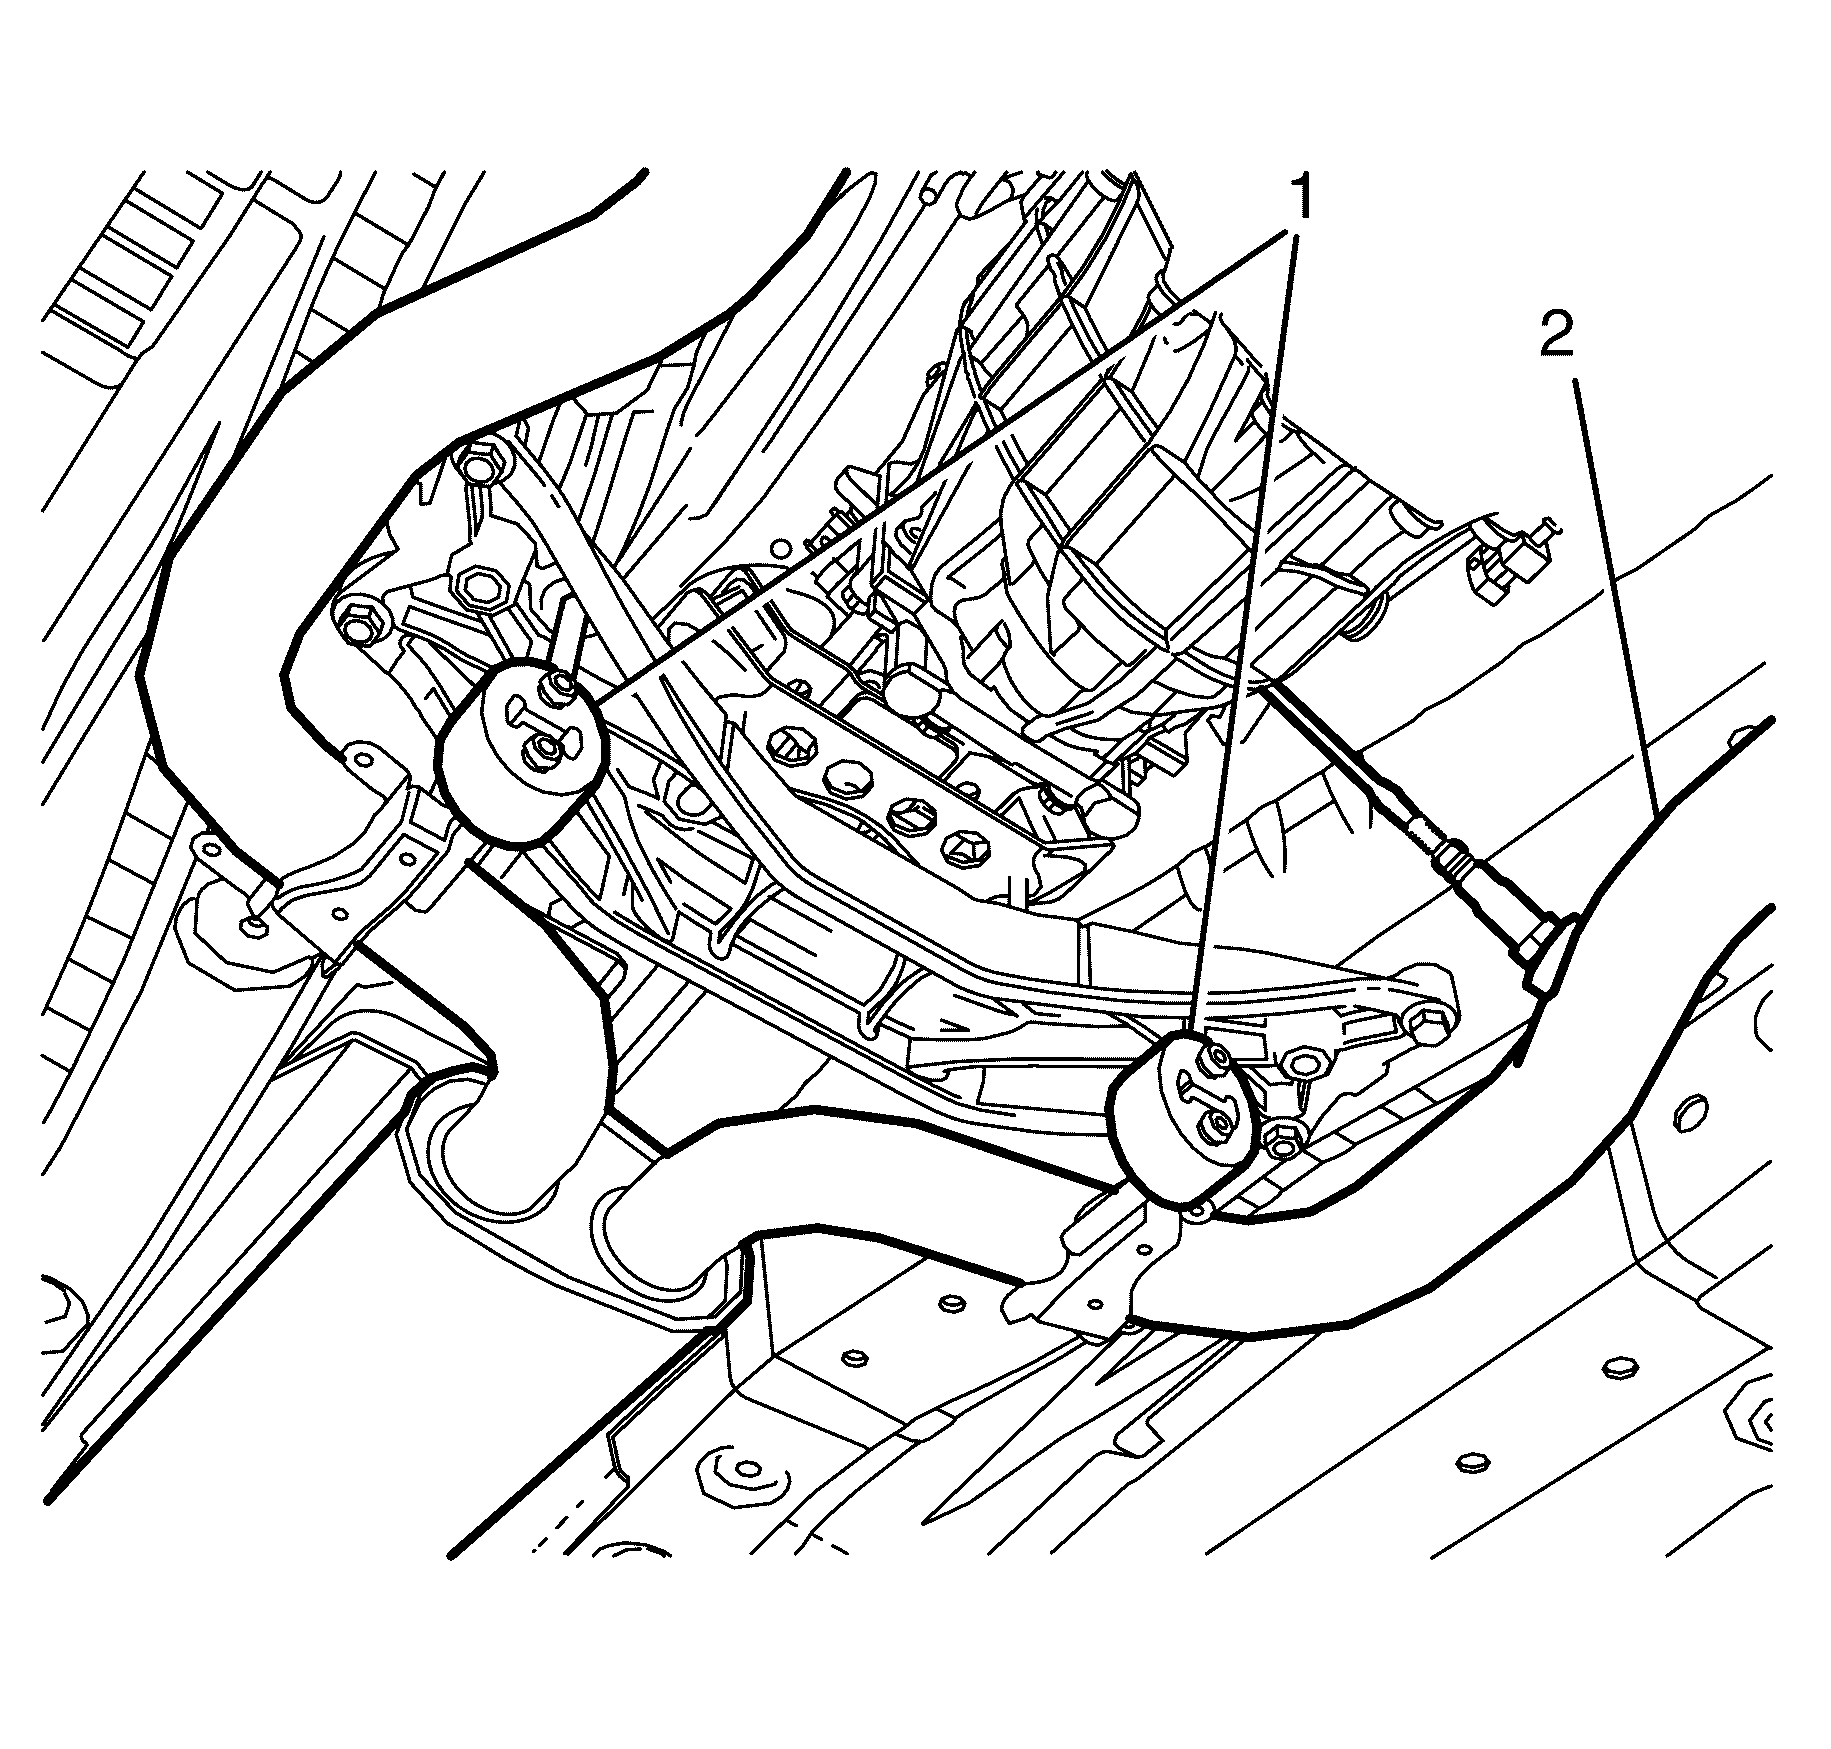
- Detach the exhaust system (2) by removing the front insulator hangers (1) if fitted.
- Detach the exhaust system (2) by removing the centre insulator hanger bracket to differential retaining bolt (1).
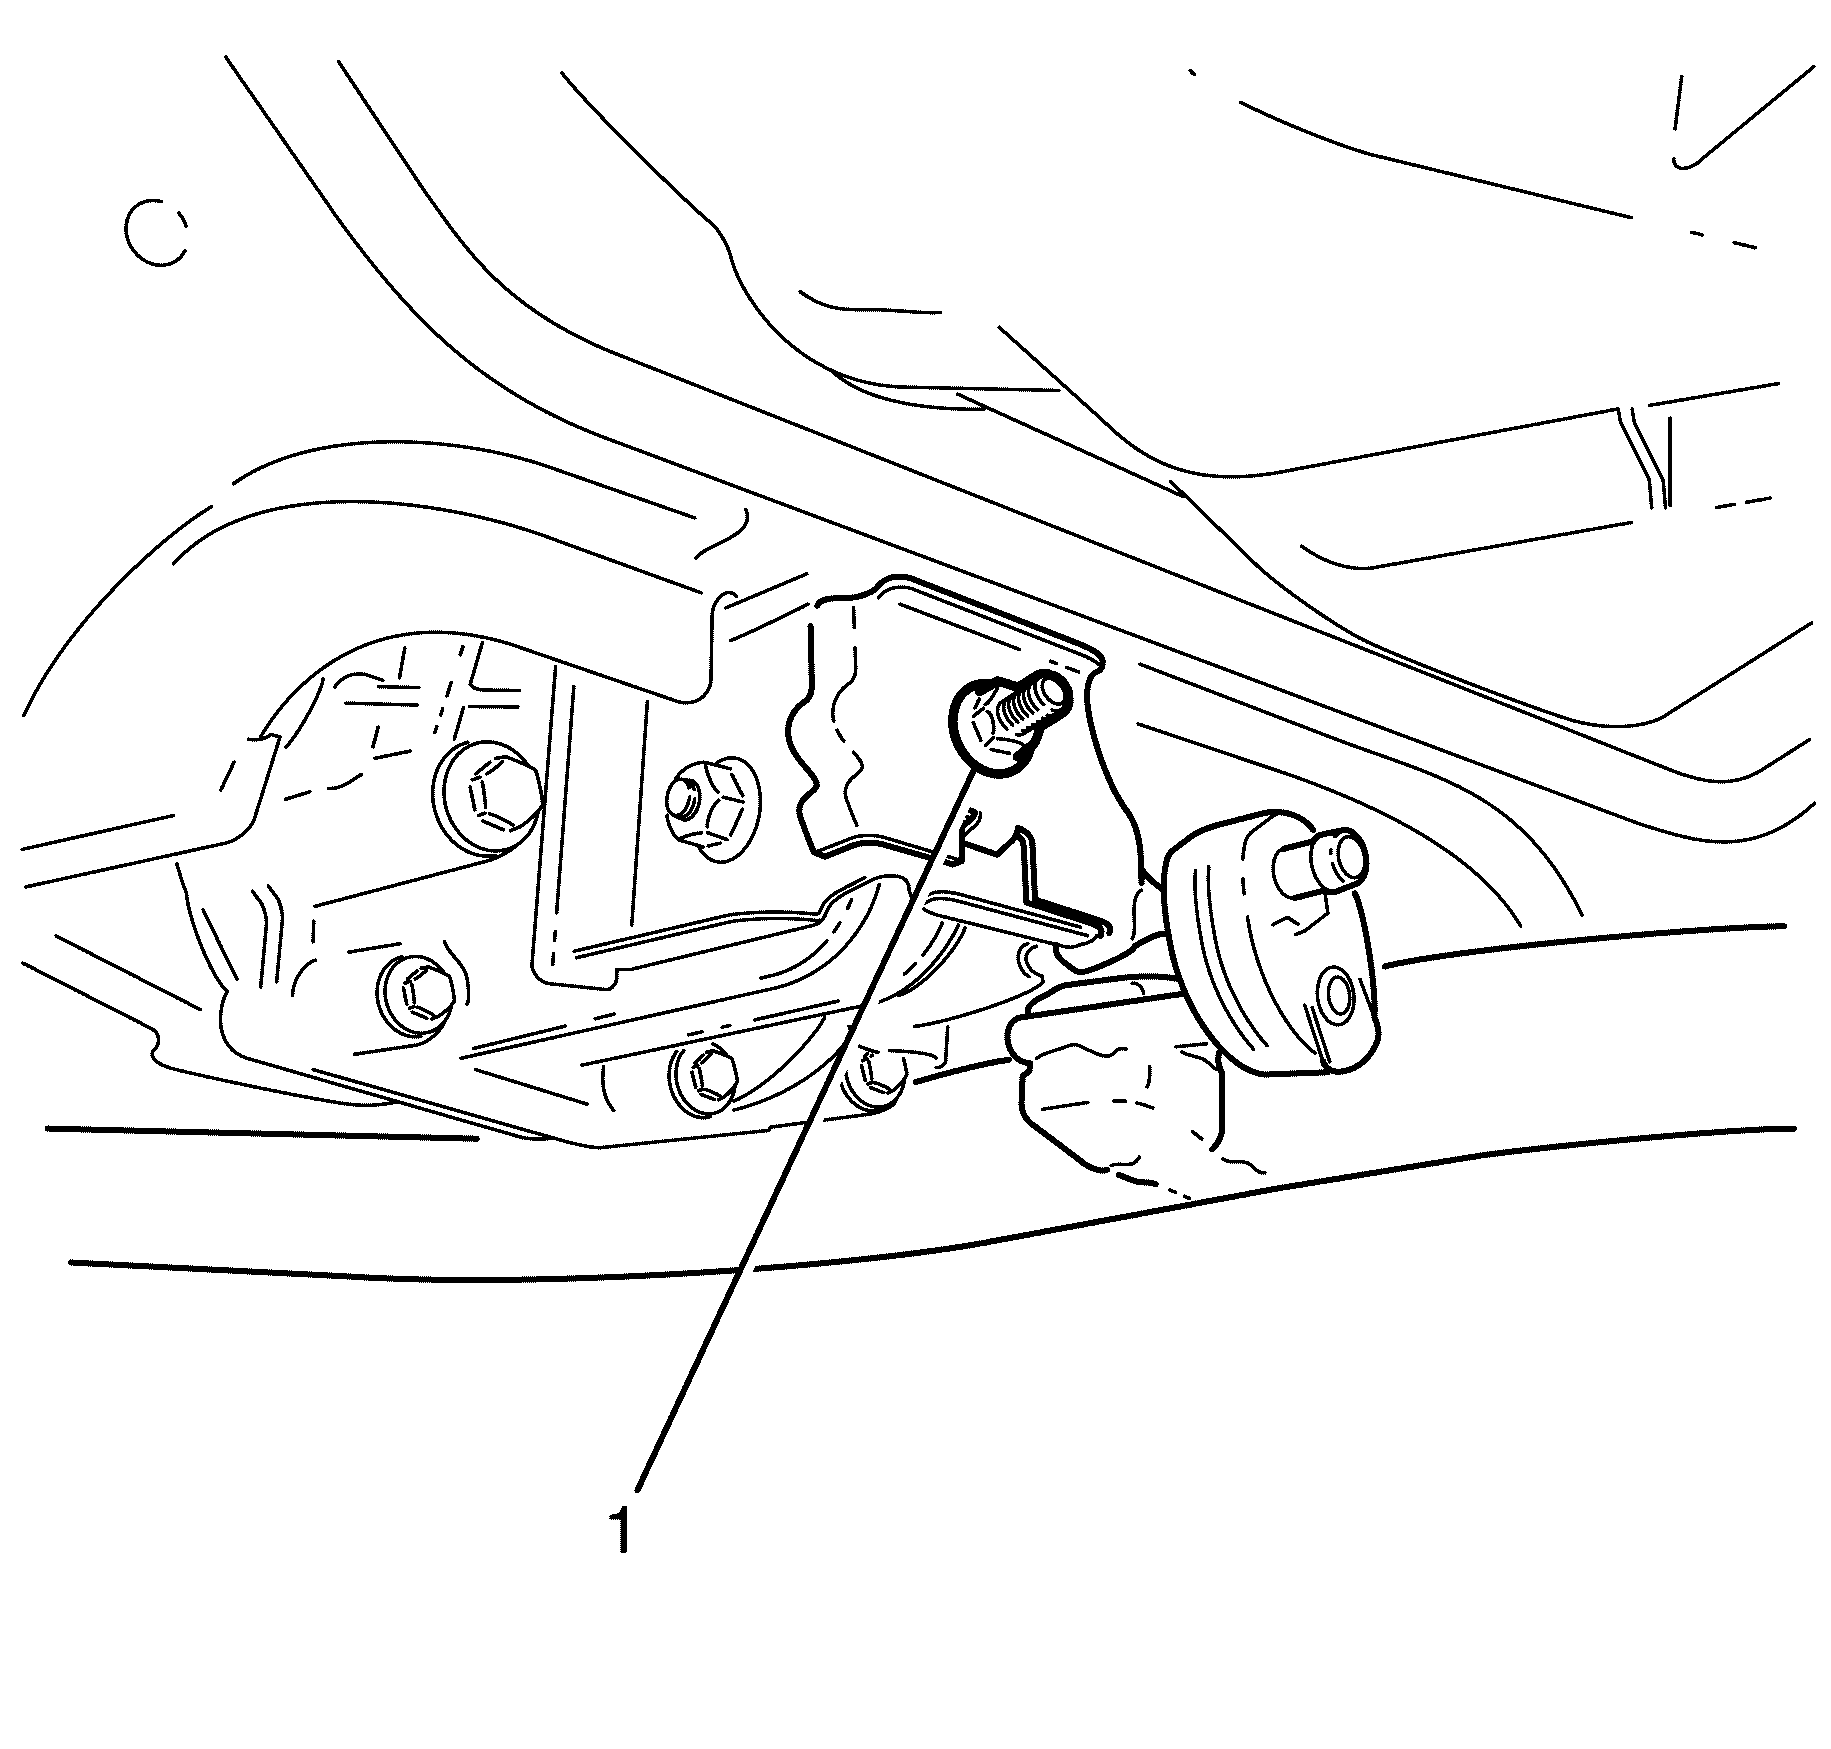
- Remove the rear insulator hanger to body retaining bolts (1).
- With the aid of an assistant or using a suitable jack; carefully lower the exhaust system from the vehicle.
- Remove the left pre-catalytic converter HO2S. Refer to Heated Oxygen Sensor Replacement - Bank 1 Sensor 1.
- Remove the left post-catalytic converter HO2S. Refer to Heated Oxygen Sensor Replacement - Bank 1 Sensor 2.
- Remove the right pre-catalytic converter HO2S. Refer to Heated Oxygen Sensor Replacement - Bank 2 Sensor 1.
- Remove the right post-catalytic converter HO2S. Refer to Heated Oxygen Sensor Replacement - Bank 2 Sensor 2.
Notice: Refer to Heated Oxygen and Oxygen Sensor Notice in the Preface section.
Caution: Refer to Exhaust Service Caution in the Preface section.
Caution: Refer to Protective Goggles and Glove Caution in the Preface section.
Important: The left catalytic converter to exhaust manifold retaining nuts (2) are single use parts. They must be discarded after removal.
Discard the nuts.
Important: The right catalytic converter to exhaust manifold retaining nuts (3) are single use parts. They must be discarded after removal.
Discard the nuts.
Caution: Refer to Vehicle Lifting Caution in the Preface section.

Notice: Refer to Exhaust System Inspection Notice in the Preface section.
Installation Procedure
- Install the left pre-catalytic converter HO2S to the left catalytic converter. Refer to Heated Oxygen Sensor Replacement - Bank 1 Sensor 1.
- Install the left post-catalytic converter HO2S to the intermediate exhaust assembly. Refer to Heated Oxygen Sensor Replacement - Bank 1 Sensor 2.
- Install the right pre-catalytic converter HO2S to the right catalytic converter. Refer to Heated Oxygen Sensor Replacement - Bank 2 Sensor 1.
- Install the right post-catalytic converter HO2S to the intermediate exhaust assembly. Refer to Heated Oxygen Sensor Replacement - Bank 2 Sensor 2.
- With the aid of an assistant or using a suitable jack; carefully raise the exhaust system to the vehicle.
- Push up and forward on the left catalytic converter (3) to connect to the left exhaust manifold (1).
- Install the NEW left catalytic converter to left exhaust manifold retaining nuts (2).
- Push up and forward on the right catalytic converter (3) to connect to the right exhaust manifold (1).
- Install the NEW right catalytic converter to right exhaust manifold retaining nuts (2).
- Attach the exhaust system (2) by installing the front insulator hangers (1) if fitted.
- Attach the exhaust system (2) by installing the centre insulator hanger bracket to differential retaining bolt (1).
- Install the rear insulator hanger to body retaining bolts (1).
- Connect the left post-catalytic converter HO2S electrical connector (1).
- Connect the right post-catalytic converter HO2S electrical connector (1).
- Install the transmission tunnel cross-brace (1).
- Install the transmission tunnel cross-brace to body retaining bolts (2).
- Remove the jack supporting the exhaust system.
- Lower vehicle.
- Tighten the left catalytic converter to left exhaust manifold retaining nuts (1).
- Tighten the right catalytic converter to right exhaust manifold retaining nuts (1).
- Make sure that the exhaust system is clear of all other components and chassis. If the exhaust system is not clear of all the other components loosen all retaining nuts and re-align. Refer to Exhaust System Alignment .
- Raise and support the vehicle. Refer to Lifting and Jacking the Vehicle.
- Connect the left pre-catalytic converter heated oxygen sensor (HO2S) wiring connector (2) to the main wiring harness.
- Install the left pre-catalytic converter heated oxygen sensor (HO2S) wiring loom to the engine wiring loom retaining clip (1).
- Lower the vehicle.
- Connect the right pre-catalytic converter heated oxygen sensor (HO2S) electrical connector (2).
- Install the right pre-catalytic converter heated oxygen sensor (HO2S) wiring loom from the transmission wiring loom retraining clip (1).
- Install the engine dress cover. Refer to Engine Cover Replacement.
- Connect the battery ground cable to the battery. Refer to Battery Negative Cable Disconnection and Connection.
- If re-programming is required. Refer to Control Module References.
- Perform diagnostic system check using diagnostic scan tool, clear all relative DTCs and inspect the system for correct operation.
Notice: Refer to Exhaust Service Caution in the Preface section.
Important: Make sure that a NEW sealing ring is fitted prior to installation. Failure to comply may cause the exhaust system to perform poorly.
Important: Do not fully tighten the left catalytic converter to left exhaust manifold retaining nuts (2) at this stage.
Do not fully tighten at this stage.
Important: Do not fully tighten the right catalytic converter to right exhaust manifold retaining nuts (2) at this stage.
Do not fully tighten at this stage.
Notice: Refer to Fastener Notice in the Preface section.
Tighten
Tighten the bolt to 45 N·m (33 lb ft).
Tighten
Tighten the bolts to 26 N·m (19 lb ft).
Tighten
Tighten the nuts to xx N·m (xx lb ft).
Tighten
Tighten the nuts to 45 N·m (33 lb ft).
Tighten
Tighten the nuts to 45 N·m (33 lb ft).
Notice: Refer to Heated Oxygen and Oxygen Sensor Notice in the Preface section.
Exhaust System Replacement LY7 - Complete
Removal Procedure
- Ignition OFF
- Disconnect the battery negative cable. Refer to Battery Negative Cable Disconnection and Connection .
- Remove the engine cover. Refer to Engine Cover Replacement.
- Remove the left pre-catalytic convertor heated oxygen sensor (HO2S). Refer to Heated Oxygen Sensor Replacement - Bank 2 Sensor 1.
- Remove the left exhaust manifold heat shield. Refer to Exhaust Manifold Heat Shield Replacement - Left Side .
- Remove the oil level indicator tube. Refer to Oil Level Indicator and Tube Removal .
- Remove the right pre-catalytic convertor HO2S. Refer to Heated Oxygen Sensor Replacement - Bank 1 Sensor 1 .
- Remove the right exhaust manifold heat shield. Refer to Exhaust Manifold Heat Shield Replacement - Right Side.
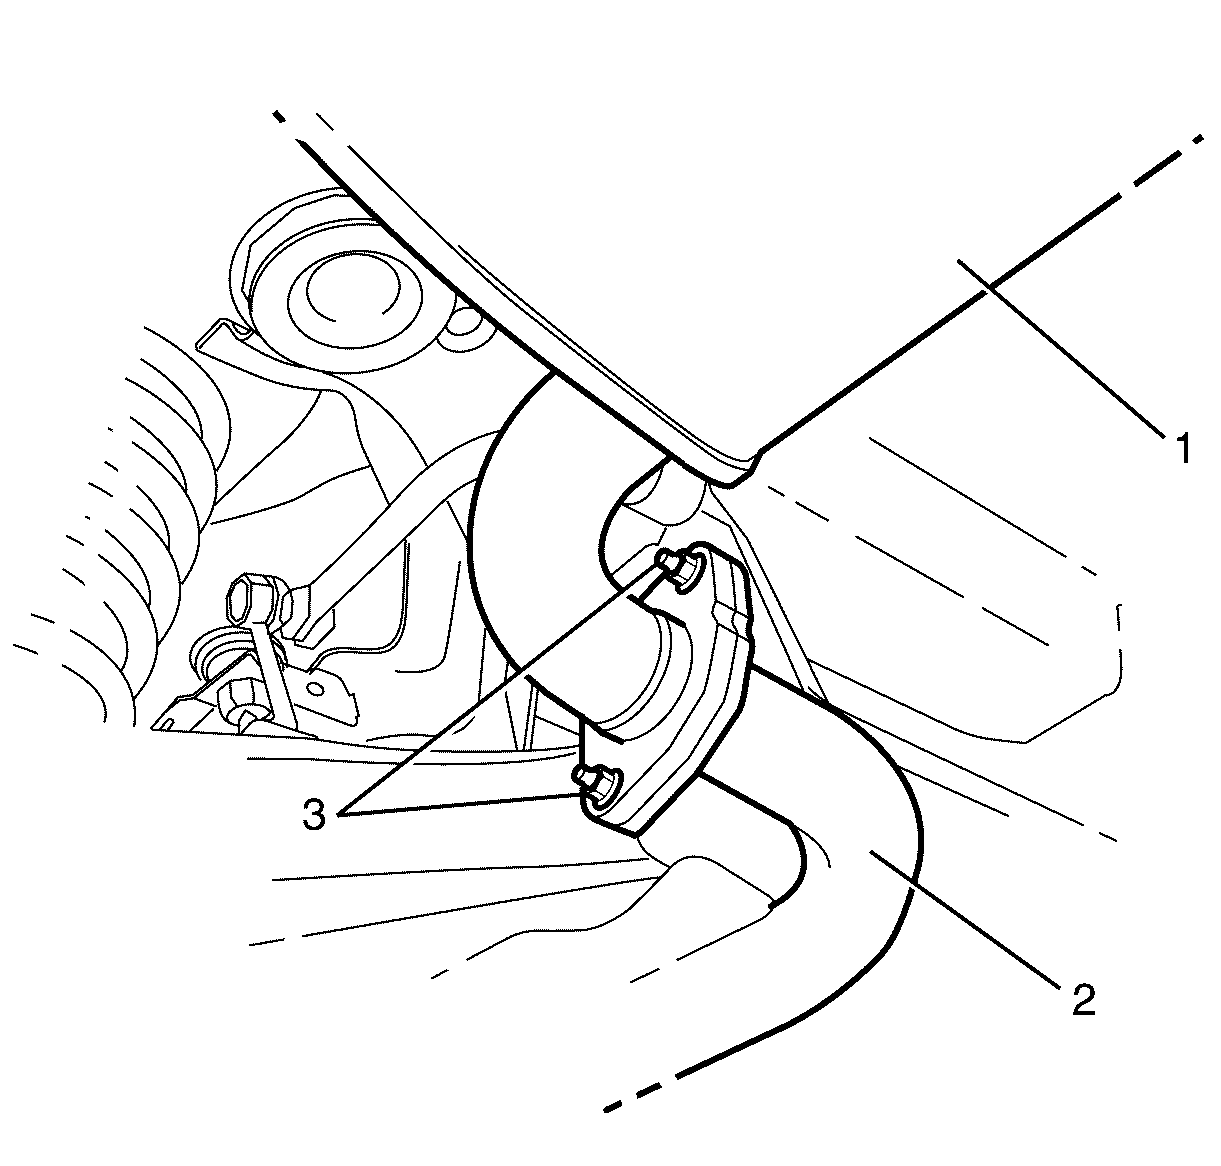
- Remove the left catalytic converter to exhaust manifold retaining nuts (2).
- Remove the right catalytic converter to exhaust manifold retaining nuts (3).
- Raise and support the vehicle. Refer to Lifting and Jacking the Vehicle.
- Remove the right post-catalytic converter HO2S. Refer to Heated Oxygen Sensor Replacement - Bank 1 Sensor 2 .
- Remove the left post-catalytic converter HO2S. Refer to Heated Oxygen Sensor Replacement - Bank 2 Sensor 2 .
- Remove the transmission tunnel cross-brace to body retaining bolts (2).
- Remove the transmission tunnel cross-brace (1).
- Support the exhaust system with a suitable jack.
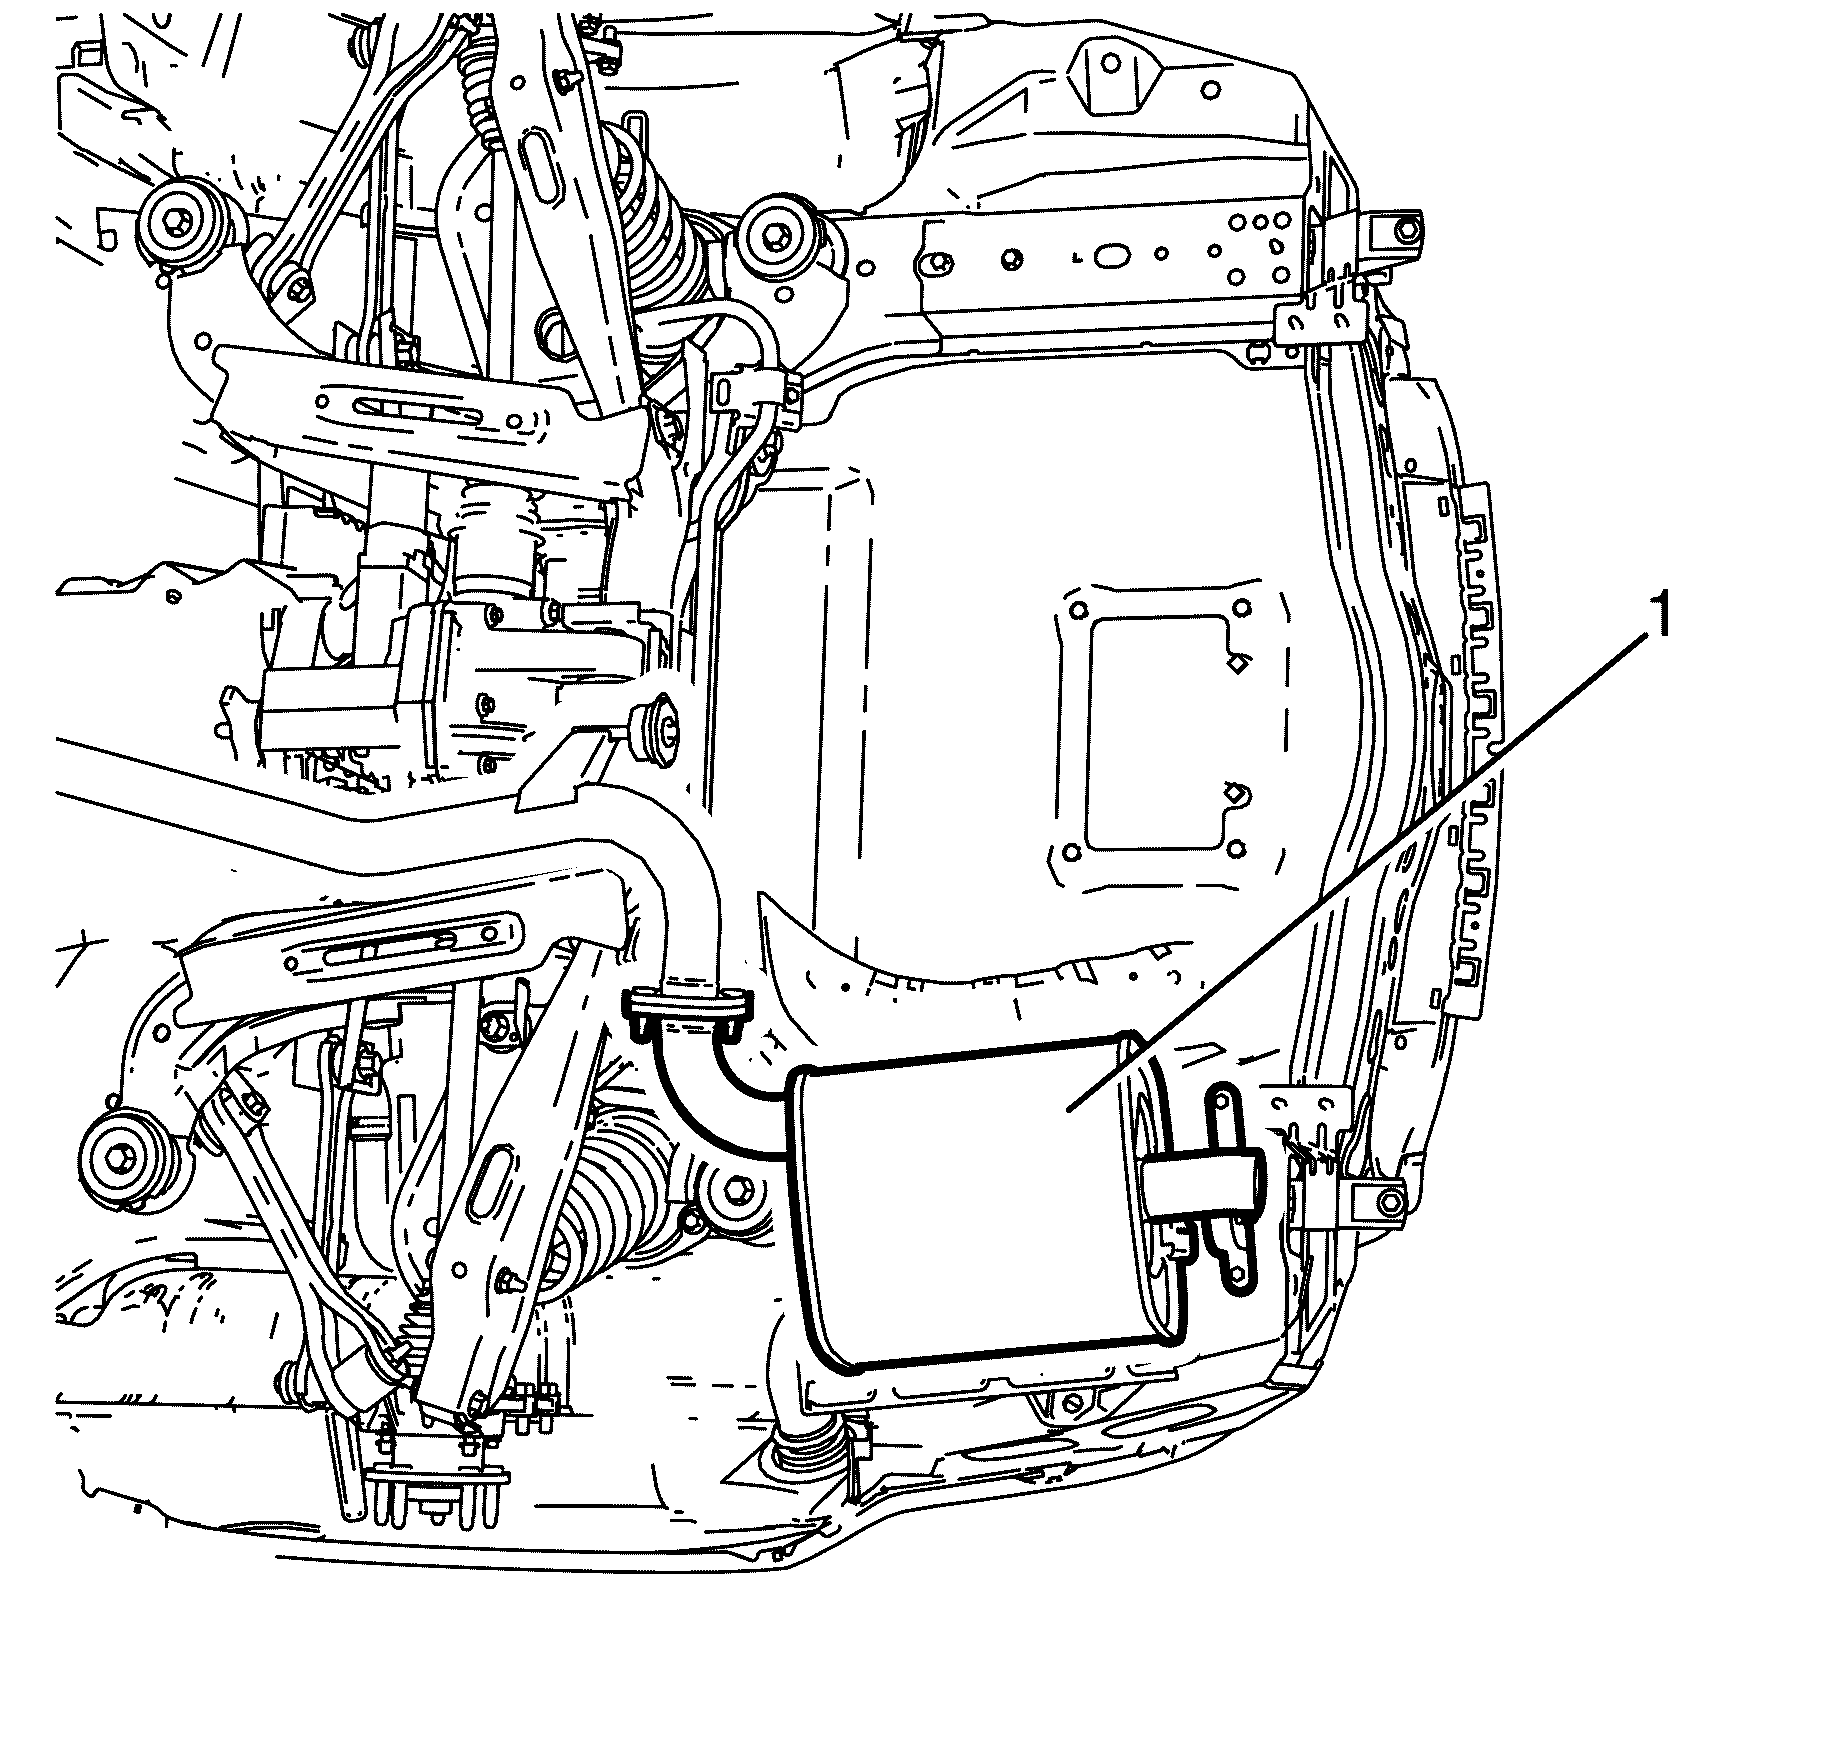
- Remove the rear insulator hanger to body retaining bolts (1).
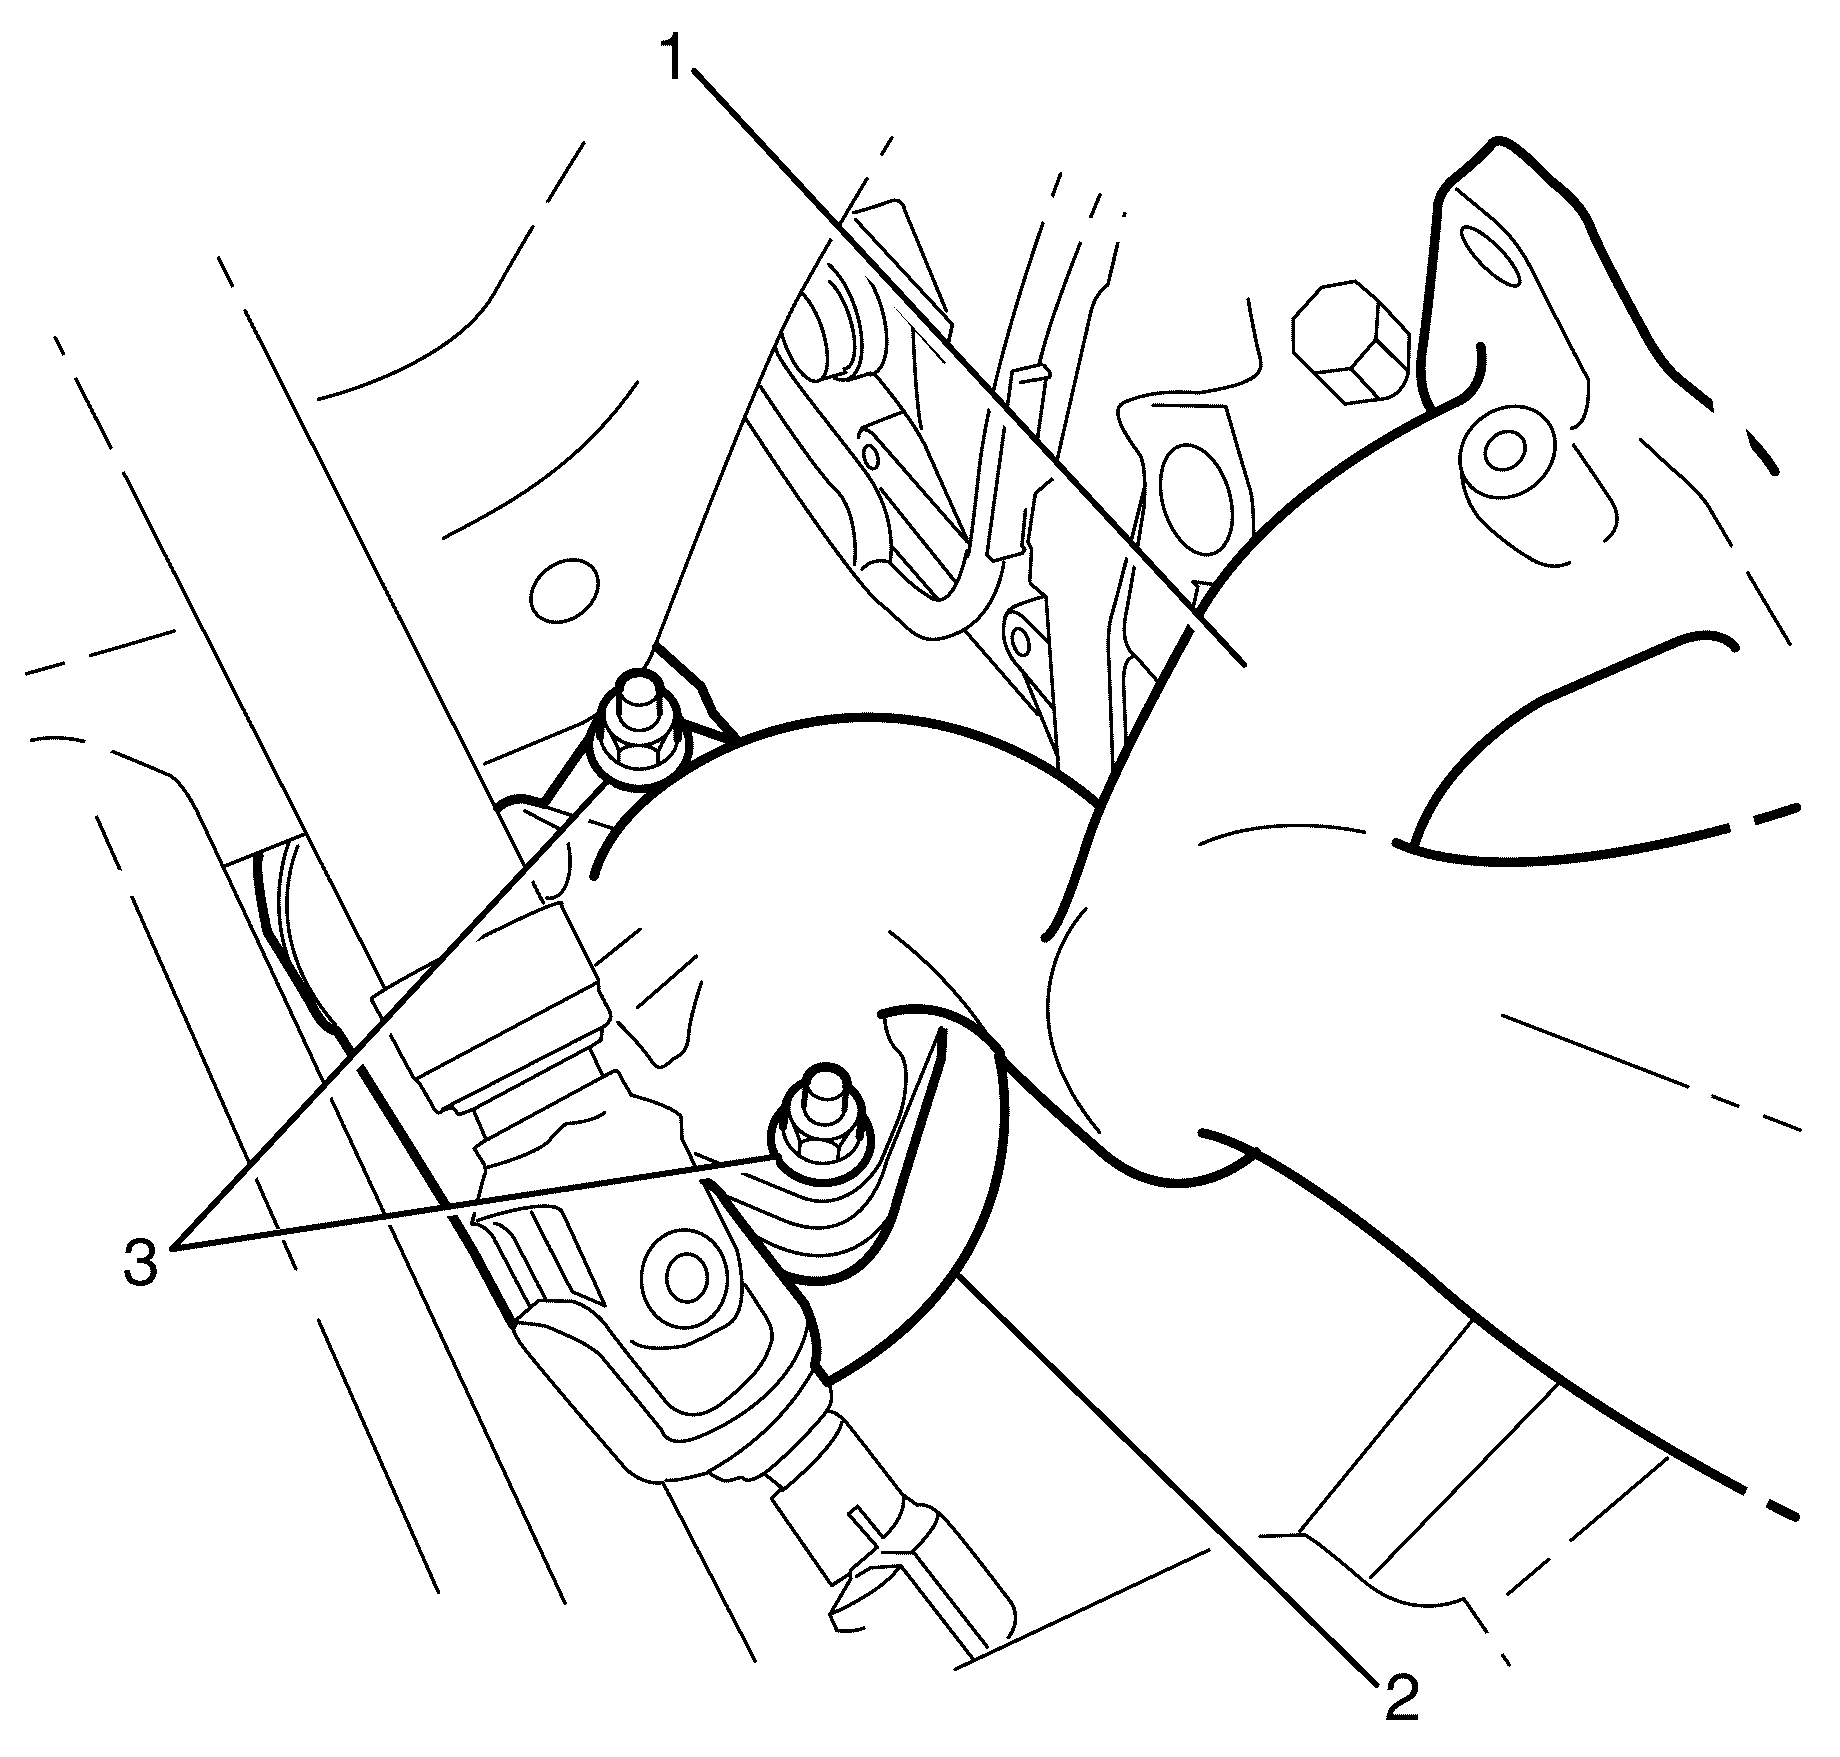
- Remove the centre insulator hanger bracket to differential retaining nut (1).
- With the aid of an assistant or using a suitable jack; detach the exhaust system from the centre insulator hanger bracket retaining stud (1) and carefully lower the exhaust system from the vehicle.
Caution: Refer to Exhaust Service Caution in the Preface section.
Caution: Refer to Protective Goggles and Glove Caution in the Preface section.
Caution: Refer to Battery Disconnect Caution in the Preface section.
Notice: Refer to Heated Oxygen and Oxygen Sensor Notice in the Preface section.
Important: The left catalytic converter to exhaust manifold retaining nuts (2) are single use parts and must be discarded after removal.
Discard the nuts.

Important: The right catalytic converter to exhaust manifold retaining nuts (3) are single use parts and must be discarded after removal.
Discard the nuts.
Caution: Refer to Vehicle Lifting Caution in the Preface section.
Installation Procedure
- From underneath the vehicle, position the right catalytic converter (2) to the exhaust manifold (1).
- Install NEW right catalytic converter to exhaust manifold retaining nuts (1)
- From underneath the vehicle, position the left catalytic converter (3) to the exhaust manifold (1).
- Install NEW left catalytic converter to exhaust manifold retaining nuts (1)
- Lower the vehicle.
- Tighten the right catalytic converter to exhaust manifold retaining nuts (3)
- Tighten the left catalytic converter to exhaust manifold retaining nuts (2)
- Raise and support the vehicle. Refer to Lifting and Jacking the Vehicle.
- With the aid of an assistant, or using a suitable jack, position the exhaust crossover pipe assembly to the vehicle.
- Align the exhaust system to the centre insulator hanger bracket to differential retaining stud (1).
- Connect the catalytic converter assemblies (1) to the exhaust crossover pipe assembly (2).
- Install the exhaust crossover pipe assembly to catalytic converter retaining nuts (3).
- Install the centre insulator hanger bracket to differential retaining nut (1).
- Install the transmission tunnel cross-brace (1).
- Install the transmission tunnel cross-brace to body retaining bolts (2).
- Install the right rear muffler (1) to the vehicle.
- Connect the right rear muffler (1) to the exhaust crossover pipe assembly (2).
- Install the right rear muffler to exhaust crossover pipe assembly retaining bolts (2).
- Install the left rear muffler (1) to the vehicle.
- Connect the left rear muffler (1) to the exhaust crossover pipe assembly (2).
- Install the left rear muffler to exhaust crossover assembly retaining bolts (3).
- Install the rear insulator hanger to body retaining bolts (1).
- Remove the jack supporting the exhaust system.
- Make sure that the exhaust system is clear of all other components and chassis. If the exhaust system is not clear of all the other components loosen all retaining nuts and re-align. Refer to Exhaust System Alignment.
- Install the right post-catalytic converter HO2S. Refer to Heated Oxygen Sensor Replacement - Bank 1 Sensor 2.
- Install the left post-catalytic converter HO2S. Refer to Heated Oxygen Sensor Replacement - Bank 2 Sensor 2 .
- Lower the vehicle.
- Install the right exhaust manifold heat shield. Refer to Exhaust Manifold Heat Shield Replacement - Right Side.
- Install the right pre-catalytic convertor HO2S sensor. Refer to Heated Oxygen Sensor Replacement - Bank 1 Sensor 1.
- Install the oil level indicator tube. Refer to Oil Level Indicator and Tube Removal .
- Install the left exhaust manifold heat shield. Refer to Exhaust Manifold Heat Shield Replacement - Left Side .
- Install the left pre-catalytic convertor HO2S. Refer to Heated Oxygen Sensor Replacement - Bank 2 Sensor 1 .
- Install the engine cover. Refer to Engine Cover Replacement.
- Connect the battery negative cable. Refer to Battery Negative Cable Disconnection and Connection .
Notice: Refer to Exhaust Service Caution in the Preface section.
Important: Make sure that a NEW sealing ring is fitted prior to installation. Failure to comply may cause the exhaust system to perform poorly.
Important: Do not fully tighten the left catalytic converter to exhaust manifold retaining nuts (2) at this stage.
Do not fully tighten at this stage.
Important: Make sure that a NEW sealing ring is fitted prior to installation. Failure to comply may cause the exhaust system to perform poorly.
Important: Do not fully tighten the left catalytic converter to exhaust manifold retaining nuts (2) at this stage.
Do not fully tighten at this stage.
Tighten
Tighten the nuts to 45 N·m (33 lb ft).
Tighten
Tighten the nuts to 45 N·m (33 lb ft).
Caution: Refer to Vehicle Lifting Caution in the Preface section.
Important: Make sure that NEW flange gaskets are fitted prior to installation. Failure to comply may cause the exhaust system to perform poorly.
Tighten
Tighten the nuts to 45 N·m (33 lb ft).
Notice: Refer to Fastener Notice in the Preface section.
Tighten
Tighten the nut to 45 N·m (33 lb ft).
Tighten
Tighten the bolts to 12 N·m (9.0 lb ft).
Tighten
Tighten the bolts to 45 N·m (33 lb ft).
Tighten
Tighten the bolts to 45 N·m (33 lb ft).
Tighten
Tighten the bolts to 26 N·m (19 lb ft).
Exhaust System Replacement LY7 - For Access
Removal Procedure
- Ignition OFF
- Disconnect the battery negative cable. Refer to Battery Negative Cable Disconnection and Connection.
- Raise and support the vehicle. Refer to Lifting and Jacking the Vehicle.
- Remove the right post-catalytic converter heated oxygen sensor (HO2S). Refer to Heated Oxygen Sensor Replacement - Bank 1 Sensor 2.
- Remove the left post-catalytic converter HO2S. Refer to Heated Oxygen Sensor Replacement - Bank 2 Sensor 2.
- Remove the exhaust crossover pipe assembly to catalytic converter retaining nuts (3).
- Separate the exhaust crossover pipe assembly (2) from the catalytic converter assemblies (1).
- Remove the transmission tunnel cross-brace to body retaining bolts (2).
- Remove the transmission tunnel cross-brace (1).
- Support the exhaust system with a suitable jack.
- Remove the rear insulator hanger to body retaining bolts (1).
- Remove the centre insulator hanger bracket to differential retaining nut (1).
- Detach the exhaust crossover pipe assembly.
- With the aid of an assistant or using a suitable jack; carefully lower the exhaust system from the vehicle.
- If required, remove the right catalytic converter. Refer to Catalytic Converter Replacement - Right Side.
- If required, remove the left catalytic converter. Refer to Catalytic Converter Replacement - Left Side.
Caution: Refer to Exhaust Service Caution in the Preface section.
Caution: Refer to Protective Goggles and Glove Caution in the Preface section.
Caution: Refer to Battery Disconnect Caution in the Preface section.
Caution: Refer to Vehicle Lifting Caution in the Preface section.
Notice: Refer to Heated Oxygen and Oxygen Sensor Notice in the Preface section.
Installation Procedure
- If removed, install the right catalytic converter. Refer to Catalytic Converter Replacement - Right Side.
- If removed, install the left catalytic converter. Refer to Catalytic Converter Replacement - Left Side.
- With the aid of an assistant or using a suitable jack; carefully raise the exhaust system up into the vehicle.
- Align the exhaust system to the centre insulator hanger bracket to differential retaining stud (1).
- Install the centre insulator hanger bracket to differential retaining nut (1).
- Install the rear insulator hanger to body retaining bolts (1).
- Install the transmission tunnel cross-brace (1).
- Install the transmission tunnel cross-brace to body retaining bolts (2).
- Connect the catalytic converter assemblies (1) to the exhaust crossover pipe assembly (2).
- Install the exhaust crossover pipe assembly to catalytic converter retaining nuts (3).
- Remove the jack supporting the exhaust system.
- Make sure that the exhaust system is clear of all other components and chassis. If the exhaust system is not clear of all the other components loosen all retaining nuts and re-align. Refer to Exhaust System Alignment.
- Install the right post-catalytic converter HO2S. Refer to Heated Oxygen Sensor Replacement - Bank 1 Sensor 2.
- Install the left post-catalytic converter HO2S. Refer to Heated Oxygen Sensor Replacement - Bank 2 Sensor 2.
- Lower the vehicle.
- Connect the battery negative cable. Refer to Battery Negative Cable Disconnection and Connection.
Notice: Refer to Fastener Notice in the Preface section.
Tighten
Tighten the nut to 45 N·m (33 lb ft).
Tighten
Tighten the bolts to 26 N·m (19 lb ft).
Tighten
Tighten the bolts to 12 N·m (9.0 lb ft).
Tighten
Tighten the nuts to 45 N·m (33 lb ft).
