Disassembly Procedure
- Remove the rear caliper. Refer to Rear Brake Caliper Replacement .
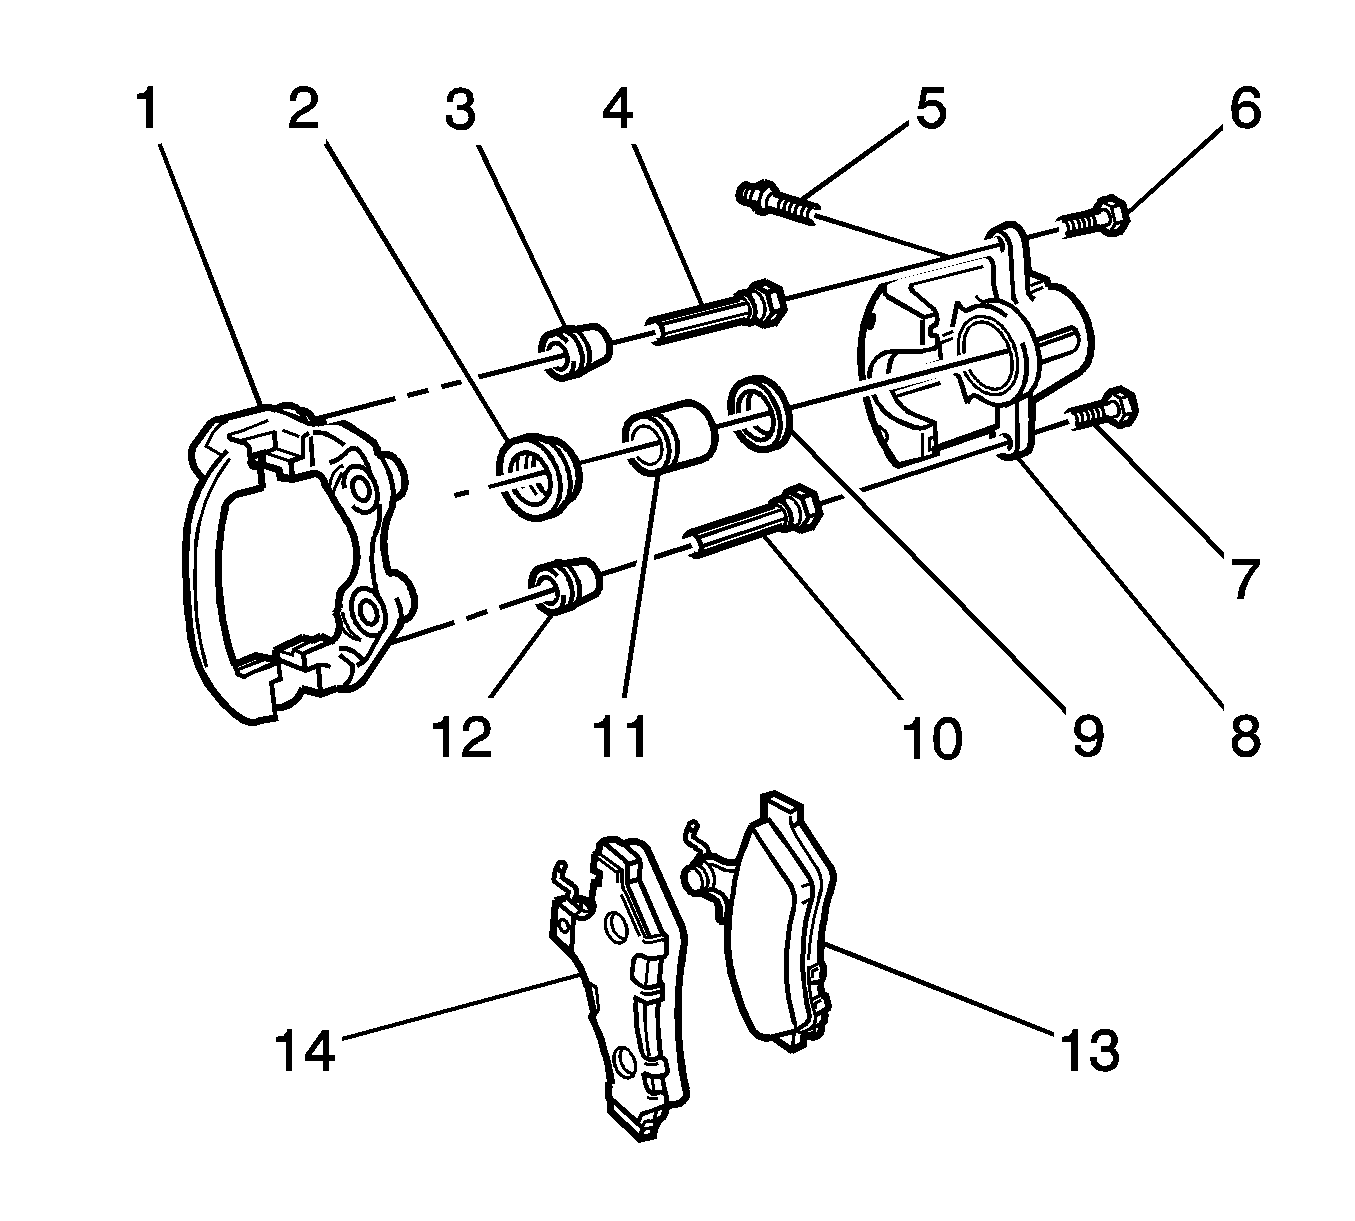
- Use a wrench in order to prevent the guide pins (4,10) from rotating.
- Remove and discard the 2 guide pin bolts (6,7).
- Separate the caliper housing (8) from the bracket (1).
- Remove the 2 brake pads (13,14).
- Remove the 2 guide pins and the 2 guide pin boots (3,12) from the bracket.
- Separate the 2 guide pins from the 2 guide pin boots.
- Discard the 2 guide pin boots.
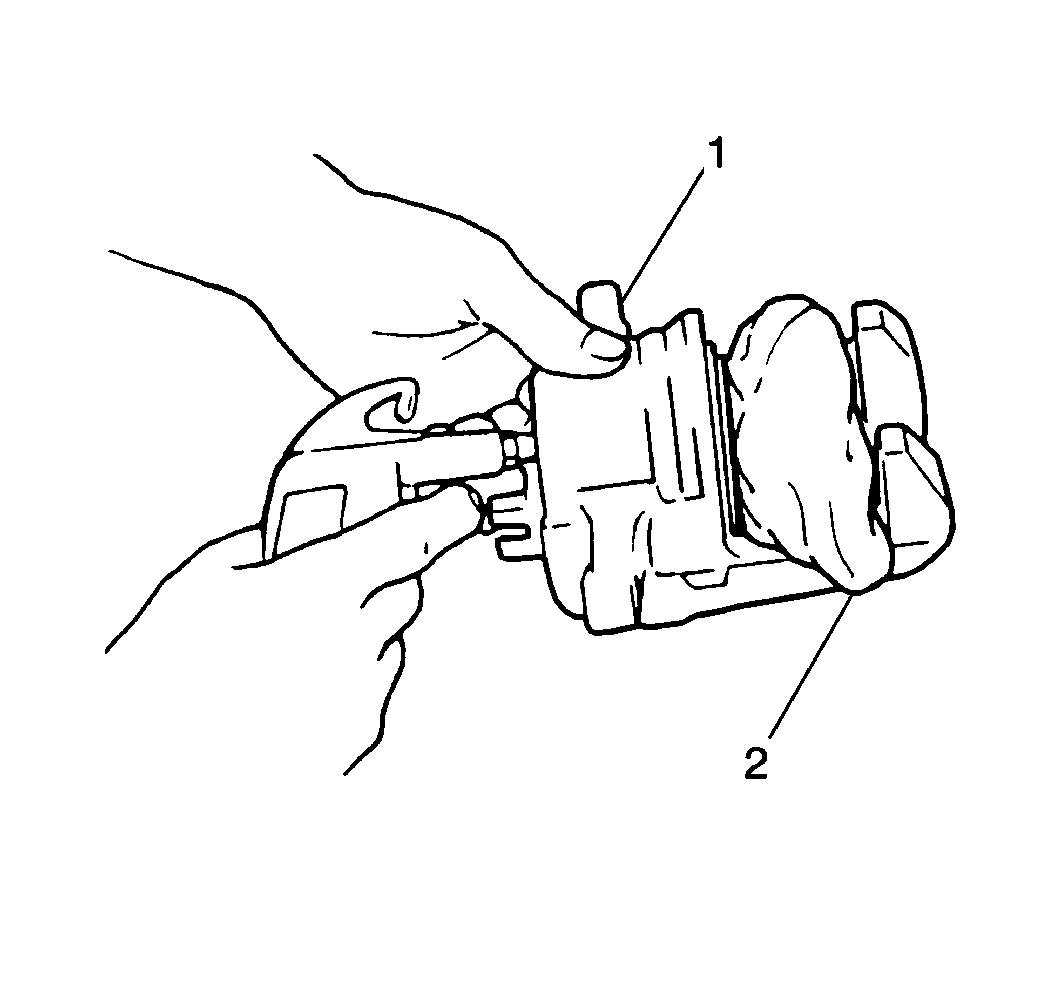
- Insert a clean shop cloth (2) into the caliper (1) in order to catch the piston.
- Apply compressed air to the caliper brake hose connector hole in order to remove the piston.
- Remove the boot from the piston.
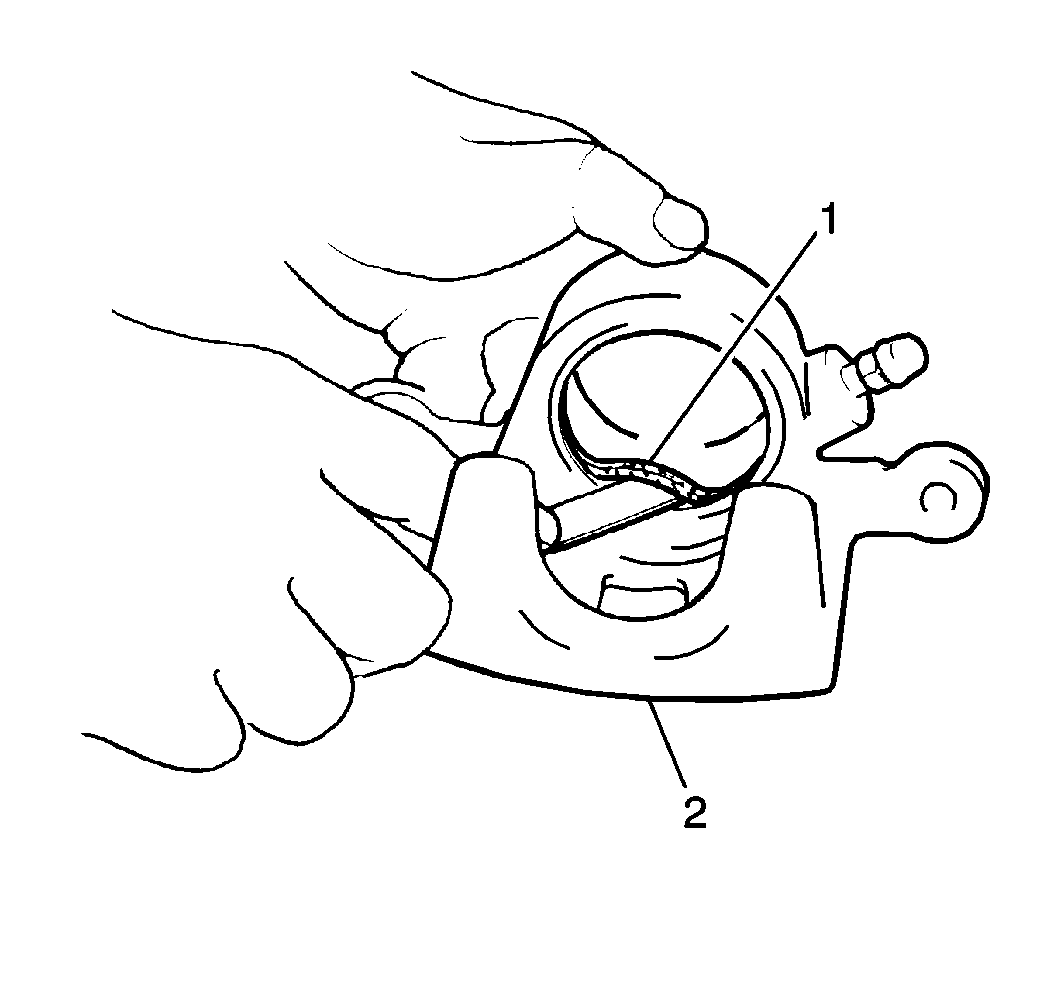
- Use a flat plastic tool in order to remove the seal (1) from the caliper (2). Discard the seal.
- Remove the bleeder valve cap.
- Remove the bleeder valve.


Caution: Wear safety glasses when using compressed air in order to prevent eye injury.
Caution: Do not place fingers in front of the caliper piston(s) in an attempt to catch or protect it when applying compressed air. The piston(s) can fly out with force and could result in serious bodily injury.
Notice: Use just enough air pressure to ease the piston out of the bore. You can damage a blown-out piston even with the padding.

Inspection Procedure
- Use denatured alcohol or an equivalent brake cleaner in order to clean all the metal parts (1,4,5,8,10,11).
- Use GM Vehicle Care® Brake and Clutch Fluid Super DOT-4, GM P/N 88958860, or an equivalent DOT-4 brake fluid, in order to clean the piston boot (2).
- Use dry, unlubricated, compressed air in order to dry the components and clean the bores in the caliper housing.
- Inspect the guide pin bores for corrosion or wear. Replace the caliper assembly if damage is evident.
- Inspect the caliper piston bore for cracks, scoring, pitting, or corrosion. Replace the caliper assembly if damage is evident.
- Inspect the bracket (1) for damage. Replace the caliper assembly if damage is evident.
- Inspect the 2 guide pins (4,10) for corrosion or wear. Replace the guide pins if damage is evident.
- Inspect the caliper piston (11) for abrasion, scoring, or corrosion. Replace the caliper piston if damage is evident.
- Inspect the piston boot for cracks, holes, or wear. Utilize the rear caliper repair kit if damage is evident.

Assembly Procedure
- Use GM Vehicle Care® Brake and Clutch Fluid Super DOT-4, GM P/N 88958860, or an equivalent DOT-4 brake fluid, in order to lubricate the following components:
- Install the NEW seal to the inner groove of the cylinder bore.
- Ensure the seal is not twisted.
- Ensure the seal is fully seated in the groove.
- Install the piston boot over the end of the piston.
- Install the piston into the cylinder bore.
- Install the piston boot to the cylinder bore groove.
- Ensure the piston boot flange is squarely and firmly seated in the cylinder bore groove.
- Push the piston squarely into the cylinder bore until fully seated.
- Ensure the piston boot is fully seated in the piston groove and in the cylinder bore groove.
- Lubricate the 2 guide pins (4,10) with Silicone Brake Lubricant, GM P/N 89021536, ACDelco P/N 89021537 (Canadian P/N 89021538), or equivalent.
- Install the guide pins to the bracket (1) WITHOUT the guide pin boots.
- Install the caliper housing (8) to the bracket.
- Use a wrench in order to prevent the guide pins from rotating.
- Install 2 NEW guide pin bolts (6,7).
- Verify the guide pins and the caliper housing slide easily in the bracket.
- Remove the bracket from the guide pins.
- Install 2 NEW guide pin boots to the guide pins.
- Install the bracket to the guide pins.
- Complete the following procedure in order to install EACH guide pin boot:
- Identify the outer brake pad (14).
- Install the outer brake pad to the caliper.
- Identify the inner brake pad (13)
- Install the inner brake pad to the caliper with the cut-out on the lower half of the pad.
- Verify the spring clip is located correctly in the top of the caliper body.
- Install the bleeder valve (5) and the valve cap to the caliper housing.
- Install the caliper to the vehicle and bleed the brake system. Refer to Rear Brake Caliper Replacement .

| • | The caliper piston (11) |
| • | The piston cylinder bore |
| • | The piston boot (2) |
| • | The NEW seal (9) |
| • | The 2 NEW guide pin boots (3,12) |
Notice: Refer to Fastener Notice in the Preface section.
Tighten
Tighten the bolts to 32 N·m (24 lb ft)
Important: If any binding is evident, add more lubricant to the guide pins and replace the guide pin bolts.
| 20.1. | Squeeze the guide pin boot in order to remove excess air. |
| 20.2. | Install the guide pin boot to the guide pin groove. |
| 20.3. | Install the guide pin boot to the bracket groove. |
The outer brake pad has a full shim on the backing plate.
The inner brake pad has a shim with an asymmetrical cut-out.
