CAMPAIGN: DAYTIME RUNNING LIGHTS MODULE MAY OVERHEAT

Models: 1990 Buick Skylark, Oldsmobile Cutlass Calais, Pontiac Grand Am LE & SE, Pontiac Sunbird SE & GT
General Motors of Canada has determined that a defect which relates to motor vehicle safety may exist in some 1990 Buick Skylark, Oldsmobile Cutlass Calais, Pontiac Grand Am LE, Pontiac Grand Am SE, Pontiac Sunbird SE and Pontiac Sunbird GT model vehicles equipped with "Daytime Running Lights" (DRL). Under certain conditions the DRL module which is located near the battery, could overheat, and possibly result in an engine compartment fire. Dealers are to replace the DRL module, install a wiring harness with fuses, and install a module cover.
VEHICLES INVOLVED:
All 1990 model vehicles listed below, equipped with "Daytime Running Lights" (DRL), within the following VIN breakpoints: Through & Model Series Plant Beginning, Including --------------------- ------ ----------- --------- --------- Models With Pulse Width Modulation (PWM) System:
Buick Skylark N Lansing North LM000005 LM033601 Olds Cutlass Calais N Lansing North LM700287 LM731352 Pontiac Grand Am LE N Lansing South LC200062 LC284197
Models With Relay System: Pontiac Grand Am SE N Lansing South LC201201 LC311994
Pontiac Sunbird SE & GT J Lordstown L7500226 L7565927
For product revision of 1990 Chevrolet Cavalier and Pontiac Sunbird LE models, see Product Revision Bulletin 0R06.
Vehicles intended for sale outside of Canada normally would not be equipped with Daytime Running Lights, and hence not subject to this campaign. Vehicles with Canadian Option Z49 are involved.
All affected vehicles have been identified by the VIN listing provided to involved dealers with this bulletin. Any dealer not receiving a listing was not shipped any of the affected vehicles.
DEALER CAMPAIGN RESPONSIBILITY
Dealers are to perform this campaign on all involved vehicles at no charge to owners, regardless of kilometres traveled, age of vehicle, or ownership, from this time forward.
Whenever a vehicle subject to this campaign is taken into your new or used vehicle inventory, or it is in your dealership for service, you are to ensure the campaign correction has been made before selling or releasing the vehicle.
Owners of vehicles recently sold from your new vehicle inventory are to be contacted by the dealer, and arrangements made to make the required modification according to instructions contained in this bulletin.
CAMPAIGN PROCEDURE
Refer to Section 4 of the Service Policies and Procedures Manual for the detailed procedure on handling Product Campaigns. Dealers are requested to complete the campaign on all transfers as soon as possible.
OWNER NOTIFICATION:
All owners of record at the time of campaign release are shown on the attached computer listing and have been notified by first class mail from General Motors. The listings provided are for campaign activity only and should not be used for any other purpose.
PARTS INFORMATION:
Parts required to complete this campaign should be ordered through regular channels, as follows:
Quantity Part Per Description Model Vehicles Series Number Vehicle --------------- ---------------- ------ -------- ------- Kit, DRL Module Buick Skylark N 22555657 1 (PWM Type) Olds. Cutlass Calais N Pontiac Grand Am LE N
Kit, DRL Module Pontiac Grand Am SE N 12350915 1 (Relay Type) Pontiac Sunbird SE & GT J
Kit P/N 22555657 (PWM system) contains the following parts: 1 of 22555621 Module-Fwd. Lamp Control (DRL Module) 1 of 22555598 Cover -DRL Module
Kit P/N 12350915 (Relay system) contains the following parts: 1 of 22545059 Module-Fwd. Lamp Control (DRL Module) 1 of 22555632 Cover -DRL Module
Both kits contain the following parts:
1 of 12102546 Wiring Harness Assembly - DRL Module 2 of (loose in kit) Connectors "A" & "C" (identical) 2 of (loose in kit) Retainers 1 of 11501907 Strap - DRL Wiring Harness Assembly 2 of 11505209 Screw & Washer Assembly
If spare one-amp fuses are needed, order P/N 12103080.
PARTS AND LABOUR CLAIM INFORMATION:
Credit for the campaign work performed will be paid upon receipt of a properly completed campaign claim card or DCS transmission in accordance with the following:
Repair Code Description Time Allowance ------------ ------------------------- -------------- 1A Inspect for DRL Cover and Fuses; .3 No Parts Replacement Required 2A Inspect for DRL Cover and Fuses; .4 Replace DRL Module, Install DRL Cover, But Do Not Install Fuse Harnesses
3A Inspect for DRL Cover and Fuses; .5 Replace DRL Module & DRL Cover, And Install Fuse Harnesses
Time allowance includes 0.1 hour for dealer administrative detail associated with this campaign. Parts credit will be based on dealer net plus 30% to cover parts handling.
SERVICE PROCEDURE:
PROCEDURES FOR PULSE WIDTH MODULATION DRL SYSTEM (PWM):
Buick Skylark Olds Cutlass Calais Pontiac Grand Am LE
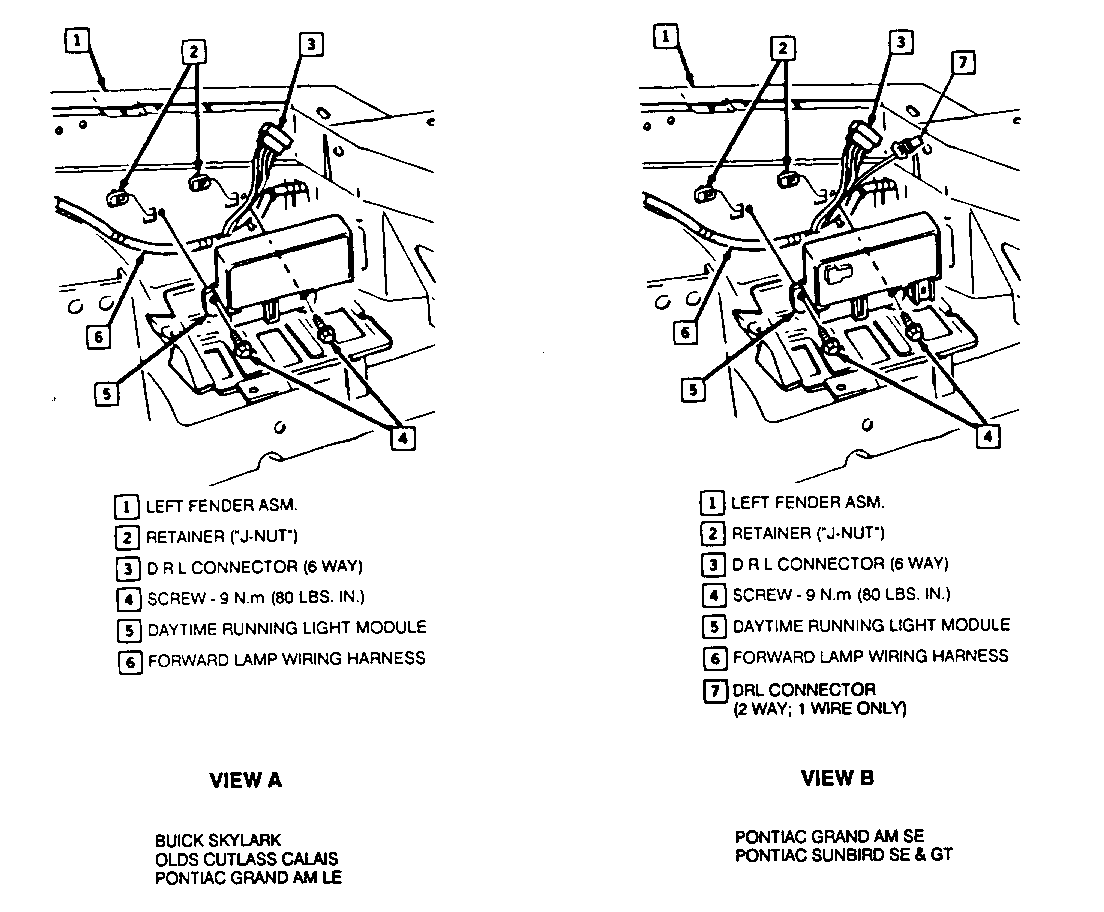
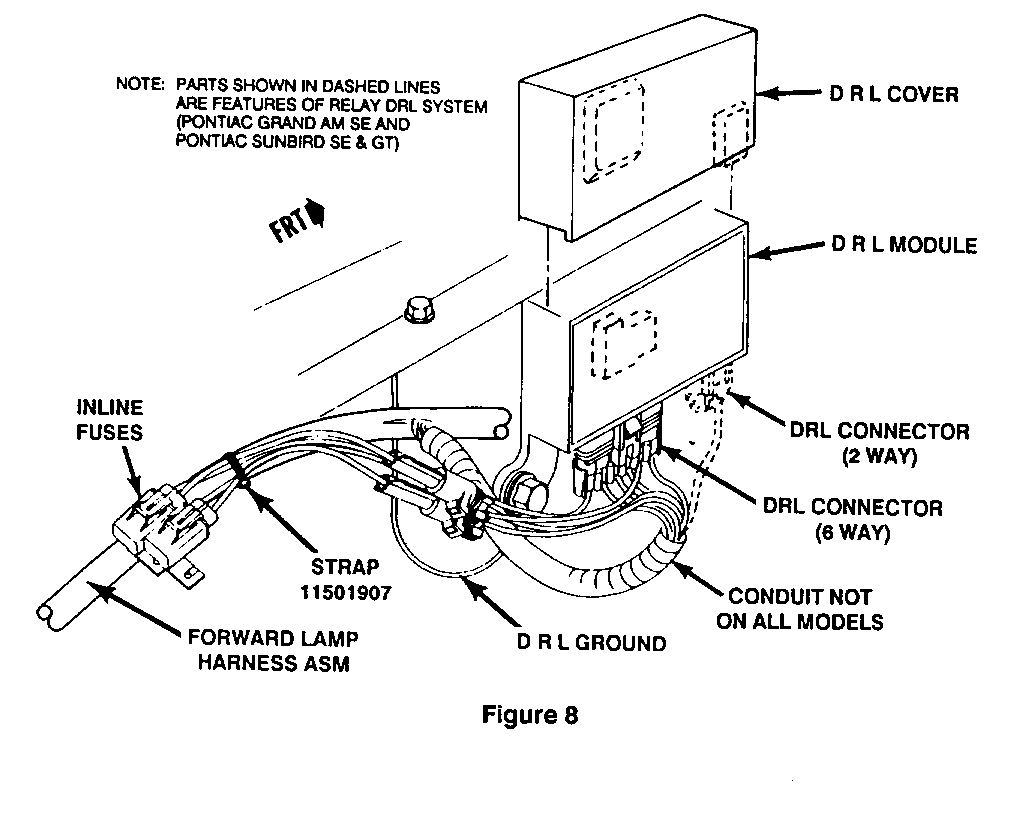
1. Raise the hood. Look outboard of the battery (Figure 1, View "A") under the hood/fender line for a black sheet metal DRL Cover as shown in Figure 8.
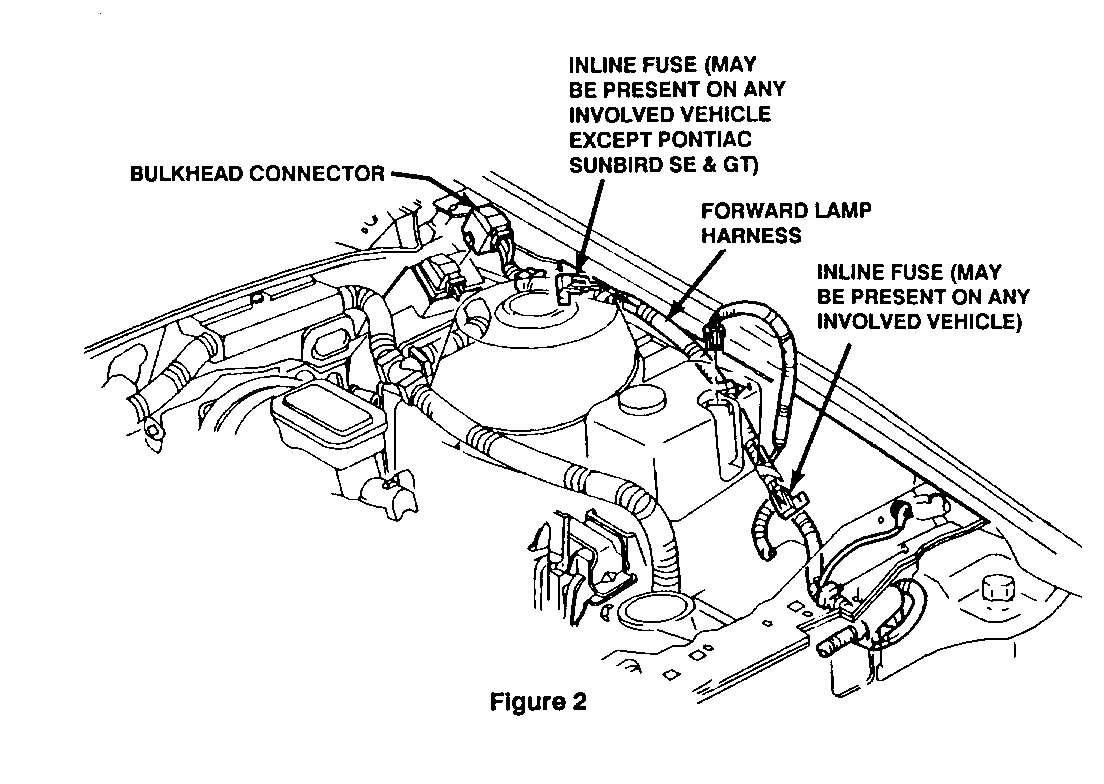
Also examine the Forward Lamp Harness for two in-line fuses (see Figure 2). If present, one in-line fuse would be taped to the harness near the bulkhead connector, and a second fuse would be taped to the harness near the DRL Module.
If both the DRL Cover and the in-line fuses are present, skip directly to Step 18 and install a Campaign Identification Label.
If the DRL Cover (black) is NOT present, and/or if the in-line fuses are NOT present, proceed to Step 2.
2. Note the stations to which the radio is preset. Place a fender cover on the left fender. Disconnect the negative battery cable, then disconnect the positive battery cable, and remove the battery.
3. Remove the existing Daytime Running Light Module (see Figure 1, View "A") by loosening the two (2) attaching screws and then removing the electrical connector.
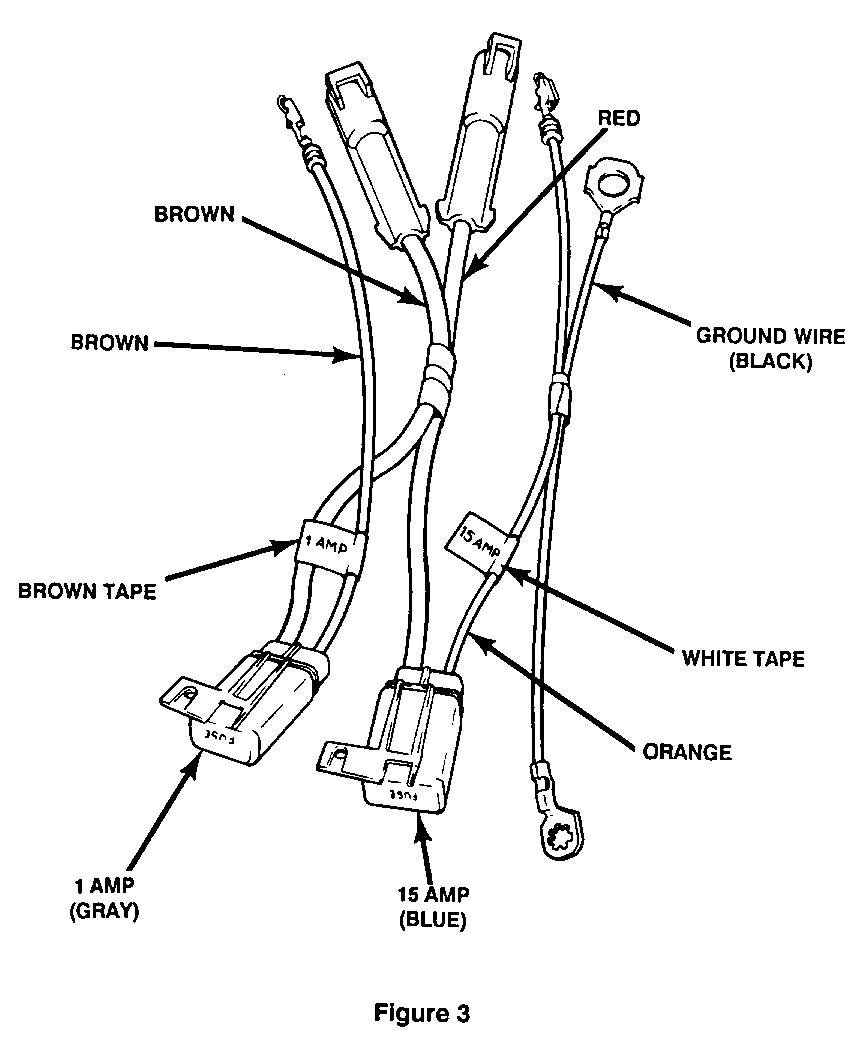
4. Obtain Kit, DRL Module (P/N 22555657) and compare the parts with Figure 3. If the in-line fuses were found (in Step 1) to be present, do NOT install P/N 12102546 harness, but skip directly to Step 13.
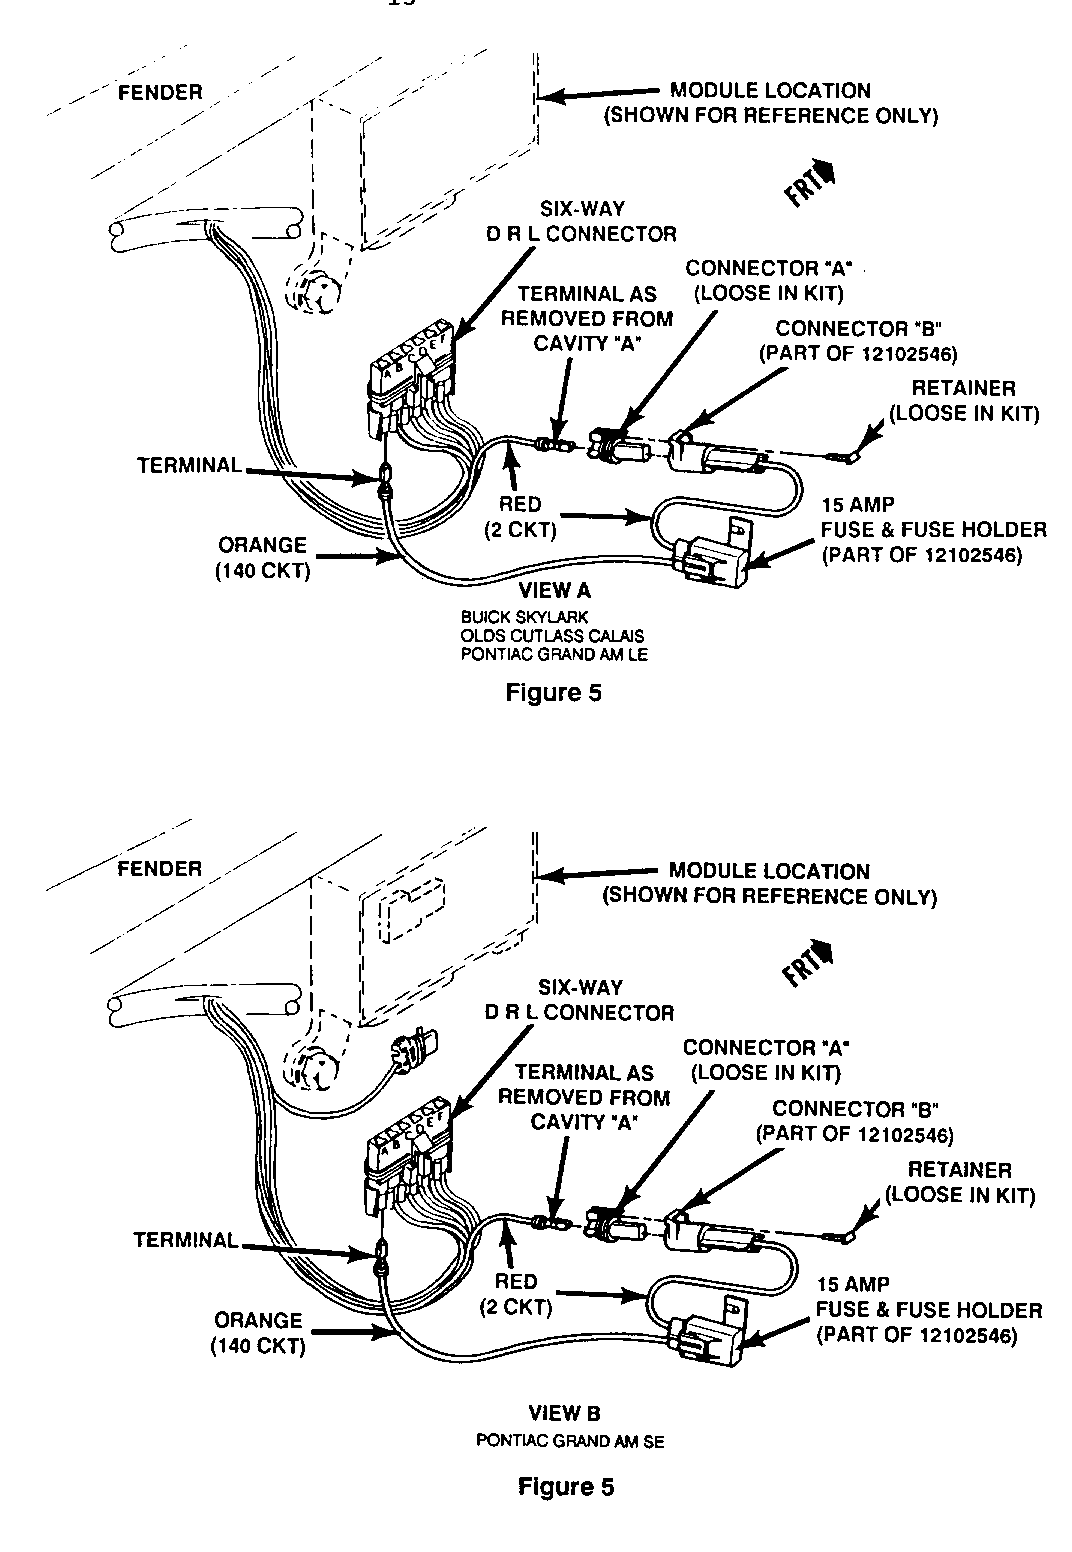
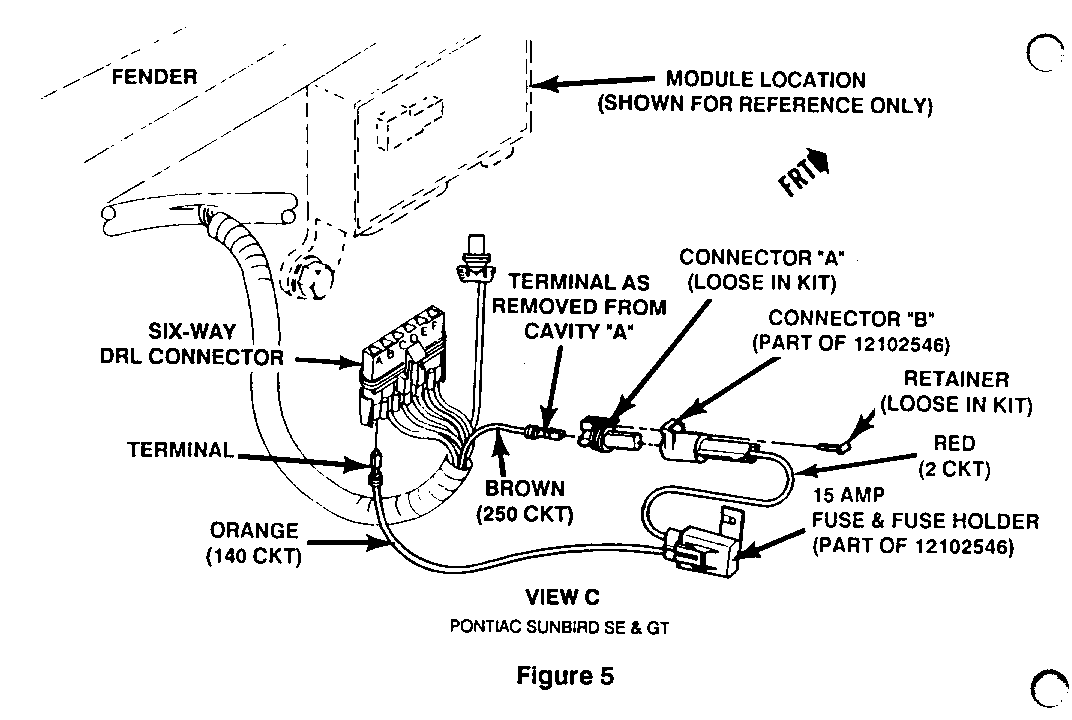
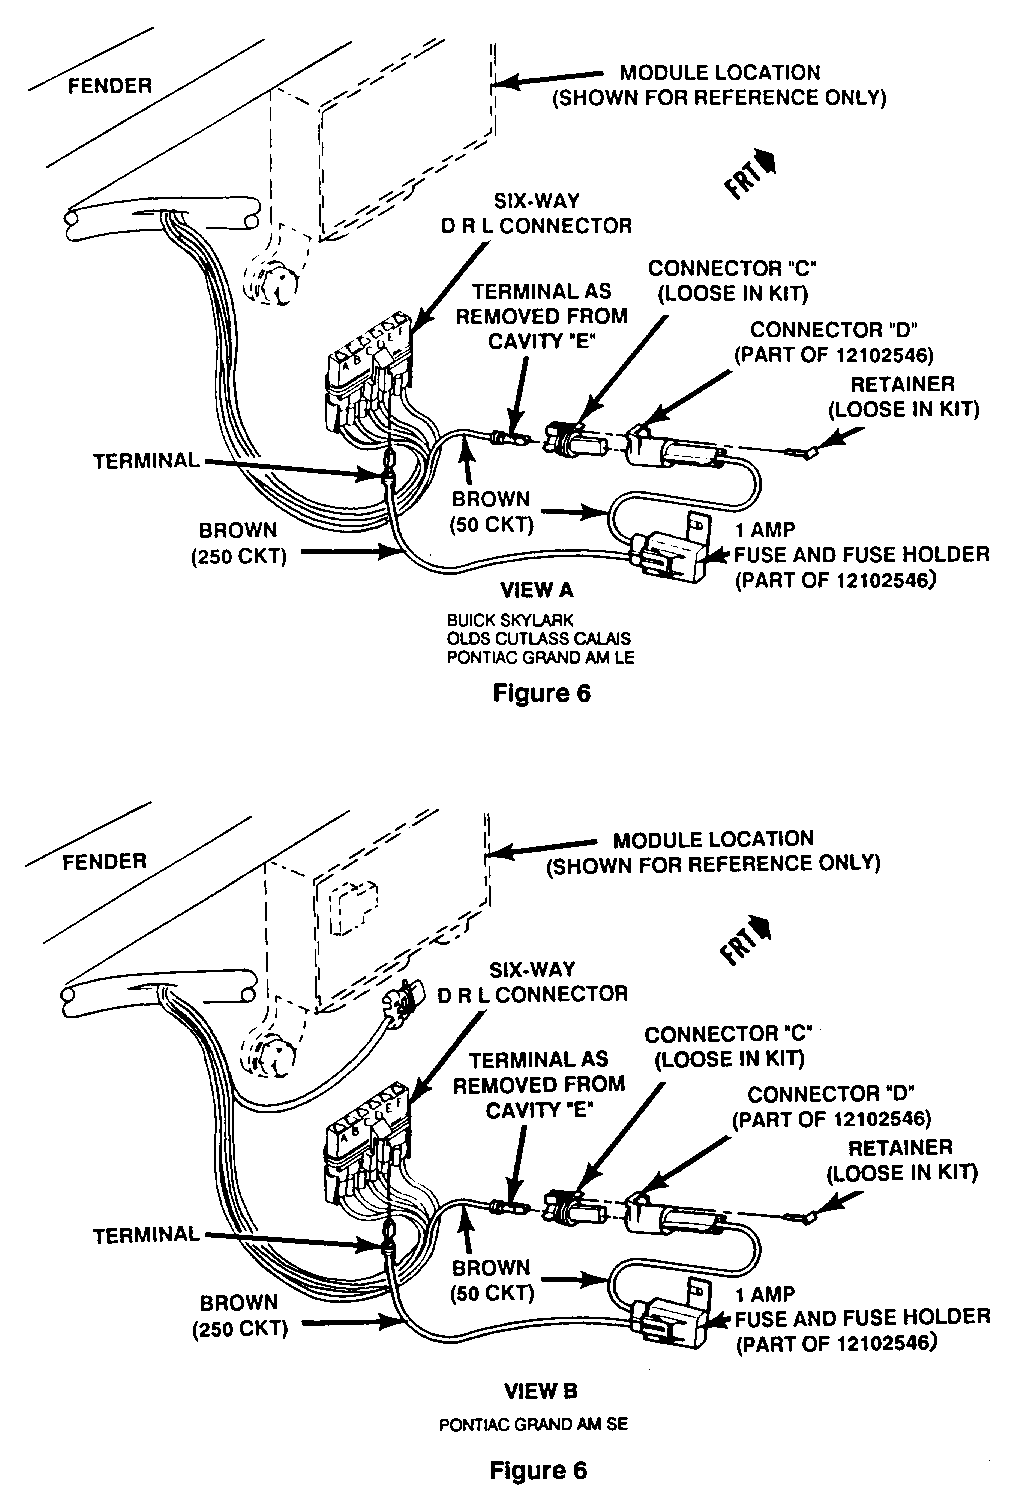
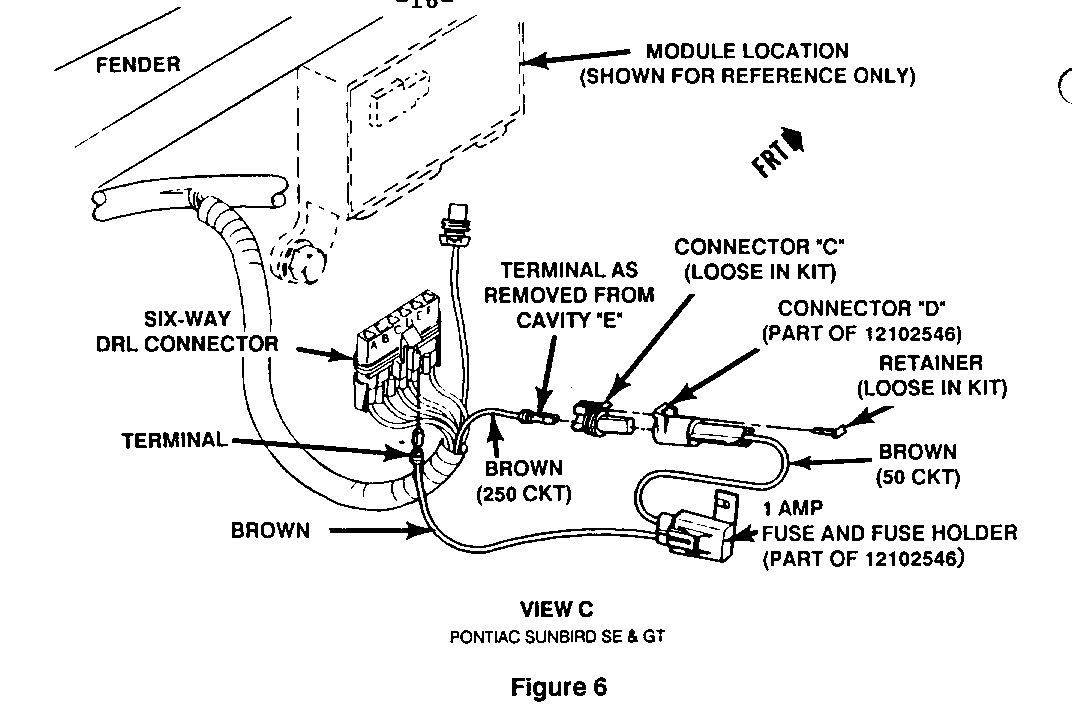
5. Remove the Wiring Harness Assembly - DRL Module (P/N 12102546) from the kit. Also remove the following loose parts from the kit: Connectors "A" & "C" and the two retainers shown in Figures 5 & 6.
NOTE: The correct wire colours must be connected as instructed in this procedure or the one-amp fuse on the brown & brown side of the harness will "blow" when the ignition is turned on.
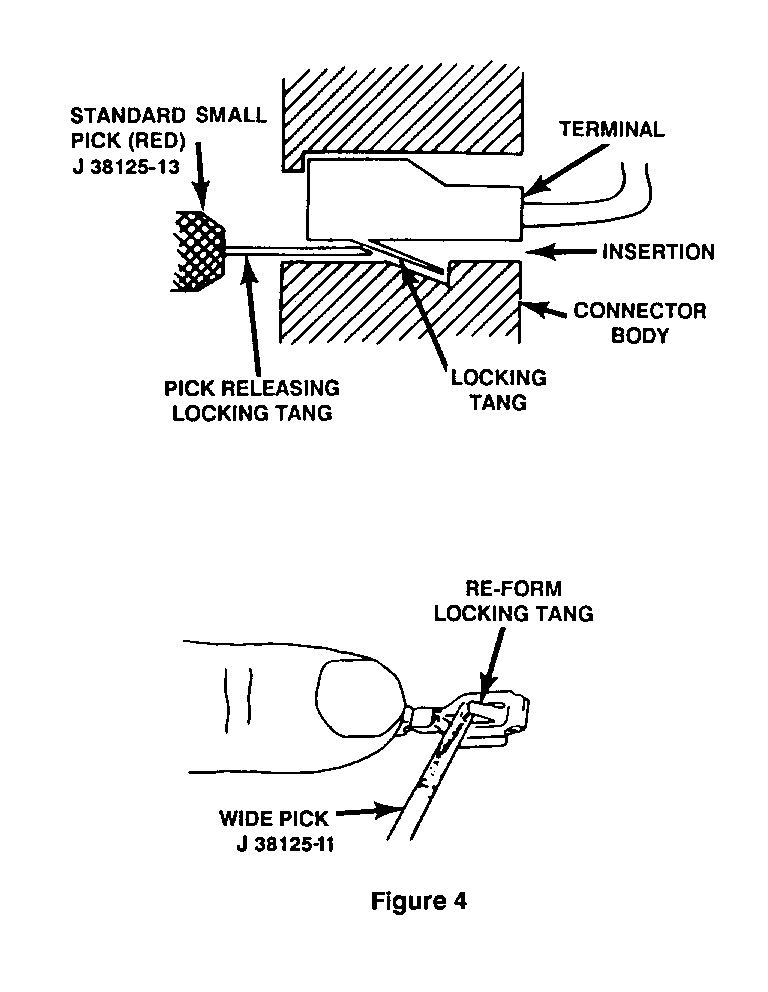
NOTE: The proper technique and tools for backing terminals out of the six-way DRL connector and reforming the locking tangs are shown in Figure 4.
6. Back out the number two circuit (red) from cavity "A" of the six-way DRL connector (see Figure 5, View "A").
Seat this terminal in the female half of connector "A" (Figure 5, View "A"). Then plug connector "A" into connector "B." Install a retainer into the mated connectors "A" & "B". The wire colour on both sides of the mated connectors must be RED.
NOTE: Connectors "A" & "C" in the kit are identical and interchangeable.
7. Seat the terminal with the orange wire into cavity "A" of the six-way DRL connector.
8. Back out the number 50 circuit (brown) from cavity "E" of the six-way DRL connector (See Figure 6, View "A").
9. Seat this terminal in the female half of connector "C" (Figure 6, View "A"). Then plug connector "C" into connector "D"; the wire colour on both sides of the mated connectors must be BROWN. Install a retainer into the mated connectors "C" & "D".
10. Seat the terminal with the brown wire into cavity "E" of the six-way DRL connector.
11. Using strap P/N 11501907, from the DRL Module Kit, secure the two in-line fuse holders to the forward lamp harness between the washer reservoir and the battery, as shown in Figure 8 .
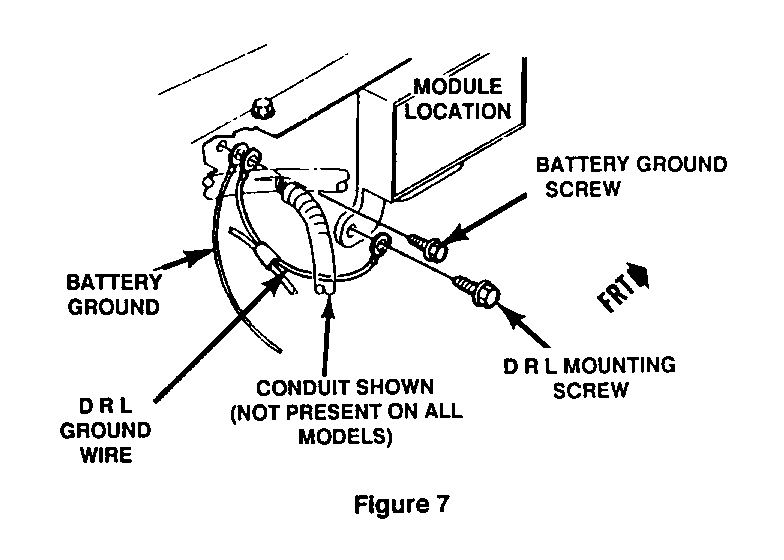
12. Unscrew the battery ground located on the fender rail between the DRL module and the washer reservoir. Screw down a ring terminal on the DRL Ground Wire with this battery ground (see Figure 7).
NOTE: Use the terminal on the long end of the wire from the harness tape.
13. Attach the new DRL module (P/N 22555621) using the two Screw & Washer Assemblies (P/N 11505209) from the kit, into the J-nuts on the left fender assembly as shown in Figure 1. Torque the screws to 9 N.m (80 Lbs. In.).
NOTE: When attaching the module rear attaching screw, screw down the other end of the DRL Ground Wire on the wiring harness with the rear leg, making sure that the terminal is between the screw head and the rear leg (as shown in Figure 7). This should be the short end of the ground wire from the harness tape. Take care not to pinch any wires or hoses behind the module.
If the in-line fuses were installed at the factory, reinstall the ground wire already provided.
14. Install the DRL cover (P/N 22555598) by placing it approximately 25 nun (one inch) higher than the DRL module and pushing it into location against the front face of the DRL module and then pushing it downward fully such that it completely covers the connector. See Figure 8 .
15. Replace and secure the battery. Connect the positive battery cable, then connect the negative battery cable.
16. Turn on ignition, wait three (3) seconds for the Daytime Running Light Module to power up, then confirm the headlamps are on.
NOTE: If the Wiring Harness Assembly - DRL Module was not wired according to this procedure, the one-amp fuse will blow and the headlamps will not light for the Daytime Running Light function.
NOTICE: Use ONLY the fuse ratings specified. Otherwise a fire or internal damage to the module may occur.
17. Remove fender cover and close hood. Reprogram memory functions in the vehicle, including radio presets.
18. Install Campaign Identification Label.
PROCEDURE FOR RELAY DRL SYSTEM:
Pontiac Grand Am SE Pontiac Sunbird SE & GT
1. Raise the hood. Look outboard of the battery (Figure 1, View "B") under the hood/fender line for a black sheet metal DRL Cover as shown in Figure 8.
Also examine the Forward Lamp Harness for the presence of an in-line fuse taped to the harness near the DRL Module (see Figure 2). If the first in-line fuse is present, the Pontiac Grand Am SE would also have a second in-line fuse taped to the harness near the bulkhead connector.
NOTE: The Pontiac Sunbird SE & GT will have only one in-line fuse, if any is present.
If both the DRL Cover and the in-line fuse(s) are present, skip directly to Step 18 and install a Campaign Identification Label.
If the DRL Cover (black) is NOT present, and/or if the in-line fuse(s) is NOT present, proceed to Step 2.
2. Note the stations to which the radio is preset. Place a fender cover on the left fender. Disconnect the negative battery cable, then disconnect the positive battery cable, and remove the battery.
3. Remove the existing Daytime Running Light Module (see Figure 1, View "B") by loosening the two (2) attaching screws and then removing the electrical connector.
4. Obtain Kit, DRL Module (P/N 12350915) and compare the parts with Figure 3. If the in-line fuse(s) was found (in Step 1) to be present, do NOT install P/N 12102546 harness, but skip directly to Step 13.
5. Remove the Wiring Harness Assembly - DRL Module (P/N 12102546) from the kit. Also remove the following loose parts from the kit: Connectors "A" & "C" and the two retainers shown in Figures 5 & 6.
NOTE: The correct wire colours must be connected as instructed in this procedure or the one-amp fuse on the brown & brown side of the harness will "blow" when the ignition is turned on.
NOTE: The proper technique and tools for backing terminals out of the six-way DRL connector and reforming the locking tangs are shown in Figure 4.
6. On the Pontiac Grand Am SE, back out the number two circuit (red) from cavity "A" of the six-way DRL connector (Figure 5, View "B").
On the Pontiac Sunbird SE or GT, back out the number 250 circuit (brown) from cavity "A" of the six-way DRL connector (Figure 5, View "C").
Seat this terminal in the female half of connector "A". Then plug connector "A" into connector "B" Install a retainer into the mated connectors "A" & "B".
NOTE: Connectors "A" & "C" in the kit are identical and interchangeable.
7. Seat the terminal with the orange wire into cavity "A" of the six-way DRL connector.
8. On the Pontiac Grand Am SE, back out the number 50 circuit (brown) from cavity "E" of the six-way DRL connector (Figure 6, View "B").
On the Pontiac Sunbird SE or GT, back out the number 250 circuit (brown) from cavity "E" of the six-way DRL connector (see Figure 6, View "C").
9. Seat this terminal in the female half of connector "C". Then plug connector "C" into connector "D"; the wire colour on both sides of the mated connectors must be BROWN. Install a retainer into the mated connectors "C" & "D".
10. Seat the terminal with the brown wire into cavity "E" of the six-way DRL connector.
11. Using strap P/N 11501907, from the DRL Module Kit, secure the two in-line fuse holders to the forward lamp harness between the washer reservoir and the battery, as shown in Figure 8 .
12. Unscrew the battery ground located on the fender rail between the DRL module and the washer reservoir. Screw down a ring terminal on the DRL Ground Wire with this battery ground (see Figure 7).
NOTE: Use the terminal on the long end of the wire from the harness tape.
13. Attach the new DRL module (P/N 22545059) using the two Screw & Washer Assemblies (P/N 11505209) from the kit, into the J-nuts on the left fender assembly (Figure 1, View "B"). Torque the screws to 9 N.m (80 Lbs. In.).
NOTE: When attaching the module rear attaching screw, screw down the other end of the DRL Ground Wire on the wiring harness with the rear leg, making sure that the terminal is between the screw head and the rear leg (as shown in Figure 7). This should be the short end of the ground wire from the harness tape. Take care not to pinch any wires or hoses behind the module.
If the in-line fuse(s) was installed at the factory, reinstall die ground wire already provided.
14. Install the DRL cover (P/N 22555632) by placing it approximately 25 mm (one inch) higher than the DRL module and pushing it into location against the front face of the DRL module and then pushing it downward fully such that it completely covers the connector. See Figure 8 .
15. Replace and secure the battery. Connect die positive battery cable, then connect the negative battery cable.
16. Turn on ignition, wait three (3) seconds for the Daytime Running Light Module to power up, then confirm the Foglamps are on.
NOTE: If the Wiring Harness Assembly - DRL Module was not wired according to this procedure, the one-amp fuse will blow and the foglamps will not light for the Daytime Running Light function.
NOTICE: Use ONLY the fuse ratings specified. Otherwise a fire or internal damage to the module may occur.
17. Remove fender cover and close hood. Reprogram memory functions in the vehicle, including radio presets.
18. Install Campaign Identification Label.
INSTALLATION OF CAMPAIGN IDENTIFICATION LABEL
Clean surface of radiator upper mounting panel and apply a Campaign Identification Label. Make sure the correct campaign number is inserted on the label. This will indicate that the campaign has been completed.
Dear General Motors Customer:
General Motors of Canada has determined that a defect which relates to motor vehicle safety may exist in some 1990 Buick Skylark, Oldsmobile Cutlass Calais, Pontiac Grand Am LE, Pontiac Grand Am SE, Pontiac Sunbird SE and Pontiac Sunbird GT model vehicles equipped with "Daytime Running Lights" (DRL). Under certain conditions the DRL module which is located near the battery, could overheat, and possibly result in an engine compartment fire.
To prevent this condition from occurring on your vehicle, we will replace the Daytime Running Light Module, install a fuse harness and install a module cover. Your dealer will perform this service for you at no charge.
Please contact your GM dealer as soon as possible to arrange a service date.
This letter identifies your vehicle. Presentation of this letter to your dealer will assist their Service personnel in completing the necessary correction to your vehicle in the shortest possible time.
Further assistance, if required, may be obtained from our Customer Assistance Centre, toll free, by calling 1-800-263-3777, or if you live in Quebec, 1-800-263-7854.
We are sorry to cause you this inconvenience; however, we have taken this action in the interest of your continued satisfaction with our products.
General Motors bulletins are intended for use by professional technicians, not a "do-it-yourselfer". They are written to inform those technicians of conditions that may occur on some vehicles, or to provide information that could assist in the proper service of a vehicle. Properly trained technicians have the equipment, tools, safety instructions and know-how to do a job properly and safely. If a condition is described, do not assume that the bulletin applies to your vehicle, or that your vehicle will have that condition. See a General Motors dealer servicing your brand of General Motors vehicle for information on whether your vehicle may benefit from the information.
