NEW HEAD GASKET AND PROCEDURE QUAD 4 SERVICE INFORMATION

SUBJECT: NEW HEAD GASKET, HEAD TIGHTENING PROCEDURE AND SERVICE MANUAL UPDATE
VEHICLES AFFECTED: 1987-91 QUAD 4 ENGINE - SERVICE INFORMATION
Bulletin Covers:
Some 1987 thru 1991 N, L, and W cars equipped with a Quad 4 engine, VIN A or D, may experience a loss of coolant and/or white smoke from the tailpipe. This condition may be caused by a leaking Cylinder Head Gasket. To correct this condition a new cylinder head gasket must be installed using the NEW TIGHTENING PROCEDURE AND CYLINDER HEAD SURFACE PREPARATION PROCEDURE outlined in this bulletin. The new bolt tightening procedure is necessary to "Pre-condition" the cylinder head gasket. This "Pre-conditioning" is necessary because it allows the gasket to be compressed to its working thickness before it is tightened to its final specification. The cylinder head surface preparation procedure is necessary to assure good cylinder head finish.
Service Parts Information:
Whenever ordering a new cylinder head gasket to correct the above condition, refer to the following part numbers:
Part Number Description ----------- ------------------------- 12352877 Gasket Kit, Cylinder Head 01051687 Engine Cooling System Sealer
Service Manual
The following procedure supplements the existing service manual procedure. The tightening sequence replaces all existing service manual head tightening procedures.
1. Completely drain the cooling system
IMPORTANT: The cylinder block, head, radiator and heater core must be completely drained of coolant since the old coolant may be contaminated with combustion residue. Refer to the appropriate section of your service manual.
2. Remove the cylinder head. Refer to the appropriate service manual section.
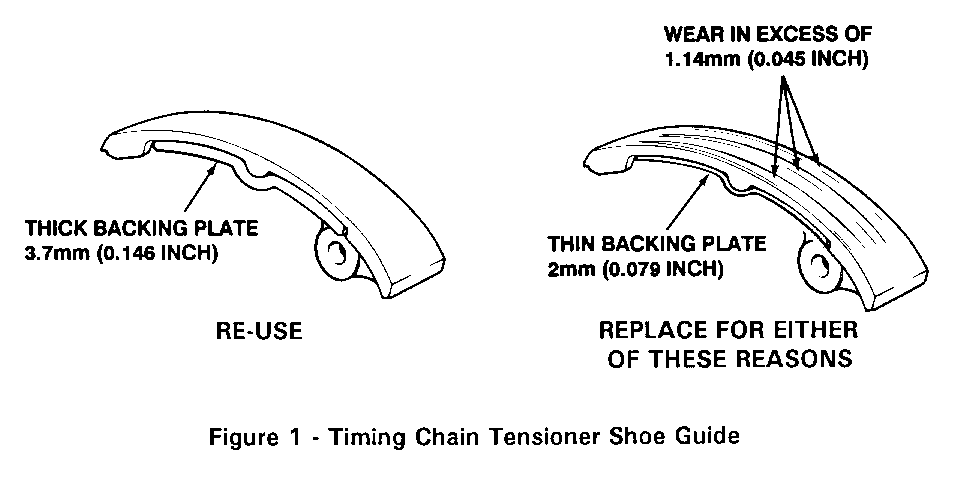
3. Inspect the timing chain tensioner shoe (1990 and earlier vehicles). If the tensioner shoe has grooves worn into it in excess of 1.14mm (0.045 in.) from the chain, replace the tensioner shoe and stud with GM Part No. 12340864. Refer to Figure 1
NOTE: On 1989 vehicles, also check the thickness of the backing plate. If the thickness is 2mm (0.079 in.), replace the tensioner shoe and stud with GM Part No. 12340864. The new tensioner shoe backing plate will be 3.7mm (0.146 in.).
4. Clean the cylinder head bolts with a wire brush to remove any old sealant that may be on them. Inspect the bolts for damaged threads or for damaged heads caused by improper use of tools. Replace head bolts if necessary.
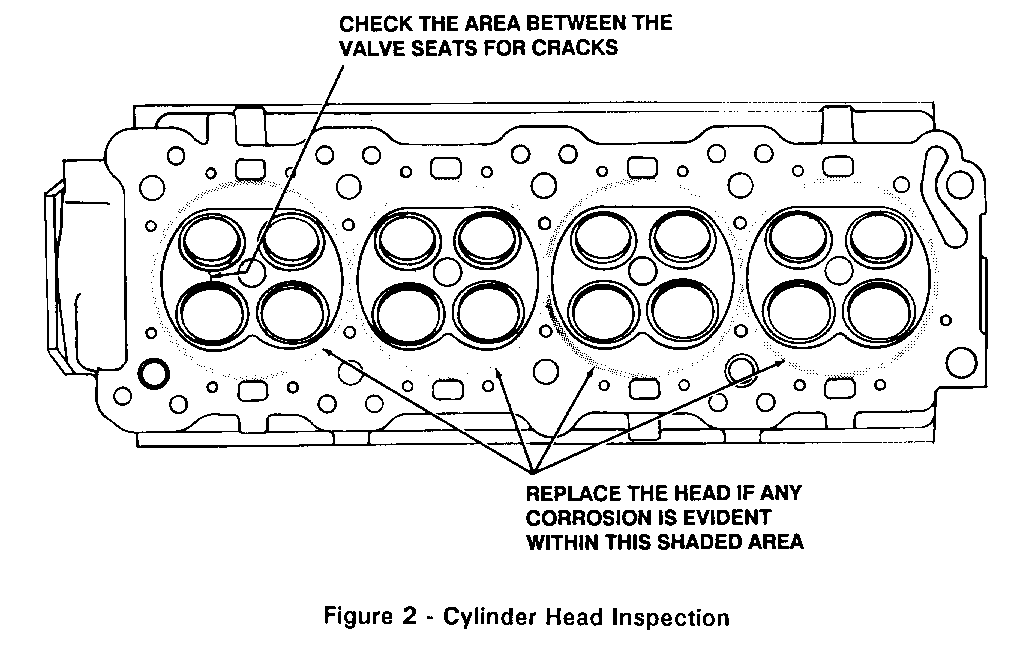
5. Inspect the cylinder head surface for corrosion or cracks. The fire rings will leave a "shadow" mark on the cylinder head (shaded area - Figure 2). If any corrosion is visible within this shaded area and/or if cracks are found, the cylinder head should be replaced.
If corrosion is evident outside of the outside diameter (OD) of the fire rings (shaded area - Figure 2), the cylinder head may be re-used.
6. Cylinder head surface preparation.
The Quad-4 aluminum cylinder head requires a very flat and smooth sealing surface for long cylinder head gasket life. NORMAL CYLINDER HEAD RESURFACING METHODS AND EQUIPMENT ARE NOT CAPABLE OF PRODUCING THE DESIRED SURFACE FINISH. Typical cylinder head gasket clean-up may also compromise cylinder head surface finish.
The surface preparation procedure is necessary whether the cylinder head has been resurfaced or not (This operation is not necessary on a new replacement cylinder head). The intent of this procedure is not to remove metal.
A 25cm x 15cm x 8cm (1" x 6" x 7") STRAIGHT / FLAT block of cold rolled steel bar stock, with flatness of at least 0.001" (this may require grinding by a machine shop), is required for this procedure (refer to Figure 3). The steel bar stock can be obtained from a steel supplier, machine shop or tool and die shop. Any burrs or protrusions on the steel bar stock must be filed flat before performing this procedure.
CYLINDER HEAD SURFACE PREPARATION PROCEDURE
The intent of the surface preparation procedure is not to remove metal from the head; rather the intent of the procedure is to provide a satiny finish.
IMPORTANT!!
o The following procedure must be followed carefully for correct surface preparation or damage to the cylinder head may occur.
o This procedure SHOULD NOT be used to straighten cylinder heads which are not flat.
o DO NOT round off corners of combustion chambers, oil/ coolant passages or outer edges of cylinder head.
A. Thoroughly clean the cylinder head.
1. Remove grit and metal shavings from resurfaced heads.
2. Carefully remove all gasket material if the cylinder head is flat and resurfacing is not necessary. Use Gasket Remover, P/N #992927 or equivalent.
IMPORTANT!! Use only a plastic or wood scraper. Use extreme care so the sealing surface is not scratched. Do not use any other method or technique to remove gasket material.
B. Before surface preparation procedure is performed, check cylinder head for flatness. Refer to service manual SECTION 6A7 for cylinder head checking procedure and specifications.
C. Wrap a CLEAN NEW 23cm x 28cm (9" x 11") 220 grit, open coat (white), sandpaper around the STRAIGHT / FLAT steel block and tape all edges to the block with duct tape or equivalent (refer to Figure 3). Be sure the area between the block and the sand paper is clean or damage to the head will result.
D. Secure the cylinder head in a vise using blocks of wood between the vise and the cylinder head to prevent damage to the cylinder head.
IMPORTANT!!
o Do not attempt to sand off marks or shadows left by the old gasket on a cylinder head that was not resurfaced. In the case of a resurfaced cylinder head, do not attempt to remove machining marks. This will require removal of too much metal and is unnecessary.
o Use a full lengthwise sanding motion; be sure the leading edge of the sanding block travels slightly (approx.2.5cm (1") beyond the ends of the cylinder head.
E. The head must be clean and dry prior to sanding. Sand the cylinder head lengthwise, USING ONLY THE WEIGHT OF THE STEEL BLOCK TO SAND THE CYLINDER HEAD. Making 15 full lengthwise passes on the cylinder head with the steel block will achieve the proper finish (refer to Figure 3). (A full lengthwise pass equals moving the sanding block from one end of the cylinder head to the other)
F. Recheck cylinder head for flatness. Refer to service manual SECTION 6A7 for service procedure.
G. Clean cylinder head thoroughly.
7. Clean each head bolt seat boss on the cylinder head. Clean the bolt holes in the cylinder block. DO NOT USE A TAP TO CLEAN THE HOLES.
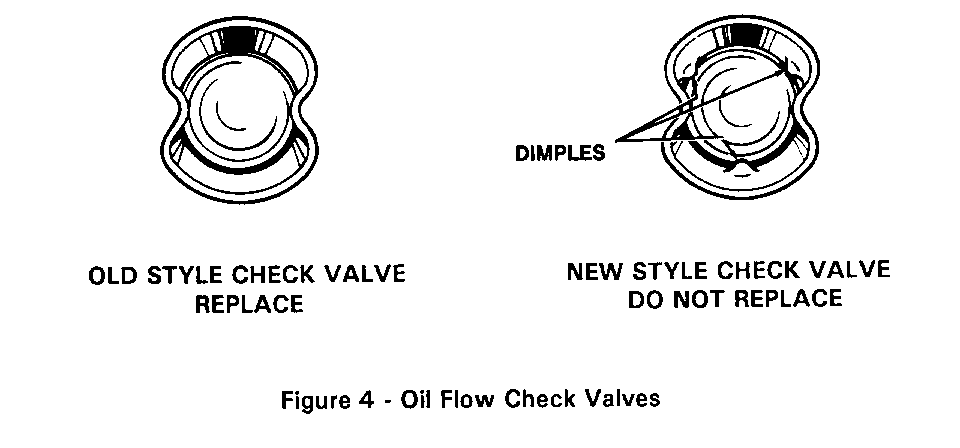
8. Replace the oil flow check valve in 1987 through 1989 model year vehicles, as necessary. Refer to the applicable 1991 model year service manual. The check valve does not need to be replaced in 1990 or newer vehicles or those vehicles where the check valve has been previously replaced.
NOTE: To determine if the check valve has been previously replaced on 1987 through 1989 vehicles, shine a flashlight into the oil check valve. If there are three dimples immediately above the check ball, it is the new style oil flow check valve and should not be replaced. Refer to Figure 4.
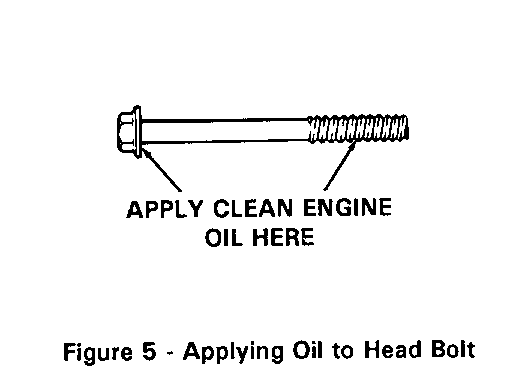
9. Apply clean engine oil to the threads and the bottom side of the flange of the bolt. Refer to Figure 5.
NOTICE: The following tightening procedure must be used to assure gasket life. Failure to follow this procedure exactly may result in cylinder head gasket leakage.
* PRE-CONDITION THE CYLINDER HEAD GASKET *
10. Install and torque cylinder head bolts to specification in SEQUENCE. Refer to Figure 6.
11. After completing step 10 on all ten bolts, tighten the cylinder head bolts an additional 90 degrees (1/4 turn) in SEQUENCE using J-36660.
12. In SEQUENCE, loosen each bolt one turn and immediately re-tighten it to the specified torque. Refer to Figure 6.
13. After completing step 12 on all ten bolts, tighten the cylinder head bolts an additional 90 degrees (1/4 turn) in SEQUENCE using J 36660.
14. Change the engine oil and filter, be sure to use a PF 1225 oil filter.
15. Fill the cooling system with new coolant meeting GM specification 1825-M. Refer to the applicable service manual section. Add (2) engine cooling system sealer pellets from package, P/N 01051687, to the cooling system.


General Motors bulletins are intended for use by professional technicians, not a "do-it-yourselfer". They are written to inform those technicians of conditions that may occur on some vehicles, or to provide information that could assist in the proper service of a vehicle. Properly trained technicians have the equipment, tools, safety instructions and know-how to do a job properly and safely. If a condition is described, do not assume that the bulletin applies to your vehicle, or that your vehicle will have that condition. See a General Motors dealer servicing your brand of General Motors vehicle for information on whether your vehicle may benefit from the information.
