Caution: When replacing stationary windows, use Urethane Adhesive Kit GM P/N 12346392
(Canadian P/N 10952983), or a urethane adhesive system meeting GM Specification
GM3651G, to maintain original installation integrity. Failure to use the urethane
adhesive kit will result in poor retention of the window which may allow unrestrained
occupants to be ejected from the vehicle resulting in personal injury.
- Remove the rear quarter trim panel. Refer to the following procedures
in Interior Trim.
- Mask off the area around the window in order to protect the painted
surfaces.
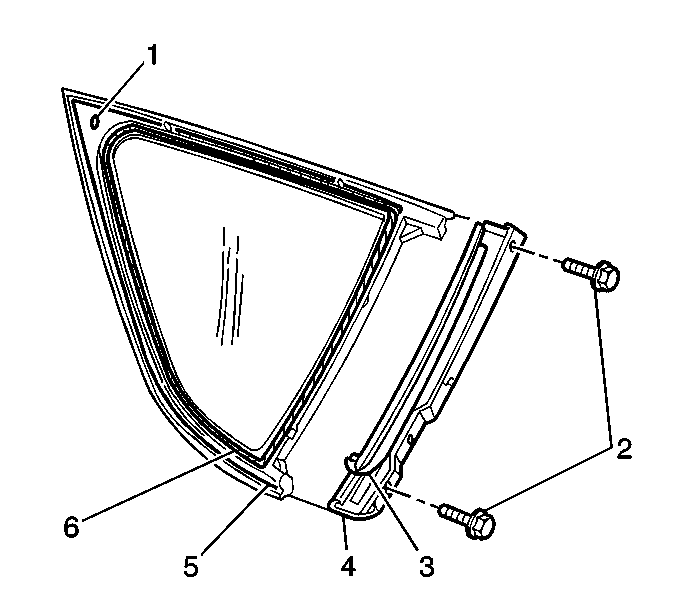
- Remove the quarter window applique.
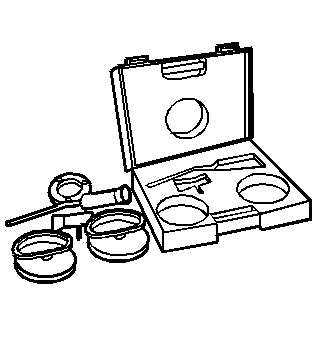
- From the inside of the vehicle, cut around the entire perimeter
of the quarter window using one of the following tools:
- Keep the blade of the tool as close to the body pinchweld flange
as possible in order to prevent damage to the quarter window reveal molding.
- Remove the quarter window.
- Clean the quarter window channel where the urethane is applied
with a clean dry cloth.
- Clean the following surfaces
to which the urethane adhesive is to be applied with a clean dry cloth:
Important:
| • | Refinish the pinchweld flange in order to present a PRIMER ONLY
surface under the following conditions: |
| - | Corrosion of the pinchweld flange is present |
| - | Sheet metal repairs or replacements are required |
| • | If paint repairs are required, mask the flange bonding area prior
to applying the color coat in order to provide a PRIMER ONLY surface. |
| • | Use the following 2-part, catalyzed products for primer
application: |
| • | Follow the manufacturer's instructions for the following primer
application steps: |
- After repairing the opening as indicated, perform the following steps:
| 9.1. | Thoroughly shake the pinchweld primer #3 (black). |
| 9.2. | Use a new dauber to apply the primer to the primed surface of
the flange in the bonding area. |
| 9.3. | Allow the primer to dry 10 minutes. |
- Inspect the body pinchweld for any damage.
- Repair all damage before continuing with the quarter window replacement.
- Attach the quarter window
applique tabs to the quarter window molding slots.
- Dry fit the glass into the body opening in order to determine
the correct position.
- Perform the following procedures:
| 3.1. | Position the window in the opening. |
| 3.2. | Use masking tape in order to mark the position of the glass at
the following points: |
| 3.3. | Slit the masking tape at the glass edges. |
Remove the window from the body opening.
| 3.4. | Place the window on a clean protected work surface with the inside
surface facing up. |
- If reinstalling the original window, use a razor knife to remove
any existing urethane adhesive from the edge of the glass surface.
- Clean the surface of the window to which the urethane adhesive
is being applied (around the edge of the inside surface).
Use the following solutions to clean the glass surface:
| • | An isopropyl alcohol dampened cloth |
| • | GM Glass Cleaner P/N 1050427, or equivalent |
Important: Primer application is important because primers act as the agent that
bonds the urethane to the applique. Use the specified primer for each application
in order to ensure the proper adhesion.
- Thoroughly shake the pinchweld primer #3 (black). Apply the primer
to any exposed surfaces where the urethane contacts the body.
Allow the primer to dry for 10 minutes.
Do not apply black pinchweld primer to any existing urethane surface.
Important: Use care in order to prevent glass prep #1 (clear) from running into
the vision area of the glass. Glass prep #1 dries almost instantly. Apply
the primer evenly in order to not stain the viewing area of the window.
- Using a new dauber, apply PVC primer #4 (clear) to the quarter window
where the urethane is to be applied. Wipe the quarter window dry with a clean
cloth.
- Shake the glass primer #2 (black) well. Use a new dauber in order
to apply the primer to the same areas to which you apply the glass prep #1.
- Allow the primer to dry for approximately 6 to 10 minutes.
Important:
| • | DO NOT apply clear primer over black primer. |
| • | DO NOT touch the primer coated surfaces. |
- Tape the rear window reveal molding away from the applique in order
to assist the installation.
- Apply a smooth continuous bead of urethane adhesive to the following
components:
| • | The quarter window assembly |
- Remove the 2-way tape backing if using a new applique.
- Install the applique and the quarter window assembly by performing
the following procedures:
| • | Press the applique in order to set the urethane adhesive |
| • | Press the window assembly in order to set the urethane adhesive |
| • | Align the previously installed masking tape marks |
| • | Avoid excessive squeeze out which may cause an appearance problem. |
- Tape the following components to the body in order to minimize
movement:
Important: DO NOT direct high pressure water at the fresh urethane adhesive.
- Water test the window immediately using a soft spray.
Warm or hot water is preferable in order to accelerate the cure of the
adhesive.
If a water leak is detected, use a flat-bladed tool to apply urethane
adhesive to the leak point and 127 mm (5 in) on both sides of
the leak point.
Important:
| • | Keep the vehicle at room temperature 22°C (72°F) and 30 percent
relative humidity for a minimum of 6 hours. |
| • | Lower the door glass partially in order to prevent pressure build
up when the doors are closed prior to the urethane adhesive cure. |
| • | DO NOT drive the vehicle until the urethane is cured (a minimum
of 6 hours at room temperature). |
| • | DO NOT use compressed air in order to dry the urethane adhesive. |
- Remove the tape from the applique and quarter window after the urethane
has cured.
- Remove the protective tape.
- Install the rear quarter trim panel. Refer to the following procedures
in Interior Trim.
