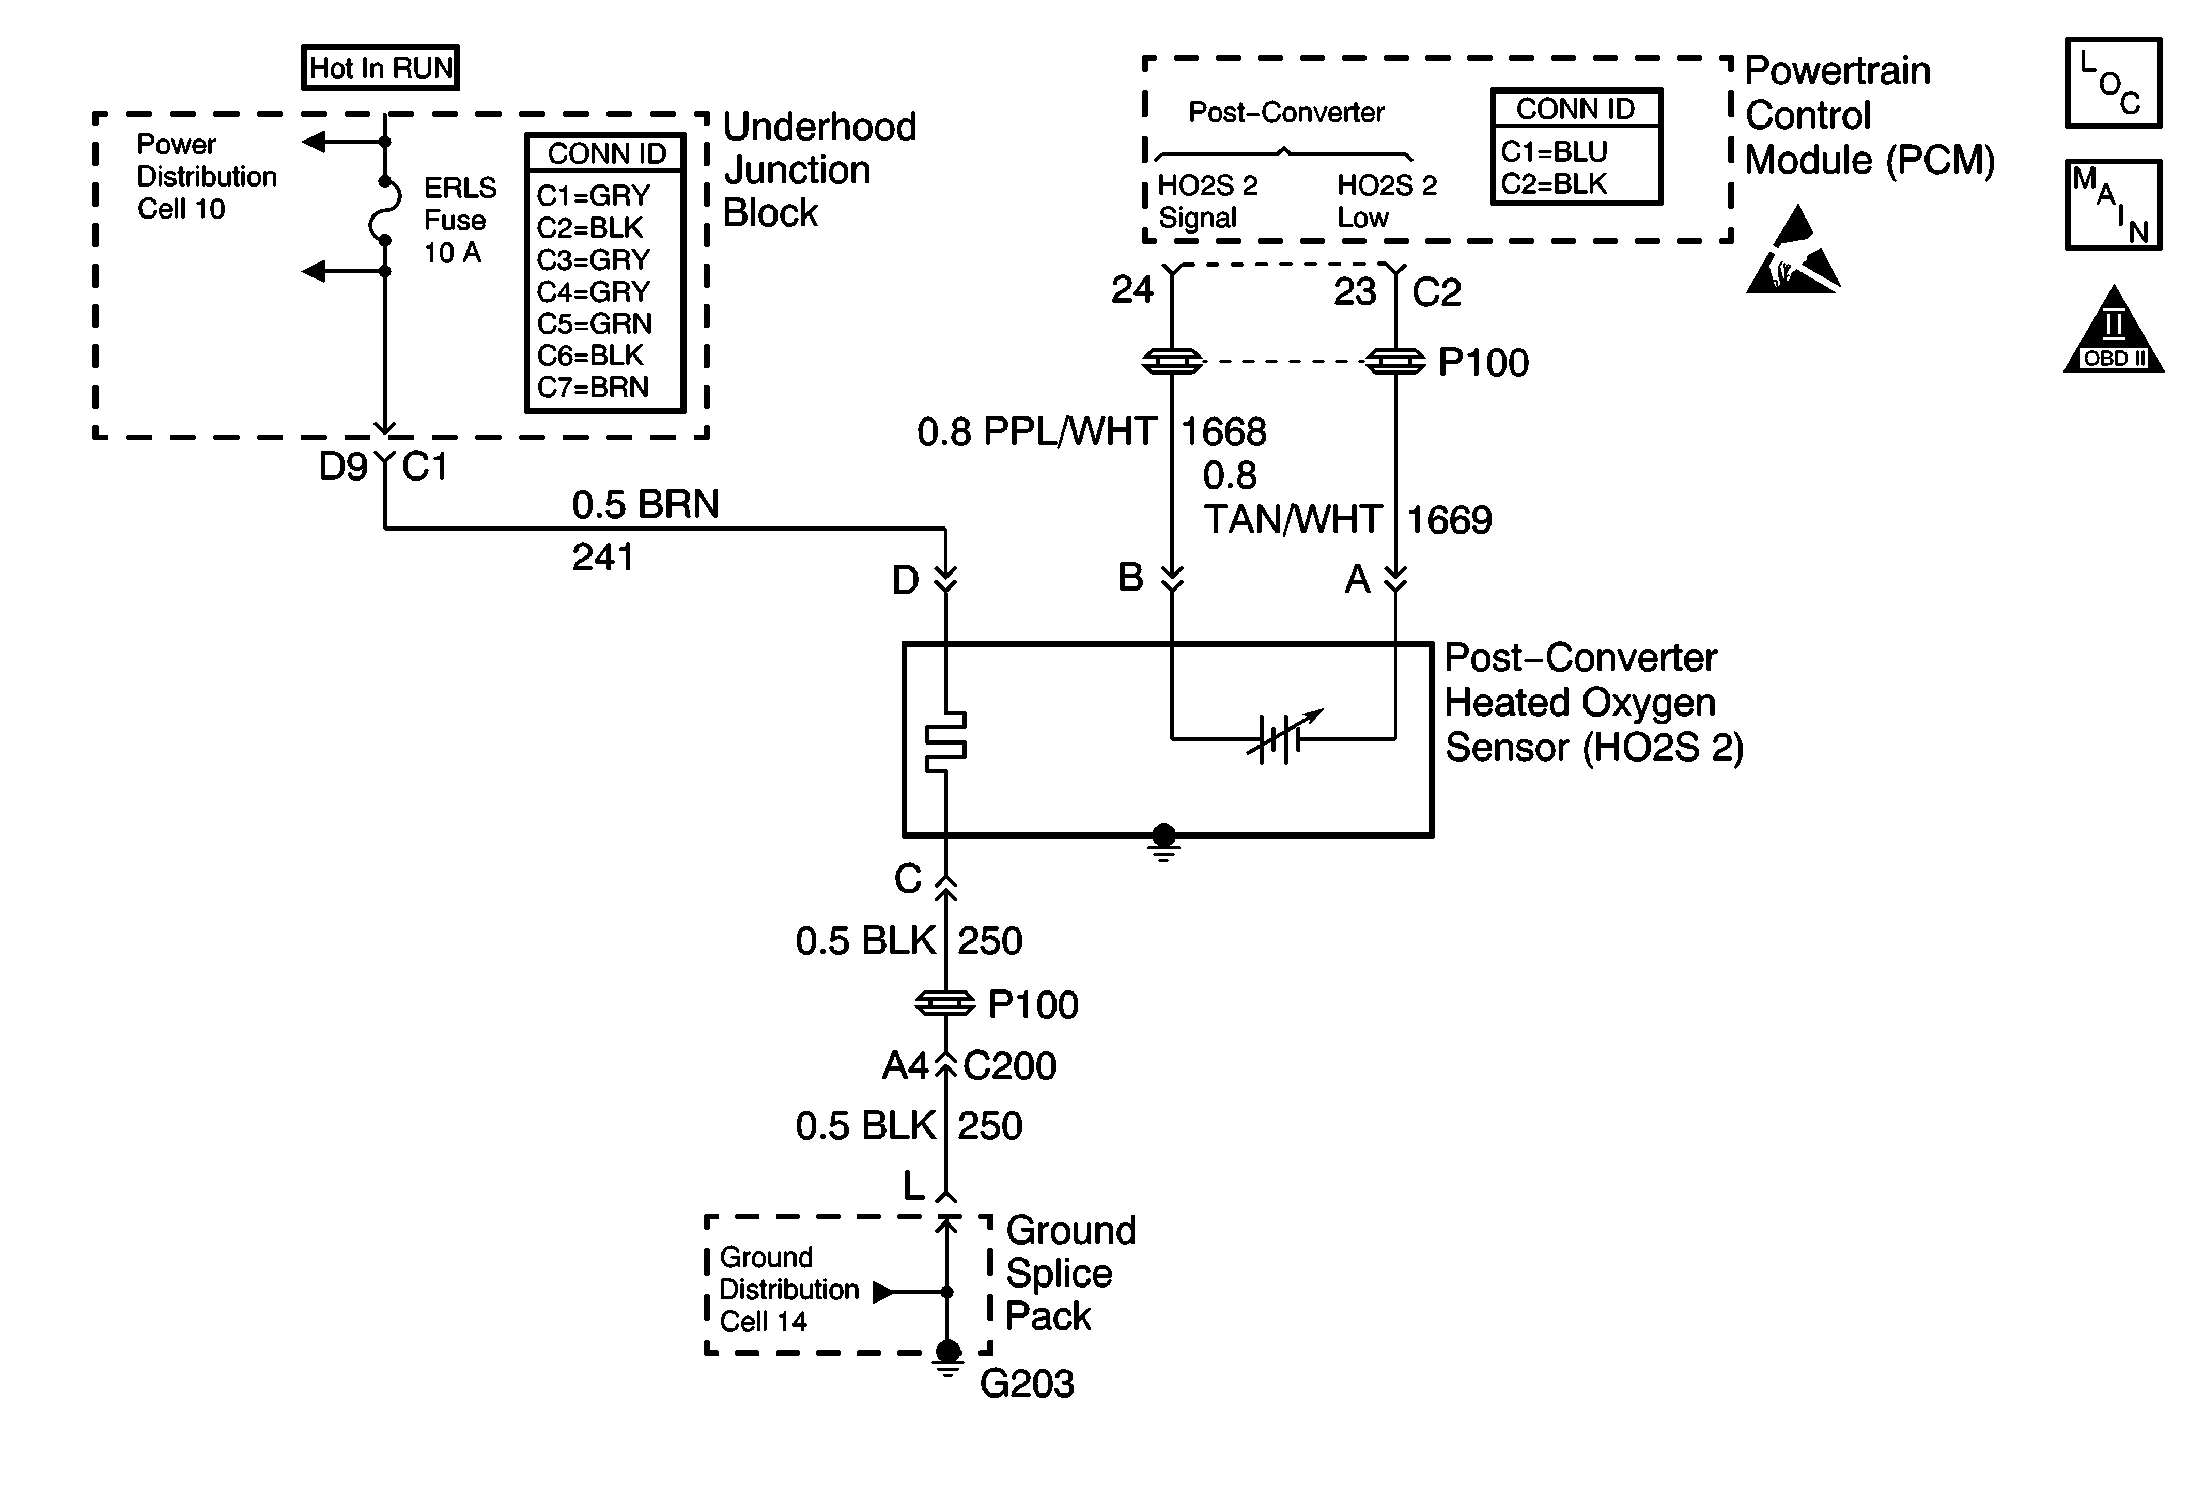
Circuit Description
In order to control emissions, a catalytic converter converts any harmful exhaust emissions into harmless water vapor and carbon dioxide.
The PCM has the capability to monitor this process by using a rear heated oxygen sensor (HO2S 2). The HO2S 2 is located in the exhaust stream past the catalytic converter. The sensor produces an output signal which indicates the storage capacity of the catalyst. This in turn indicates the catalyst's ability to convert the exhaust emissions effectively. If the catalyst is functioning properly, the HO2S 2 signal will be far less active than the signal produced by the front oxygen sensor (O2S 1).
Conditions for Running the DTC
| • | The following DTCs are not set: P0105, P0107, P0108, P0112, P0113, P0117, P0118, P0122, P0123, P0171, P0172, P0201, P0202, P0203, P0204, P0300, P0336, P0440, P0446, P0452, P0453, P0506, P0507, P0601, P0602, or P1441. |
| • | The engine is in power enrichment mode. |
| • | The battery voltage is more than 10.0 volts. |
| • | The engine coolant temperature (ECT) is more than 75°C (167°F). |
| • | The fuel level is more than 10 percent. |
| • | The engine has been running more than 10 seconds. |
Conditions For Setting The DTC
The HO2S 2 remains less than 400 mV for more than 5 seconds. The diagnostic then runs for 11 seconds after a 5 second delay.
Action Taken When the DTC Sets
| • | The malfunction indicator lamp (MIL) will illuminate after 2 consecutive ignition cycles in which the diagnostic runs with the malfunction present. |
| • | The PCM will record the operating conditions at the time that the diagnostic fails. This information will store in the Freeze Frame and Failure Records buffers. |
| • | A history DTC stores. |
Conditions for Clearing the MIL/DTC
| • | The MIL will turn off after 3 consecutive ignition cycles in which the diagnostic runs without a fault. |
| • | A history DTC will clear after 40 consecutive warm up cycles without a fault. |
| • | Use a scan tool to clear the DTCs. |
Diagnostic Aids
| • | Inspect the exhaust system between the catalytic converter and the flange for the following conditions: |
| - | Any leaks |
| - | Any corrosion |
| - | Any loose or missing hardware |
| • | Inspect the wiring for the following conditions: |
| - | Any wiring contacting the exhaust system |
| - | Any incorrectly mating terminals |
| - | Any broken locks |
| - | Any incorrectly formed harness connectors |
| - | Any damaged terminals |
| - | Any poor terminal-to-wire connections |
| - | A damaged harness |
| • | Observe the HO2S 2 reading on a scan tool while moving the related connectors and the wiring harness with the ignition on. If the malfunction is induced, the HO2S 2 display will change. This should help isolate the location of the malfunction. |
An intermittent could be the result of the following conditions:
| • | A poor connection |
| • | A rubbed through wire insulation |
| • | A broken wire inside of the insulation |
Do not attempt to repair the HO2S 2. Replace the entire HO2S 2 assembly if the following conditions exist:
| • | Any damaged wiring |
| • | A damaged connector |
| • | Any damaged terminals |
Obstruction of the air reference and degraded HO2S 2 performance can result from any attempt to repair the above conditions.
The HO2S 2 must have a clean air reference in order for the sensor to function properly. This clean air reference is obtained by the HO2S 2 wires.
Test Description
The numbers below refer to step numbers on the diagnostic table.
-
This step determines if DTC P1137 is the result of a hard malfunction or an intermittent condition.
-
It is necessary to jump the HO2S 2 low circuit to ground in order to allow the PCM to display the supplied bias voltage. The PCM and wiring are OK if the voltage is between 0.35 and 0.55 volt .
-
The replacement PCM must be programmed and the Crankshaft Position System Variation Learn procedure must be performed.
Step | Action | Values | Yes | No | ||||
|---|---|---|---|---|---|---|---|---|
1 | Did you perform the Powertrain On-Board Diagnostic (OBD) System Check? | -- | Go to Step 2 | |||||
Use a scan tool in order to observe the HO2S 2 voltage. Is the voltage less than the specified value? | 22 mV(0.02V) | Go to Step 4 | Go to Step 3 | |||||
3 |
Is the voltage less than the specified value? | 40 mV | Go to Step 4 | Go to Diagnostic Aids | ||||
Caution: Avoid contact with moving parts and hot surfaces while working around a running engine in order to prevent physical injury. Is the voltage within the specified range? | 350 -550 mV | Go to Step 7 | Go to Step 5 | |||||
5 |
Did you find and correct the condition? | Go to Step 8 | Go to Step 6 | |||||
|
Important:: The replacement PCM must be programmed. Refer to Powertrain Control Module Replacement/Programming . Replace the PCM. Refer to Powertrain Control Module Replacement . Did you complete the repair? | -- | Go to Step 8 | -- | |||||
7 |
Caution: Avoid contact with moving parts and hot surfaces while working around a running engine in order to prevent physical injury. Did you complete the repair? | -- | Go to Step 8 | -- | ||||
8 |
Does the DTC reset? | -- | Go to Step 2 | System OK |
