F/CMVSS Noncompliance - Manual Transaxle Shifter

| Subject: | 00091 -- Manual Transaxle Shifter |
| Models: | Certain 2000-01 Oldsmobile Alero and Pontiac Grand Am Model Vehicles |
Condition
General Motors has decided that certain 2000-01 Oldsmobile Alero and Pontiac Grand Am model vehicles equipped with manual transaxles (RPO M86) fail to conform to these Federal/Canada Motor Vehicle Safety Standards: (FMVSS) 114, "Theft Protection," (CMVSS) 114, "Locking System." When a driver attempts to shift from 5th gear to reverse, a shift inhibitor causes the transmission to be mechanically in 4th gear even though the shift lever indicates reverse gear. In this situation, the key can be removed from the ignition while the transmission is in a forward gear, which is not permitted by the standard.
Correction
Dealers are to disable the 5th/Reverse inhibitor by removing a retaining pin and replace the shifter assembly.
Vehicles Involved
Involved are certain 2000-01 Oldsmobile Alero and Pontiac Grand Am model vehicles equipped with manual transaxle (RPO M86) and built within these VIN breakpoints:
Year | Division | Model | Plant | From | Through |
|---|---|---|---|---|---|
2000 | Oldsmobile | Alero | Lansing C | YC000002 | YC429554 |
2001 | Oldsmobile | Alero | Lansing C | 1C100053 | 1C119965 |
2000 | Pontiac | Grand Am | Lansing C | YC517962 | YC517970 |
2000 | Pontiac | Grand Am | Lansing M | YM700031 | YM879094 |
2001 | Pontiac | Grand Am | Lansing M | 1M500001 | 1M517019 |
Important: Dealers should confirm vehicle eligibility through GMVIS (GM Vehicle Inquiry System) or GM Access Screen (Canada only) or DCS Screen 445 (IPC only) before beginning campaign repairs. [Not all vehicles within the above breakpoints may be involved.]
Involved vehicles have been identified by Vehicle Identification Number. Computer listings containing the complete Vehicle Identification Number, customer name and address data have been prepared, and are being furnished to involved dealers with the campaign bulletin. The customer name and address data furnished will enable dealers to follow up with customers involved in this campaign. Any dealer not receiving a computer listing with the campaign bulletin has no involved vehicles currently assigned.
These dealer listings may contain customer names and addresses obtained from Motor Vehicle Registration Records. The use of such motor vehicle registration data for any other purpose is a violation of law in several states/provinces/countries. Accordingly, you are urged to limit the use of this listing to the follow-up necessary to complete this campaign.
Parts Information
Parts required to complete this campaign are to be obtained from General Motors Service Parts Operations (GMSPO). Please refer to your "involved vehicles listing" before ordering parts. Normal orders should be placed on a DRO = Daily Replenishment Order. In an emergency situation, parts should be ordered on a CSO = Customer Special Order.
Part Number | Description | Qty/ Vehicle |
|---|---|---|
22678092 | Control Assembly, Manual Transaxle (leather, w/shift pattern), Grand Am | 1 |
22678093 | Control Assembly, Manual Transaxle (vinyl, w/shift pattern), Alero | 1 |
01052943 | Sealer-Goodwrench Gasket Maker RTV (one tube will service 10 vehicles) | As required |
Service Procedure
- Prep the vehicle. Place the vehicle in the repair stall over a hoist, place blocks in front of and behind the front tires.
- Place the transaxle shifter in the Neutral position.
- Position the driver and passenger seat assemblies in the full rearward position.
- Hook up both seat belts (connect the belt to the buckle).
- Remove the battery from the vehicle.
- Remove the air cleaner assembly.
- Remove the clutch master cylinder hose from its bracket, just below the underhood fuse and relay center.
- Raise the vehicle on the hoist.
- Depress the locking tab on the underhood fuse and relay bracket and slide the relay center toward the front of the vehicle.
- Remove the left front tire and wheel assembly.
- Remove the left front fender inner closeout panels.
- Remove the specified bolt from the side of the transaxle. Refer to Figure 1.
- Lower the vehicle.
- Disconnect the fuse and relay center from the bracket.
- Remove the four (4) bolts holding the relay and air cleaner bracket to the vehicle. Remove the bracket.
- Using mechanics wire, tie the fuse and relay center to the left front fender area, where the air cleaner assembly normally rests.
- Disconnect the shift cables from the attachment points on the transaxle shift selector. Refer to Figure 2.
- Inside the vehicle, unsnap the shift boot fasteners in order to open the shifter boot.
- For Oldsmobile vehicle, go to Step 20. For Pontiac vehicles, go to Step 28.
- For Oldsmobile vehicles, remove the rubber noise insulator pad from the bottom of the storage compartment under the radio, in the trim plate.
- Reach in the storage bin and lift up on the console trim plate.
- Disconnect the electrical connector for the Enhanced Traction System (ETS) switch and remove the trim plate.
- Open the rear console door and remove the rubber insulator from the bottom of the console bin. Remove the rear console to floor pan retaining screws (2).
- Remove the four (4) front and middle retaining screws (two (2) per side).
- Gently separate the sides of the console from the IP trim plate by pulling toward the sides of the vehicle and disengaging the retainer and locating tab.
- Pull up the park brake lever as high as it will go, lift the console assembly and slide it rearward as far as possible.
- Go to Step 36.
- For Pontiac vehicles, remove the bezel from around the ignition lock cylinder assembly.
- Remove the radio trim plate and disconnect the wiring harness connectors.
- Remove the two screws from the bottom of the front cupholder wells and remove the cup holder from the console.
- Remove the two (2) nuts which attach the console to the lower dash panel.
- Remove the four (4) front and middle retaining screws (two (2) per side).
- Open the rear console door and remove the rubber insulator from the bottom of the storage compartment.
- Remove the two (2) bolts which are in the bottom of the storage compartment.
- Pull up the park brake lever as high as it will got. Gently lift the console assembly and remove it from the vehicle.
- Unlock the shift cable retainers at the shifter assembly. Refer to Figure 3.
- Depress the locking tabs and disconnect both cables from the shifter plate.
- Disconnect the brake transmission shift interlock (BTSI) cable from the shifter.
- Push the shift cable inner cables into the housings as far as they will go.
- Remove the front and the rear shifter mounting nuts and remove the shifter from the vehicle.
- Inspect the new shifter assembly for the following (refer to Figure 4):
- Position the shifter to the floor of the vehicle and install the front and the rear shifter mounting nuts. Remember to position the console mounting bracket onto the rear shifter mounting studs. DO NOT HOOK UP THE SHIFT CABLES AT THIS TIME.
- Remove the five (5) bolts holding the shift tower to the transaxle. Refer to Figure 5.
- Remove the shift tower from the transaxle.
- Place the shift tower on a firm metal surface (for example, a vise) and with the aid of a hammer and punch, remove the roll pin from the shift tower lower shaft. Discard the roll pin. Refer to Figure 6.
- Clean the interface surface of the transaxle and the shift tower.
- Apply sealer (P/N 01052943 or the equivalent) to the transaxle case assembly. A very small amount is all that is needed (about 1/6 of an inch wide). Refer to Figure 7.
- Reinstall the shift tower into the transaxle.
- Install the five (5) shift tower to transaxle case retaining bolts. Refer to Figure 8.
- Verify that the shift tower is in the neutral position by lifting the levers. If the levers move easily, it is in neutral.
- Pull the shift cable assemblies out of the housing as far as they will go.
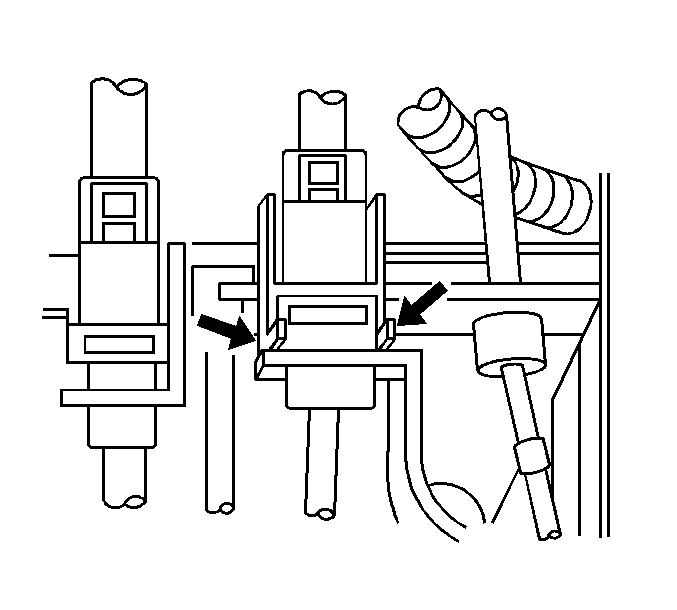
- From inside the vehicle, place the shift cables into the retainers. The cable with the white outer casing goes on the left and the black on the right. Snap the cables into the anchor plate. Do not close the retainers as the cables will need to be adjusted. Refer to Figure 9.
- From under the hood, attach the shift cables to the shift tower. The cable with the white outer casing goes to the bottom and the black sheathed cable to the top.
- Reinstall the relay and the air cleaner bracket to the vehicle.
- Reinstall the relay and fuse center in the bracket. Be sure it is properly snapped into place.
- Position the clutch master cylinder line into the bracket on the relay and air cleaner bracket.
- Reinstall the air cleaner assembly.
- Raise the vehicle on the hoist.
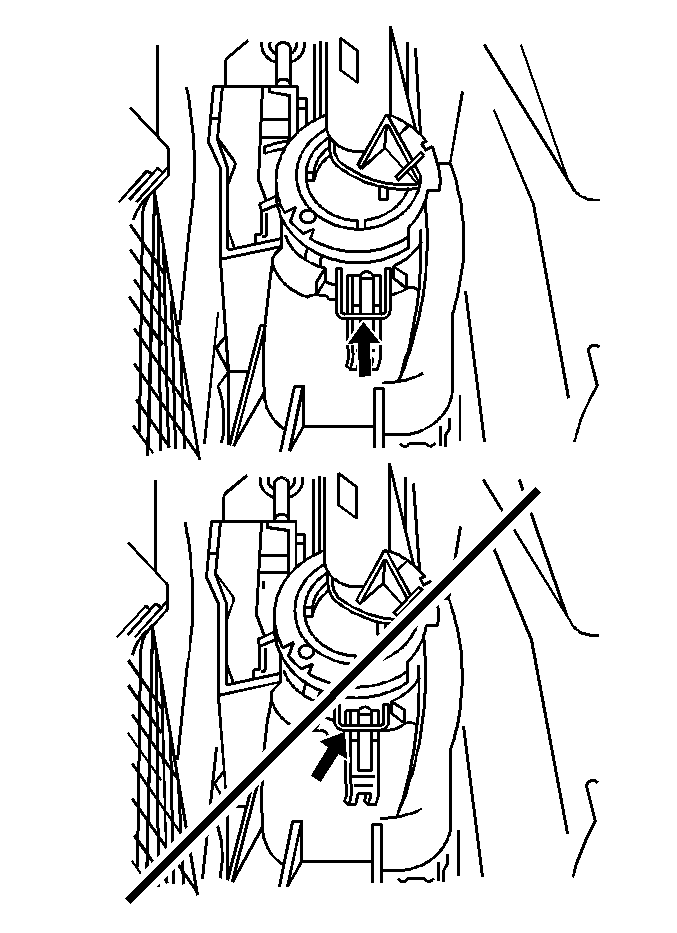
- Reinstall the specified bolt. Refer to Figure 10.
- Reinstall the left front fender inner closeout panels.
- Reinstall the left front tire and wheel assembly using the proper star pattern and the torque stick for tightening the lug nuts.
- Lower the vehicle.
- From inside the vehicle, close and lock the locking tabs for the shifter cables adjusters.
- With a straight-bladed screwdriver, gently pull/pry the neutral position U-clip out. Make sure it is locked into position on the shifter between the indents. Refer to Figure 11.
- Test the shifter operation. All the gears should easily engage. Readjust the shifter cables as required.
- Reconnect the BTSI cable to the shifter. Lock the cable into the cable bracket.
- Place the console into the proper position and install the two (2) nuts to the studs on the inside front of the console.
- Reinstall the four (4) side console bolts.
- Reinstall the two (2) bolts into the rear console bin.
- Complete the reinstallation of the remaining console components.
- Close and snap the shifter boot around the shifter handle.
- Reinstall the battery and hook up both battery cables.
- Road test the vehicle for proper shifter operation. Make numerous stops, starts and shifts through all the gears (including reverse) to ensure proper operation.
- Install the GM Campaign Identification Label.
Figure 1
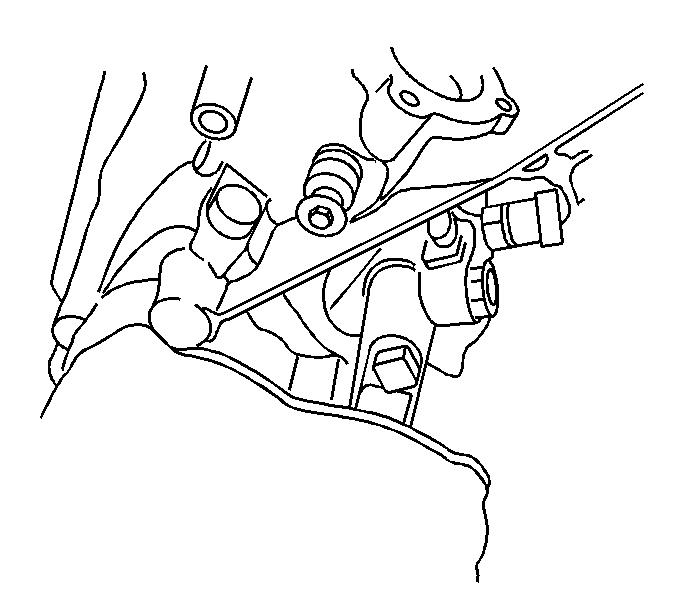
Figure 2
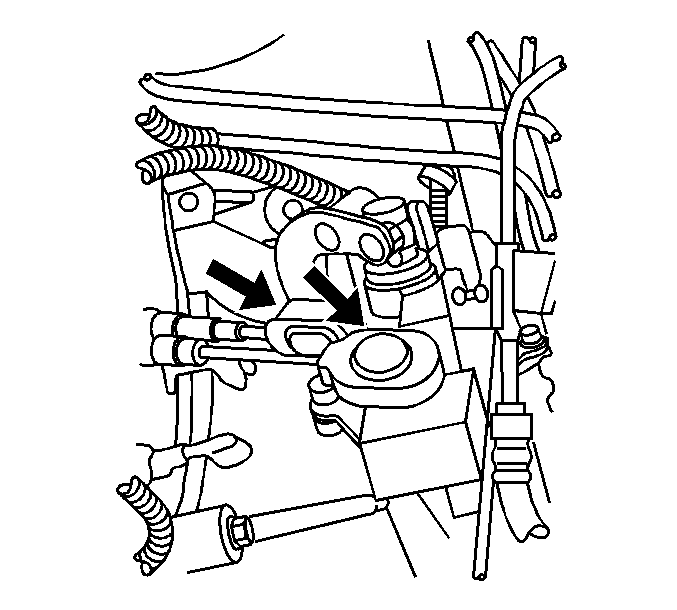
Figure 3
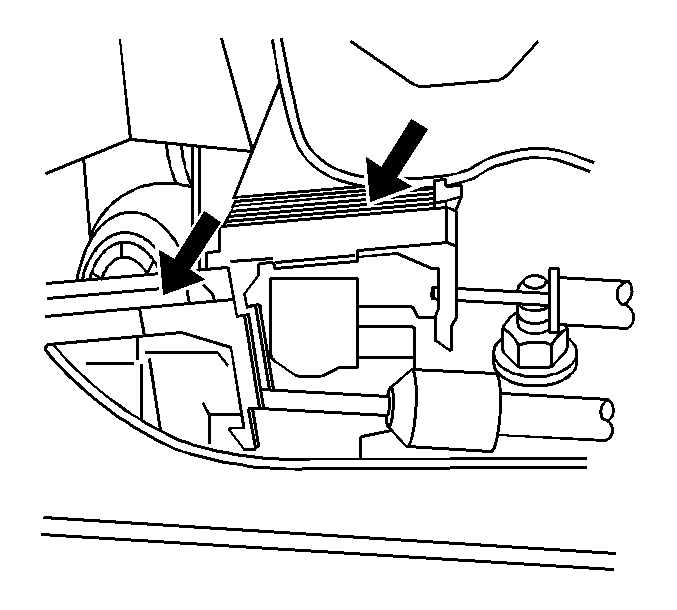
Figure 4
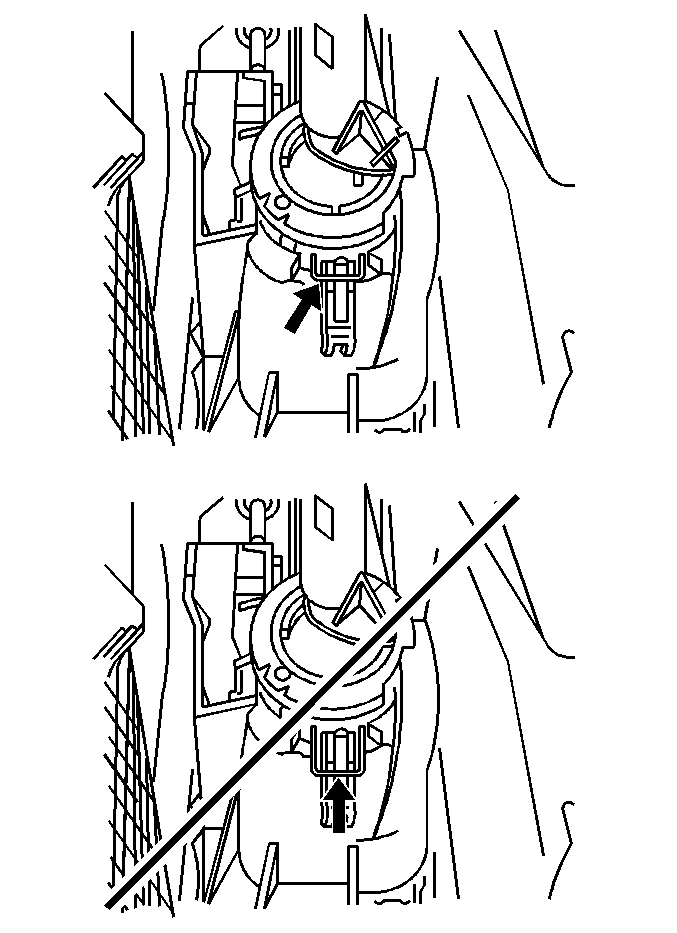
| • | Ensure that the shifter neutral position U-clip is pushed all the way in. If it isn't, find the neutral position between 3rd and 4th gear and push the U-clip in while moving the shifter handle very slightly. The U-clip should be close to the shifter assembly body. |
| • | The shift cable retainers are in the open position. |
Tighten
Tighten the nuts to 25 N·m (18 lb ft).
Figure 5
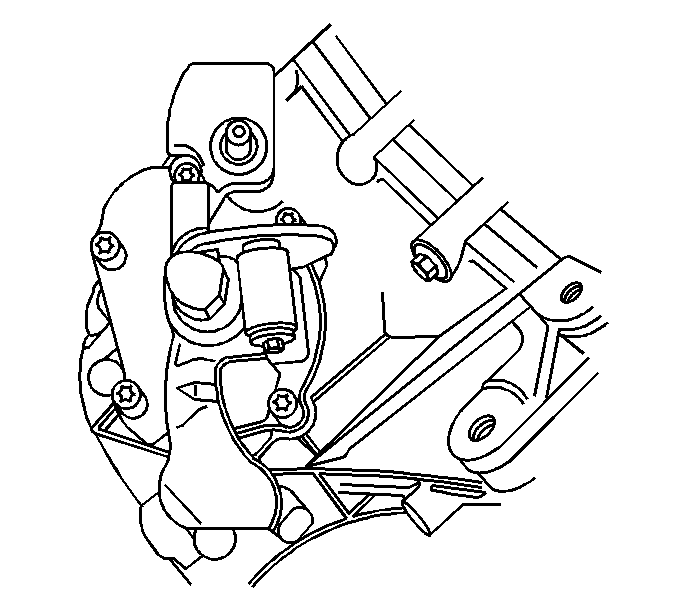
Figure 6
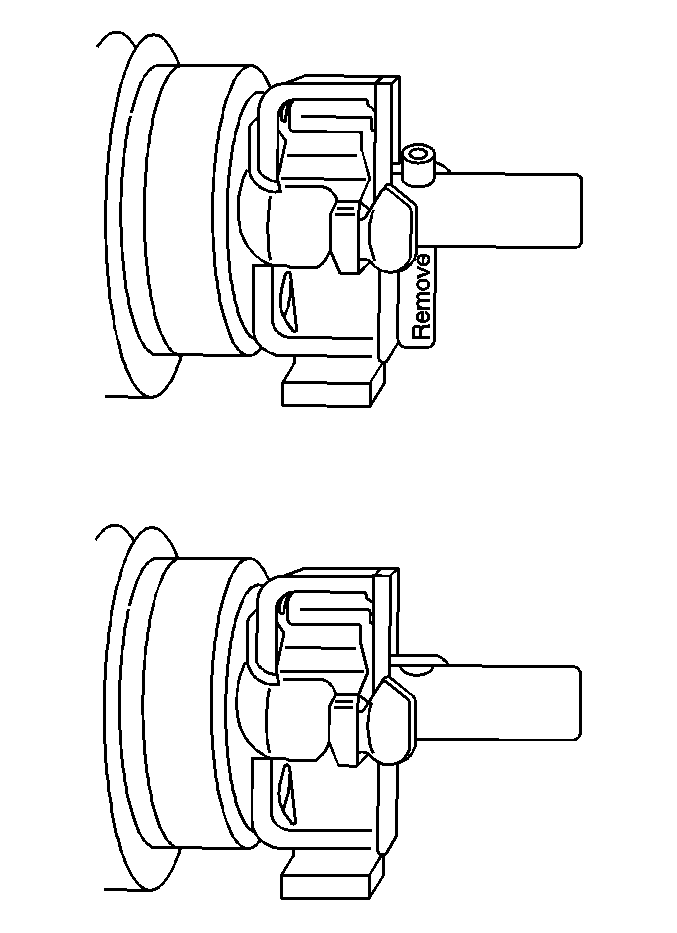
Figure 7
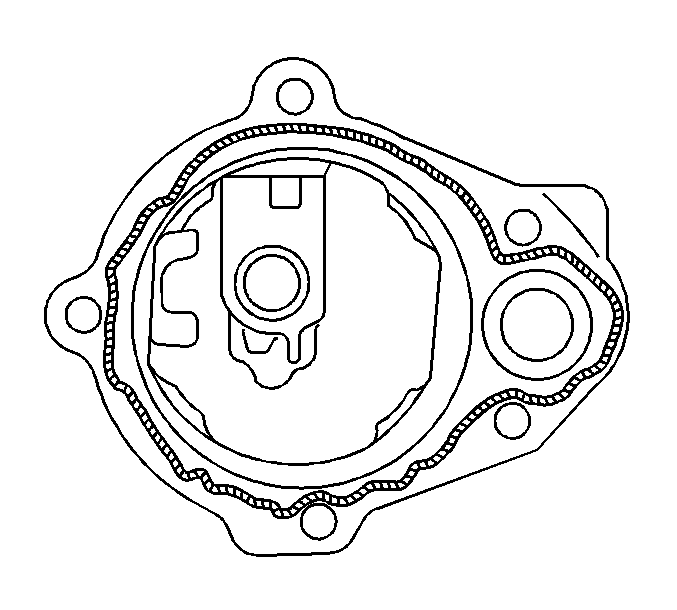
Figure 8

Tighten
Tighten the bolts to 25 N·m (18 lb ft).
Figure 9
Tighten
Tighten the four (4) bolts to 25 N·m (18 lb ft).
Figure 10

Figure 11
Tighten
Tighten the nuts to 2 N·m (18 lb in).
Tighten
Tighten the bolts to 2 N·m (18 lb in).
Tighten
Tighten the bolts to 7 N·m (61 lb in).
Campaign Identification Label
FOR US AND IPC
Place a Campaign Identification Label on each vehicle in accordance with the instructions outlined in this Product Campaign Bulletin. Each label provides a space to include the campaign number and the five (5) digit dealer code of the dealer performing the campaign service. This information may be inserted with a typewriter or a ball point pen.
Put the Campaign Identification Label on a clean and dry surface of the radiator core support in an area that will be visible to people servicing the vehicle. When installing the Campaign Identification Label, be sure to pull the tab to allow the adhesion of the clear protective covering. Additional Campaign Identification Labels for US dealers can be obtained from Dealer Support Materials by calling 1-888-549-6152 (Monday-Friday, 8:00 am to 5:00 pm EST). Ask for Item Number S-1015 when ordering.
Additional Campaign Identification Labels for IPC dealers can be obtained from your Regional Marketing Office.
Campaign Identification Label
FOR CANADA
Place a Campaign Identification Label on each vehicle in accordance with the instructions outlined in this Product Campaign Bulletin. Each label provides a space to include the campaign number and the five (5) digit dealer code of the dealer performing the campaign service. This information may be inserted with a typewriter or a ball point pen.
Put the Campaign Identification Label on a clean and dry surface of the radiator core support in an area that will be visible to people servicing the vehicle. Additional Campaign Identification Labels for Canadian dealers can be obtained from DGN by calling 1-800-668-5539 (Monday-Friday, 8:00 am to 5:00 pm EST). Ask for Item Number GMP 91 when ordering.
Claim Information
Submit a Product Campaign Claim with the information indicated below:
Repair Performed | Part Count | Part No. | Parts Allow | CC-FC | Labor Op | Labor Hours* | Net Item |
|---|---|---|---|---|---|---|---|
Disable 5th/Reverse inhibitor by removing a retaining pin and replace shifter assembly | 1 | 22678092 | ** | MA-96 | V0605 | 2.1 (Oldsmobile | *** |
2.2 (Pontiac) | |||||||
* -- For Campaign Administrative Allowance, add 0.1 hours to the "Labor Hours". ** -- The "Parts Allowance" should be the sum total of the current GMSPO Dealer Net price plus applicable Mark-Up or Landed Cost Mark-Up (for IPC) for the shifter assembly needed to complete the repair. *** -- The amount identified in the "Net Item" column should represent the sum total of the Current GMSPO Dealer Net Price applicable Mark-Up or Landed Cost Mark-Up (for IPC) for sealer needed to perform the required repairs. | |||||||
Refer to the General Motors WINS Claim Processing Manual for details on Product Campaign Claim Submission.
Customer Notification
FOR US AND CANADA
Customers will be notified of this campaign on their vehicles by General Motors (see copy of customer letter included with this bulletin).
Customer Notification
FOR IPC
Letters will be sent to known owners of record located within areas covered by the US National Traffic and Motor Vehicle Safety Act. For owners outside these areas, dealers should notify customers using the attached suggested dealer letter.
Dealer Campaign Responsibility
FOR US AND IPC (US States, Territories, and Possessions)
The US National Traffic and Motor Vehicle Safety Act provides that each vehicle that is subject to a recall campaign of this type must be adequately repaired within a reasonable time after the customer has tendered it for repair. A failure to repair within sixty days after tender of a vehicle is prima facie evidence of failure to repair within a reasonable time. If the condition is not adequately repaired within a reasonable time, the customer may be entitled to an identical or reasonably equivalent vehicle at no charge or to a refund of the purchase price less a reasonable allowance for depreciation. To avoid having these burdensome remedies, every effort must be made to promptly schedule an appointment with each customer and to repair their vehicle as soon as possible. In the recall campaign notification letters, customers are told how to contact the US National Highway Traffic Safety Administration if the campaign is not completed within a reasonable time.
This bulletin is notice to you that the new motor vehicles included in this campaign may not comply with the standard identified above. Under Title 49, Section 30112 of the United States Code, it is illegal for a dealer to sell a new motor vehicle which the dealer knows does not comply with an applicable Federal Motor Vehicle Safety Standard. As a consequence, if you sell any of these motor vehicles without first performing the campaign correction, your dealership may be subject to a civil penalty for each such sale.
Dealer Campaign Responsibility
ALL
All unsold new vehicles in dealers' possession and subject to this campaign MUST be held and inspected/repaired per the service procedure of this campaign bulletin BEFORE customers take possession of these vehicles.
Dealers are to service all vehicles subject to this campaign at no charge to customers, regardless of mileage, age of vehicle, or ownership, from this time forward.
Customers who have recently purchased vehicles sold from your vehicle inventory, and for which there is no customer information indicated on the dealer listing, are to be contacted by the dealer. Arrangements are to be made to make the required correction according to the instructions contained in this bulletin. This could be done by mailing to such customers a copy of the customer letter accompanying this bulletin. Campaign follow-up cards should not be used for this purpose, since the customer may not as yet have received the notification letter.
In summary, whenever a vehicle subject to this campaign enters your vehicle inventory, or is in your dealership for service in the future, please take the steps necessary to be sure the campaign correction has been made before selling or releasing the vehicle.
December, 2000Dear General Motors Customer:
This notice is sent to you in accordance with the requirements of the National Traffic and Motor Vehicle Safety Act.
Reason For This Recall
General Motors has decided that certain 2000-01 Oldsmobile Alero and Pontiac Grand Am model vehicles equipped with manual transaxles (RPO M86) fail to conform to these Federal/Canada Motor Vehicle Safety Standards: (FMVSS) 114, "Theft Protection," (CMVSS) 114, "Locking System." When a driver attempts to shift from 5th gear to reverse, a shift inhibitor causes the transmission to be mechanically in 4th gear even though the shift lever indicates reverse gear. In this situation, the key can be removed from the ignition while the transmission is in a forward gear, which is not permitted by the standard.
What Will Be Done
Your dealer will disable the 5th/Reverse inhibitor by removing a retaining pin and replace the shifter assembly. This service will be performed for you at no charge .
How Long Will The Repair Take?
The length of time required to perform this service correction is approximately 2 hours, 15 minutes. Additional time may be required to schedule and process your vehicle. If you dealer has a large number of vehicles awaiting service, this additional time may be significant. Please ask your dealer if you wish to know how much additional time will be needed schedule, process, and repair your vehicle.
Contacting Your Dealer
Please contact your dealer as soon as possible to arrange a service date. Parts are available and instructions for making this correction have been sent to your dealer.
Your dealer is best equipped to obtain parts and provide services to correct your vehicle as promptly as possible. Should your dealer be unable to schedule a service date within a reasonable time, you should contact the appropriate Customer Assistance Center at the number listed below:
Division | Number | Deaf, Hearing Impaired, or Speech Impaired* |
|---|---|---|
Pontiac | 1-800-762-2737 | 1-800-833-7668 |
Oldsmobile | 1-800-442-6537 | 1-800-833-6537 |
GMODC | (905)644-4112 |
|
Puerto Rico - English | 1-800-496-9992 |
|
Puerto Rico - Español | 1-800-496-9993 |
|
Virgin Islands | 1-800-496-9994 |
|
* Utilizes Telecommunication Devices for the Deaf/Text Telephones (TDD/TTY) | ||
If, after contacting the appropriate customer assistance center, you are still not satisfied that we have done our best to remedy this condition without charge and within a reasonable time, you may wish to write the Administrator, National Highway Traffic Safety Administration, 400 Seventh Street SW, Washington, DC 20590 or call 1-888-327-4236.
Customer Reply Card
The attached customer reply card identifies your vehicle. Presentation of this card to your dealer will assist in making the necessary correction in the shortest possible time. If you no longer own this vehicle, please let us know by completing the attached and mailing it in the postage paid envelope.
We are sorry to cause you this inconvenience; however, we have taken this action in the interest of your safety and continued satisfaction with our products.
General Motors Corporation
Enclosure
