REPAIR BODY SIDE MOLDINGS DAMAGE SCREW ADHESIVE RETAINED

Subject: REPAIR OF LOOSE OR DAMAGED SCREW/ ADHESIVE RETAINED BODY SIDE MOLDINGS - 1982 6000
To repair loose or damaged screw/adhesive retained body side moldings, perform the following operations:
1. Remove all attaching screws (if present). Using a heat gun, apply heat to soften adhesive. Then, carefully remove molding from body.
2. Remove all traces of adhesive from body side panel and molding (if to be reinstalled) with an oil free solvent, such as naptha or alcohol. Panel and molding must be thoroughly cleaned to assure proper adhesion of the molding to the body.
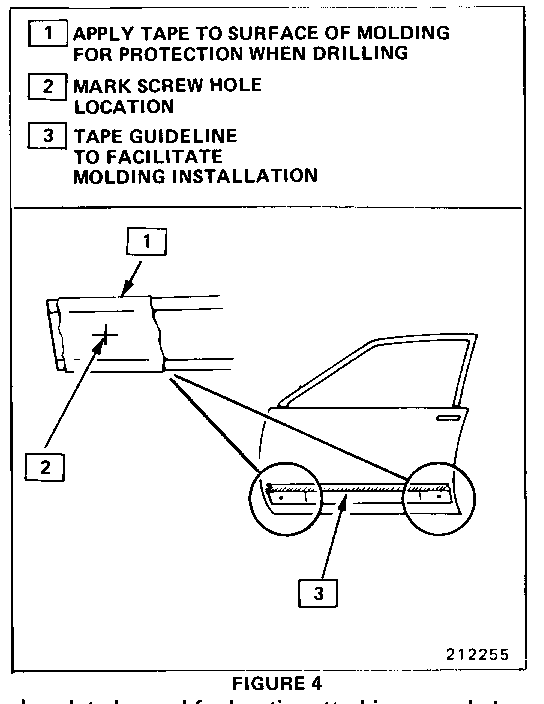
3. Apply a strip of masking tape across the body panels, to be used as a guideline, for installing replacement moldings (see Figure 4).
4. If original molding is to be reinstalled, apply 3M neoprene tape (part number 06379, if available, or 06377 or 06378) to back of molding.
5. If a new body side service molding is to be installed, cut the molding to the desired length with a hacksaw. Finish edge of molding with 360 grit abrasive paper. Body side service moldings are serviced in two (2) lengths, 1356.5mm, group number 12.112, and 371.5mm, group number 12.116, and are available through WDDGM.
6. If the body temperature is below 70 F, warm the body panel with a heat lamp or heat gun. Warming the body will promote adhesion of the molding to the body.
7. Center the molding side to side on the panel and align upper edge of molding with masking tape (see Figure 4). Apply heavy even pressure over entire length of molding to establish proper adhesion of the molding to the body panel.
8. On all replacement moldings or molding without attaching screw holes, apply a piece of masking tape onto the surface of the molding, at each end, to be used for locating attaching screw holes, and for protection during drilling operation (see Figure 4).
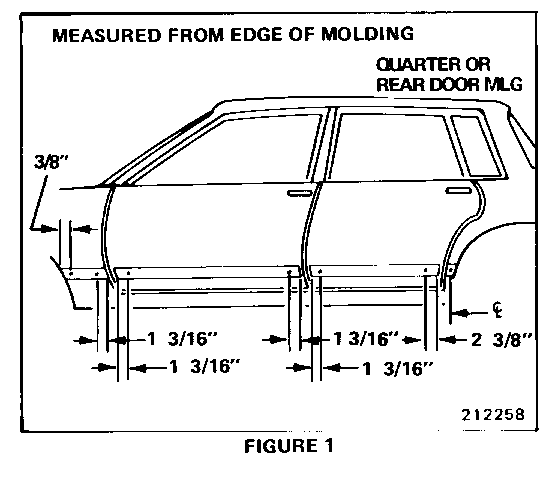
9. On all replacement moldings, refer to Figure 1 for specific location, and drill a 1/8" attaching hole complete through the molding and panel assembly.
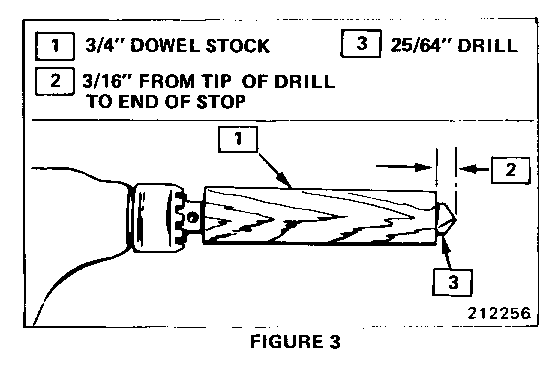
10. Using a 25/64" drill and a piece of 3/4" dowel stock, fabricate a countersink as shown in Figure 3. The countersink is used for counter- sinking the holes in the molding to the proper diameter and depth.
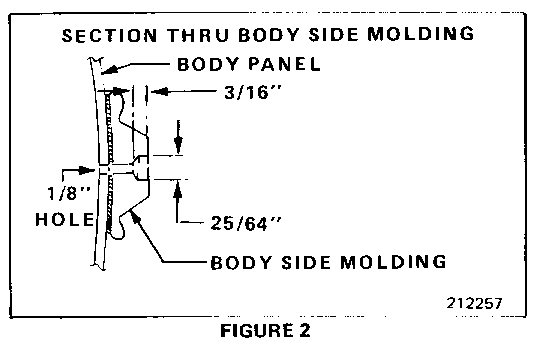
11. A rust protective coating should be applied to the screw holes in the body panels (see Figure 2).
12. Countersink all attaching screw holes in the replacement moldings.
13. Install screw, *11503537, (1" long) into all body side attaching screw holes.


General Motors bulletins are intended for use by professional technicians, not a "do-it-yourselfer". They are written to inform those technicians of conditions that may occur on some vehicles, or to provide information that could assist in the proper service of a vehicle. Properly trained technicians have the equipment, tools, safety instructions and know-how to do a job properly and safely. If a condition is described, do not assume that the bulletin applies to your vehicle, or that your vehicle will have that condition. See a General Motors dealer servicing your brand of General Motors vehicle for information on whether your vehicle may benefit from the information.
