POOR ENGINE PERFORMANCE CATALYTIC CONVERTER REPAIR

Subject: REPAIR PROCEDURES FOR DUAL BED BEAD CATALYTIC CONVERTERS - ALL 1981-1982 VEHICLES EQUIPPED WITH DUAL BED BEAD CATALYTIC CONVERTERS
A new repair procedure has been developed for servicing dual bed bead catalytic converters. This procedure consists of transferring the catalyst beads from a plugged or externally damaged (not internally damaged or expanded) dual bed converter to an empty newly designed dual bed bead converter shell. Used beads from an expanded or internally damaged converter cannot be used in the new empty converter shell.
Vehicles which had the original dual bed converter replaced with a single bed converter or a 1982 vehicle produced with a single bed converter, (built after April 17, 1982) should be serviced with the same single bed converter and, therefore, are not involved in this bulletin.
Models involved with this new procedure are shown below:
VEHICLE CONFIGURATION VEHICLES INVOLVED ----------------------------------------- ------------------ 1981-1982 Firebird With 4-Speed Manual All Transmission And 5.OL Engine
1982 Firebird With 3-Speed Auto- SOP - CN508894 matic Transmission And 5.OL Engine SOP - C L 529315
INSPECTION PROCEDURE
1. Raise vehicle on hoist.
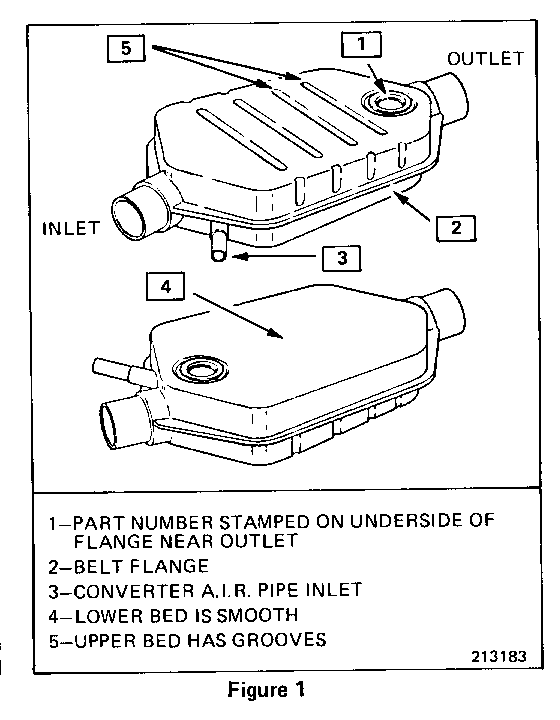
2. See Figure 1 (shown on the reverse side) for the location of the catalytic converter part number.
3. If the converter part number is in Column 1 of table below, order the appropriate replacement converter shell identified in Column 2. Vehicles with converters not listed in Column 1 will require the same converter as was removed (single bed converter).
Column 1 Column 2 ------------- ---------------------- Original Dual Replacement Empty Dual Bed Bead Converter Bed Bead Converter Shell ---------------------------------------------------------- 8999648 25056675
8999830 25056676
BEAD TRANSFER PROCEDURE
CAUTION:
Catalytic converter beads contain platinum, palladium and/or rhodi- um. Catalyst beads may be finely coated with lead compounds, therefore, precautions should be taken to minimize dust during the transfer procedures. These precautions include:
o Pouring water into the catalytic converter prior to removing beads as described in Step 5.
o Using a suitable dust mask, rubber gloves and safety glasses is recommended when handling catalyst beads.
o Applicable OSHA standards should be reviewed.
o Allowing the catalytic converter to cool before handling.
o Listed below are the tools required to perform repair procedures. (These tools are considered part of the 1984 Essential Tool Package.)
TOOL NUMBER DESCRIPTION NUMBER REQUIRED ------------------------ ------- ------------ Converter Plug Installer J-34118 1
Catalytic Converter Bead Replacement Kit J-34155 1
Replacement Kit Includes: Sifting Pan J-34155-1 1 Storage Pan J-34155-2 2 Funnel J-34155-3 1
1. Disconnect the air supply pipe from the catalytic converter.
2. Disconnect the intermediate pipe from rear of converter.
3. Disconnect hanger bracket from converter.
4. Remove front exhaust clamp and remove converter.
5. Stand old converter upright on inlet end and pour two (2) eight ounce (8-ounce) cups of water into outlet end to control catalyst dust.
6. Using a hammer and chisel, remove the upper bed fill hole plug (refer to Figure 1 for description of upper and lower beds) from the old converter by driving chisel between the converter shell and rim of fill plug. Deform the fill plug until it can be removed with a pliers.
7. Hold the converter over a clean pan (J-34155-2) and empty catalyst beads into the pan by shaking and tapping the converter belt flange (refer to Figure 1) with rubber mallet.
NOTICE: If the upper bed is empty or near empty (a cupful or less) of catalyst beads, the converter is considered to be damaged (internally) or expanded and are not to be used in the new con- verter shells. Unusable beads and dust can be returned via the normal exchange program.
8. Pour upper bed beads into sifting pan (J-34155-1) to sift out any broken (smaller) beads into a clean box. Pour the sifted beads into the first pan (J-34155-2) and set aside until later.
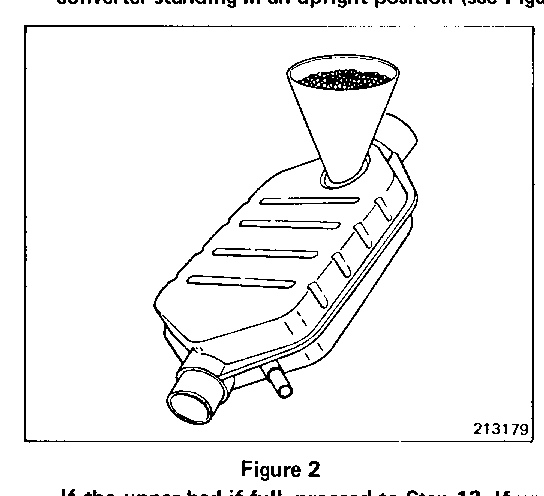
9. Prop the new converter shell up to a 45" angle with the upper bed fill hole at the top (refer to Figure 1). Tap funnel (J-34155-3) into the converter upper bed fill hole with a rubber mallet (see Figure 2 below).
10. Pour a packet of new upper bed beads (kit part number 25056590) into the upper bed of the new converter shell.
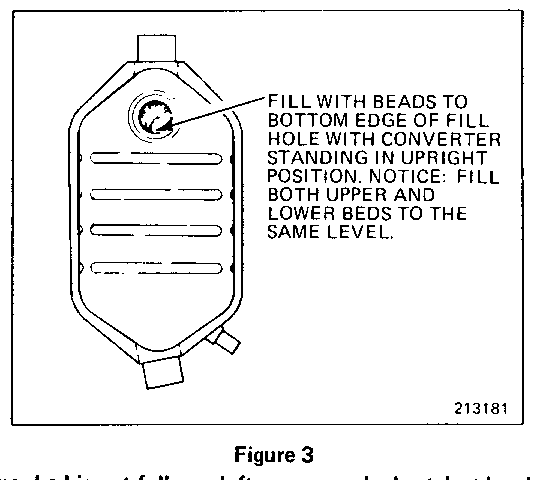
11. Pour the sifted upper bed beads referred to in Step 8 and/or some additional new upper bed beads (if required) into upper bed. Tap the belt flange of converter with a rubber mallet to allow beads to settle and continue filling and tapping until the beads are up to the bottom edge of the fill hole with the converter standing in an upright position (see Figure 3).
If the upper bed if full, proceed to Step 12. If upper bed is not full, use leftover upper bed catalyst beads from other involved dual bed converters to fill upper bed. If there are not enough used upper bed beads, obtain a upper bed bead kit (part number 25056680) to finish filling the upper bed.
NOTICE: Any leftover upper bed beads can be saved for future use. Store any unused upper bed beads in a clean container marked "upper bed." DO NOT MIX UPPER AND LOWER CATALYST BEADS. Also, do not mix any other catalyst beads from converters other than converters involved in this bulletin.
12. Lay the converter down on a flat surface with the upper bed facing up.
13. Insert a fill plug already provided in kit into the upper bed fill hole. if the outer rim of the fill plug doesn't seat flat against the converter shell, remove enough beads so it does.
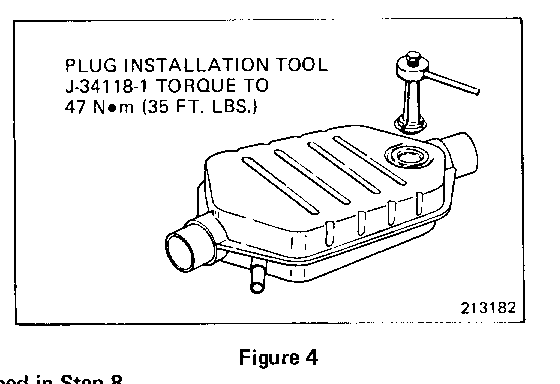
14. With the fill plug in fill hole, insert tool J-34118 into fill plug and tighten to 47 Nm (35 ft. lbs.) making sure the fill plug outer rim is flat and tight against the converter shell. Set new converter aside until later (see Figure 4).
15. Remove the lower bed fill hole plug from the original converter using procedures described in Step 6.
16. Hold the converter over a clean pan (J-34155-2) and empty the catalyst beads by shaking and tapping the converter belt flange with a rubber mallet (refer to Figure 1).
17. Sift the lower bed beads using procedures described in Step 8.
18. Prop the new converter shell up at a 45 angle with the lower bed fill hole at the top. Tap funnel (J-34155-3) into converter fill hole with a rubber mallet (refer to Figure 2).
19. Pour the sifted lower bed beads referred to in Step 17 and/or new lower bed beads (if required), into the new converter lower bed. Tap the belt flange with rubber mallet to allow the beads to settle. Continue filling and tapping until the lower bed of the converter is full (refer to Figure 3).
If the lower bed if not full, use leftover lower bed catalyst beads saved from other involved dual bed converters. If there are not enough used lower beads, obtain a lower bed bead service kit (part number 25056682) and continue filling the lower bed until full.
NOTICE: The leftover lower bed beads can be saved for future use. Store them in a clean container marked "lower bed." DO NOT MIX UPPER AND LOWER BEADS. Also, do not mix any other catalyst beads from converters other than converters involved in this bulletin.
20. Lay the converter down on a flat surface with lower bed facing upwards and install the fill plug using procedure described in Steps 13 and 14.
21. Reverse the removal procedure to install the new converter. Refer to the appropriate Service Manuals for the correct installation torques.
WARRANTY INFORMATION
Labor Operation T3118 Time Allowance .9 Hr. Trouble Code 56
PARTS LIST NUMBER REQUIRED PART PER DESCRIPTION NUMBER CARLINE VEHICLE ------------------------ -------- ------- ---------- Upper Bed Rebuilt Kit 25056590 All 1 (Contains 300 grams of upper bed catalyst, two (2) fill hole plugs and instruction sheet.)
Upper Bed Bead Kit 25056680 All As Required (Contains 700 grams of catalyst beads, no fill hole plugs or instruction sheet.)
Lower Bed Bead Kit 25056682 All As Required (Contains 1,000 grams of catalyst beads, no fill hole plugs or instruction sheet.)


General Motors bulletins are intended for use by professional technicians, not a "do-it-yourselfer". They are written to inform those technicians of conditions that may occur on some vehicles, or to provide information that could assist in the proper service of a vehicle. Properly trained technicians have the equipment, tools, safety instructions and know-how to do a job properly and safely. If a condition is described, do not assume that the bulletin applies to your vehicle, or that your vehicle will have that condition. See a General Motors dealer servicing your brand of General Motors vehicle for information on whether your vehicle may benefit from the information.
