REDUNDANT STEERING WHEEL CONTROL CONCERNS

VEHICLES AFFECTED: 1989 W-CAR
Some customers may comment that the redundant steering wheel control system for the radio or A/C is not functioning properly. Vehicles produced before VIN 1445106 (Buick), F261340 (Pontiac), and D338684 (Oldsmobile) are affected.
Some of the symptoms that have been reported include:
- Lights in steering wheel pad buttons flicker or go out for short periods of time.
- Radio will intermittently shut off or change stations.
- Radio is heard only through left front speaker when ignition is turned on requiring owner to reset fade and balance controls whenever ignition is cycled. (OLDSMOBILE AND PONTIAC ONLY)
- Some of the buttons are hard to push. (BUICK AND OLDSMOBILE ONLY)
- Redundant A/C control buttons on left side of steering wheel pad are intermittent or inoperative. (OLDSMOBILE ONLY).
Unless otherwise noted, each of the following changes should be made to repair affected vehicles:
STEP 1. SLIP RING BRUSH AND SPRING REPLACEMENT
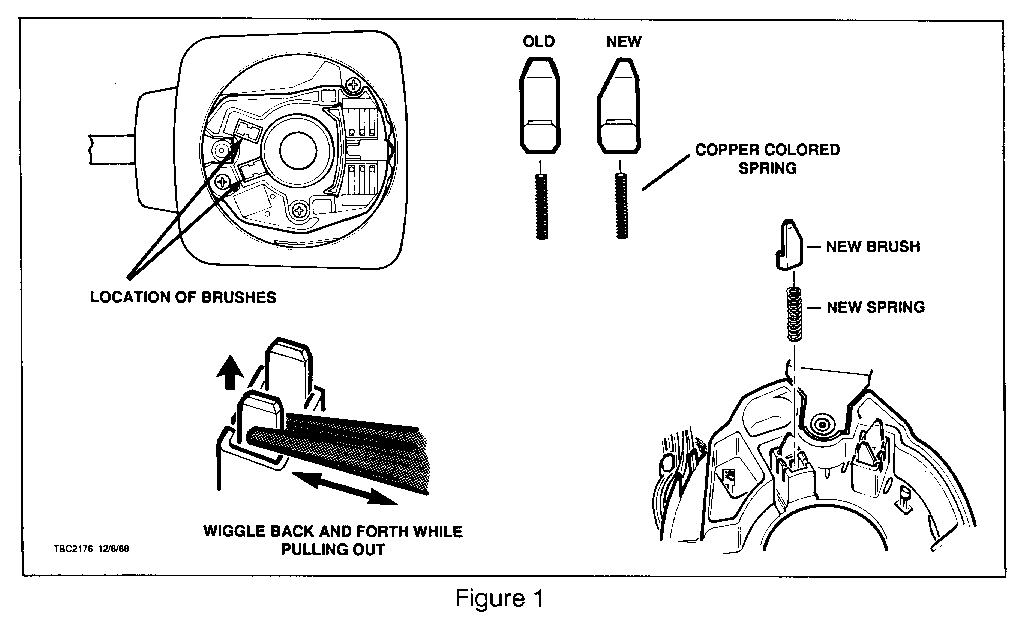
* Replace 4 slip ring brushes and springs in steering column using kit, P/N 10456442. (See Figure 1).
STEP 2. IS FOR OLDSMOBILE AND BUICK ONLY
On vehicles with a steering wheel control pad date coded before 10-1-88 (100188) install a new pad. The date code is located on the back of the pad and may be seen after the pad is removed.
New Control Pad Colour Division --------------- ------ -------- * * 16061754 Black Buick 16137283 Med. Beechwood Oldsmobile 16137293 Graphite Oldsmobile 16137263 Garnet Red Oldsmobile 16137303 Dk. Gray Oldsmobile 16137273 Dk. Saphire Oldsmobile
IMPORTANT (FOR OLDSMOBILE ONLY):
If a new steering wheel pad has been installed in Step 2, skip Step 3.
If a new pad is not available, the delay relay in Step 3 may be installed until the new pad is available. If the new pad is installed at a later date, the delay relay should be removed.
* STEP 3. DELAY RELAY INSTALLATION - PONTIAC AND OLDSMOBILE ONLY
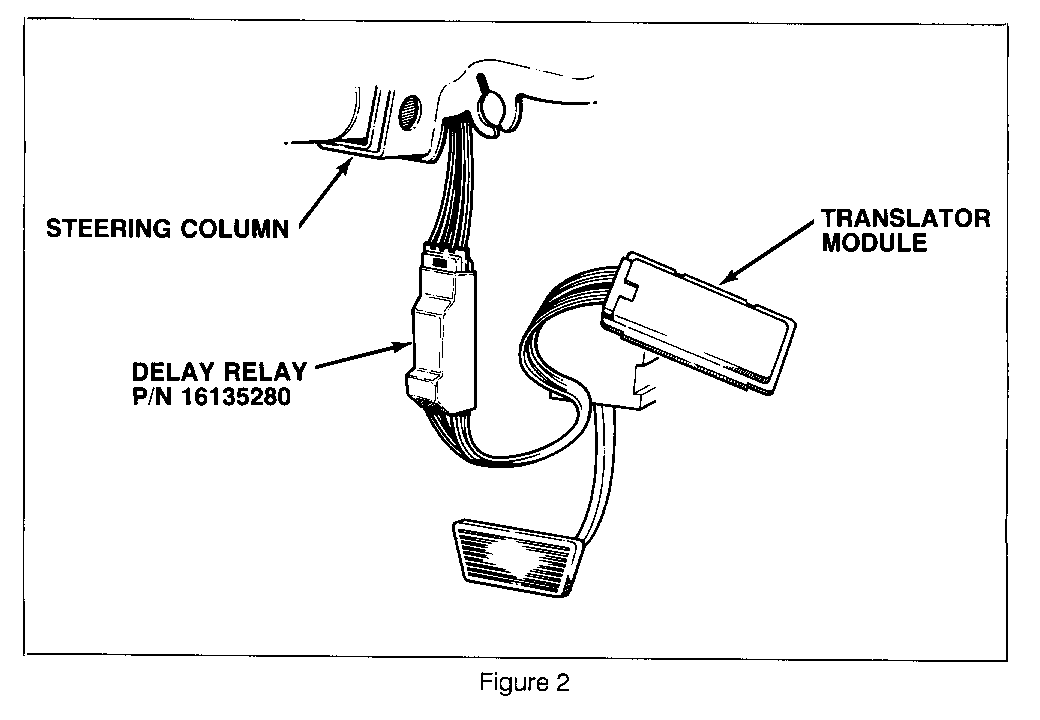
Install a new delay relay, P/N 16135280 between steering column wiring harness and translator module. Module is located on lower right hand side of the steering column. (See Figure 2)
STEP 4 IS FOR OLDSMOBILE ONLY
STEP 4. A/C CONTROL HEAD REPLACEMENT
Replace A/C control head on vehicles with C68 automatic temperature control.
1228880 With defog (C49) option 1228881 Without defog (C49) option
SERVICE PROCEDURE
ATTENTION:
PONTIAC, OLDSMOBILE AND BUICK ---------- ------------------------------ PONTIAC SHOULD ONLY USE STEPS 1-11, 13-18 AND 24
OLDSMOBILE SHOULD USE STEPS 1-24
BUICK SHOULD ONLY USE STEPS 1- 13 AND 24
SLIP RING BRUSH AND SPRING REPLACEMENT
1). Disconnect negative battery cable.
2). Remove steering wheel radio control pad.
3). Disconnect plug at cancelling cam, then disconnect horn contact connector.
4). Remove safety retaining ring and wheel nut. Remove steering wheel.
NOTICE: WHEN REMOVING A STEERING WHEEL WITH REDUNDANT ELECTRONIC ACCESSORY CONTROLS IN THE HUB, CARE MUST BE TAKEN TO AVOID DAMAGE TO ELECTRONIC CIRCUITS. WHEEL PULLER BOLTS, USED WITH SPECIAL TOOL J1859-03, SHOULD BE TURNED INTO STEERING HUB NO MORE THAN FIVE COMPLETE TURNS. THIS WILL PREVENT BOLT CONTACT WITH SENSITIVE ELECTRONIC CIRCUITS. REFERENCE BULLLETIN # 89-8-117.
5). Remove cancelling cam from turn signal switch.
6). Using pliers, remove four brushes and springs by rocking each brush back and forth while pulling it up and out of position. (See Figure 1) Discard springs and brushes.
IMPORTANT: Make sure loose parts don't fall into column. --------- 7). Insert one new spring into end of each new brush.
8). Position each new spring and brush assembly on turn signal switch as shown. Press down and lock each assembly in position. When all four spring and brush assemblies are locked in position, press down and release each brush to check for proper movement.
9). Install cancelling cam.
10). Install steering wheel, wheel nut, and safety snap ring.
11). Connect horn contact wire and cancelling cam wiring.
12). Check date code on steering wheel pad. If it is before10-1-88 (100188) a new pad is required. (See previous pad chart for part number.)
13). Install steering wheel control pad.
IMPORTANT: (FOR OLDSMOBILE ONLY) --------------------------------- If a new steering wheel pad has been installed skip to Step 19.
DELAY RELAY INSTALLATION
14). Remove lower sound insulator panel and steering column trim panel.
15). Disconnect translator module from steering column wiring harness. Module is a clear plastic box located on right side of steering column. (See Figure 2)
16). Connect delay relay, P/N 16135280 in series with translator module.
17). Tape relay and translator module together and tuck them up next to steering column.
18). Reinstall steering column trim panel and lower sound insulator.
A/C CONTROL HEAD REPLACEMENT
19). Remove instrument cluster trim plate. Tilt top of trim plate downward releasing clips that mount the bottom of the plate to the dash.
20). Remove accessory trim center plate or sport pad assembly by again tilting the top downward to release clips.
21). Remove A/C control head.
22). Install new A/C control head, (See previous A/C control Head chart for part number)
23). Reinstall accessory trim centre plate or sport pad and cluster trim
24). Reconnect negative battery cable.


General Motors bulletins are intended for use by professional technicians, not a "do-it-yourselfer". They are written to inform those technicians of conditions that may occur on some vehicles, or to provide information that could assist in the proper service of a vehicle. Properly trained technicians have the equipment, tools, safety instructions and know-how to do a job properly and safely. If a condition is described, do not assume that the bulletin applies to your vehicle, or that your vehicle will have that condition. See a General Motors dealer servicing your brand of General Motors vehicle for information on whether your vehicle may benefit from the information.
