UPPER EDGE OF BODYSIDE MOLDING GAPS-NEW MOLDING RETAINER

SUBJECT: UPPER EDGE OF DOOR MOUNTED BODY SIDE MOLDING GAPS TO DOOR (NEW MOLDING RETAINER)
VEHICLES AFFECTED: 1990 PONTIAC GRAND PRIX STE SEDAN
Condition:
--------- Upper edge of door mounted body side molding gaps to door.
Correction:
---------- Install new style molding retainers using following instructions:
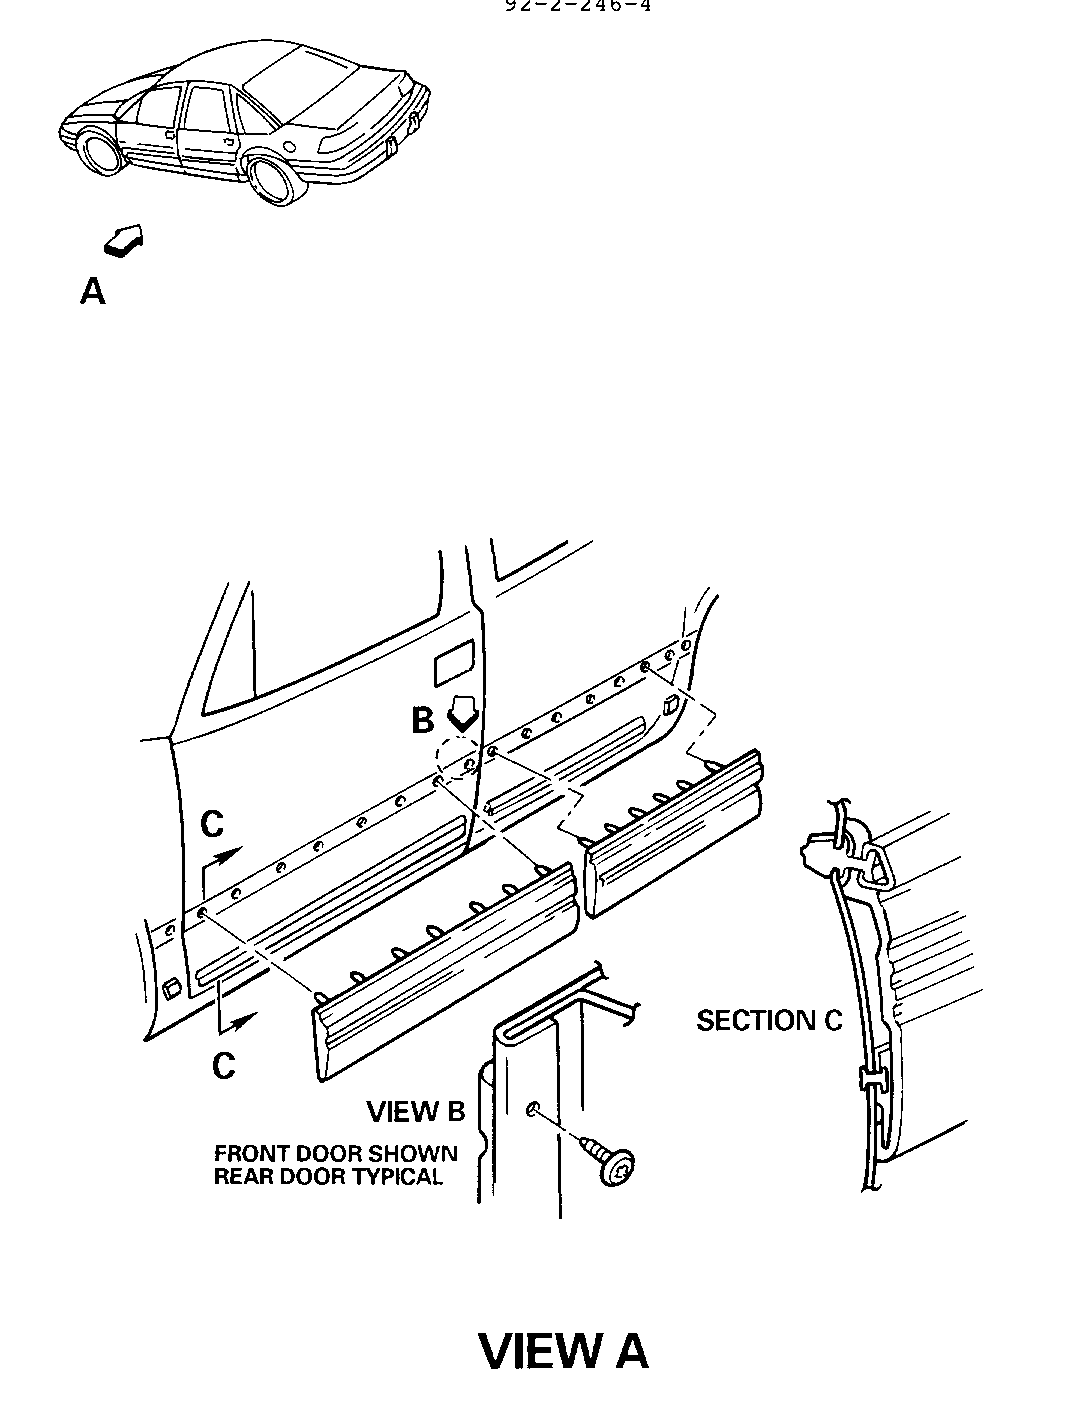
Parts Required: 1 (per door) retainer kit P/N 12518531 -------------- 1. Remove molding from vehicle as follows: (Refer to View A)
A. Open door and remove molding retaining screw located at rear edge of door.
B. Close door and carefully separate molding from retainers by pulling top edge of molding from door. Be careful not to permanently distort the bright molding insert.
C. Remove molding from door by sliding molding downward to release it from lower retainers.
2. Using appropriate tool, remove white upper retaining clips from door and discard.
3. Remove bright molding insert from the painted molding as follows:
A. Remove retainers from back side of molding assembly by turning 1/4 turn and gently prying from assembly. There are six retainers on front doors and five on rear doors.
NOTICE: On some vehicles, glue was used to ensure the position of the black retainers. Gentle prying may be required to remove the retainers after they have been turned.
B. Note the position of the push-in fastener (christmas tree) at the forward edge of the molding.
C. Slightly flex the bright molding insert and remove it from the painted molding.
4. Position the painted molding on the door ensuring that the bottom edge of the molding is retained by the retainers and that the hole where the push-in fastener (christmas tree) was located is aligned with the appropriate hole in the door. Tape the molding to the front and rear edge of the door hem flange using cloth body tape.
5. Using the molding as a template, mark the location of the bright molding retainer holes on the door with a grease pencil. Six locations for front door, five locations for rear door.
6. Remove the molding from the door.
7. Center punch the marked locations.
8. Ensure that door glass is in the full up position.
9. Drill holes at the marked locations using a 7 mm (9/32 inch) drill bit with a drill stop set at 12 mm (1/2 inch).
10. Use a small "rat tail" file to remove flash at edges of all holes.
11. Treat all holes with a zinc-rich primer to prevent corrosion. Follow manufacturer's recommendations for drying time.
12. Remove white "nut" from end of bright molding insert and slide appropriate number of new "rosebud" fasteners on to bright molding insert (six for front doors, five for rear doors) and position them to align with holes in painted molding. Replace the push-in fastener (christmas tree) if necessary.
13. Reinstall white "nut" on bright molding insert.
14. Slightly flex the bright molding insert and install it in the painted molding. Be sure that the push-in fastener (christmas tree) is positioned at the forward edge of the molding.
15. Position the lower edge of the molding under the lower retainers, then push the push-in (christmas tree) and "rosebud" fasteners into the holes in the door. Make sure all fasteners are fully installed.
16. Reinstall molding retaining screw at rear edge of door.
For vehicles repaired under warranty use:
Labor Time: 0.4 Hour (One Door) 0.3 Hour (Each Additional Door) Not to Exceed 1.3 Hours.

General Motors bulletins are intended for use by professional technicians, not a "do-it-yourselfer". They are written to inform those technicians of conditions that may occur on some vehicles, or to provide information that could assist in the proper service of a vehicle. Properly trained technicians have the equipment, tools, safety instructions and know-how to do a job properly and safely. If a condition is described, do not assume that the bulletin applies to your vehicle, or that your vehicle will have that condition. See a General Motors dealer servicing your brand of General Motors vehicle for information on whether your vehicle may benefit from the information.
