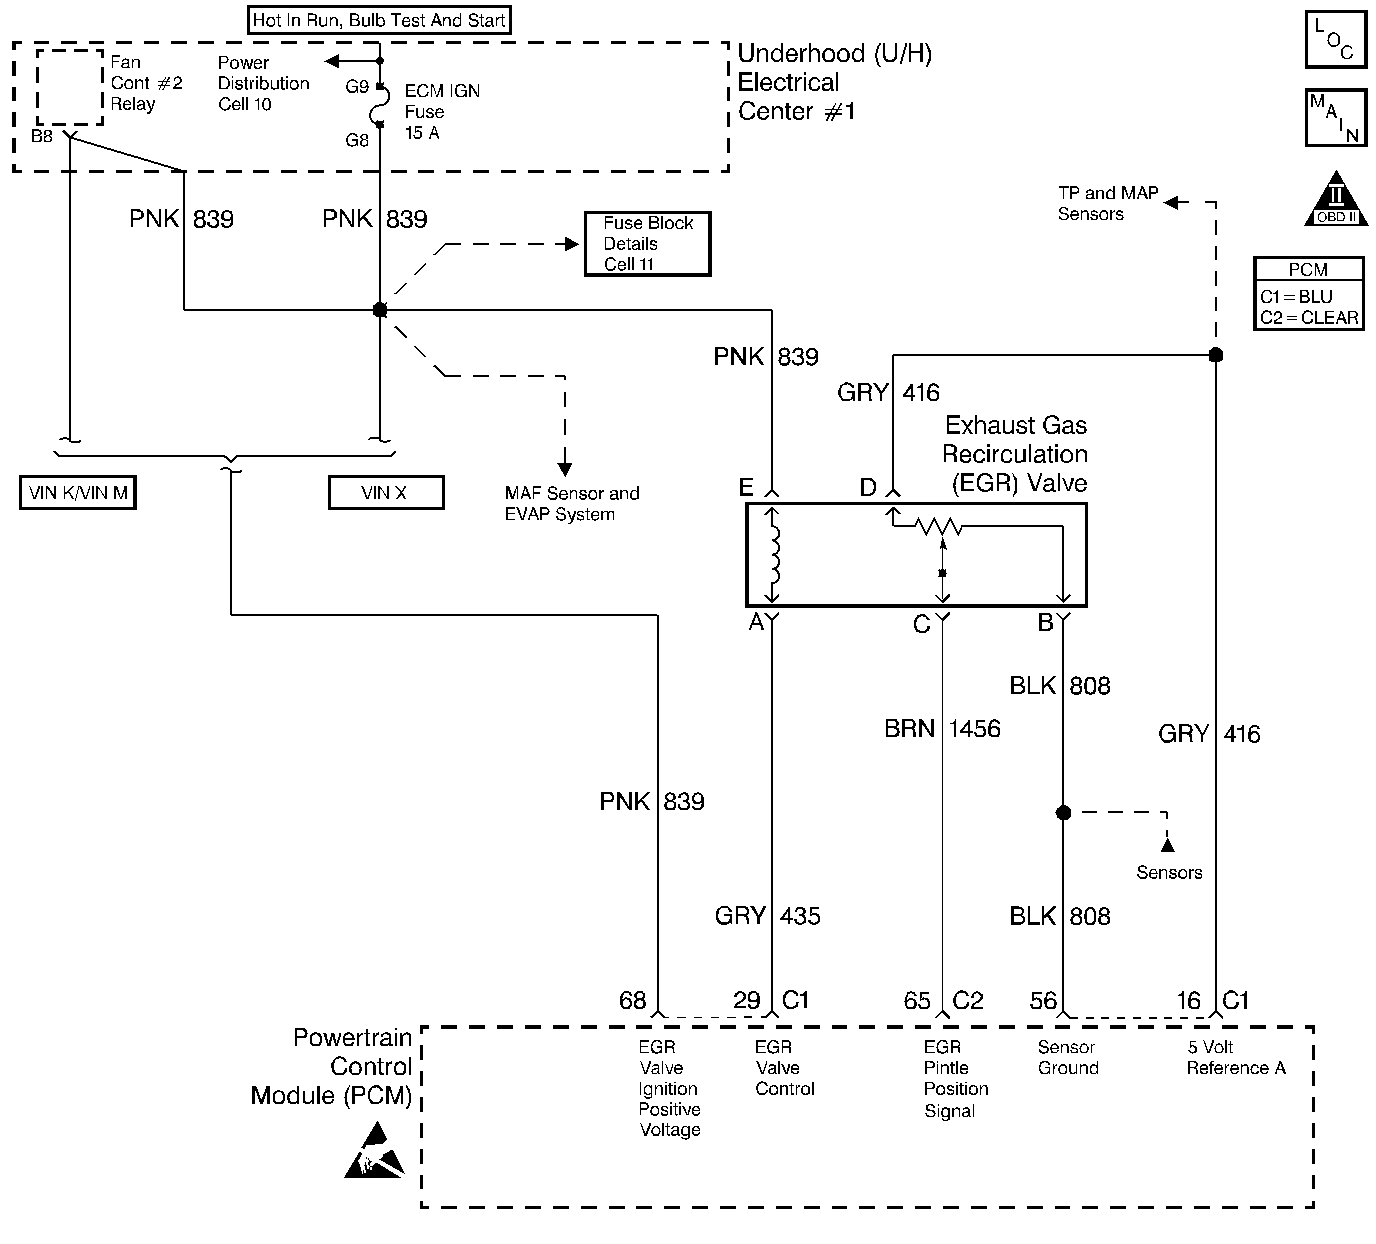
Circuit Description
The PCM monitors the EGR valve pintle position input to ensure that the valve responds properly to commands from the PCM and to detect a fault if the pintle position sensor and control circuits are open or shorted. If the PCM detects a pintle position signal voltage outside the normal range of the pintle position sensor, or a signal voltage that is not within a tolerance considered acceptable for proper EGR system operation, the PCM will set DTC P1406.
Conditions for Setting the DTC
EGR Feedback is less than 0.14 volt at any time.
OR
EGR Feedback is 0.4 volt greater or less than the EGR Closed Valve Pintle Position when the Desired EGR Pos is commanded to 0%.
OR
| • | Actual EGR Pos is 20% greater or less than the Desired EGR Pos. |
| • | Any of the above conditions present for longer than 20 seconds. |
Action Taken When the DTC Sets
| • | The PCM will illuminate the malfunction indicator lamp (MIL) during the second consecutive trip in which the diagnostic test has been run and failed. |
| • | The PCM will store conditions which were present when the DTC set as Freeze Frame and Failure Records data. |
Conditions for Clearing the MIL/DTC
| • | The PCM will turn OFF the MIL during the third consecutive trip in which the diagnostic has been run and passed. |
| • | The History DTC will clear after 40 consecutive warm-up cycles have occurred without a malfunction. |
| • | The DTC can be cleared by using the scan tool. |
Diagnostic Aids
Check for the following conditions:
| • | Excessive deposits on EGR valve pintle or seat. Check for deposits that may interfere with the EGR valve pintle extending completely or cause the pintle to stick. |
| • | Poor connection or damaged harness. Inspect the wiring harness for damage. If the harness appears to be OK, observe the EGR actual position display on the scan tool while moving connectors and wiring harnesses related to the EGR valve. A change in the display will indicate the location of the fault. |
Important: If the EGR valve shows signs of excessive heat, check the exhaust system for blockage (possibly a plugged catalytic converter) using the Restricted Exhaust System Check.
Reviewing the Fail Records vehicle mileage since the diagnostic test last failed may help determine how often the condition that caused the DTC to be set occurs. This may assist in diagnosing the condition.
Test Description
Number(s) below refer to the step number(s) on the Diagnostic Chart.
-
Verifies that the fault is present.
-
If DTC P01406 will only set under certain conditions, the fault may be intermittent refer to Diagnostic Aids. If an intermittent wiring problem is not present, check for an open EGR ignition circuit to the PCM. Connect a test light to ground and probe the EGR ignition at the PCM harness connector. With the ignition ON, the test light should be ON. If not, repair the open in the EGR ignition circuit. If the test light is ON, check for a faulty connection at the PCM. If the connection at the PCM is OK and DTC P1406 continues to set, replace the EGR valve.
Step | Action | Value(s) | Yes | No |
|---|---|---|---|---|
1 | Was the Powertrain On-Board Diagnostic System Check performed? | -- | Go to the Powertrain On Board Diagnostic System Check | |
With the engine idling, observe the EGR ACTUAL POS. display on the scan tool EGR data list. Is EGR ACTUAL POS. at the specified value? | 0% | |||
Select the scan tool Misc. Tests, EGR Control function and increment the EGR valve through the 30%, 50%, 80% and 100% positions while comparing EGR Desired POS. to EGR ACTUAL POS. Does EGR Desired Pos. remain close to EGR Actual Pos. at all commanded positions? | -- | |||
4 |
Note test result does scan tool indicate DTC P1406 failed this ignition? | -- | Refer to DTC Chart Test Description for additional information | Refer to Diagnostic Aids |
5 |
Does the voltage measure approx. 0 volts at 0% commanded EGR position and increase to approximately battery positive voltage as the commanded EGR position is increased to 100%? | -- | ||
6 | Probe the EGR valve ignition battery positive voltage circuit with a test light to ground. Is the test light ON? | -- | ||
7 |
Was the fuse blown? | -- | ||
8 |
Was the EGR control circuit open? | -- | ||
9 |
Was a problem found? | -- | ||
10 | Disconnect the EGR valve electrical connector and observe the EGR ACTUAL POS. value on the scan tool. Is EGR ACTUAL POS. at the specified value? | 0% | ||
11 |
Is the measured voltage near the specified value? | 0V | ||
12 | Probe the sensor ground circuit at the EGR valve harness connector with a test light to battery positive voltage. Is the test light ON? | -- | ||
13 |
Was a problem found? | -- | ||
14 | Probe the EGR control circuit at the EGR valve connector with a test light to battery positive voltage. Is the test light ON? | -- | ||
15 |
Is the test light ON? | -- | ||
16 | Connect a DVM to measure voltage between the EGR valve sensor ground circuit and the 5 volt reference A circuit at the EGR valve connector. Is the voltage at the specified value? | 5V | ||
17 | Probe the pintle position circuit at the EGR valve harness connector with a test light connected to battery positive voltage. Is the test light ON? | -- | ||
18 |
Is EGR ACTUAL POS. at the specified value? | 100% | ||
19 |
Was a problem found? | -- | ||
20 |
Is test light On? | -- | ||
21 |
Was a problem found? | -- | ||
22 |
Was the 5 volt reference A circuit open or shorted? | -- | ||
23 | Locate and repair the open in the ignition battery positive voltage circuit to the EGR valve (refer to Engine Electrical). Is action complete? | -- | -- | |
24 |
Was the terminal faulty? | -- | ||
25 | Locate and repair the short to voltage in the pintle position circuit. Is action complete? | -- | -- | |
26 | Replace the EGR valve. Is action complete? | -- | -- | |
27 | Locate and repair the short to ground in the EGR control circuit. Is action complete? | -- | -- | |
28 | Locate and correct the short to ground in the pintle position circuit. Is action complete? | -- | -- | |
29 | Replace the PCM. Important: Replacement PCM must be programmed. Refer to Powertrain Control Module Replacement/Programming Is action complete? | -- | -- | |
30 |
Note test result does scan tool indicate DTC P1406 failed this ignition? | -- | Repair complete |
