Caution: Departure from these conditions or the procedure below could result
in the following conditions:
• Serious personal injury (particularly to eyes) or property damage
from such causes as battery explosion, battery acid, or electrical burns • Damage to electronic components of either vehicle
Caution: Do not connect a jumper cable directly to the negative terminal of a discharged battery to prevent sparking and possible explosion of battery gases.
Notice: When jump starting a vehicle with charging equipment, be sure the equipment used is 12 V and negative ground. Do not use 24 V charging equipment. Using such equipment can cause serious damage to the electrical system or electronic parts.
Notice: Push starting the vehicle can, under some conditions, cause damage to the catalytic converter and an automatic transmission.
This vehicle has a 12 Volt, negative ground electrical system. Make sure the vehicle or equipment being used to jump start the engine is also 12 Volt, negative ground. Use of any other type of system will damage the vehicle's electrical components.- Position the vehicle with the booster (charged) battery so that the jumper cables will reach, but do not allow the vehicles to touch.
- Place an automatic transmission in PARK.
- Set the parking brake.
- Block the wheels.
- Turn all electrical loads that are not needed OFF (leave the hazard flashers ON as needed).
- Turn the ignition OFF.
- Check the built-in battery hydrometer of the discharged battery.
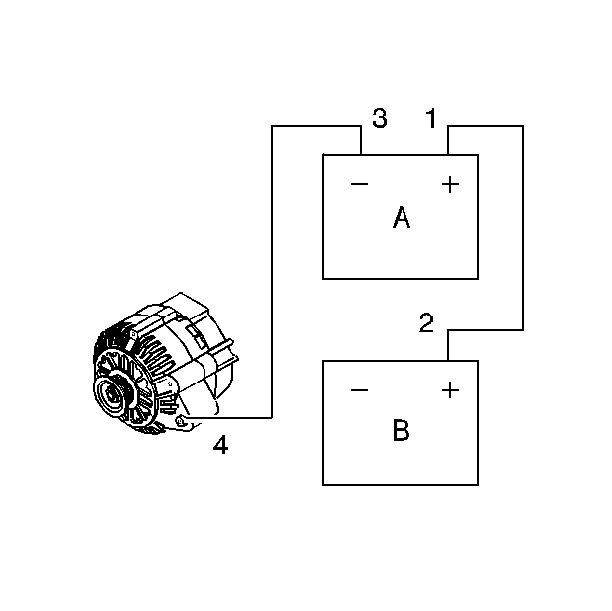
- Attach the end of one jumper cable to the positive terminal of the booster battery (A 1).
- A remote positive stud is provided for jump starting. The stud is covered by a red plastic flap and is located on the right side of the accessory wiring junction block. Attach the other end of the same cable to the positive terminal of the discharged battery or the remote positive stud (B 2). (A) is the booster battery, (B) is the discharged battery. Never connect positive to negative.
- Attach one end of the remaining jumper cable to the negative terminal of the booster battery (A 3).
- The final connection (4) is made to a good engine ground (such as the engine lift hook bracket), away from the discharged battery (B). Make sure the cables are not on or near pulleys, fans or other parts that will move when the engine starts.
- Start the engine of the vehicle that is providing the boost. Run the engine at a moderate speed, approximately 1500 RPM, for several minutes.
- Crank the engine of the vehicle with the discharged battery.
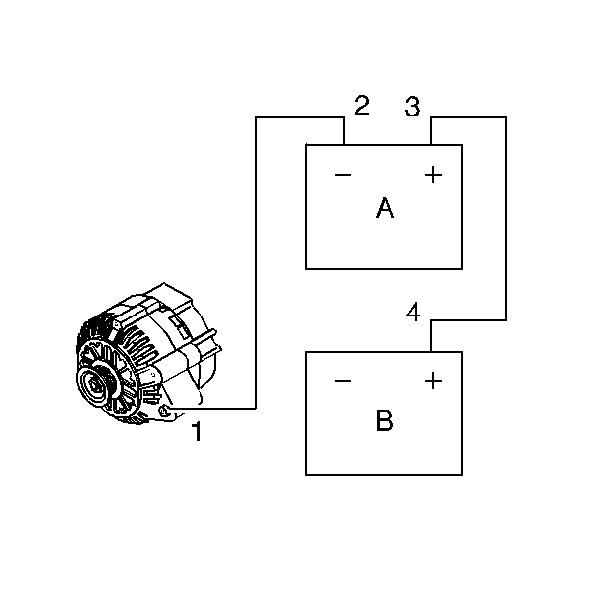
- The negative jumper cable must be disconnected from the battery that was boosted, first (A 1).
- Remove the other end of the negative jumper cable from the booster battery (A 2).
- Remove the positive jumper cable from the booster battery (A 3).
- Remove the positive jumper cable from the other battery (B 4).
Make sure the jumper cables do not have loose or missing insulation.
If the hydrometer is clear or light yellow, do not jump (charge) the battery. Replace the battery.
A spark could ignite an accumulation of hydrogen gas from the discharged battery.
Do not let the cable end touch any metal (until after the other cable end is disconnected).
