For 1990-2009 cars only
Removal Procedure
- Remove the air cleaner and duct assembly. Refer to Air Cleaner Assembly Replacement in Engine Controls - 3.1L or Air Cleaner Assembly Replacement in Engine Controls - 3.8L.
- Recover the refrigerant. Refer to Refrigerant Recovery and Recharging .
- Remove the EBTCM. Refer to Electronic Brake and Traction Control Module Replacement in Antilock Brake System.
- Remove the expansion (orifice) tube.
- Remove the impacted residues.
- Using a heat gun (hair dryer, epoxy dryer or the equivalent), apply heat approximately ¼ inch from the dimples on the inlet pipe. Do not overheat the pipe.
- While applying heat, perform the following steps:
- Add 30 ml (1 oz) of Polyalkylene Glycol (PAG) Synthetic Refrigerant Oil to the system.
- Lubricate the new expansion (orifice) tube and O-ring seal with mineral base 525 viscosity refrigerant oil and insert into the inlet pipe.
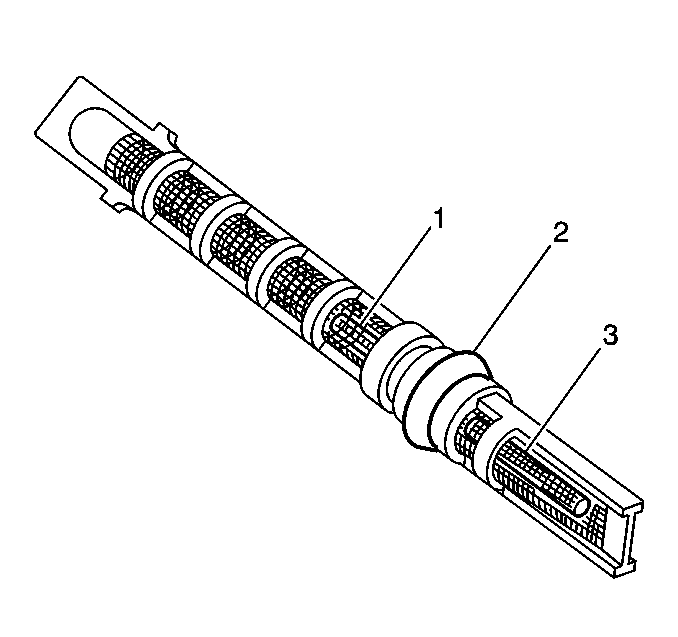
- Install tube with the smaller screen (3) first.
- Remove the O-rings seals (2).
Important: If the expansion (orifice) tube is restricted or plugged, perform the following procedure:
| 7.1. | Use needle-nose pliers in order to grip the orifice tube. |
| 7.2. | Use a turning motion along with a push-pull motion in order to loosen the impacted orifice tube. |
| 7.3. | Remove the orifice tube. |
Installation Procedure
- Install the new O-ring seals (2).
- Install the liquid line/suction line bracket.
- Connect the electrical connector to the A/C refrigerant pressure sensor.
- Install the EBTCM. Refer to Electronic Brake and Traction Control Module Replacement in Antilock Brake System.
- Evacuate and charge the system. Refer to Refrigerant Recovery and Recharging .
- Inspect the system for leaks. Refer to Leak Testing .
- Install the air cleaner and duct assembly. Refer to Air Cleaner Assembly Replacement in Engine Controls - 3.1L or Air Cleaner Assembly Replacement in Engine Controls - 3.8L.
Important: Coated the new O-ring seals (2) with mineral base 525 viscosity refrigerant oil.
Install the new expansion (orifice) tube with the shorter screen (3) end in first.
