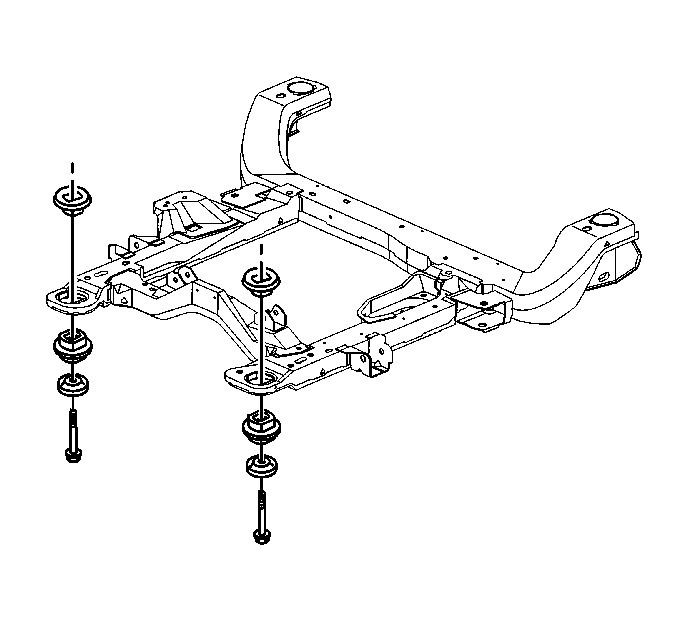
Removal Procedure
- Raise and suitably support the vehicle. Refer to Lifting and Jacking the Vehicle in General Information.
- Remove the intermediate shaft from the steering gear stub shaft. Refer to Intermediate Steering Shaft Replacement in Power Steering System.
- Install a utility stand to the rear of the frame.
- Remove the rear frame bolts.
- Lower the rear of the frame.
- Remove the upper and lower insulators from the rear of the frame as a set.
Important: In order to remove any frame insulator, loosen the adjacent frame insulators to permit the frame to separate from the body. Do not break the fan shroud or damage the frame attachments, such as steering hoses and brake pipes during the replacement of body mounts.
When installing a body mount, ensure the lower insulator is seated into the frame. The lower insulator should not be loose. The spacer and the corresponding upper insulator is pressed into the lower insulator thus squeezing the frame. The bolt is then inserted through the mount, capturing the lower retainer. The body mount components prevent contact of the frame to the body. Do not over tighten the body mount. Over tightening may collapse a spacer or strip a bolt. When the frame insulator bolts are removed, always discard the bolts and replace with new bolts. When clamping by the mount, ensure the surfaces are clean and dry. If the frame insulator bolt does not screw in smoothly, run a tap through the frame crossmember nut in the body in order to remove foreign material. Ensure the tap does not punch through the underbody. Whenever the body is moved in relation to the frame, disconnect the intermediate shaft from the rack and pinion steering gear and stub shaft.
Installation Procedure
- Apply lube to inside surface of lower insulator and to top surface of upper insulator.
- Install the upper and lower insulators to the rear of the frame as a set.
- Raise the rear of the frame.
- Install the rear frame bolts.
- Remove the utility stand.
- Install the intermediate shaft to the steering gear stub shaft. Refer to Intermediate Steering Shaft Replacement in Power Steering System.
- Lower the vehicle.

Notice: Use the correct fastener in the correct location. Replacement fasteners must be the correct part number for that application. Fasteners requiring replacement or fasteners requiring the use of thread locking compound or sealant are identified in the service procedure. Do not use paints, lubricants, or corrosion inhibitors on fasteners or fastener joint surfaces unless specified. These coatings affect fastener torque and joint clamping force and may damage the fastener. Use the correct tightening sequence and specifications when installing fasteners in order to avoid damage to parts and systems.
Tighten
Tighten the rear frame bolts to 165 N·m (122 lb ft).
