Playing the Radio
POWER: Push this knob to turn the system on and off.VOL (Volume): Turn this knob to increase or to decrease volume.
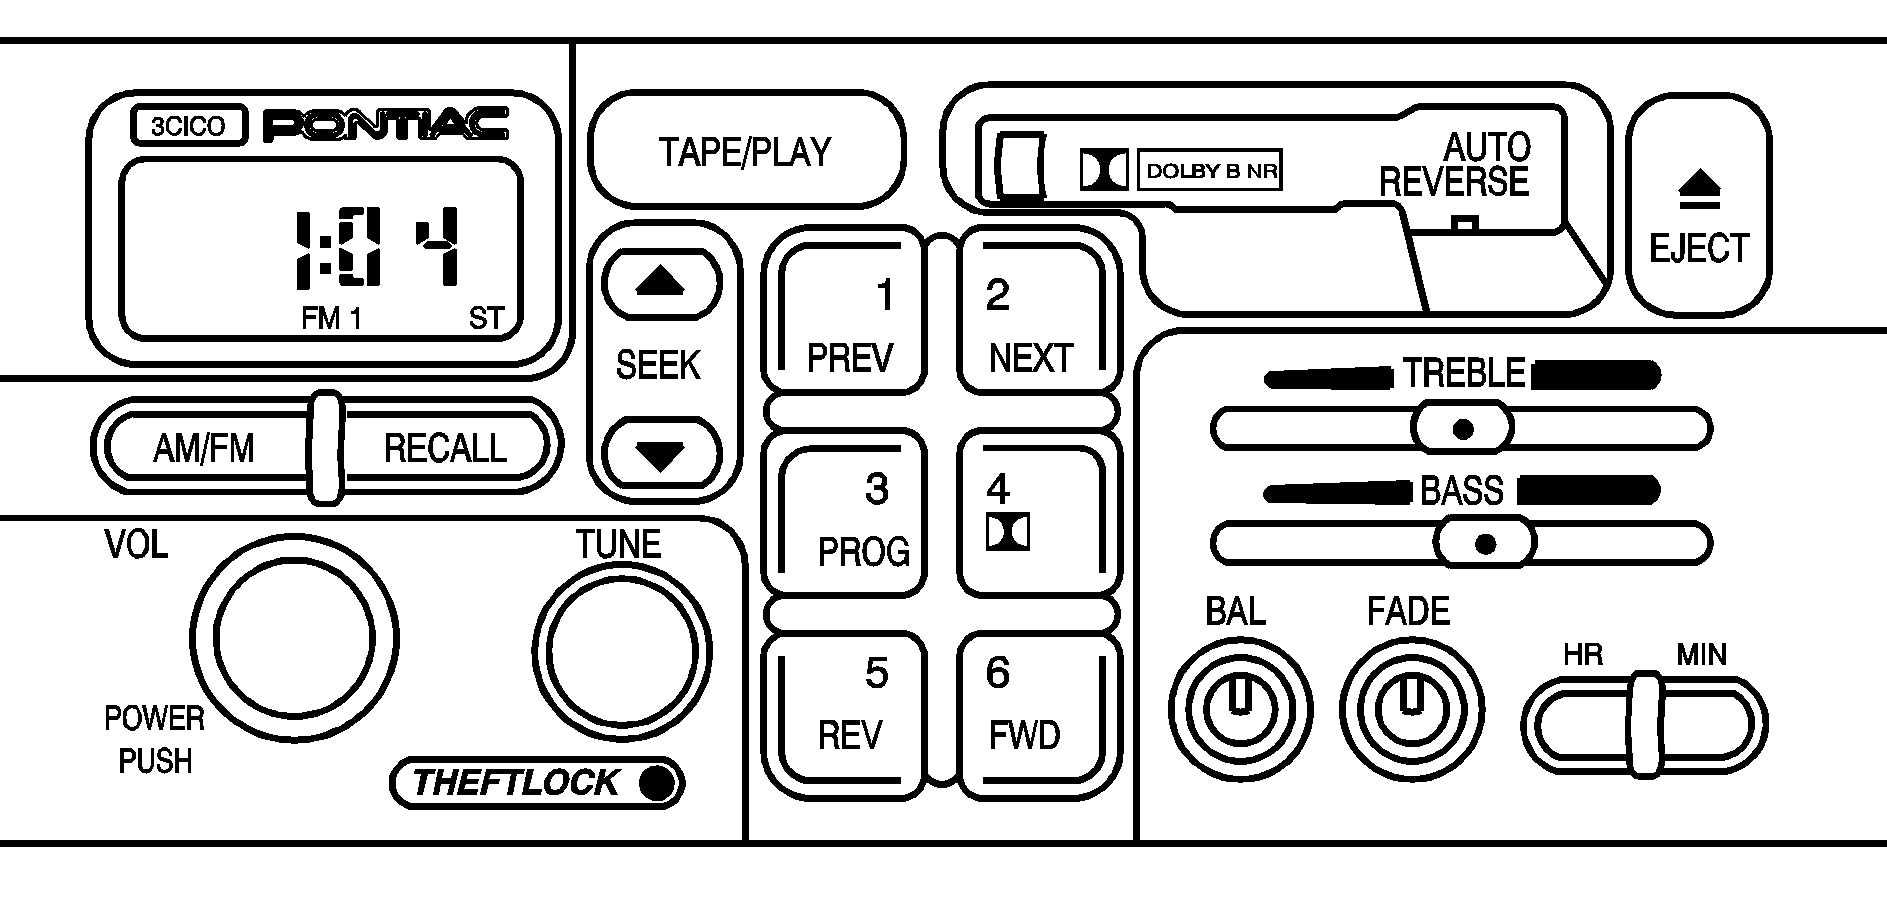
RECALL: Press this button to switch the display between the radio station frequency and the time. Time display is available with the ignition turned off.
Finding a Station
AM/FM: Press this button to switch between AM, FM1 and FM2. The display will show your selection.TUNE: Press this knob lightly so it extends. Turn it to choose radio stations. Press the knob back into its stored position when you're not using it.
SEEK : Press the up or the down arrow to go to the next or to the previous station and stay there.
Setting Preset Stations
The six numbered pushbuttons let you return to your favorite stations. You can set up to 18 stations (six AM, six FM1 and six FM2) by performing the following steps:
- Turn the radio on.
- Press AM/FM to select AM, FM1 or FM2.
- Tune in the desired station.
- Press and hold one of the six numbered pushbuttons until SET appears on the display. Whenever you press that numbered pushbutton, the station you set will return.
- Repeat the steps for each pushbutton.
Setting the Tone (Bass/Treble)
BASS: Slide the lever to the right or to the left to increase or to decrease bass.TREBLE: Slide the lever to the right or to the left to increase or to decrease treble. If a station is weak or noisy, you may want to decrease the treble.
Adjusting the Speakers (Balance/Fade)
BAL (Balance): Press this knob lightly so it extends. Turn this knob to move the sound toward the left or the right speakers.FADE: Press this knob lightly so it extends. Turn this knob to move the sound toward the front or the rear speakers. Press these knobs back into their stored positions when you're not using them.
Playing a Cassette Tape
Your tape player is built to work best with tapes that are up to 30 to 45 minutes long on each side. Tapes longer than that are so thin they may not work well in this player.
While the tape is playing, use the VOL, FADE, BAL, BASS and TREBLE controls just as you do for the radio. The display will show an arrow to show which side of the tape is playing. When the down indicator arrow is lit, selections listed on the bottom side of the cassette are playing. When the up arrow is lit, selections listed on the top side of the cassette are playing. The tape player automatically begins playing the other side when it reaches the end of the tape.
If an error appears on the display, see "Cassette Tape Messages" later in this section.
1 PREV (Previous): Your tape must have at least three seconds of silence between each selection for previous to work. Press this pushbutton to search for the previous selection on the tape. Press PREV again or the SEEK down arrow to stop searching.2 NEXT: Your tape must have at least three seconds of silence between each selection for next or seek to work. Press this pushbutton to search for the next selection on the tape. If you hold the pushbutton, the player will continue moving forward through the tape. Press NEXT again or the SEEK up arrow to stop searching.
3 PROG (Program): Press this pushbutton to play the other side of the tape.
4 (Dolby): Press this pushbutton to reduce background noise. The double-D symbol will appear on the display. Dolby Noise Reduction is manufactured under a license from Dolby Laboratories Licensing Corporation. Dolby and the double-D symbol are trademarks of Dolby Laboratories Licensing Corporation.
5 REV (Reverse): Press this pushbutton to reverse the tape rapidly. Press it again to return to playing speed. The radio will play while the tape reverses. You may select stations during reverse operation using SEEK or TUNE.
6 FWD (Forward): Press this pushbutton to advance quickly. Press the pushbutton again to return to playing speed. The radio will play while the tape advances. You may select stations during forward operation using SEEK or TUNE.
SEEK : Press the up or the down arrow to seek to the next or to the previous selection on the tape.
AM/FM: Press this button to listen to the radio when a tape is playing.
TAPE/PLAY: Press this button to change to playing a tape when listening to the radio. The tape symbol with an arrow will appear on the display while the tape is active.
EJECT: Press this button to stop a tape when it is playing and to remove a tape when it is not playing. The eject button may be activated with either the ignition or radio off. Cassettes may be loaded with the radio and ignition off if this button is pressed first.
Cassette Tape Messages
E (Error): If this message and a number appears while trying to play a cassette tape, it could be one of the following:| • | E10: The tape is tight and the player can't turn the tape hubs. Remove the tape. Hold the tape with the open end down and try to turn the right hub counterclockwise with a pencil. Turn the tape over and repeat. If the hubs do not turn easily, your tape may be damaged and should not be used in the player. Try a new tape to make sure your player is working properly. |
| • | E11: The tape is broken. Try a new tape. |
| • | E14: Wrapped tape. Try a new tape. |
CD Adapter Kits
It is possible to use a portable CD player adapter kit with your cassette tape player after activating the bypass feature on your tape player.
To activate the bypass feature, use the following steps:
- Turn the ignition on.
- Turn the radio off.
- Press and hold TAPE/PLAY for three seconds. The tape symbol on the display will flash for two seconds, indicating the feature is active.
- Insert the adapter into the cassette slot. It will power up the radio and begin playing.
The override feature will remain active until EJECT is pressed.
