UPDATE-REPLACEMENT LOCK CYLINDER ASSEMBLY PROCEDURE

Models Affected: 1988-89 LEMANS
SERVICE MANUAL UPDATE
GM parts has made available replacement lock cylinder/tumbler kits for all locks on the Pontiac LeMans. Kits for ignition, door and rear compartment/hatch lid locks are available.
Following are procedures for assembling the tumblers and lock cylinders for all three locations.
Procedures:
REPLACEMENT LOCK CYLINDER ASSEMBLY
Assembling Tumblers
Figures 1, 2 and 3
Tools Required:
J 26900-5 Vernier Calipers
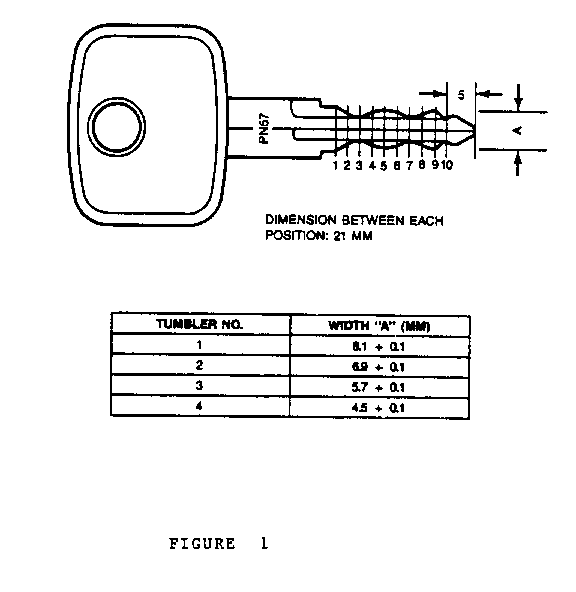
Tumblers for all locks are shaped exactly the same, with the exception of the piercing portion. Four sizes of tumblers are used to make various lock combinations. Each tumbler is coded with a number 1 through 4; these numbers are stamped on the side of each tumbler.
Every key has ten positions, and each of these ten positions is one of four different depths, corresponding to the four tumbler sizes (Figure 1).
Figure 1 Key and Tumbler Dimensions Here Figure 2 Ignition Lock Cylinder Here
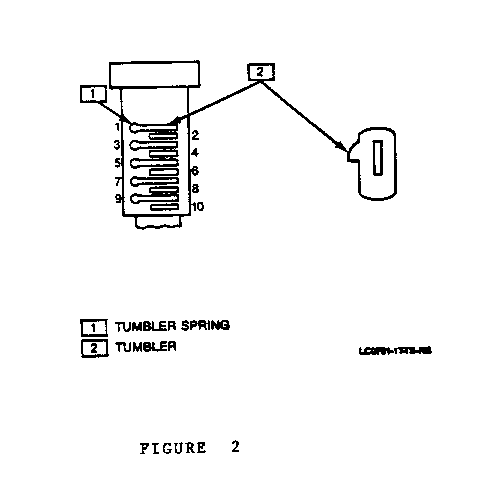
IGNITION LOCK CYLINDER
Figure 2
Determine the tumbler numbers and arrangement by measuring the lock cylinder width at each tumbler position (1 through 10) with a J 26900-5 vernier caliper. Measure and record these tumbler numbers.
Starting at position 1, insert the tumbler spring first and then the tumbler into each slot in order as called for by the code. Ten tumblers are used in the ignition lock cylinder.
IMPORTANT
Apply a thin coating of grease to all surface areas when assembling the springs and tumblers.
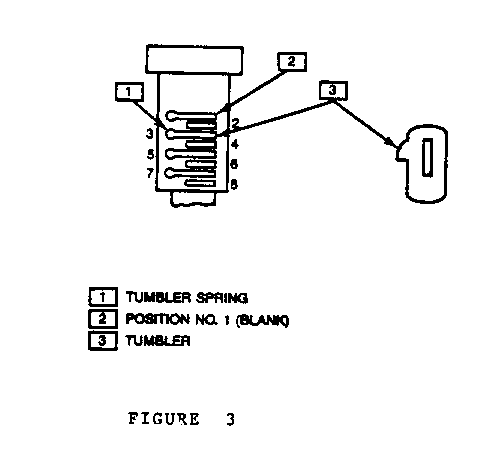
Figure 3 Door and Tailgate Lock Cylinder
DOOR OR TAILGATE/REAR COMPARTMENT LOCK CYLINDER ----------------------------------------------- Figure 3
Starting at position 2, insert the tumbler spring first and then the tumbler into each slot in order as called for by the code.
IMPORTANT
* Be sure not to insert the spring and tumbler into position number 1.
* Apply a thin coating of grease to all surface areas when assembling the springs and tumblers.
Insert the key into the lock cylinder to check for proper installation. If all tumblers are flush with the cylinder after key insertion, the tumblers are assembled correctly.
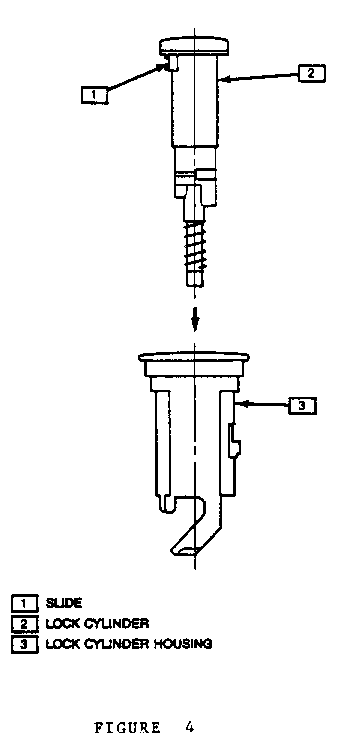
Figure 4 Ignition Lock Cylinder Assembly
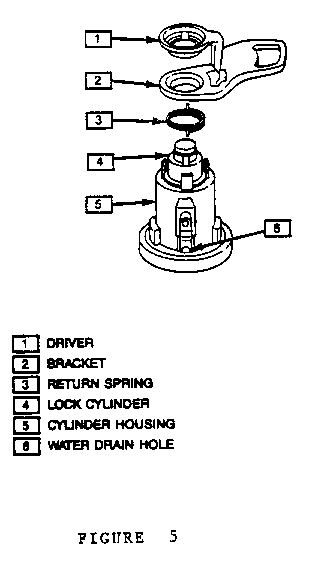
Figure 5 Door Lock Cylinder
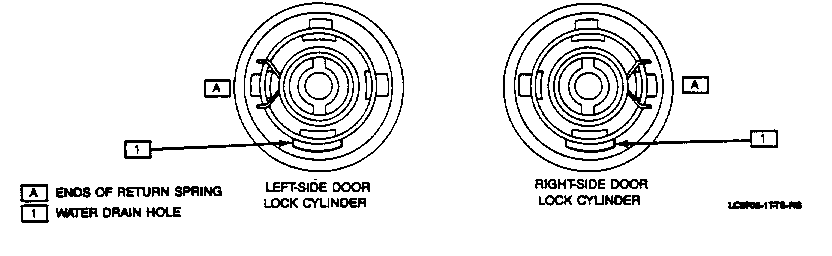
Figure 6 Return Spring Position
ASSEMBLING LOCK CYLINDERS
Figures 4 and 7
1. Ignition Lock Cylinder
A. Apply grease to the slide spring and the slide, then insert them into the recess on the lock cylinder. Line tumblers up by inserting the ignition key into the cylinder.
B. Apply grease to internal surface of the cylinder housing, and insert the cylinder into the housing.
C. Install steering pin spring and steering pin in the hole on the cylinder, applying grease.
2. Door Lock Cylinder Right and Left Side
A. Apply grease to the internal surface of the housing and assemble cylinder with key inserted.
IMPORTANT
---------
When assembling the cylinder and housing, make sure to align the water drain holes on both units (Figures 5 and 6).
B. Install return spring on top of the housing, On the left-side door lock cylinder, both spring ends should be hooked at the projection located to the left of the water drain hole. On the right-side cylinder, assemble so the spring is hooked to the right of the water drain hole (Figure 6).
The brackets can be distinguished by their color: white for the left side, black for the right.
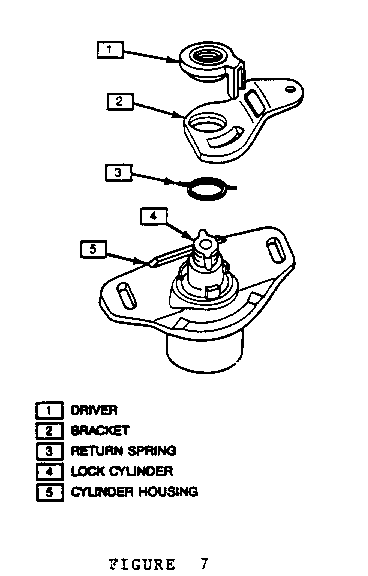
Figure 7
Tailgate/Rear Compartment Cylinder Assembly
3. Tailgate/Rear Compartment Lock Cylinder
A. Apply grease to the internal surface of the housing and assemble cylinder with key inserted.
B. Install return spring on the top of housing.
IMPORTANT:
Both spring ends must be hooked on the center projection of the housing.
C. Install bracket on top of the housing.
D. Position the driver on top of the cylinder, pressing it on. Be sure that the lever of the driver is between both ends of the return spring.
General Motors bulletins are intended for use by professional technicians, not a "do-it-yourselfer". They are written to inform those technicians of conditions that may occur on some vehicles, or to provide information that could assist in the proper service of a vehicle. Properly trained technicians have the equipment, tools, safety instructions and know-how to do a job properly and safely. If a condition is described, do not assume that the bulletin applies to your vehicle, or that your vehicle will have that condition. See a General Motors dealer servicing your brand of General Motors vehicle for information on whether your vehicle may benefit from the information.
