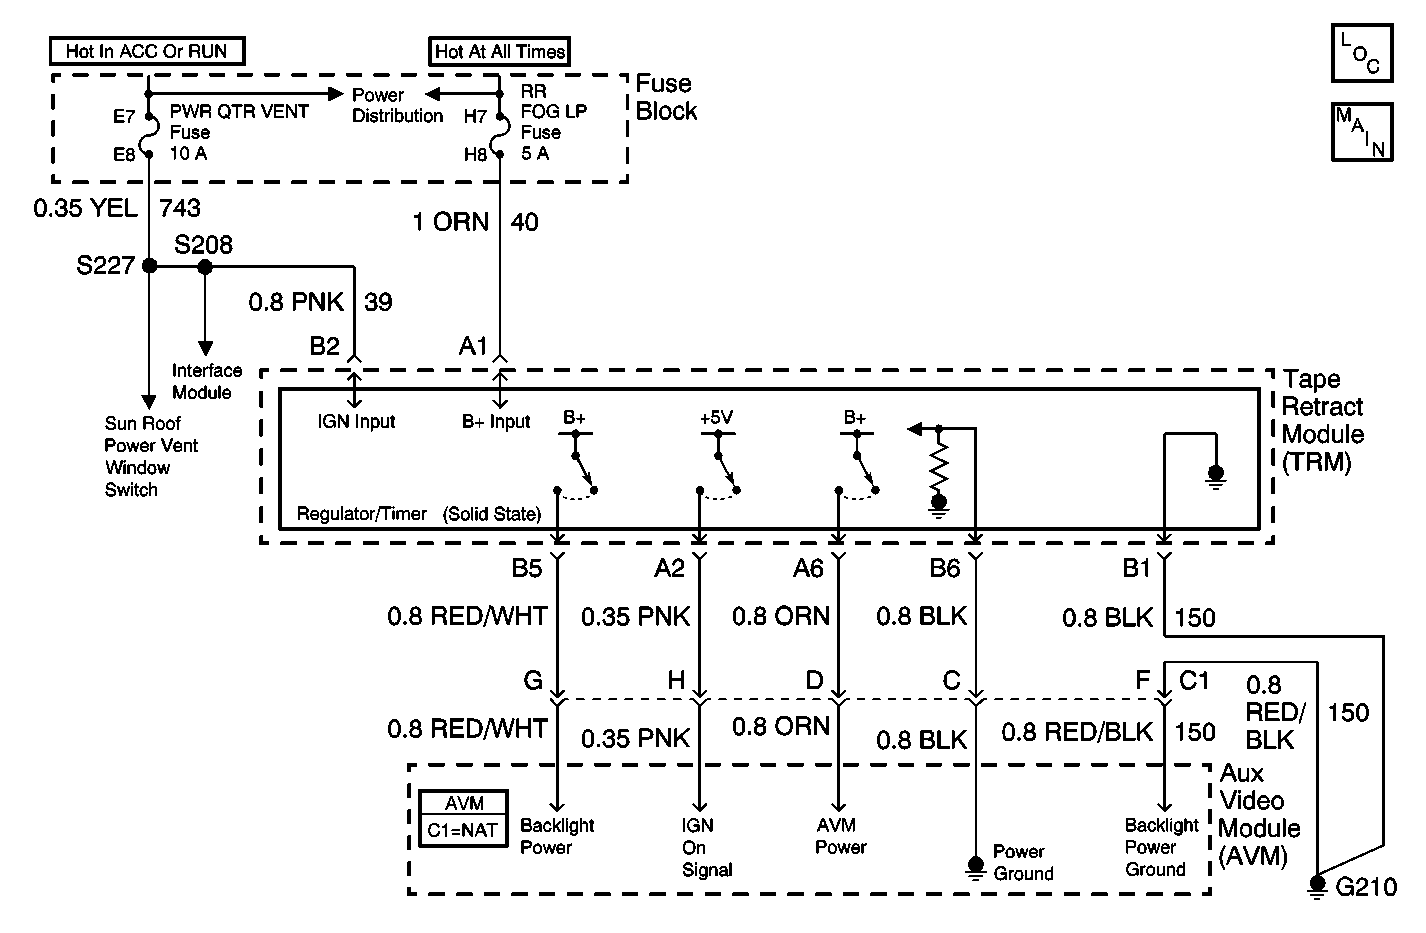
Auxiliary Video Module Inoperative Early Design

Circuit Description
The Auxiliary Video Module (AVM) controls the operation of the Video Entertainment System (VES). The AVM turns on the VES when the video screen is placed in the down position. When the ignition is on, the Tape Retract Module (TRM) supplies battery voltage, power ground, and an ignition on signal to the AVM. The AVM determines when the video screen is in the down position by means of a screen position switch located in the video screen. When the video screen is moved from the up (stored) to the down position, the screen position switch closes and sends a voltage signal back to the AVM. Then, the AVM turns on the VES.
Diagnostic Aids
| • | Check for the following conditions: |
| - | An open in the backlight power circuit between the TRM and the AVM. |
| - | An open in the AVM power circuit between the TRM and the AVM. |
| - | An open in the ignition on circuit between the TRM and the AVM. |
| - | An open in the power ground circuit between the TRM and the AVM. |
| - | An open in the backlight power ground circuit between the TRM and the AVM. |
| - | A faulty TRM. |
| • | An intermittent failure may be very difficult to detect and to diagnose accurately. Faulty electrical connections or wiring causes most intermittent problems. When an intermittent condition is suspected, check the suspected circuits for the following conditions: |
| - | Poor mating of connector halves or backed out terminals |
| - | Improperly formed or damaged terminals |
| - | Wire chafing |
| - | Poor wire to terminal connections |
| - | Dirty or corroded terminals |
| - | Damage to connector bodies |
| - | Wire broken inside the insulation |
Test Description
The number(s) below refer to the step number(s) on the diagnostic table.
-
Tests if the TRM and the AVM are operating correctly.
-
Tests for an open in the backlight power circuit to the AVM.
-
Tests for an open in the AVM power circuit to the AVM.
-
Tests for an open in the IGN ON circuit to the AVM.
-
Tests for an open in the power ground circuit to the AVM.
-
Tests for an open in the backlight power ground circuit to the AVM.
-
Tests to ensure that all disconnected components are re-connected.
Step | Action | Value(s) | Yes | No |
|---|---|---|---|---|
DEFINITION: The video display screen does not turn on when placing the screen in the down position. No video audio is available. However, the Video Cassette Player (VCP) can be turned on. | ||||
Does the VCP turn on? | -- | Go to Step 3 | Go to Step 2 | |
2 | Refer to the Video Entertainment System Inoperative for further diagnosis and repair of the VES. Is the action complete? | -- | Go to Step 14 | -- |
Is there battery voltage at the test point? | -- | Go to Step 5 | Go to Step 4 | |
4 | Repair the poor connection or the open in the backlight power circuit to the AVM. If an open or poor connection does not exist, then replace the Tape Retract Module. Refer to Tape Retract Module Replacement . Is the repair complete? | -- | Go to Step 14 | -- |
Is there battery voltage at the test point? | -- | Go to Step 7 | Go to Step 6 | |
6 | Repair the poor connection or the open in the AVM power circuit to the AVM. If an open or poor connection does not exist, then replace the Tape Retract Module. Refer to Tape Retract Module Replacement . Is the repair complete? | -- | Go to Step 14 | -- |
Does the voltage measure in the specified range? | 4-6V. | Go to Step 9 | Go to Step 8 | |
8 | Repair the poor connection or the open in the IGN on circuit to the AVM. If an open or poor connection does not exist, then replace the Tape Retract Module. Refer to Tape Retract Module Replacement . Is the repair complete? | -- | Go to Step 14 | -- |
Does the voltage measured indicate a good ground? | -- | Go to Step 11 | Go to Step 10 | |
10 | Repair the poor connection or the open in the power ground circuit to the AVM. If an open or poor connection does not exist, then replace the Tape Retract Module. Refer to Tape Retract Module Replacement . Is the repair complete? | -- | Go to Step 14 | -- |
Does the voltage measured indicate a good ground? | -- | Go to Step 13 | Go to Step 12 | |
12 | Repair the poor connection or the open in the backlight power ground circuit to the AVM. If an open or poor connection does not exist, then replace the Tape Retract Module. Refer to Tape Retract Module Replacement . Is the repair complete? | -- | Go to Step 14 | -- |
13 | Inspect the connectors at the TRM module and the AVM for poor connections. If a poor connection does not exist , then replace the AVM. Refer to Audio/Video Interface Module Replacement . Is the repair complete? | ---- | Go to Step 14 | -- |
Does the VES operate normally? | -- | System OK | ||
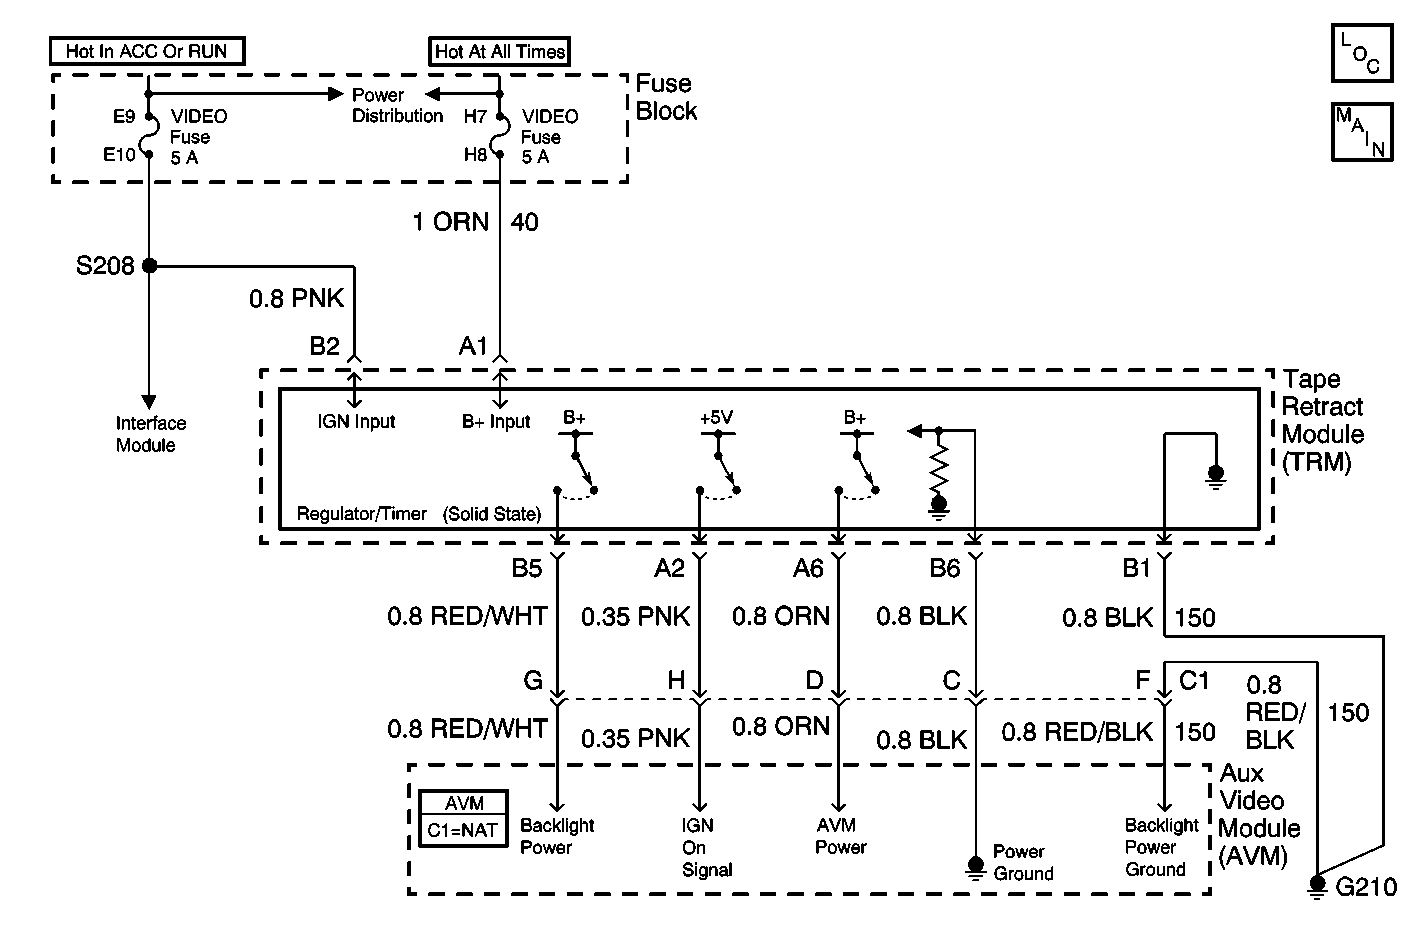
Auxiliary Video Module Inoperative Later Design

Circuit Description
The Auxiliary Video Module (AVM) controls the operation of the Video Entertainment System (VES). The AVM turns on the VES when the video screen is placed in the down position. When the ignition is on, the Tape Retract Module (TRM) supplies battery voltage, power ground, and an ignition on signal to the AVM. The AVM determines when the video screen is in the down position by means of a screen position switch located in the video screen. When the video screen is moved from the up (stored) to the down position, the screen position switch closes and sends a voltage signal back to the AVM. Then, the AVM turns on the VES.
Diagnostic Aids
| • | Check for the following conditions: |
| - | An open in the backlight power circuit between the TRM and the AVM. |
| - | An open in the AVM power circuit between the TRM and the AVM. |
| - | An open in the ignition on circuit between the TRM and the AVM. |
| - | An open in the power ground circuit between the TRM and the AVM. |
| - | An open in the backlight power ground circuit between the TRM and the AVM. |
| - | A faulty TRM. |
| • | An intermittent failure may be very difficult to detect and to diagnose accurately. Faulty electrical connections or wiring causes most intermittent problems. When an intermittent condition is suspected, check the suspected circuits for the following conditions: |
| - | Poor mating of connector halves or backed out terminals |
| - | Improperly formed or damaged terminals |
| - | Wire chafing |
| - | Poor wire to terminal connections |
| - | Dirty or corroded terminals |
| - | Damage to connector bodies |
| - | Wire broken inside the insulation |
Test Description
The number(s) below refer to the step number(s) on the diagnostic table.
-
Tests if the TRM and the AVM are operating correctly.
-
Tests for an open in the backlight power circuit to the AVM.
-
Tests for an open in the AVM power circuit to the AVM.
-
Tests for an open in the IGN ON circuit to the AVM.
-
Tests for an open in the power ground circuit to the AVM.
-
Tests for an open in the backlight power ground circuit to the AVM.
-
Tests to ensure that all disconnected components are re-connected.
Step | Action | Value(s) | Yes | No |
|---|---|---|---|---|
DEFINITION: The video display screen does not turn on when placing the screen in the down position. No video audio is available. However, the Video Cassette Player (VCP) can be turned on. | ||||
Does the VCP turn on? | -- | Go to Step 3 | Go to Step 2 | |
2 | Refer to the Video Entertainment System Inoperative for further diagnosis and repair of the VES. Is the action complete? | -- | Go to Step 14 | -- |
Is there battery voltage at the test point? | -- | Go to Step 5 | Go to Step 4 | |
4 | Repair the poor connection or the open in the backlight power circuit to the AVM. If an open or poor connection does not exist, then replace the Tape Retract Module. Refer to Tape Retract Module Replacement . Is the repair complete? | -- | Go to Step 14 | -- |
Is there battery voltage at the test point? | -- | Go to Step 7 | Go to Step 6 | |
6 | Repair the poor connection or the open in the AVM power circuit to the AVM. If an open or poor connection does not exist, then replace the Tape Retract Module. Refer to Tape Retract Module Replacement . Is the repair complete? | -- | Go to Step 14 | -- |
Does the voltage measure in the specified range? | 4-6V. | Go to Step 9 | Go to Step 8 | |
8 | Repair the poor connection or the open in the IGN on circuit to the AVM. If an open or poor connection does not exist, then replace the Tape Retract Module. Refer to Tape Retract Module Replacement . Is the repair complete? | -- | Go to Step 14 | -- |
Does the voltage measured indicate a good ground? | -- | Go to Step 11 | Go to Step 10 | |
10 | Repair the poor connection or the open in the power ground circuit to the AVM. If an open or poor connection does not exist, then replace the Tape Retract Module. Refer to Tape Retract Module Replacement . Is the repair complete? | -- | Go to Step 14 | -- |
Does the voltage measured indicate a good ground? | -- | Go to Step 13 | Go to Step 12 | |
12 | Repair the poor connection or the open in the backlight power ground circuit to the AVM. If an open or poor connection does not exist, then replace the Tape Retract Module. Refer to Tape Retract Module Replacement . Is the repair complete? | -- | Go to Step 14 | -- |
13 | Inspect the connectors at the TRM module and the AVM for poor connections. If a poor connection does not exist , then replace the AVM. Refer to Audio/Video Interface Module Replacement . Is the repair complete? | ---- | Go to Step 14 | -- |
Does the VES operate normally? | -- | System OK | ||
