Liftgate Emblem/Nameplate Replacement Buick
Tools Required
J 25070
Heat Gun
Removal Procedure
- When replacing or repairing an emblem/nameplate perform the following:
| 1.1. | Use tape to protect the body panel during removal. |
| 1.2. | Use tape for alignment marks for installation of the emblem/nameplate. |
- To remove an emblem/nameplate, heat the emblem/nameplate using a
J 25070
.
- Apply heat using a circular motion for about 30 seconds holding the
J 25070
approximately 152 mm (6 in) from the surface.

Notice: Use a plastic, flat-bladed tool to prevent paint damage when removing
an emblem/name plate.
- Use a plastic, flat-bladed tool to remove the emblem/nameplate from the panel surface.
- When replacing, remove all adhesive as follows:
| • | For body panels use a 3M™ Scotch Brite molding adhesive remover disk 3M™ P/N 07501 or equivalent. |
| • | For plastic panels use a lint free cloth and varnish makers and painters (VMP) naphtha or a 50/50 mixture by volume of isopropyl alcohol and water to remove the adhesive. |
Installation Procedure
Important: Apply the emblem/nameplate in an environment that is free from dust or other dirt that could come into contact with the sticky backing. Foreign material may cause improper adhesion.
- Clean the area where the emblem/nameplate will be installed.
Use a lint free cloth and VMP naphtha or a 50/50 mixture by volume of isopropyl alcohol and water to clean the area.
- Dry the area thoroughly.
- If the location of the emblem/nameplate has not been marked, apply tape and mark the location as shown below.

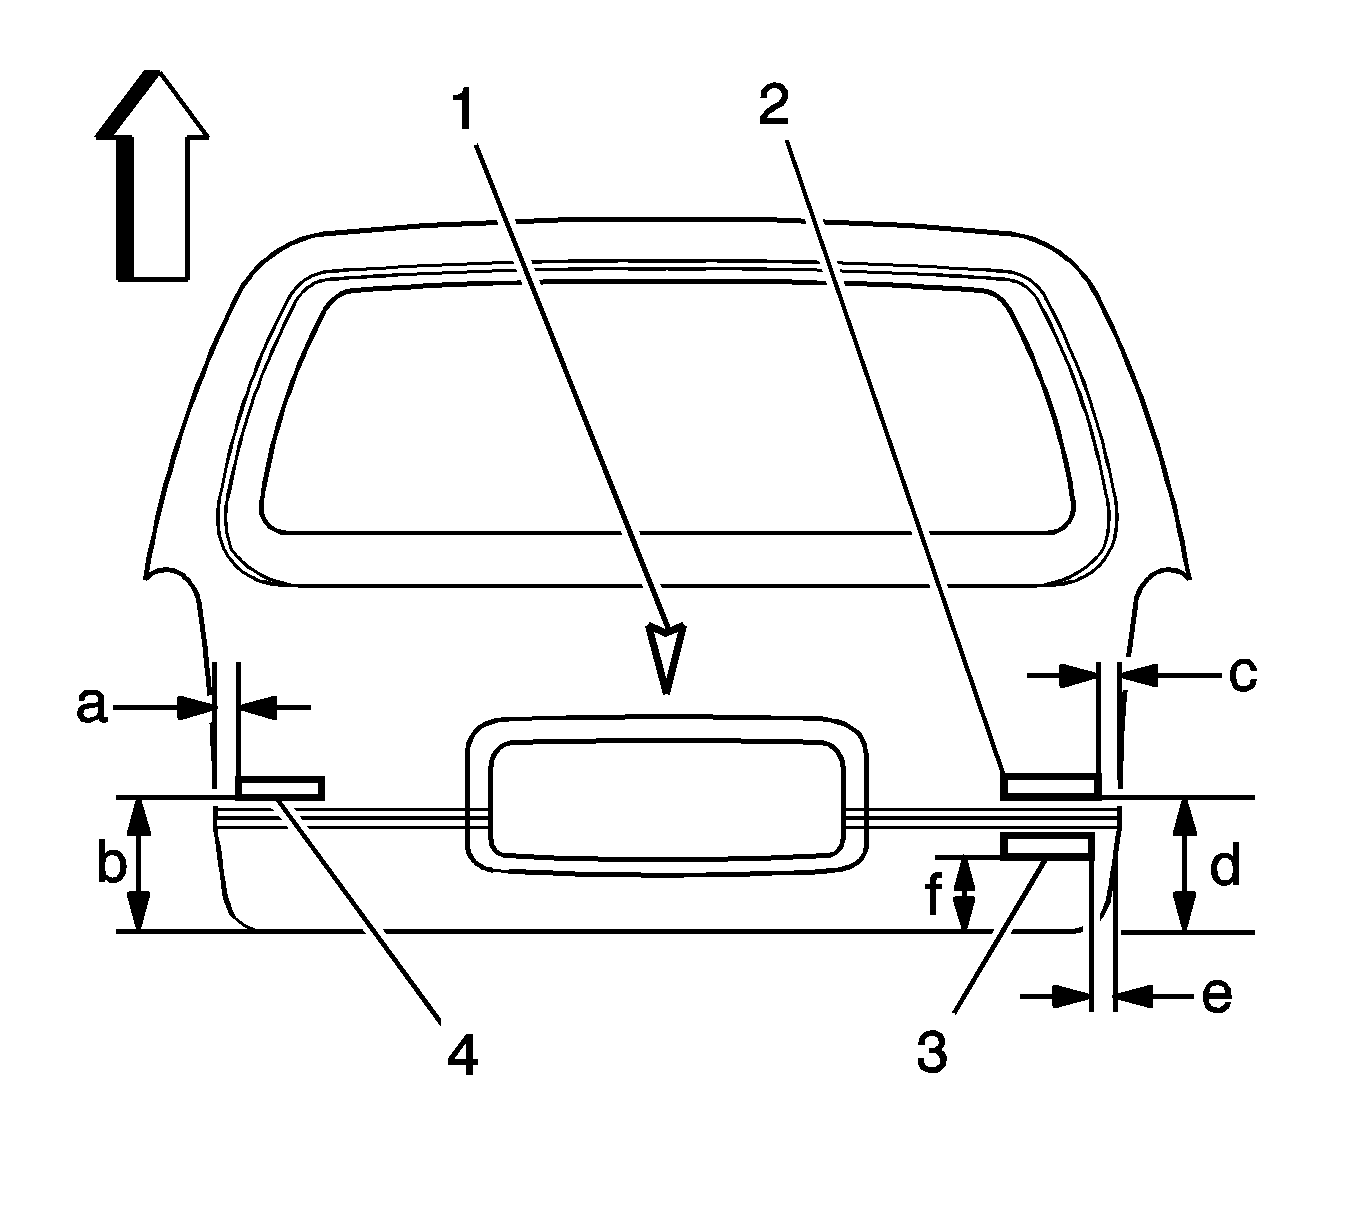
- For the TERRAZA (3) emblem/nameplate, install as shown.
| • | Dimension (a) is 31 mm (1.30 in) from the outer edge of the liftgate to the left side of the TERRAZA (4) emblem/nameplate edge. |
| • | Dimension (b) is 209 mm (8.23 in) from the bottom edge of the liftgate to the bottom of the TERRAZA (4) emblem/nameplate. |
| • | For the CXL emblem/nameplate, dimension (c) is 31 mm (1.30 in) from the right edge of the liftgate to the edge of the CXL (2) emblem/nameplate. |
| • | Dimension (d) is 209 mm (8.23 in) from the bottom edge of the liftgate to the bottom edge of the CXL (2) emblem/nameplate. |
| • | Dimension (e) is 37 mm (1.46 in) from the right edge of the liftgate to the right edge of the VERSATRAK (3) emblem/nameplate. |
| • | Dimension (f) is 53 mm (2.09 in) from the bottom edge of the liftgate to the bottom edge of the VERSATRAK (3) emblem/nameplate. |
- The Buick (1) emblem is centered and indexed above the license plate pocket of the liftgate.
- Heat the mounting surface to approximately 27-41°C (80-105°F) using the
J 25070
, if necessary.
- Ensure that the temperature of the emblem/nameplate is approximately 29-32°C (85-90°F).
Important: Do not touch the adhesive backing on the emblem/nameplate.
- Remove the protective liner from the back of the emblem/nameplate.
- Position the emblem/nameplate to the location marks and press the emblem/nameplate to the mounting surface.
- Apply equal pressure along the emblem/nameplate to uniformly bond the item to the mounting surface.
- Remove the protective tape from the body panel.
Liftgate Emblem/Nameplate Replacement Chevrolet
Tools Required
J 25070
Heat Gun
Removal Procedure
- When replacing or repairing an emblem/nameplate perform the following:
| 1.1. | Use tape to protect the body panel during removal. |
| 1.2. | Use tape for alignment marks for installation of the emblem/nameplate. |
- To remove an emblem/nameplate, heat the emblem/nameplate using a
J 25070
.
- Apply heat using a circular motion for about 30 seconds holding the
J 25070
approximately 152 mm (6 in) from the surface.
Notice: Use a plastic, flat-bladed tool to prevent paint damage when removing
an emblem/name plate.
- Use a plastic, flat-bladed tool to remove the emblem/nameplate from the panel surface.
- When replacing, remove all adhesive as follows:
| • | For body panels use a 3M™ Scotch Brite molding adhesive remover disk 3M™ P/N 07501 or equivalent. |
| • | For plastic panels use a lint free cloth and varnish makers and painters (VMP) naphtha or a 50/50 mixture by volume of isopropyl alcohol and water to remove the adhesive. |
Installation Procedure
Important: Apply the emblem/nameplate in an environment that is free from dust or other dirt that could come into contact with the sticky backing. Foreign material may cause improper adhesion.
- Clean the area where the emblem/nameplate will be installed.
Use a lint free cloth and VMP naphtha or a 50/50 mixture by volume of isopropyl alcohol and water to clean the area.
- Dry the area thoroughly.
- If the location of the emblem/nameplate has not been marked, apply tape and mark the location as shown below.
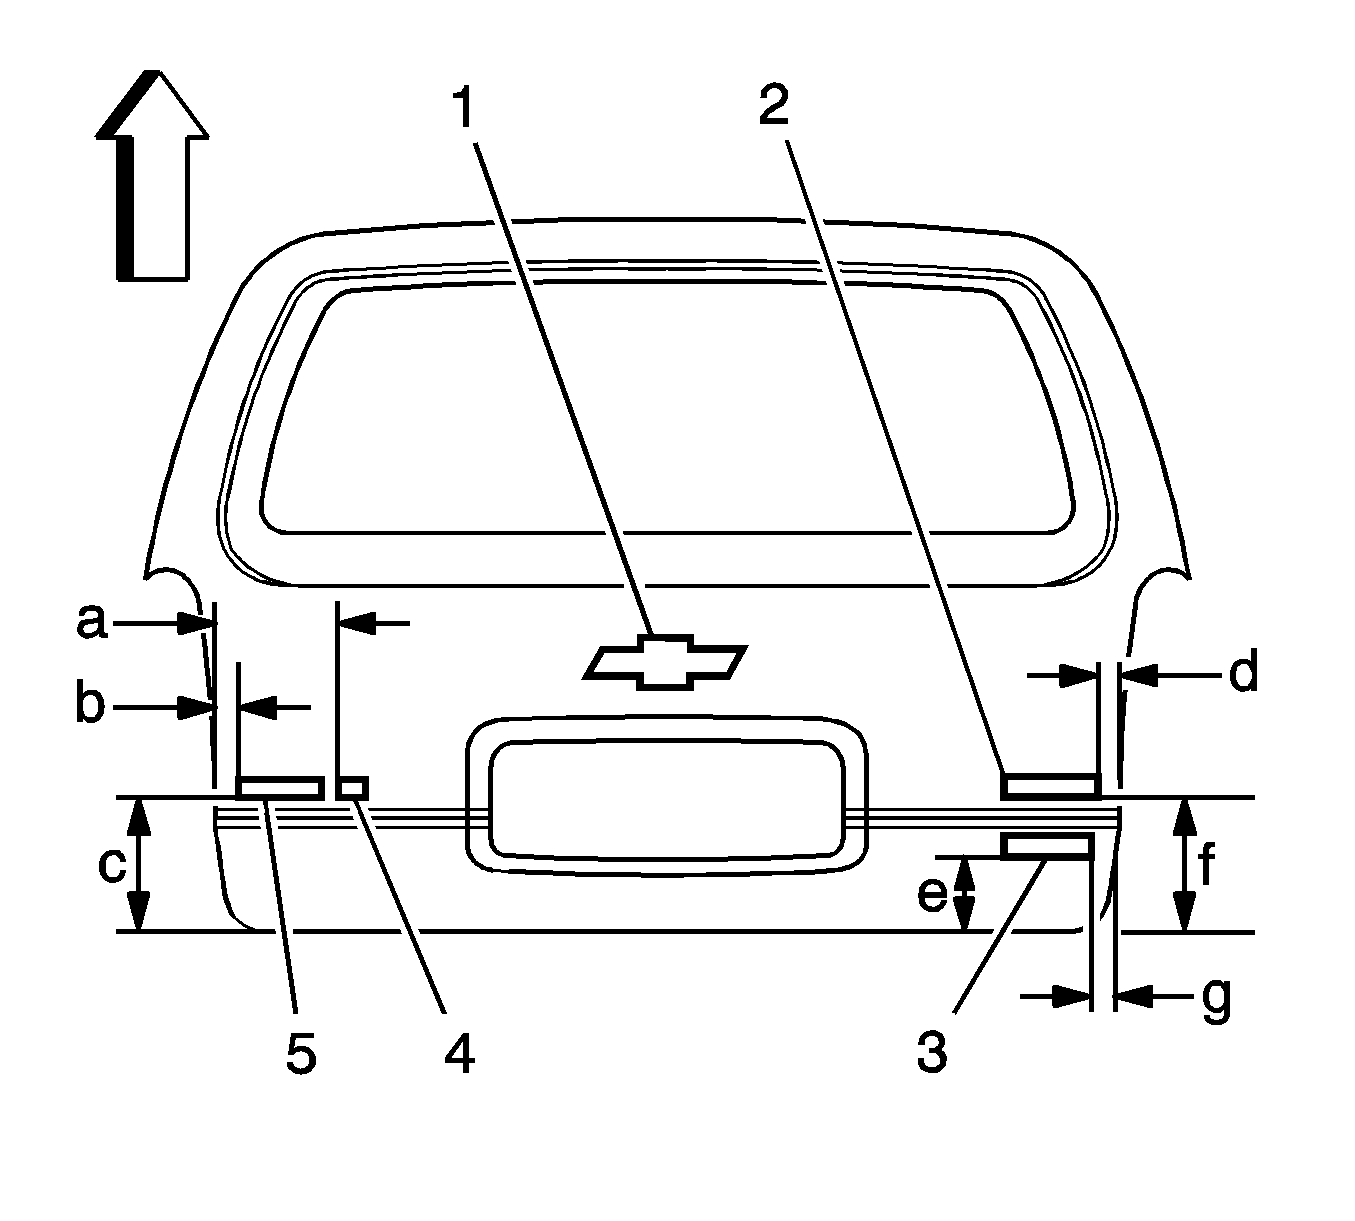
- For the UPLANDER (5) emblem/nameplate, install as shown.
| • | For the LS or LT emblem/nameplate, dimension (a) is 270 mm (10.63 in) from the left edge of the liftgate to the left edge of the LS or LT emblem/nameplate. |
| • | Dimension (b) is 31 mm (1.30 in) from the outer edge of the liftgate to the left side of the UPLANDER emblem/nameplate edge. |
| • | Dimension (c) is 209 mm (8.23 in) from the bottom edge of the liftgate to the bottom of the UPLANDER emblem/nameplate. |
| • | For the Chevrolet (2) emblem/nameplate, dimension (d) is 31 mm (1.30 in) from the right edge of the liftgate to the right edge of the Chevrolet emblem/nameplate. |
| • | For the VERSATRAK (3) emblem/nameplate, dimension (e) is 53 mm (2.09 in) from the bottom edge of the liftgate to the bottom edge of the VERSATRAK (3) emblem/nameplate. |
| • | Dimension (f) is 209 mm (8.23 in) from the bottom edge of the liftgate to the bottom edge of the Chevrolet (2) emblem/nameplate. |
| • | Dimension (g) is 37 mm (1.46 in) from the right edge of the liftgate to the right edge of the VERSATRAK emblem/nameplate. |
- The Chevrolet (1) emblem is centered and indexed above the license plate pocket of the liftgate.
- Heat the mounting surface to approximately 27-41°C (80-105°F) using the
J 25070
, if necessary.
- Ensure that the temperature of the emblem/nameplate is approximately 29-32°C (85-90°F).
Important: Do not touch the adhesive backing on the emblem/nameplate.
- Remove the protective liner from the back of the emblem/nameplate.
- Position the emblem/nameplate to the location marks and press the emblem/nameplate to the mounting surface.
- Apply equal pressure along the emblem/nameplate to uniformly bond the item to the mounting surface.
- Remove the protective tape from the body panel.
Liftgate Emblem/Nameplate Replacement Pontiac
Tools Required
J 25070
Heat Gun
Removal Procedure
- When replacing or repairing an emblem/nameplate perform the following:
| 1.1. | Use tape to protect the body panel during removal. |
| 1.2. | Use tape for alignment marks for installation of the emblem/nameplate. |
- To remove an emblem/nameplate, heat the emblem/nameplate using a
J 25070
.
- Apply heat using a circular motion for about 30 seconds holding the
J 25070
approximately 152 mm (6 in) from the surface.
Notice: Use a plastic, flat-bladed tool to prevent paint damage when removing
an emblem/name plate.
- Use a plastic, flat-bladed tool to remove the emblem/nameplate from the panel surface.
- When replacing, remove all adhesive as follows:
| • | For body panels use a 3M™ Scotch Brite molding adhesive remover disk 3M™ P/N 07501 or equivalent. |
| • | For plastic panels use a lint free cloth and varnish makers and painters (VMP) naphtha or a 50/50 mixture by volume of isopropyl alcohol and water to remove the adhesive. |
Installation Procedure
Important: Apply the emblem/nameplate in an environment that is free from dust or other dirt that could come into contact with the sticky backing. Foreign material may cause improper adhesion.
- Clean the area where the emblem/nameplate will be installed.
Use a lint free cloth and VMP naphtha or a 50/50 mixture by volume of isopropyl alcohol and water to clean the area.
- Dry the area thoroughly.
- If the location of the emblem/nameplate has not been marked, apply tape and mark the location as shown below.
- For the Montana SV6 (4) emblem/nameplate, install as shown.
| • | Dimension (a) is 31 mm (1.30 in) from the left outer edge of the liftgate to the left side of the Montana SV6 emblem/nameplate edge. |
| • | Dimension (b) is 209 mm (8.23 in) from the bottom edge of the liftgate to the bottom of the Montana SV6 emblem/nameplate. |
| • | For the Pontiac (2) emblem/nameplate, dimension (c) is 31 mm (1.30 in) from the right edge of the liftgate to the right edge of the Pontiac emblem/nameplate. |
| • | Dimension (d) is 209 mm (8.23 in) from the bottom edge of the liftgate to the bottom edge of the Pontiac emblem/nameplate. |
| • | For the VERSATRAK (3) emblem/nameplate, dimension (e) is 37 mm (1.46 in) from the right edge of the liftgate to the right edge of the VERSATRAK emblem/nameplate. |
| • | Dimension (f) is 53 mm (2.09 in) from the bottom edge of the liftgate to the bottom edge of the VERSATRAK emblem/nameplate. |
- The Pontiac (1) emblem/nameplate is centered and indexed above the license plate pocket of the liftgate.
- Heat the mounting surface to approximately 27-41°C (80-105°F) using the
J 25070
, if necessary.
- Ensure that the temperature of the emblem/nameplate is approximately 29-32°C (85-90°F).
Important: Do not touch the adhesive backing on the emblem/nameplate.
- Remove the protective liner from the back of the emblem/nameplate.
- Position the emblem/nameplate to the location marks and press the emblem/nameplate to the mounting surface.
- Apply equal pressure along the emblem/nameplate to uniformly bond the item to the mounting surface.
- Remove the protective tape from the body panel.
