For 1990-2009 cars only
Removal Procedure
- Disconnect the battery negative cable. Refer to Battery Negative Cable Disconnection and Connection in Engine Electrical.
- Open the liftgate.
- Remove the liftgate trim panel. Refer to Liftgate Trim Panel Replacement .
- Remove the water deflector. Refer to Liftgate Water Deflector Replacement .
- Remove the rear speakers from the liftgate. Refer to Radio Rear Speaker Replacement in Entertainment.
- Remove the high mounted stop lamp. Refer to High Mount Stop Lamp Replacement in Lighting Systems.
- Remove the license plate lamps. Refer to Rear License Lamp Replacement in Lighting Systems.
- Lower the rear of the headliner to access the body harness to the liftgate harness electrical connector. Refer to Headlining Trim Panel Replacement .
- Disconnect the liftgate latch electrical connectors.
- Remove the rear washer hose. Refer to Rear Window Washer Nozzle Replacement in Wipers/Washer Systems.
- Remove the rear corner upper garnish moldings. Refer to Upper Rear Trim Finish Panel Replacement in Interior Trim.
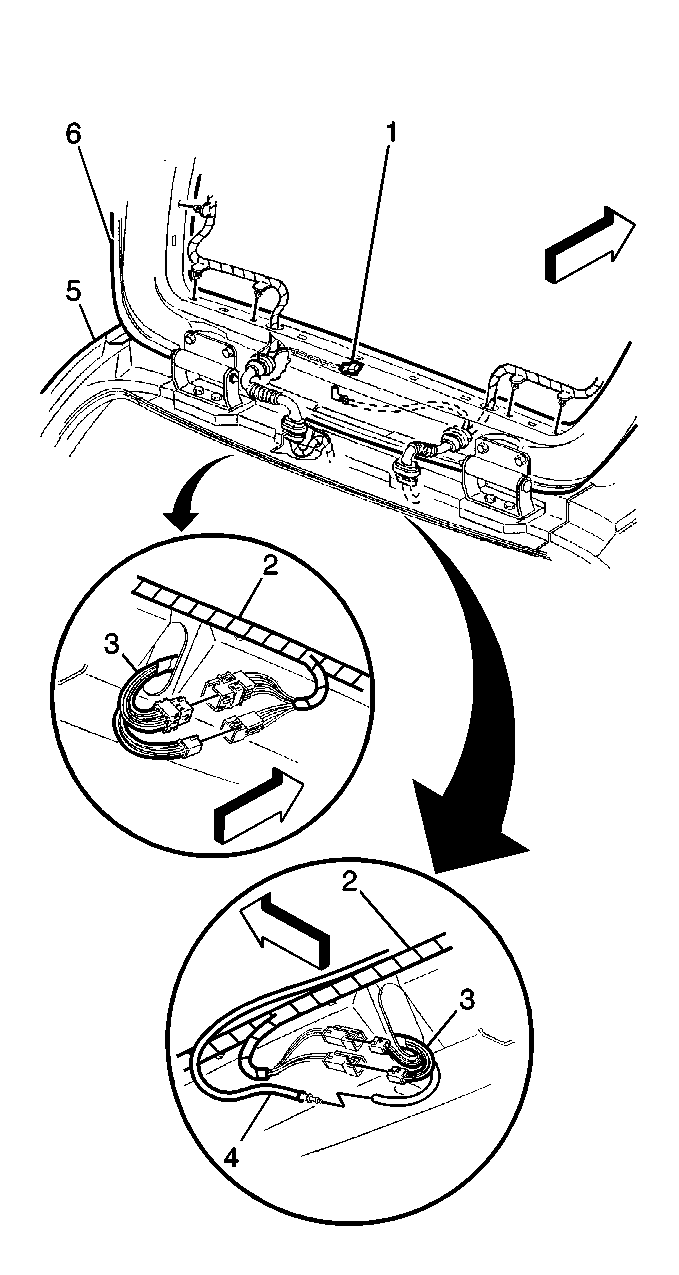
- Disconnect liftgate wiring harness connectors (2) from the rear body wiring harness (3).
- Disconnect the following electrical connectors and harness clips from the liftgate panel.
- Remove the electrical harness from the liftgate.
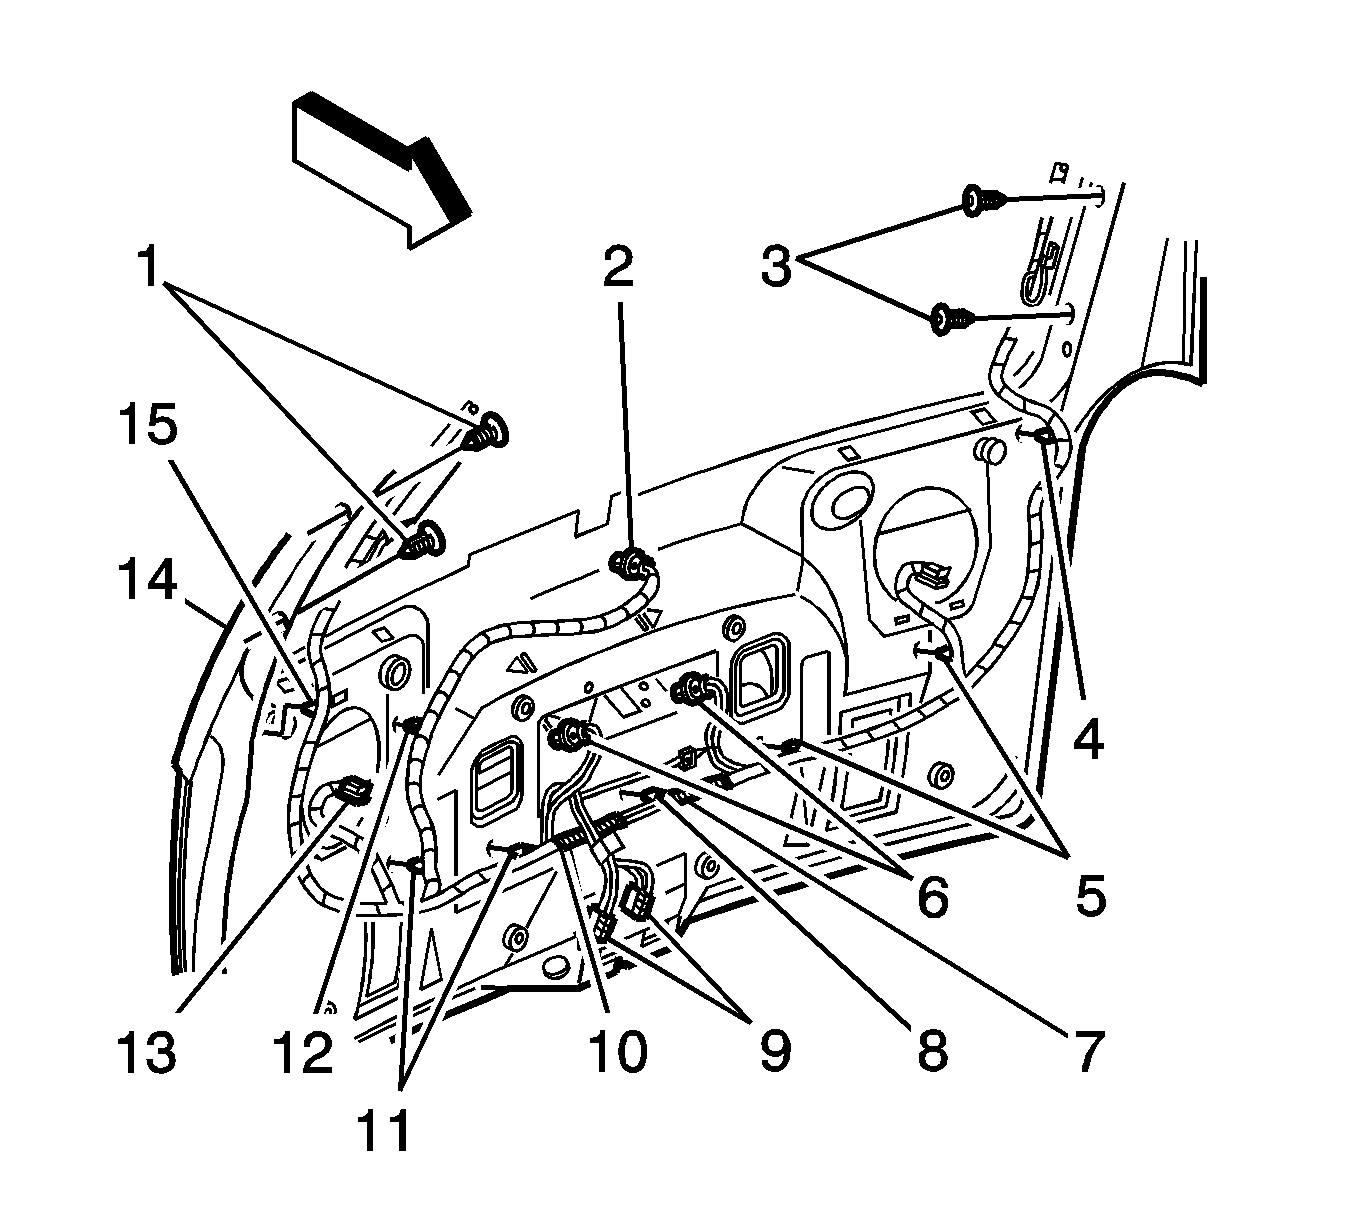
| • | Harness retainer (1) |
| • | Wiper motor connector (2) |
| • | Harness retainer (3) |
| • | Harness clip (4) |
| • | Harness clips (5) |
| • | License plate lamp sockets (6) |
| • | Pink tape used for visual aid (7) |
| • | Harness clip (8) |
| • | Liftgate latch electrical connectors (9) |
| • | Green tape used for visual aid (10) |
| • | Harness clips (11) |
| • | Wiper motor harness clip to liftgate (12) |
| • | Speaker electrical connector (13) |
| • | Harness clip (15) |
Installation Procedure
- Route and position the electrical harness to the liftgate.
- Connect the following electrical connectors and harness clips to the liftgate.
- Connect liftgate wiring harness connectors (2) to the rear body wiring harness (3).
- Install the rear corner upper garnish moldings. Refer to Upper Rear Trim Finish Panel Replacement in Interior Trim.
- Install the rear washer hose. Refer to Rear Window Washer Nozzle Replacement in Wipers/Washer Systems.
- Connect the liftgate latch electrical connectors.
- Install the headliner that was lowered. Refer to Headlining Trim Panel Replacement .
- Install the license plate lamps. Refer to Rear License Lamp Replacement in Lighting Systems.
- Install the high mounted stop lamp. Refer to High Mount Stop Lamp Replacement in Lighting Systems.
- Install the rear speakers to the liftgate. Refer to Radio Rear Speaker Replacement in Entertainment.
- Install the water deflector. Refer to Liftgate Water Deflector Replacement .
- Install the liftgate trim panel. Refer to Liftgate Trim Panel Replacement .
- Close the liftgate.
- Connect the battery negative cable. Refer to Battery Negative Cable Disconnection and Connection in Engine Electrical.
- Re-initialize the power sliding door. Refer to Rear Side Door Actuator Control Module Programming and Setup .
| • | Harness retainer (1) |
| • | Wiper motor connector (2) |
| • | Harness retainer (3) |
| • | Harness clip (4) |
| • | Harness clips (5) |
| • | License plate lamp sockets (6) |
| • | Pink tape used for visual aid (7) |
| • | Harness clip (8) |
| • | Liftgate latch electrical connectors (9) |
| • | Green tape used for visual aid (10) |
| • | Harness clips (11) |
| • | Wiper motor harness clip to liftgate (12) |
| • | Speaker electrical connector (13) |
| • | Harness clip (15) |
