SERVICE MANUAL UPDATE REAR AXLE PINION DEPTH

SERVICE MANUAL REVISION - SETTING REAR AXLE PINION DEPTH
Models Affected 1987-88 SAFARI AND FIREBIRD --------------- WITH GM CORPORATE AXLES SERVICE MANUAL UPDATE
The new page replaces the 1987 Safari Wagon and 1987-88 Firebird Service Manual information.
The service manual instructions have been changed to enable the technician to accurately calculate the thickness of the shim pack used to determine the proper depth of the rear axle drive pinion.
Replace the original service manual instructions in Section 4B with the one supplied in this bulletin.
PINION DEPTH
Figures 1 through 3
Tools Required:
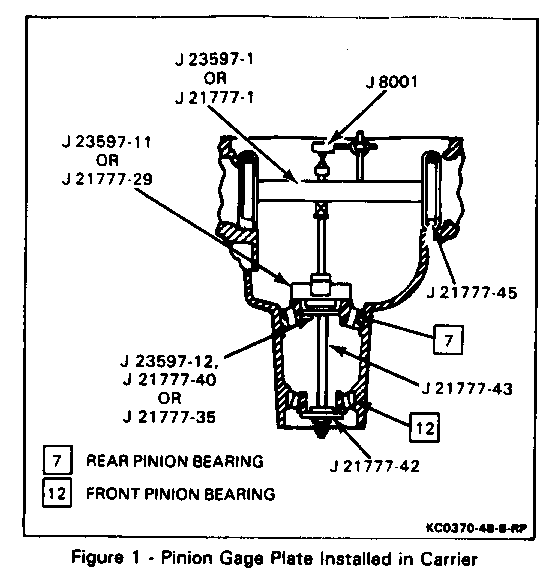
J 8001 Dial Indicator Set J 23597- 1 Arbor, 7 1/2-inch and 7 5/8-inch Ring Gears J 23597-11 Gage Plate, 7 1/2-inch and 7 5/8-inch Ring Gears J 23597-12 Rear Pilot Washer, 7 5/8-inch Ring Gear J 21777- 1 Arbor, 8 1/2-inch Ring Gear J 21777-29 Gage Plate, 8 1/2-inch Ring Gear J 21777-35 Rear Pilot Washer, 8 1/2-inch Ring Gear J 21777-40 Rear Pilot Washer, 7 1/2-inch Ring Gear J 21777-42 Front Pilot Washer J 21777-43 Stud Assembly, Bolt J 21777-45 Side Bearing Diws
Pinion depth is measured with a pinion setting gage. The gage provides a "nominal" or "zero" pinion as a gaging reference.
CLEAN
1. All pans of gage. 2. Side bearing bore. 3. Front and rear bearing cups. o Lubricate front pinion bearing (12) and rear pinion bearing (7) with rear axic lubricant.
INSTALL OR CONNECT
1. J 2 1777-35 through J 23597-12, as required. Refer to Figure 1. 2. J 2 3597-11 or J 2 1777-29. 3. J 21777-42 and nut in carrier.
TIGHTEN
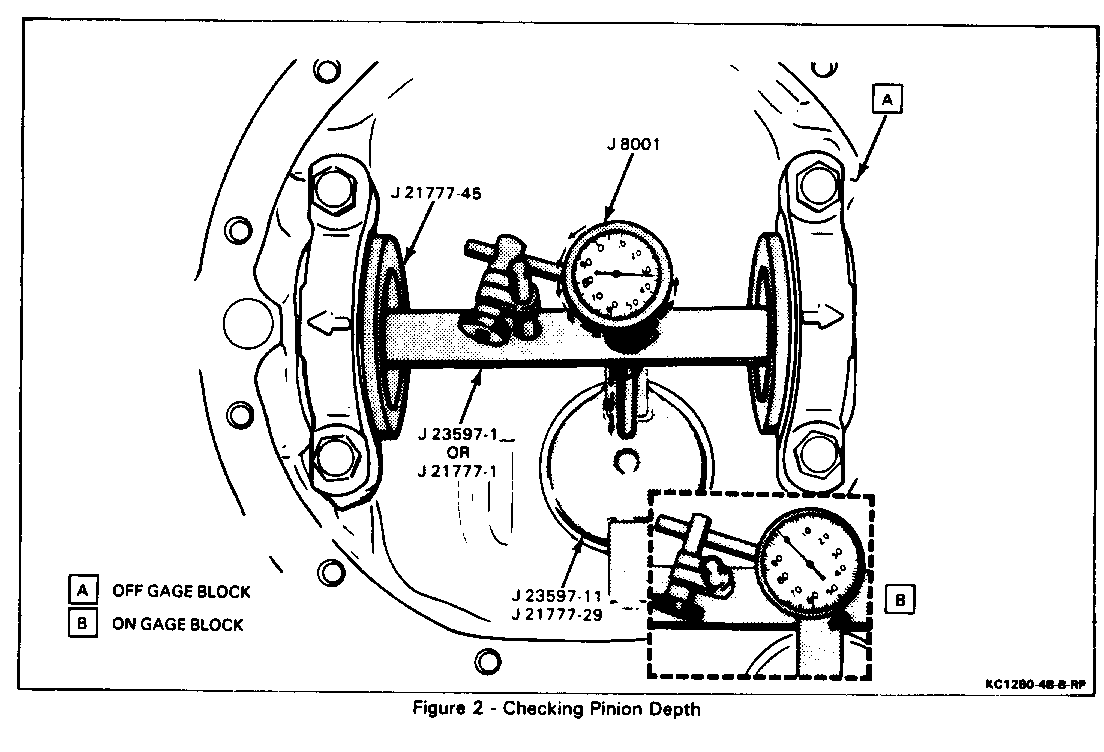
o Nut to 2.3 N-m (20 lb. in.). o Rotate J 23597-11 or J 21777-29 to seat the bearings. o Mount J800I on J23597-1 or J21777-1 and preload indicator against plunger about 1.27 mm 0.050 inch).
4. J 2177745 on J 23597-1 or J 21777-1 and position unit in carrier. 5. Side bearing caps and bearing cap bolts.
TIGHTEN
o Bearing cap bolts to 75 N-m (55 lb. ft.). MEASURE ------- o Pinion depth.
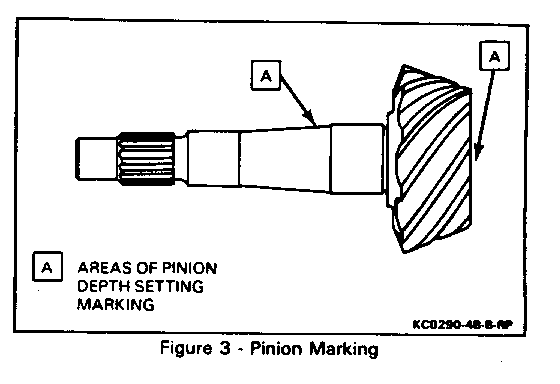
o Rotate J 23597-1 or J 21777-1 slowly back and forth until J 8001 reads the greatest deflection (the point where the needle changes direction). At that point, set J 8001 to zero. Repeat rock action to verify the zero setting. o After zero setting is obtained, rotate J 23597-1 or J21777-1 just until the plunger no longer touches J 23597-11 or J 21777-29. This provides the gaging reference of a "nominal" or "zero" pinion. o Record J 8001 reading at printer position. This indicates the proper shim to use. Example:if pointer moved counterclockwise 1.70mm (0.067 inch) to a dial reading of 0.84 mm (0.033 inch), this indicates a shim thickness of 0.84 mm (0.033 inch) (Figure 2). o On 7 1/2-inch and 7 5/8-inch ring gear axle assemblies (Type K), select the correct drive pinion shim to be used during reassembly on the following basis: - No marking on drive pinion, correct shim has thickness EQUAL to J reading. - Plus (+) marking on drive pinion, shim thickness indicated by J 8001 INCREASES by the amount on the drive pinion. - Minus (-) on drive pinion, shim thickness indicated by J 8001 DECREASES by the amount on the drive pinion. o On 8 1/2-inch ring gear axle assemblies (Type G) drive pinions are nominal gears and do not have markings. Required shim thickness is EQUAL to J 8001 reading. o Shims are available in 0.03 mm to 0.94 mm (0.001 inch to 0.037 inch). Shim thickness is etched on the flat surface for easy identification.
REMOVE OR DISCONNECT
o Loosen J 21777-43 and remove special tools and both bearings from carrier
REINSTALL OR CONNECT
1. Correct shim on drive pinion. 2. Drive pinion rear bearing (7).
ASSEMBLE
o Differential case. Refer to "Differential Case Removal with Axle Shafts Removed," in the appropriate service manual.
MEASURE
o Preload of the total assembly at the pinion yoke nut. With new bearings, preload is 4.0 to 4.5 N-m (35 to 40 lb. in.) rotating torque with a new seal. With used bearings, preload is 2.3 to 2.8 N-m (20 to 25 lb. in.) rotating torque with a new seal.


General Motors bulletins are intended for use by professional technicians, not a "do-it-yourselfer". They are written to inform those technicians of conditions that may occur on some vehicles, or to provide information that could assist in the proper service of a vehicle. Properly trained technicians have the equipment, tools, safety instructions and know-how to do a job properly and safely. If a condition is described, do not assume that the bulletin applies to your vehicle, or that your vehicle will have that condition. See a General Motors dealer servicing your brand of General Motors vehicle for information on whether your vehicle may benefit from the information.
