Main Shaft Replacement 4WD
Removal Procedure
Tools Required
Important: The main shaft first gear bushing and the reverse gear bushing are identical.
Make note of these components and their positions during disassembly
in order to ensure correct assembly and operation.
- Use the J 34757
in
order to remove the high speed and reverse hub C-clip from the main shaft.
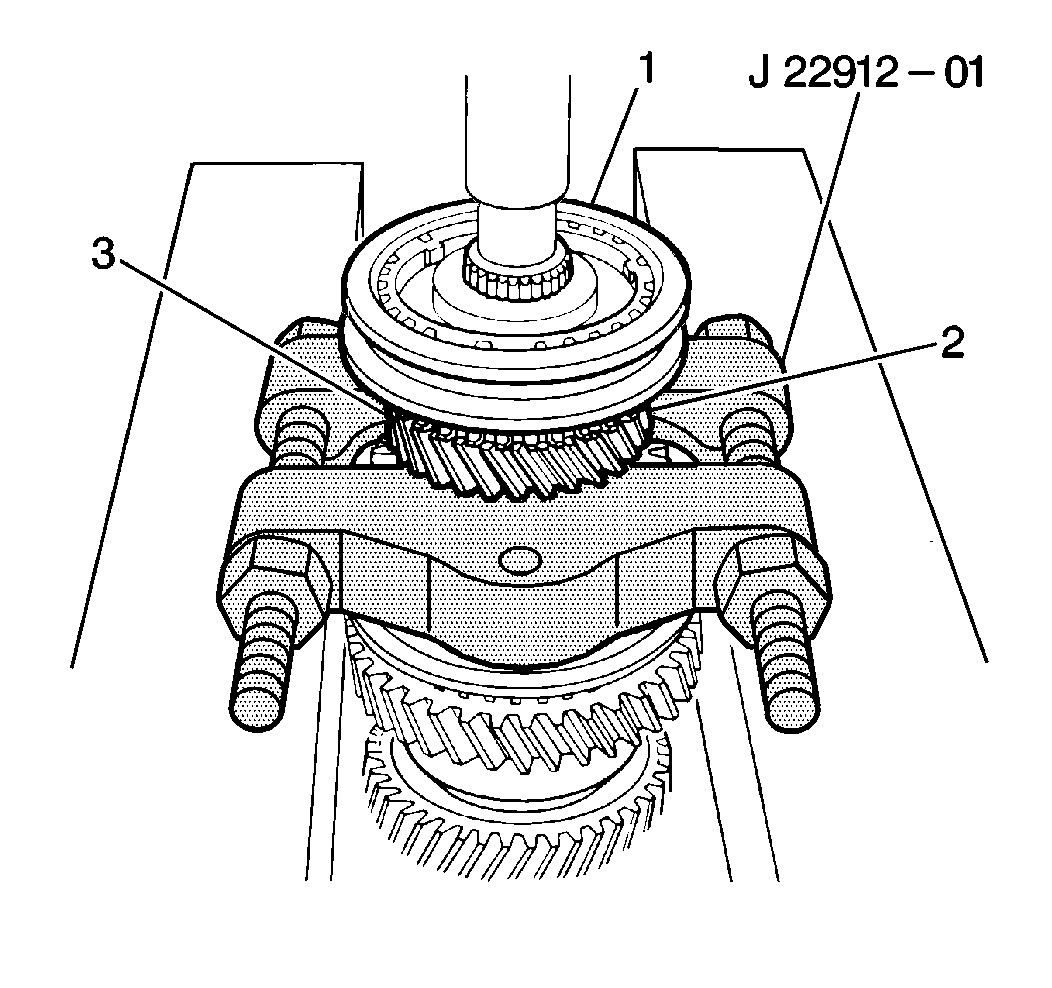
- Use the J 22912-01
and a press arbor in order to remove
the following components from the main shaft:
| 2.1. | The high speed synchronizer rings (2) |
| 2.2. | The high speed hub and sleeve assembly (1) |
| 2.3. | The main shaft third gear (3) |
| 2.4. | The main shaft third gear needle bearing |
- Remove the high speed synchronizer sleeve from the high speed
synchronizer hub.
- Remove the following components from the high speed synchronizer
hub:
| 4.1. | The high speed synchronizer springs |
| 4.2. | The three synchronizer keys |
- Use the J 34757
in
order to remove the main shaft rear bearing C-clip from the main shaft.
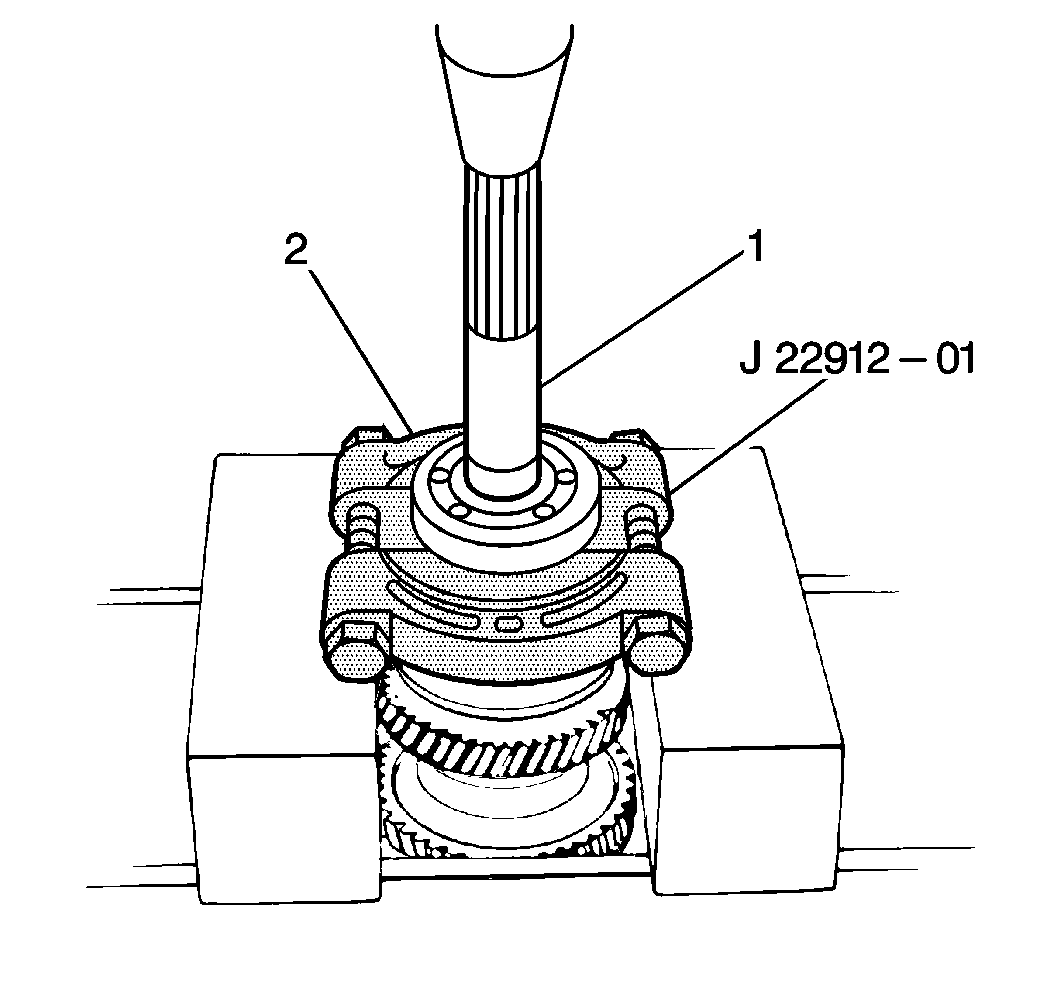
- Use the J 22912-01
and a press arbor in order to remove
the main shaft rear bearing (2) from the main shaft (1).
Important: The main shaft fifth gear needle bearing separates into two halves.
Make note of the position and the location of the main shaft fifth gear
needle bearing in order to ensure correct assembly and operation.
- Remove the following components from the main shaft:
| 7.1. | The main shaft fifth gear washer |
| 7.2. | The main shaft washer ball |
| 7.3. | The main shaft fifth gear |
| 7.4. | The high speed synchronizer ring |
| 7.5. | The main shaft fifth gear needle bearing |
- Remove the reverse synchronizer sleeve from the reverse synchronizer
hub.
- Remove the following components from the reverse synchronizer
hub:
| 9.1. | The reverse synchronizer springs |
| 9.2. | The three synchronizer keys |
- Use the J 34757
in
order to remove the high speed and reverse hub C-clip from the main shaft.
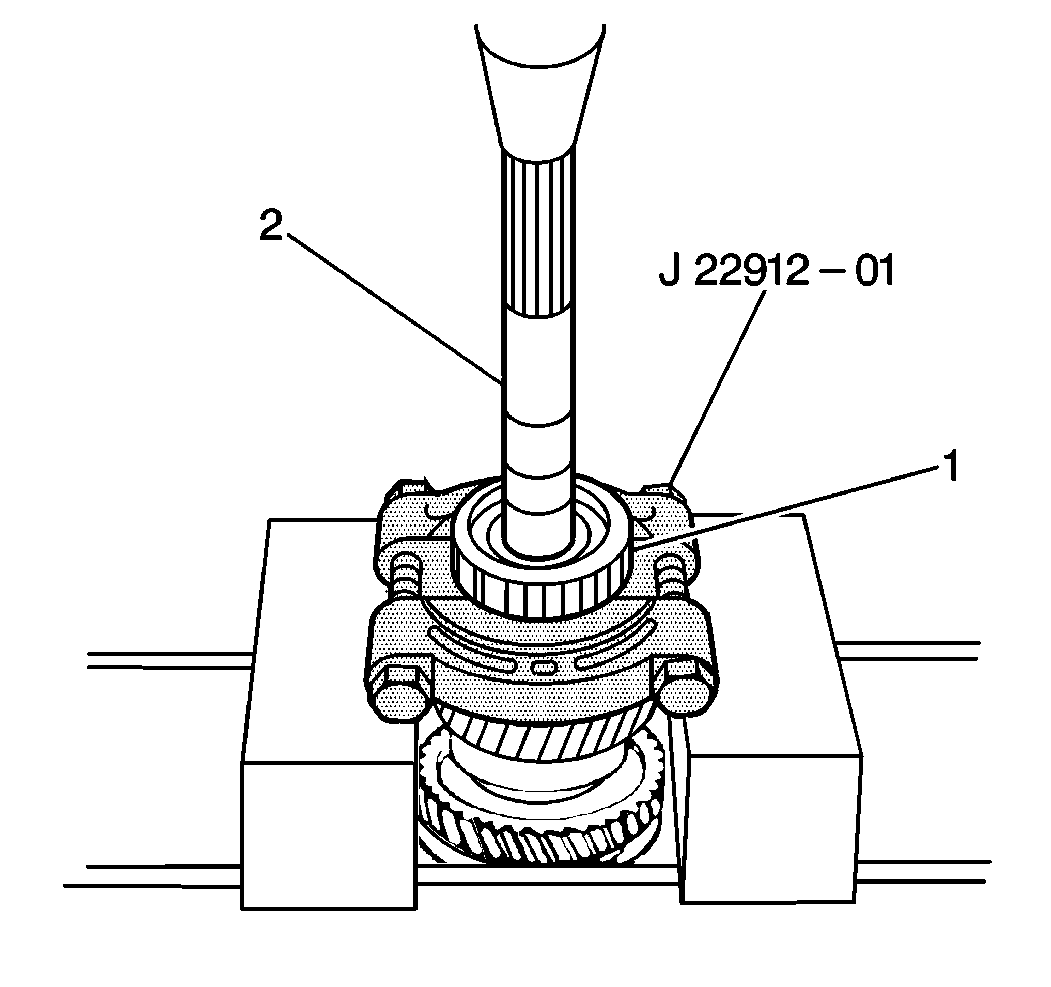
- Use the J 22912-01
and a press arbor in order to remove
the reverse synchronizer hub (1) from the main shaft (2).
- Remove the main shaft reverse gear and the needle bearing from
the main shaft.
Notice: DO NOT remove the main shaft bearing washer, the main shaft reverse
gear bushing and the main shaft center bearing in one step. The main shaft
washer ball which locks the main shaft bearing washer in place could damage
the main shaft or the main shaft center bearing. Remove the main shaft reverse
gear bushing first, then, remove the main shaft bearing washer and the main
shaft washer ball before removing the bushing main shaft center bearing from
the main shaft.
- Remove the following components from the main shaft:
| 13.1. | The main shaft reverse gear bushing |
| 13.2. | The main shaft bearing washer |
| 13.3. | The main shaft washer ball |
- Use the J 22912-01
and a press arbor in order to remove the main shaft center bearing
from the main shaft.
Notice: DO NOT remove the main shaft bearing washer, the main shaft 1st gear,
the main shaft 1st gear needle bearing and the low speed synchronizer ring
in one step. The main shaft washer ball which locks the main shaft bearing
washer in place could damage the main shaft or the main shaft 1st gear. Remove
the main shaft bearing washer and the main shaft washer first, then, remove
the main shaft 1st gear, the main shaft 1st gear needle bearing and the low
speed synchronizer ring.
- Remove the following components from the main shaft:
| 15.1. | The main shaft bearing washer |
| 15.2. | The main shaft washer ball |
| 15.3. | The main shaft first gear |
| 15.4. | The main shaft first gear needle bearing |
| 15.5. | The low speed synchronizer ring |
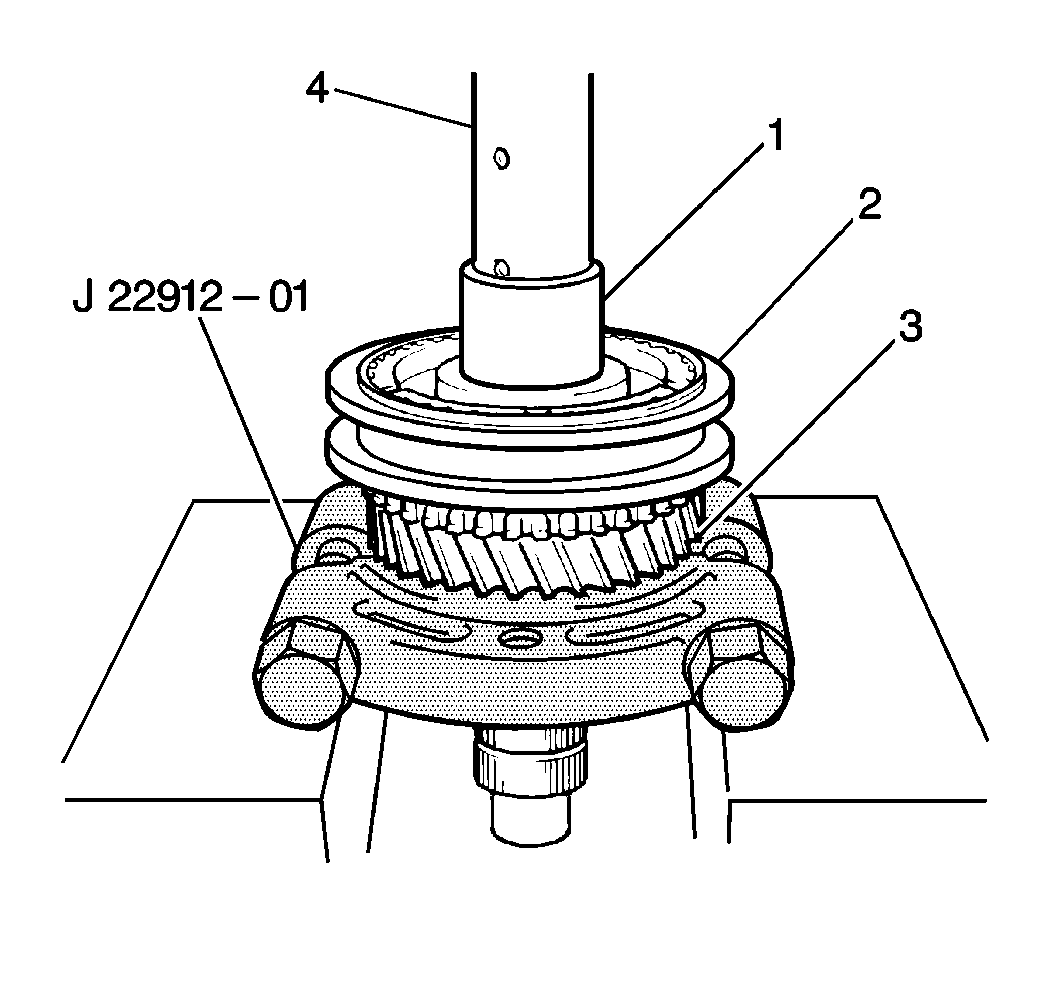
- Use the J 22912-01
and a press arbor in order to remove
the following components from the main shaft:
| 16.1. | The main shaft first gear bushing (1) |
| 16.2. | The low speed sleeve and hub assembly (2) |
| 16.3. | The low speed synchronizer ring |
| 16.4. | The main shaft second gear (3) |
- Remove the main shaft second gear needle bearing from the main
shaft.
- Remove the low speed synchronizer sleeve from the low speed synchronizer
hub.
- Remove the following components from the low speed synchronizer
hub:
| 19.1. | The low speed synchronizer springs |
| 19.2. | The synchronizer keys |
- Clean all main shaft components thoroughly with solvent. Air dry
the components.
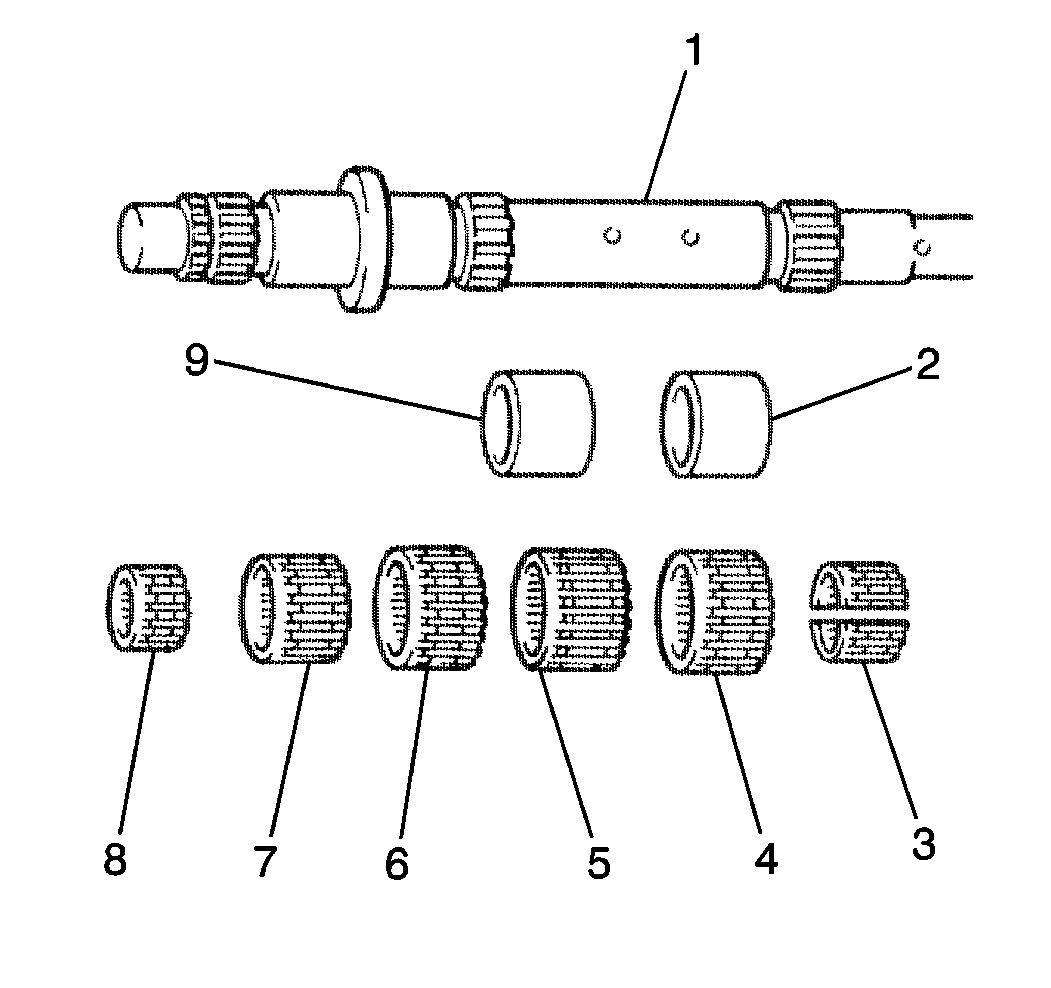
- Inspect all of the needle
bearings (3-8) for unusual wear or damage. Replace the needle bearings
as necessary.
- Inspect all of the ball bearings for roughness or wear. Replace
the ball bearings as necessary.
- Inspect the chamfered portion of each synchronizer ring for excessive
wear. Replace as necessary.
- Inspect all of the synchronizer springs and keys for distortion
or damage. Replace as necessary.
- Inspect the main shaft (1) for the following conditions and replace
as necessary:
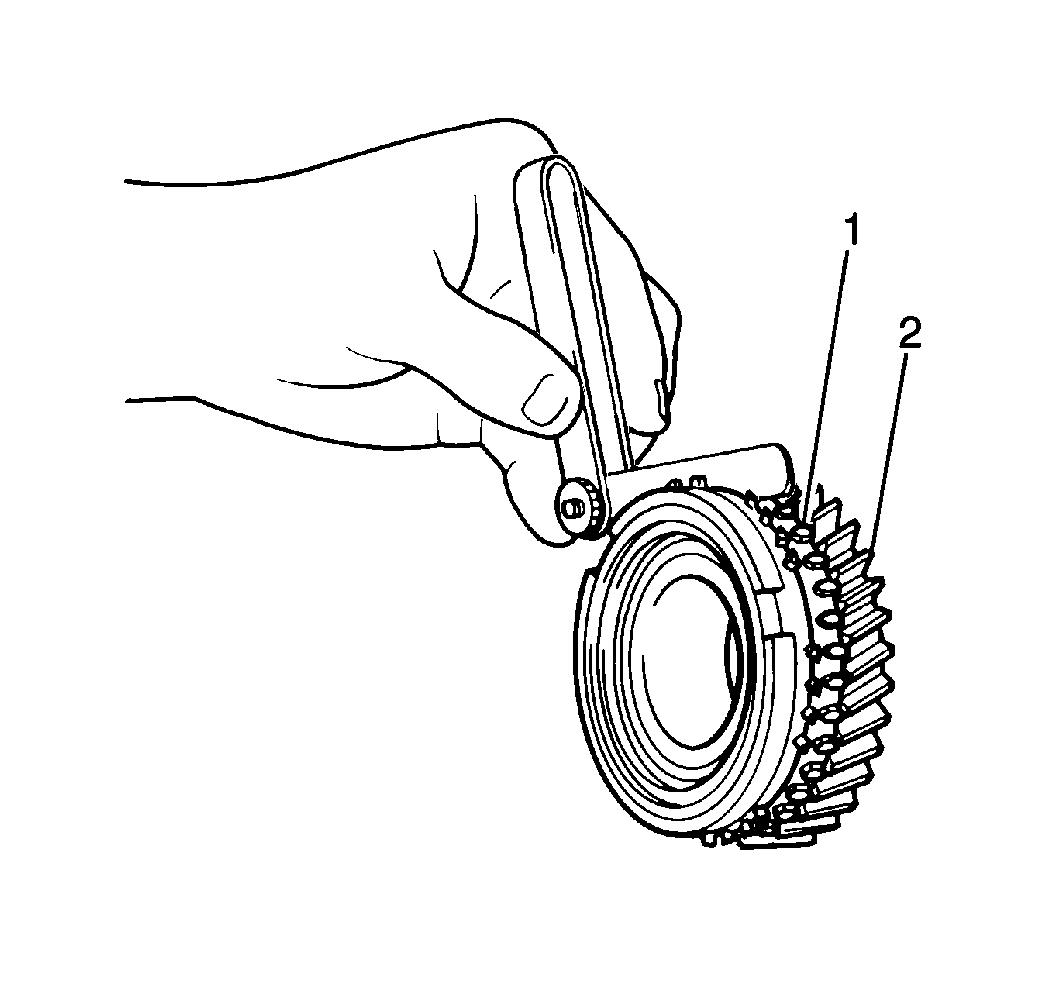
- Use a feeler gage in order
to measure the clearance between each synchronizer ring (1) and its respective
gear (2).
The maximum clearance allowed is 1.0 to 1.4 mm (0.039 to 0.055 in).
If the synchronizer ring clearance exceeds the specification, replace
the synchronizer ring and gear.
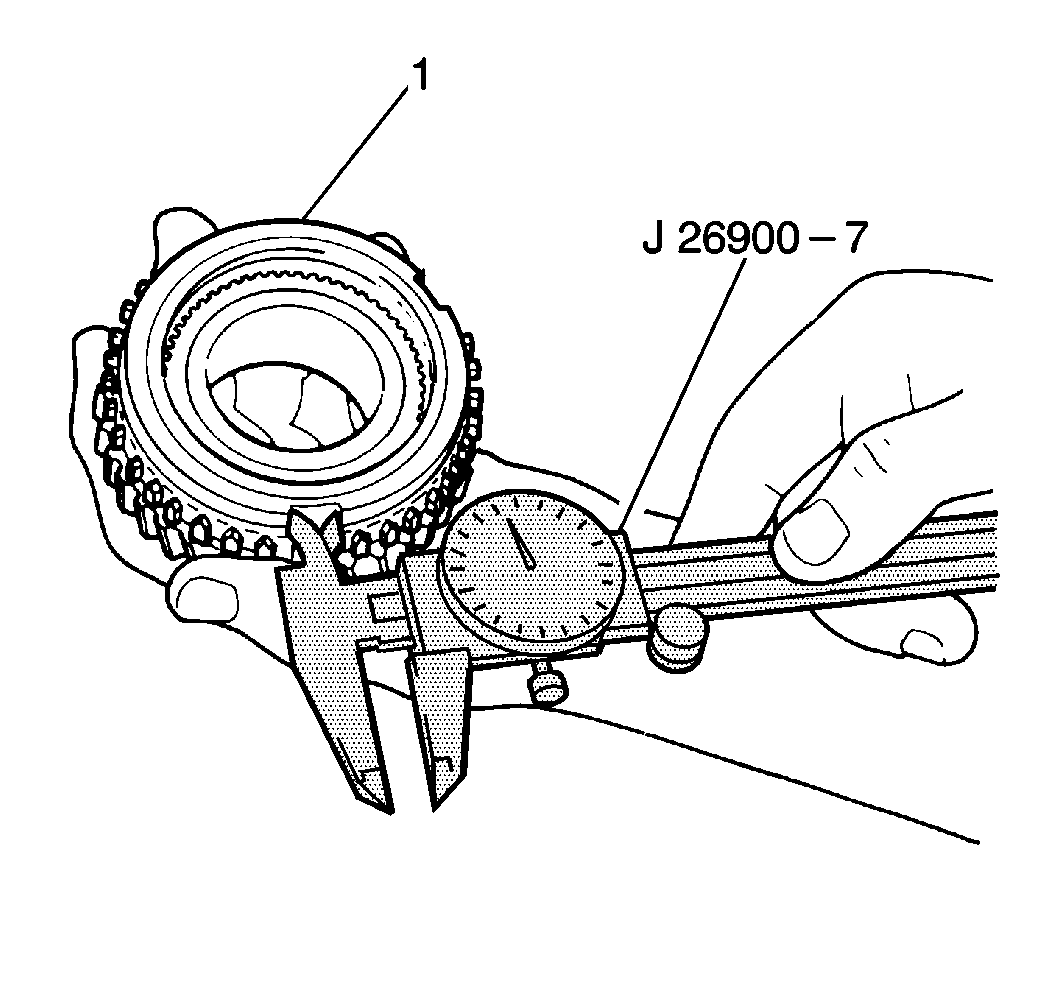
- Use the J 26900-7
in order to measure the key slot
width of each synchronizer ring (1).
The maximum synchronizer key slot width allowed is 10.1 to 10.4 mm
(0.397 to 0.409 in).
If the synchronizer key slot width exceeds the specification, replace
the synchronizer ring.
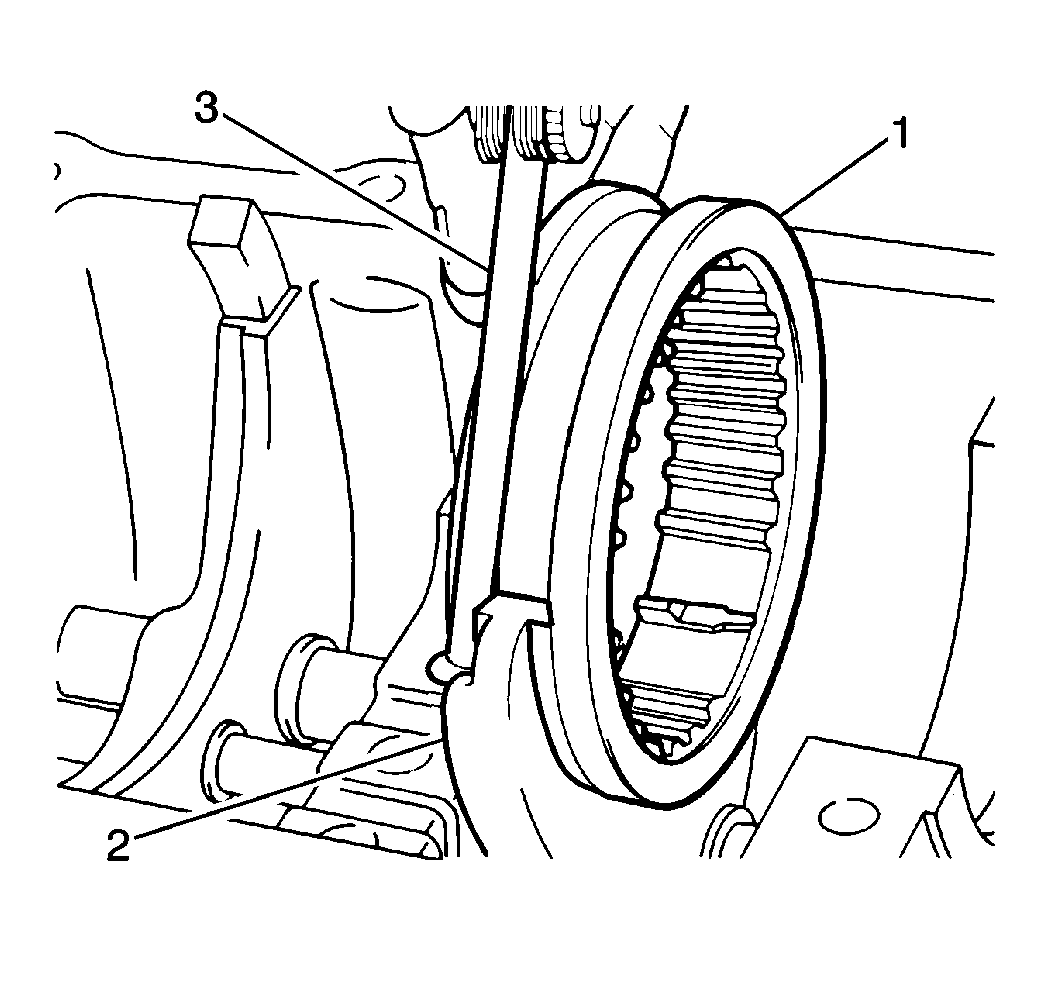
- Use a feeler gage (3)
in order to measure the clearance between each gearshift fork (2) and its
respective synchronizer sleeve (1).
The maximum gearshift fork clearance allowed is 1.0 mm (0.039 in).
If the gearshift fork clearance exceeds the specification, replace the
gearshift fork and the synchronizer sleeve.
Installation Procedure
Tools Required
| • | J 36850 Transjel®
Transmission Assembly Lubricant |
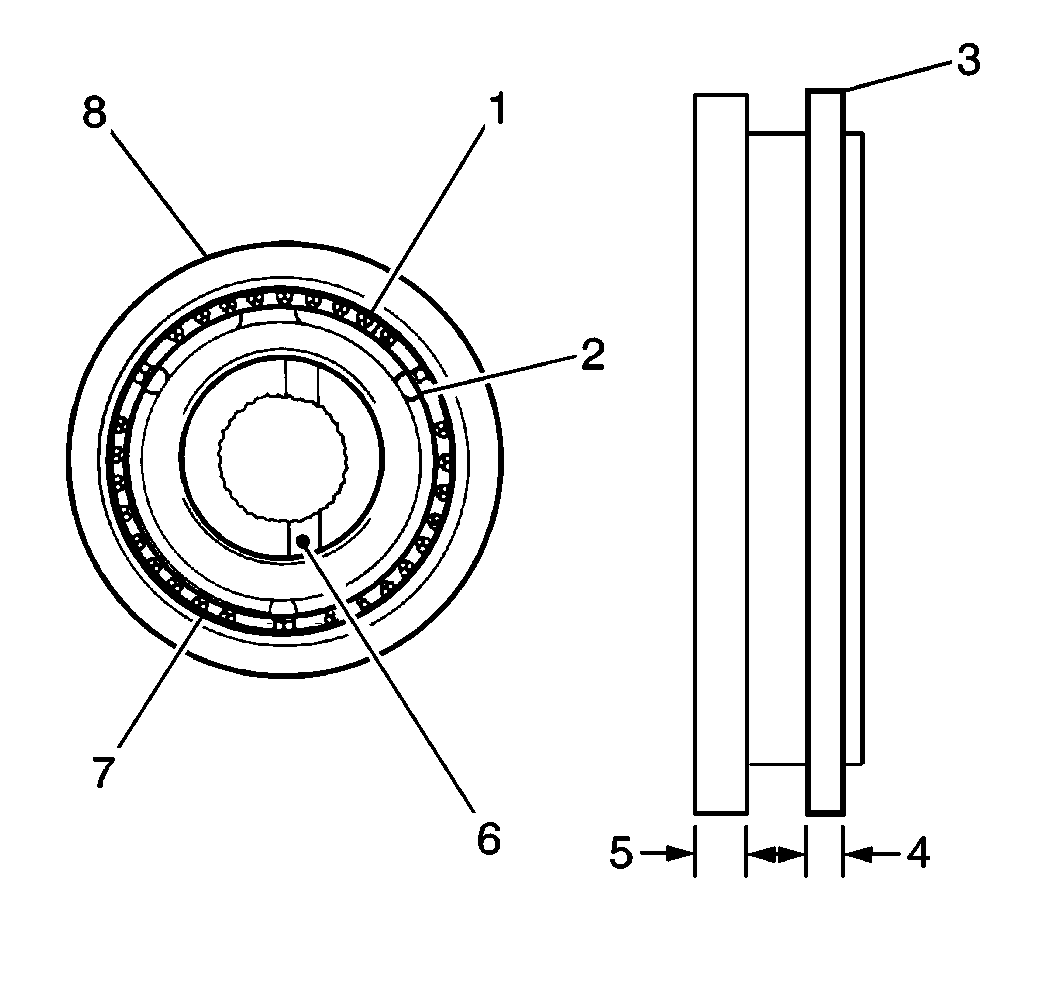
- Install the following
components onto the low speed synchronizer hub (7):
| 1.1. | The low speed synchronizer springs (1) |
| 1.2. | The synchronizer keys (2) |
- Install the low speed synchronizer sleeve (8) onto the low speed
synchronizer hub (7).
- Apply J 36850
to
the main shaft second gear needle bearing.
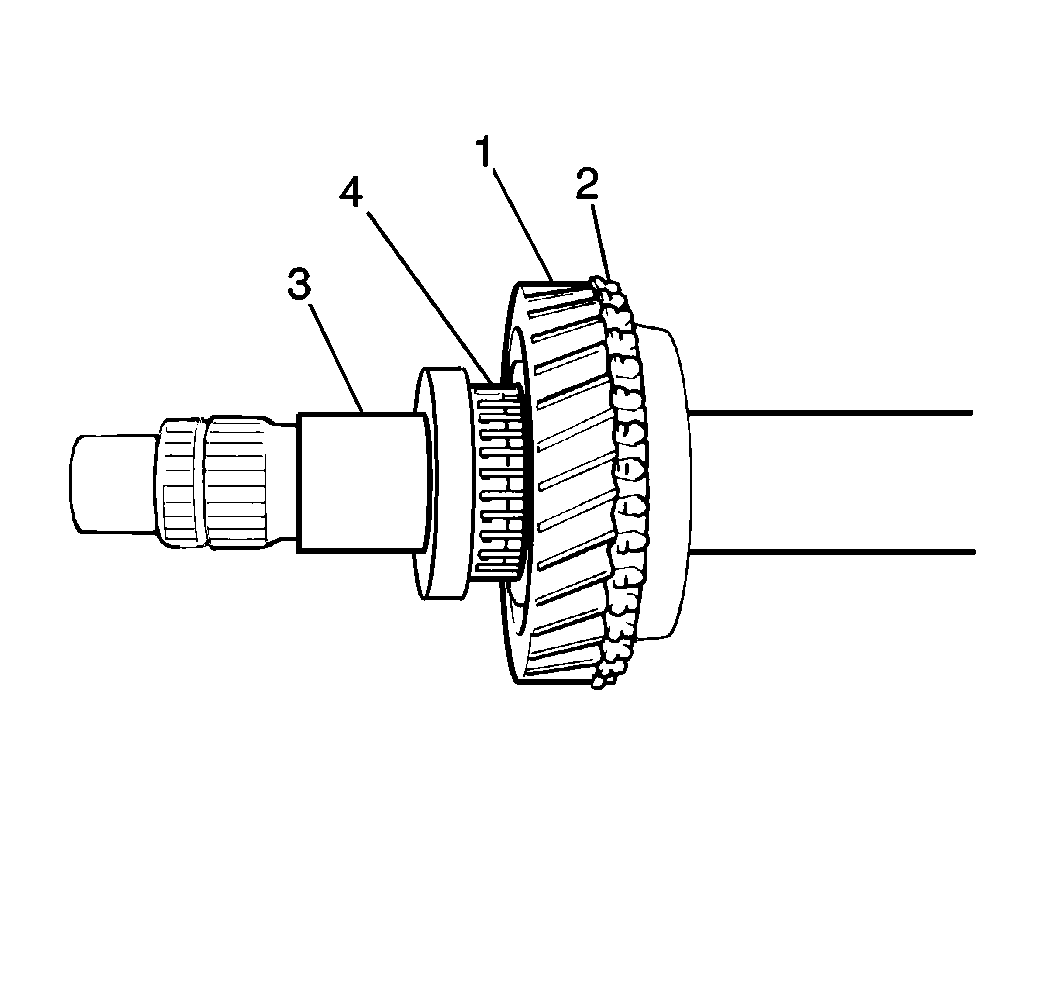
- Install the following
components onto the main shaft (3):
| 4.1. | The main shaft second gear needle bearing (4) |
| 4.2. | The main shaft second gear (1) |
| 4.3. | The low speed synchronizer ring (2) |
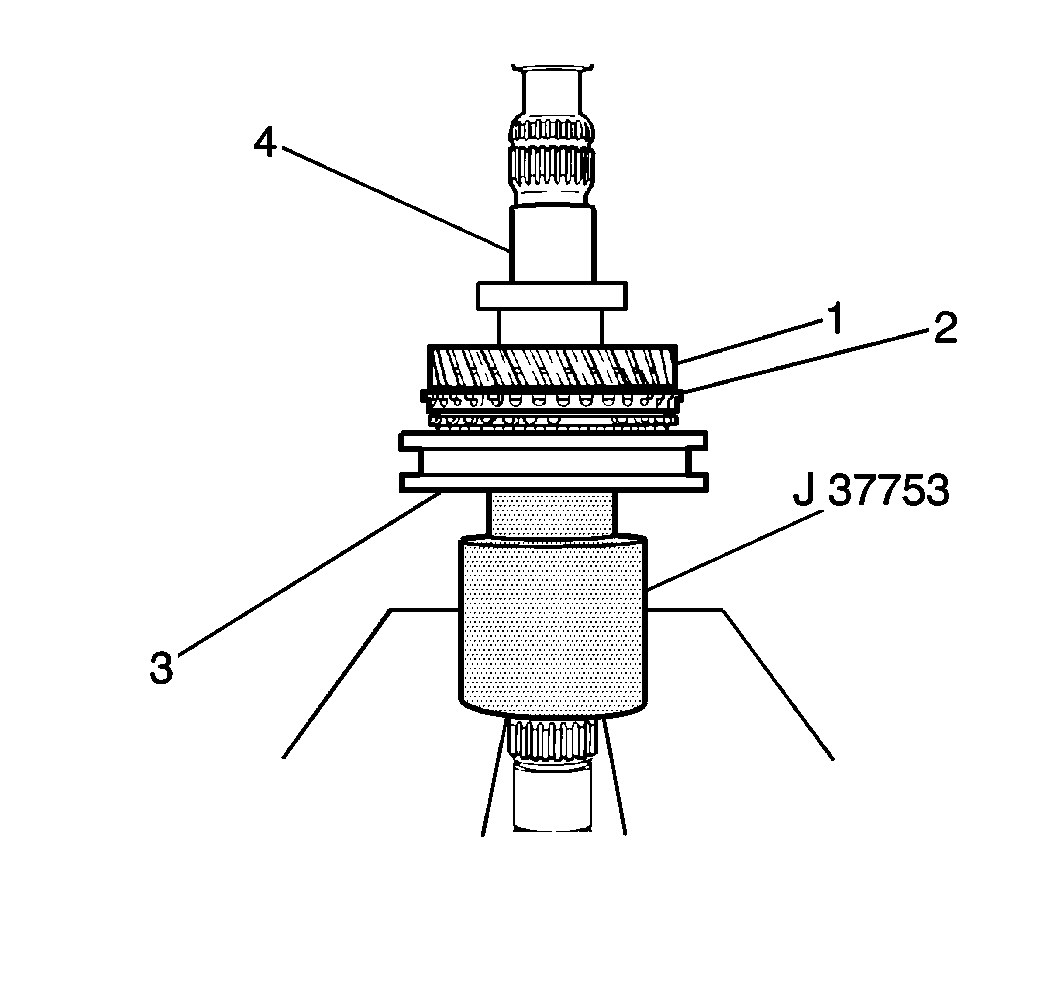
- Use the J 37753
and a press arbor in order to install
the low speed sleeve and hub assembly (3) onto the main shaft (4).
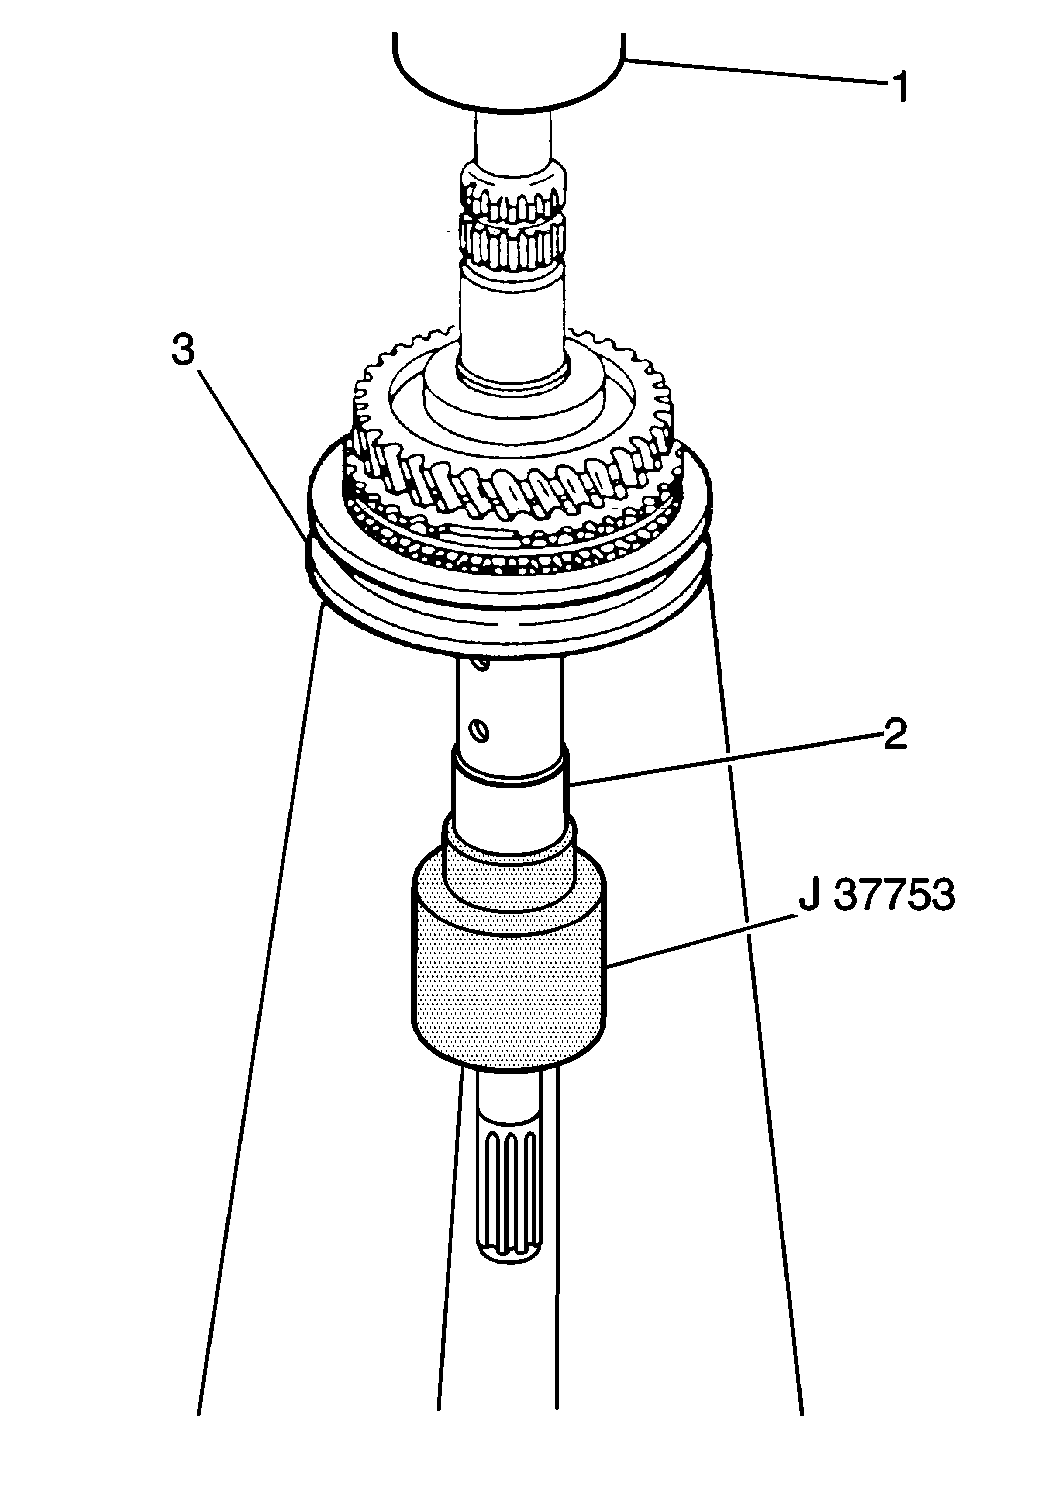
- Use the J 37753
and a press arbor (1) in order to
install the main shaft first gear bushing (2) onto the main shaft.
- Apply J 36850
to
the main shaft first gear needle bearing.
- Install the following components onto the main shaft:
| 8.1. | The main shaft first gear needle bearing |
| 8.2. | The low speed synchronizer ring |
| 8.3. | The main shaft first gear |
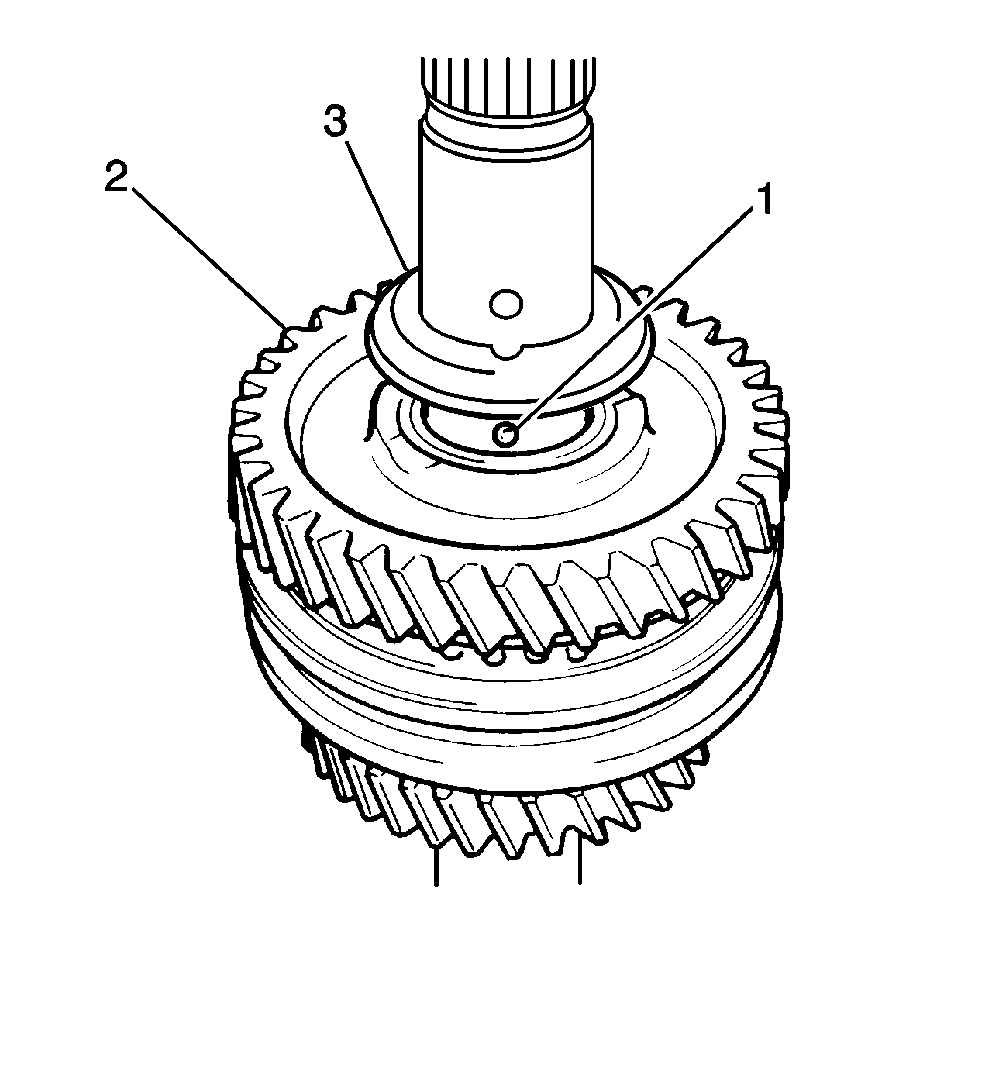
- Install the following
components onto the main shaft:
| • | The main shaft washer ball (1) |
| • | The main shaft bearing washer (3) |
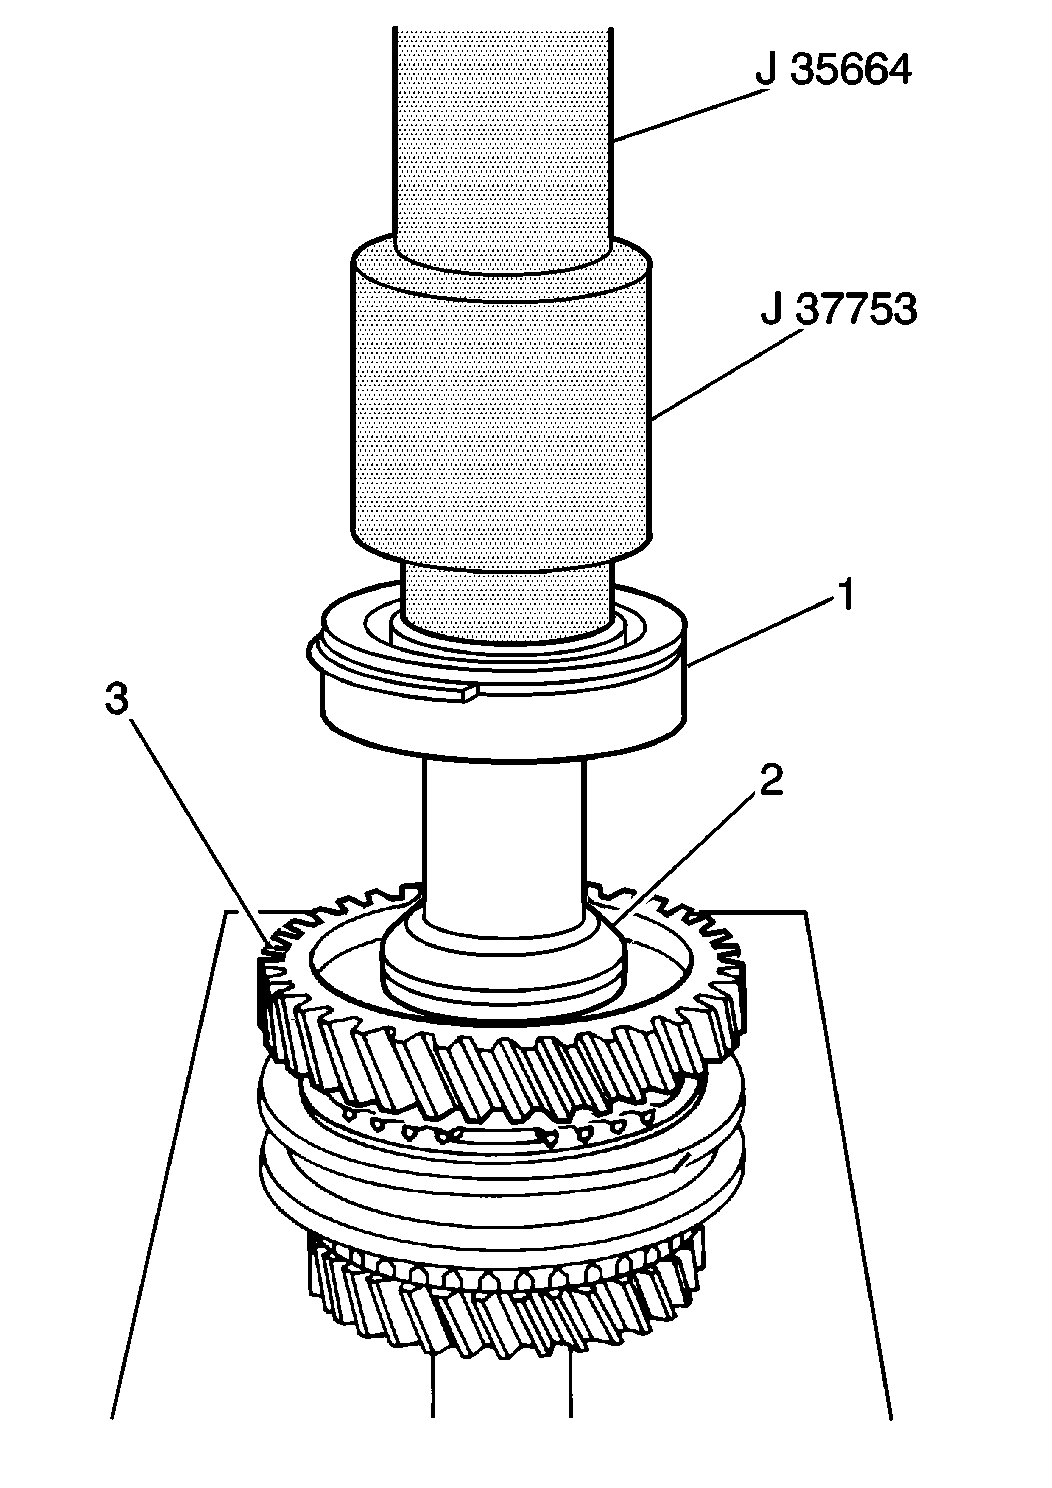
- Use the J 37753
, the J 35664
and a press arbor in order to install the main shaft center
bearing (1) onto the main shaft.
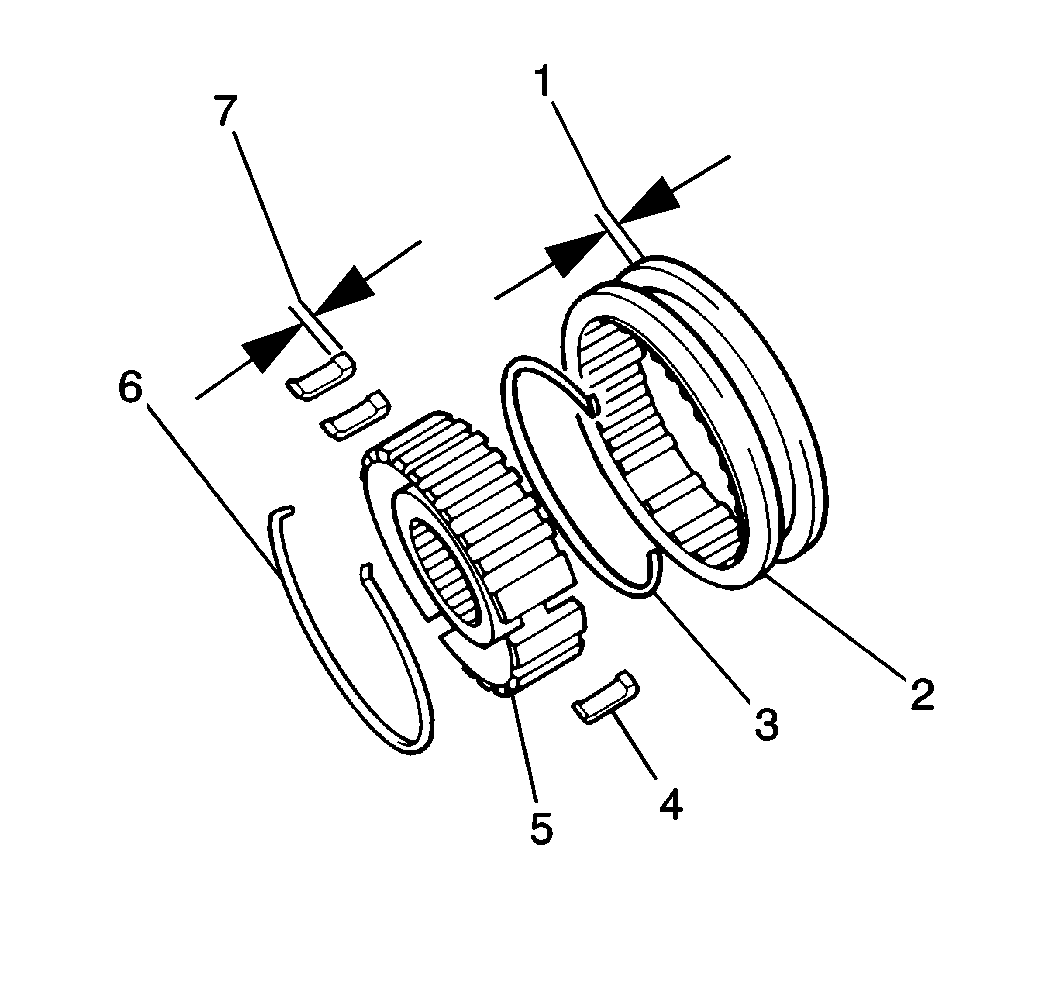
- Install the following
components onto the reverse synchronizer hub (5):
| 11.1. | The reverse synchronizer springs (3) |
| 11.2. | The three synchronizer keys (4) |
Ensure that the thick side of the synchronizer keys (4) and the synchronizer
sleeve (2) face toward the main shaft 5th gear.
- Connect the reverse synchronizer sleeve (2) to the reverse synchronizer
hub (5).
- Connect the following components to the main shaft:
| 13.1. | The main shaft washer ball |
| 13.2. | The main shaft bearing washer |
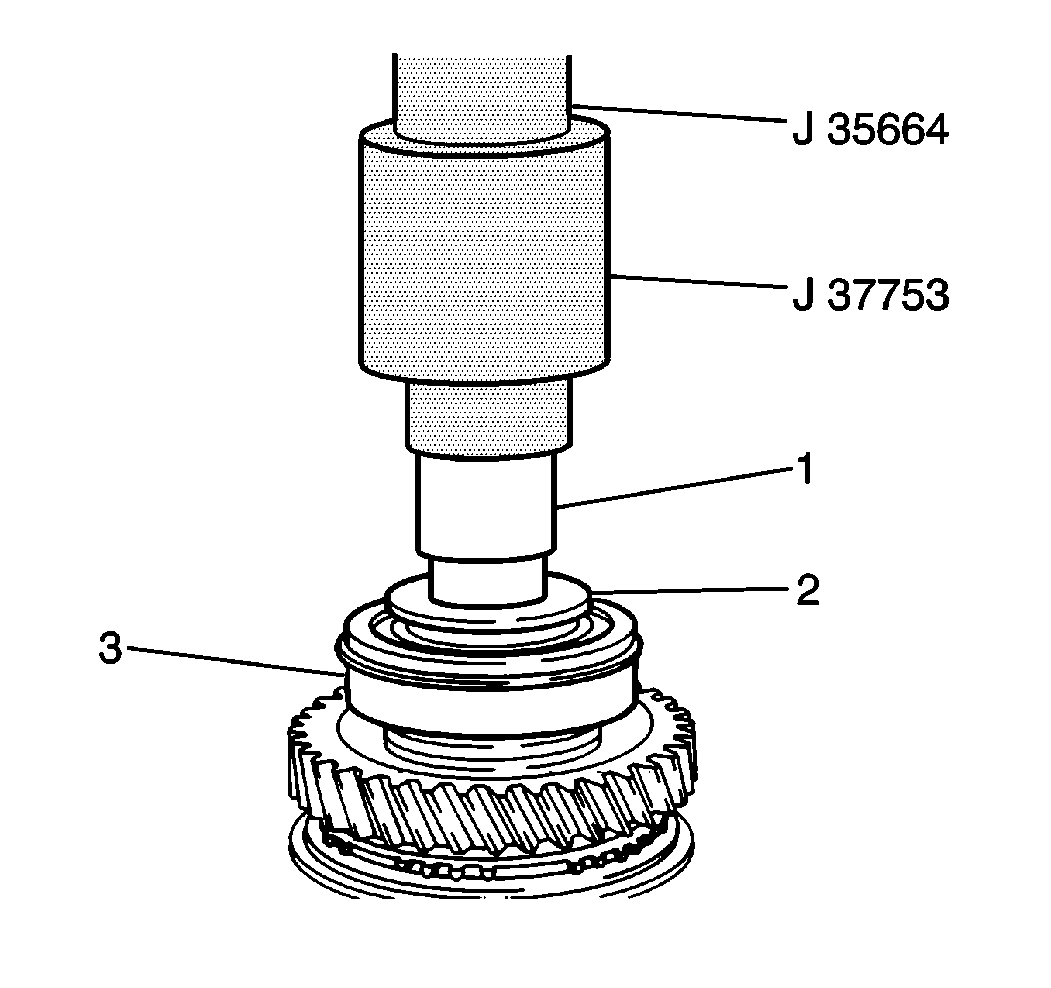
- Use the J 37753
and the J 35664
in order to install the main shaft reverse gear bushing (1)
into the main shaft.
Gently tap the bushing into place.
- Apply J 36850
to
the main shaft reverse gear needle bearing.
- Install the following components onto the main shaft:
| • | The main shaft reverse gear needle bearing |
| • | The main shaft reverse gear |
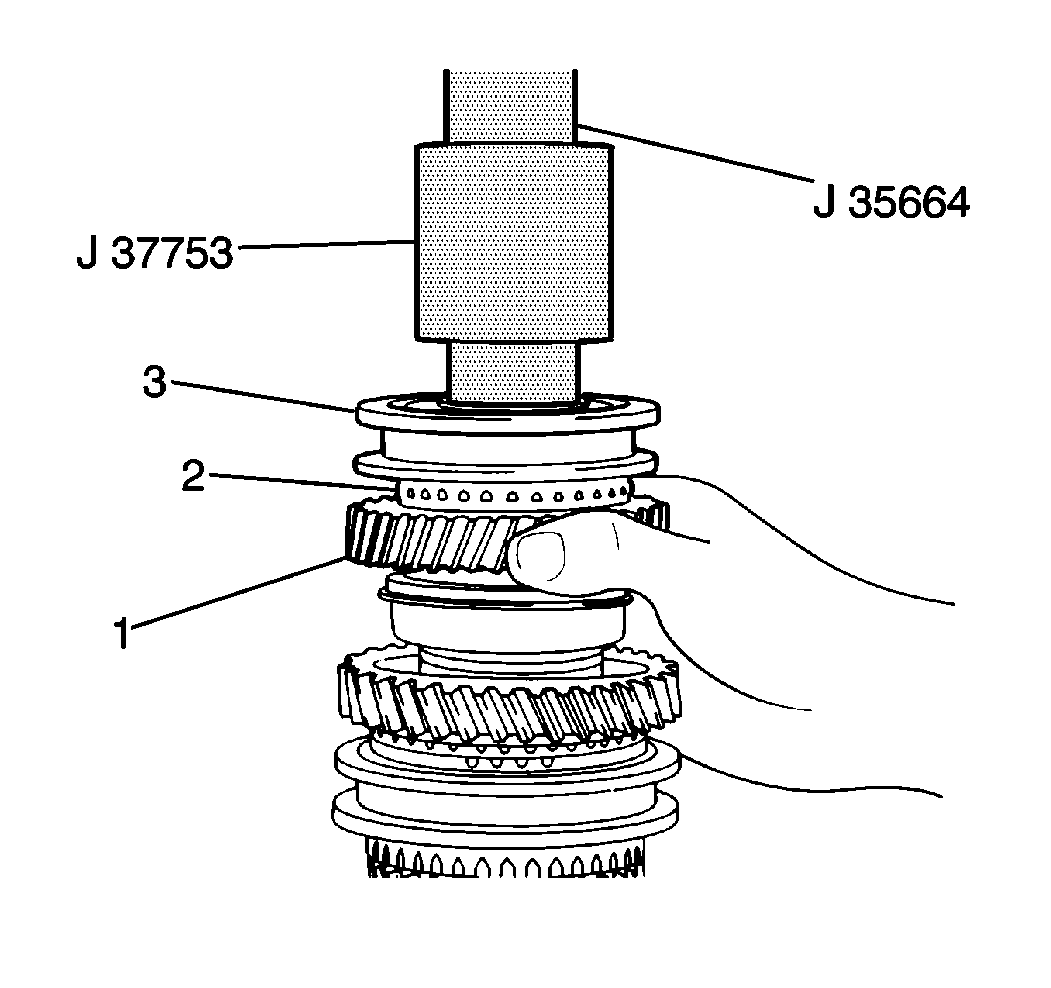
- Use the J 37753
and the J 35664
in order to install the reverse sleeve and hub assembly (3)
onto the main shaft.
Gently tap the assembly into place.
- Install the high speed and reverse hub C-clip onto the main shaft.
- Apply J 36850
to
both halves of the main shaft fifth gear needle bearing.
- Install the following components onto the main shaft:
| 20.1. | The high speed synchronizer ring (2) |
| 20.2. | The main shaft fifth gear needle bearing |
| 20.3. | The main shaft fifth gear |
| 20.4. | The main shaft washer ball |
| 20.5. | The main shaft fifth gear washer |
Ensure that the oil slot in the main shaft fifth gear washer faces the
main shaft fifth gear.
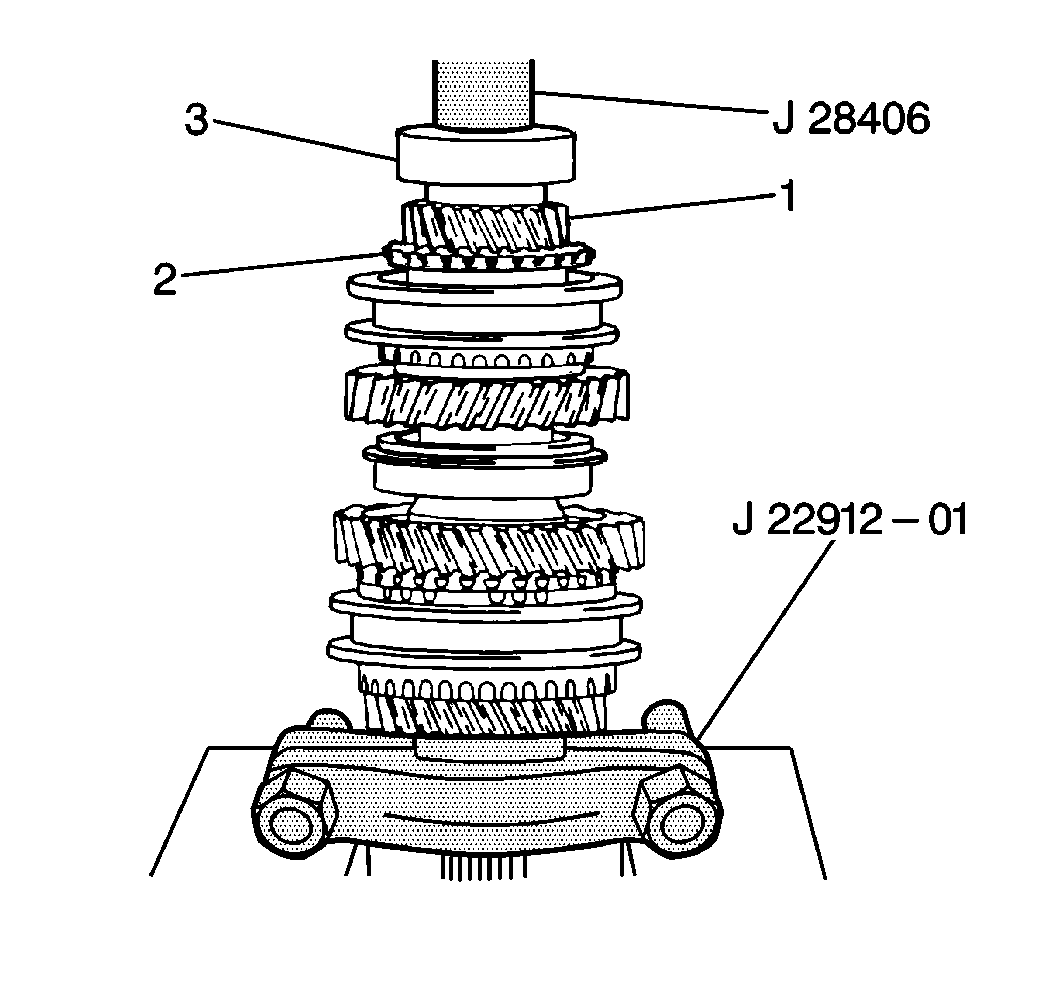
- Support the main shaft
rear bearing (3) with the J 22912-01
.
Use the J 28406
and
a press arbor in order to install the main shaft rear bearing (3) onto the
main shaft.
- Install the main shaft rear bearing C-clip onto the main shaft.
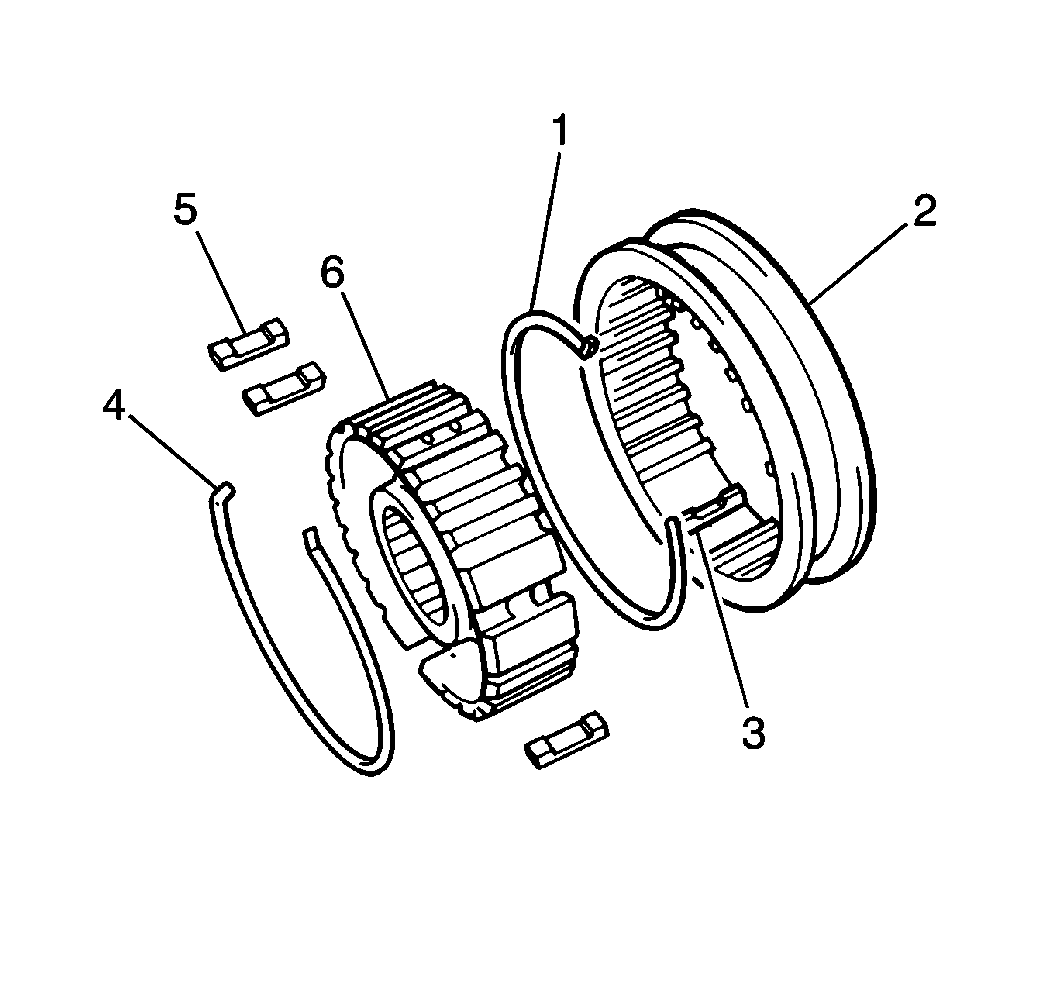
- Install the following
components onto the high speed synchronizer hub:
| 23.1. | The high speed synchronizer springs (1, 4) |
| 23.2. | The three synchronizer keys (5) |
- Install the high speed synchronizer sleeve (2) onto the high speed
synchronizer hub (6).
- Apply J 36850
to
the main shaft 3rd gear needle bearing.
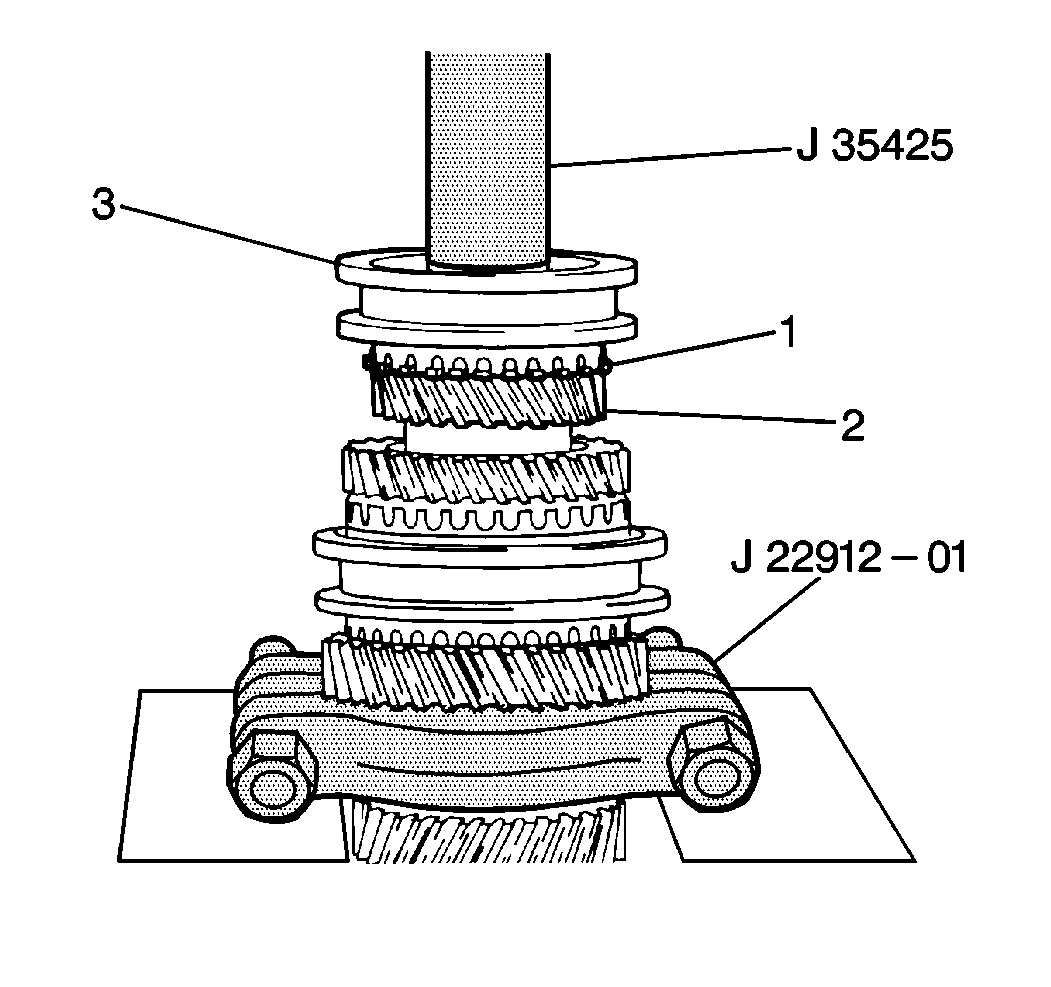
- Support the main shaft
with the J 22912-01
.
Use the J 35425
and
a press arbor in order to install the following components to the main shaft:
| 26.1. | The main shaft third gear needle bearing |
| 26.2. | The main shaft third gear (2) |
| 26.3. | The high speed synchronizer rings (1) |
| 26.4. | The high speed sleeve and hub assembly (3) |
- Install the high speed and reverse hub C-clip onto the main shaft.
Main Shaft Replacement 2WD
Removal Procedure
Tools Required
Important: The following components are identical:
| • | The main shaft first gear and reverse gear bushings |
| • | The main shaft first and second gear needle bearings |
- Use the J 34757
in
order to remove the high speed and reverse hub C-clip from the main shaft.

- Use the J 22912-01
and a press arbor in order to remove
the following components from the main shaft:
| 2.1. | The high speed synchronizer rings (2) |
| 2.2. | The high speed sleeve and hub assembly (1) |
| 2.3. | The mainshaft third gear (3) |
| 2.4. | The main shaft third gear needle bearing |
- Remove the high speed synchronizer sleeve from the high speed
synchronizer hub.
- Remove the high speed synchronizer springs and the synchronizer
keys from the high speed synchronizer hub.
- Use the J 34757
in
order to remove the following components from the main shaft:
| 5.1. | The two retaining rings |
| 5.2. | The speedometer drive gear |
- Use the J 34757
in
order to remove the main shaft rear bearing C-clip from the main shaft.

Important: The main shaft fifth gear and reverse gear needle bearings separate
into two halves each.
Make note of the components and their locations in order to ensure correct
assembly and operation.
- Use the J 22912-01
and
a press arbor in order to remove the main shaft rear bearing from the main
shaft (1).
- Remove the following components from the main shaft:
| 8.1. | The fifth gear washer |
| 8.2. | The main shaft washer ball |
| 8.3. | The main shaft fifth gear |
| 8.4. | The high speed synchronizer ring |
| 8.5. | The main shaft fifth gear needle bearing |
- Remove the reverse synchronizer sleeve from the reverse synchronizer
hub.
- Remove the following components from the reverse synchronizer
hub:
| 10.1. | The reverse synchronizer springs |
| 10.2. | The three synchronizer keys |
- Use a J 34757
in
order to remove the high speed and reverse hub C-clip from the main shaft.

- Use the J 22912-01
and a press arbor in order to
remove the reverse synchronizer hub (1) from the main shaft (2).
- Remove the following components from the main shaft:
| • | The main shaft reverse gear |
Notice: DO NOT remove the main shaft bearing washer, the main shaft reverse
gear bushing and the main shaft center bearing in one step. The main shaft
washer ball which locks the main shaft bearing washer in place could damage
the main shaft or the main shaft center bearing. Remove the main shaft reverse
gear bushing first, then, remove the main shaft bearing washer and the main
shaft washer ball before removing the bushing main shaft center bearing from
the main shaft.
- Remove the following components from the main shaft:
| 14.1. | The main shaft reverse gear bushing |
| 14.2. | The main shaft bearing washer |
| 14.3. | The main shaft washer ball |
- Use the J 22912-01
and a press arbor in order to remove the main shaft center bearing
from the main shaft.
Notice: DO NOT remove the main shaft bearing washer, the main shaft 1st gear,
the main shaft 1st gear needle bearing and the low speed synchronizer ring
in one step. The main shaft washer ball which locks the main shaft bearing
washer in place could damage the main shaft or the main shaft 1st gear. Remove
the main shaft bearing washer and the main shaft washer first, then, remove
the main shaft 1st gear, the main shaft 1st gear needle bearing and the low
speed synchronizer ring.
- Remove the following components from the main shaft:
| 16.1. | The main shaft bearing washer |
| 16.2. | The main shaft washer ball |
- Remove the following components from the main shaft:
| 17.1. | The main shaft first gear |
| 17.2. | The main shaft first gear needle bearing |
| 17.3. | The low speed synchronizer ring |

- Use the J 22912-01
and a press arbor in order to
remove the following components from the main shaft (4):
| 18.1. | The first gear bushing (1) |
| 18.2. | The low speed sleeve and hub assembly (2) |
| 18.3. | The low speed synchronizer ring |
| 18.4. | The main shaft second gear (3) |
- Remove the main shaft second gear needle bearing from the main
shaft.
- Remove the low speed synchronizer sleeve from the low speed synchronizer
hub.
- Remove the following components from the low speed synchronizer
hub:
| 21.1. | The low speed synchronizer springs |
| 21.2. | The synchronizer keys |
- Clean all of the main shaft components thoroughly with solvent
Air dry the components.
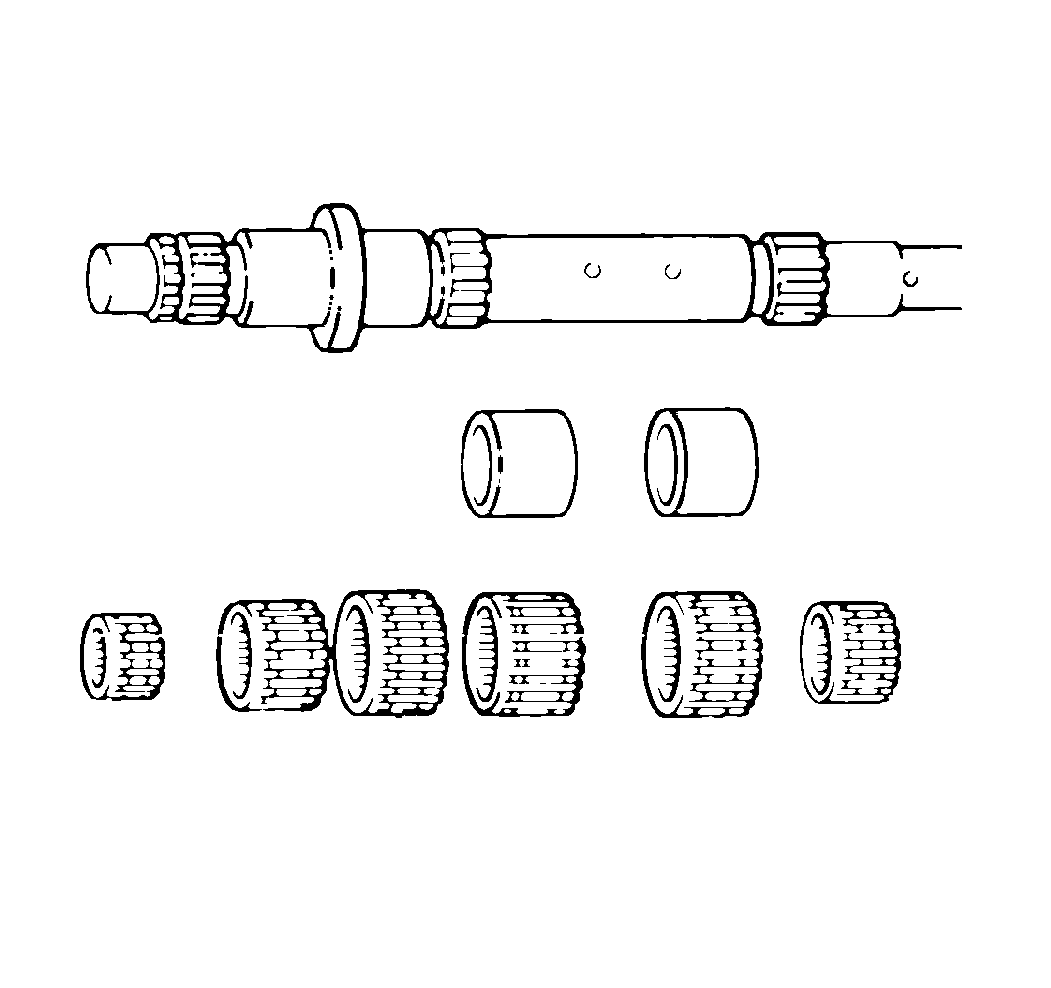
- Inspect all of the needle
bearings for the following conditions and replace as necessary:
- Inspect all of the ball bearings for the following conditions
and replace as necessary:
- Inspect the chamfered portion of each synchronizer ring for excessive
wear. Replace as necessary.
- Inspect all of the synchronizer springs and the keys for the following
conditions and replace as necessary:
- Inspect the main shaft for the following conditions and replace
as necessary:

- Use a feeler gage in order
to measure the clearance between each synchronizer ring (1) and its respective
gear (2).
The maximum synchronizer ring clearance is 1.0 to 1.4 mm (0.039
to 0.055 in).
If the synchronizer ring clearance exceeds the specification, replace
the synchronizer ring and gear.

- Use the J 26900-7
in order to measure the key slot
width of each synchronizer ring (1).
The maximum synchronizer key slot width is 10.1 to 10.4 mm (0.397
to 0.409 in).
If the synchronizer ring key slot width exceeds the specification, replace
the synchronizer ring.

- Use a feeler gage (3)
in order to measure the clearance between each gearshift fork (2) and its
respective synchronizer sleeve (1).
The maximum gearshift fork clearance is 1.0 mm (0.039 in).
If the gearshift fork clearance exceeds specification, replace the gearshift
fork and the synchronizer sleeve.
Installation Procedure
Tools Required
| • | J 36850 Transjel®
Transmission Assembly Lubricant |

- Install the following
components onto the low speed synchronizer hub (6):
| 1.1. | The low speed synchronizer springs (1,4) |
| 1.2. | The synchronizer keys (5) |
| 1.3. | The low speed synchronizer sleeve (2) |

- Install the low speed
synchronizer sleeve (8) onto the low speed synchronizer hub (7).
- Apply J 36850
to
the main shaft second gear needle bearing.

- Install the following
components onto the main shaft (3):
| 4.1. | The main shaft second gear needle bearing (4) |
| 4.2. | The main shaft second gear (1) |
| 4.3. | The low speed synchronizer ring (2) |

- Use the J 37753
and a press arbor in order to install
the low speed sleeve (3) and hub assembly onto the main shaft (4).

- Use the J 37753
and a press arbor (1) in order to
install the main shaft first gear bushing (2) onto the main shaft.
- Apply J 36850
to
the main shaft first gear needle bearing.
- Install the following components onto the main shaft:
| 8.1. | The first gear needle bearing |
| 8.2. | The low speed synchronizer ring |
| 8.3. | The main shaft first gear |

- Install the following
components onto the main shaft:
| 9.1. | The main shaft washer ball (1) |
| 9.2. | The main shaft bearing washer (3) |

- Use the J 37753
, the J 35664
and a press arbor in order to install the main shaft center
bearing (1) onto the main shaft.

- Connect the reverse synchronizer
springs (3, 6) and the three synchronizer keys (4) to the reverse synchronizer
hub (5).
Ensure that the thick side of the synchronizer keys (7) and the synchronizer
sleeve (1) faces toward the main shaft fifth gear.
- Install the reverse synchronizer sleeve (2) to the reverse synchronizer
hub (5).
- Install the following components to the main shaft:
| 13.1. | The main shaft washer ball |
| 13.2. | The main shaft bearing washer |

- Use the J 37753
with the J 35664
in order to install the main shaft reverse gear bushing
(1) onto the main shaft.
Gently tap in order to install the main shaft reverse gear bushing (1).
- Apply J 36850
to
both halves of the main shaft reverse gear needle bearing.
- Install the following components onto the main shaft:
| 16.1. | The main shaft reverse gear needle bearing |
| 16.2. | The main shaft reverse gear |

- Use the J 37753
and the J 35664
in order to install the reverse sleeve and hub assembly
(3) onto the main shaft.
Gently tap in order to install the reverse sleeve and hub assembly (3).
- Install the high speed and reverse hub C-clip onto the main shaft.
- Apply J 36850
to
both halves of the main shaft fifth gear needle bearing.
- Install the following components onto main shaft:
| 20.1. | The high speed synchronizer ring |
| 20.2. | The main shaft fifth gear needle bearing |
| 20.3. | The main shaft fifth gear |
| 20.4. | The main shaft washer ball |
| 20.5. | The main shaft fifth gear washer |
Ensure that the oil slot in the main shaft fifth gear washer faces the
main shaft fifth gear.

- Use the J 22912-01
in order to support the main shaft.
Use the J 28406
and
a press arbor in order to install the main shaft rear bearing (3) onto
the main shaft.
- Install the main shaft rear bearing C-clip onto the main shaft.
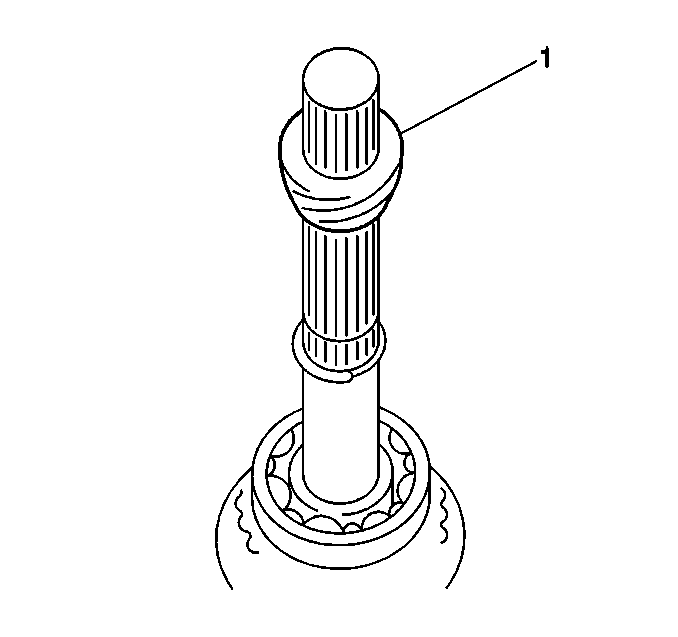
- Install the speedometer
drive gear onto the main shaft; secure the speedometer drive gear with
the speedometer drive gear retaining rings.

- Install the following
components onto the high speed synchronizer hub (6):
| 24.1. | The high speed synchronizer springs (1) |
| 24.2. | Three synchronizer keys (5) |
- Install the high speed synchronizer sleeve (2) onto the high speed
synchronizer hub (6).
- Apply the J 36850
to the main shaft third gear needle bearing.

- Use theJ 22912-01
in order to support the main shaft.
Use the J 35425
and
a press arbor in order to install the following components onto the main
shaft:
| 27.1. | The third gear needle bearing |
| 27.2. | The main shaft third gear (2) |
| 27.3. | The high speed synchronizer rings (1) |
| 27.4. | The high speed sleeve and hub assembly (3) |
- Install the high speed and reverse hub C-clip onto the main shaft.


