CAMPAIGN: DAYTIME RUNNING LIGHT MODULE POSSIBLE OVERHEAT

Models: 1990 Chevrolet Cavalier and Pontiac Sunbird LE Models
TO: ALL GENERAL MOTORS DEALERS
In September 1989 General Motors of Canada notified dealers via DCS that a defect existed in some 1990 Chevrolet Cavalier and Pontiac Sunbird LE models equipped with "Daytime Running Lights" (DRL). Under certain conditions the DRL module which is located near the battery, could overheat resulting in an engine compartment fire.
The purpose of this Product Campaign is to provide for the restoration of the Daytime Running Light function on the involved vehicles.
At the time of the notification, replacement parts were not available to correct the defect; therefore dealers were instructed to remove the 6-way DRL connector from the module and place tape over the end of the wiring connector. Vehicles shipped from the assembly plants thereafter were equipped with a "dummy" (green top) module, rendering the DRL function inoperative.
VEHICLES INVOLVED:
All 1990 Chevrolet Cavalier and Pontiac Sunbird LE model vehicles equipped with "Daytime Running Lights" (DRL) within the following VIN breakpoints:
Through & Year & Model Plant Beginning Including ------------ ----- --------- ---------- 1990 Chevrolet Cavalier Lordstown L7100010 L7136932
1990 Chevrolet Cavalier Janesville LJ100017 LJ160303
1990 Pontiac Sunbird LE Lordstown L7500017 L7547271
Vehicles equipped with factory installed fog lamps (Pontiac SE & GT) are NOT subject to this campaign.
Vehicles intended for sale outside of Canada are NOT equipped with Daytime Running Lights.
All affected vehicles have been identified by the VIN listing provided to involved dealers with this bulletin. Any dealer not receiving a listing was not shipped any of the affected vehicles.
DEALER CAMPAIGN RESPONSIBILITY:
Dealers are to perform this campaign on all involved vehicles at no charge to owners, regardless of kilometres traveled, age of vehicle, or ownership, from this time forward.
Whenever a vehicle subject to this campaign is taken into your new or used vehicle inventory, or it is in your dealership for service, you are to ensure the campaign correction has been made before selling or releasing the vehicle.
Owners of vehicles recently sold from your new vehicle inventory are to be contacted by the dealer, and arrangements made to make the required modification according to instructions contained in this bulletin.
CAMPAIGN PROCEDURE:
Refer to Section 4 of the Service Policies and Procedures Manual for the detailed procedure on handling Product Campaigns. Dealers are requested to complete the campaign on all transfers as soon as possible.
OWNER NOTIFICATION:
All owners of record at the time of campaign release are shown on the attached computer listing and have been notified by first class mail from General Motors. The listings provided are for campaign activity only and should not be used for any other purpose.
PARTS INFORMATION:
Parts required to complete this campaign should be ordered through regular channels, as follows:
Description Part Number Quantity Per Vehicle ----------- ----------- --------------------- Kit, DRL Module 22555657 1
The above kit contains the following parts:
Module Fwd Lamp Control (DRL Module) 22555621 1 Cover DRL Module 22555598 1
Strap - DRL Wiring Harness Assy. 11501907 1 Wiring Harness Assy.-DRL Module 12102546 1 Connectors "A" & "C" (identical) (loose in kit) 2 Retainers (loose in kit) 2 Screw & Washer Assy. 11505209 2
If spare one-amp fuses are needed, order P/N 12102724.
PARTS AND LABOUR CLAIM INFORMATION:
Credit for the campaign work performed will be paid upon receipt of a properly completed campaign claim card, RAPID terminal or DCS transmission in accordance with the following:
Repair Code Description Time Allowance
2A Replace DRL Module .5
Time allowance includes 0.1 hour for dealer administrative detail associated with this campaign. Parts credit will be based on dealer net plus 30% to cover parts handling.
SERVICE PROCEDURE:
1. Note the stations to which the radio is preset. Disconnect the negative battery cable, then disconnect the positive battery cable, and remove the battery.
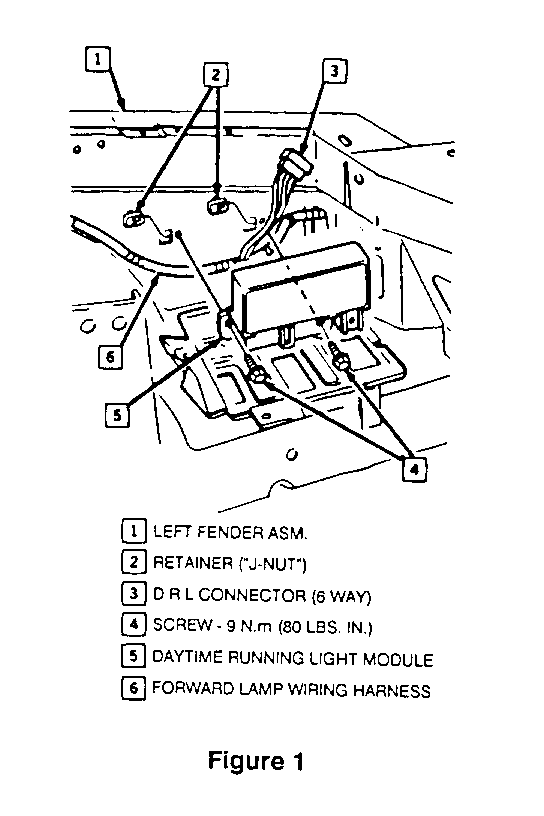
2. Remove the existing Daytime Running Light Module (see Figure 1) which should be in one of the following two states:
A) A module with a green top (P/N 22555547) has the connector attached to the module. The module should be removed by loosening the two (2) attaching screws and the connector should then be removed. Proceed directly to Step 3.
B) A module with a natural aluminum colour top (P/N 22555342) with the 6-way connector previously removed and covered with tape. Remove the module by loosening and removing the attaching screws. Remove the tape from the end of the wiring connector and proceed directly to Step 3.
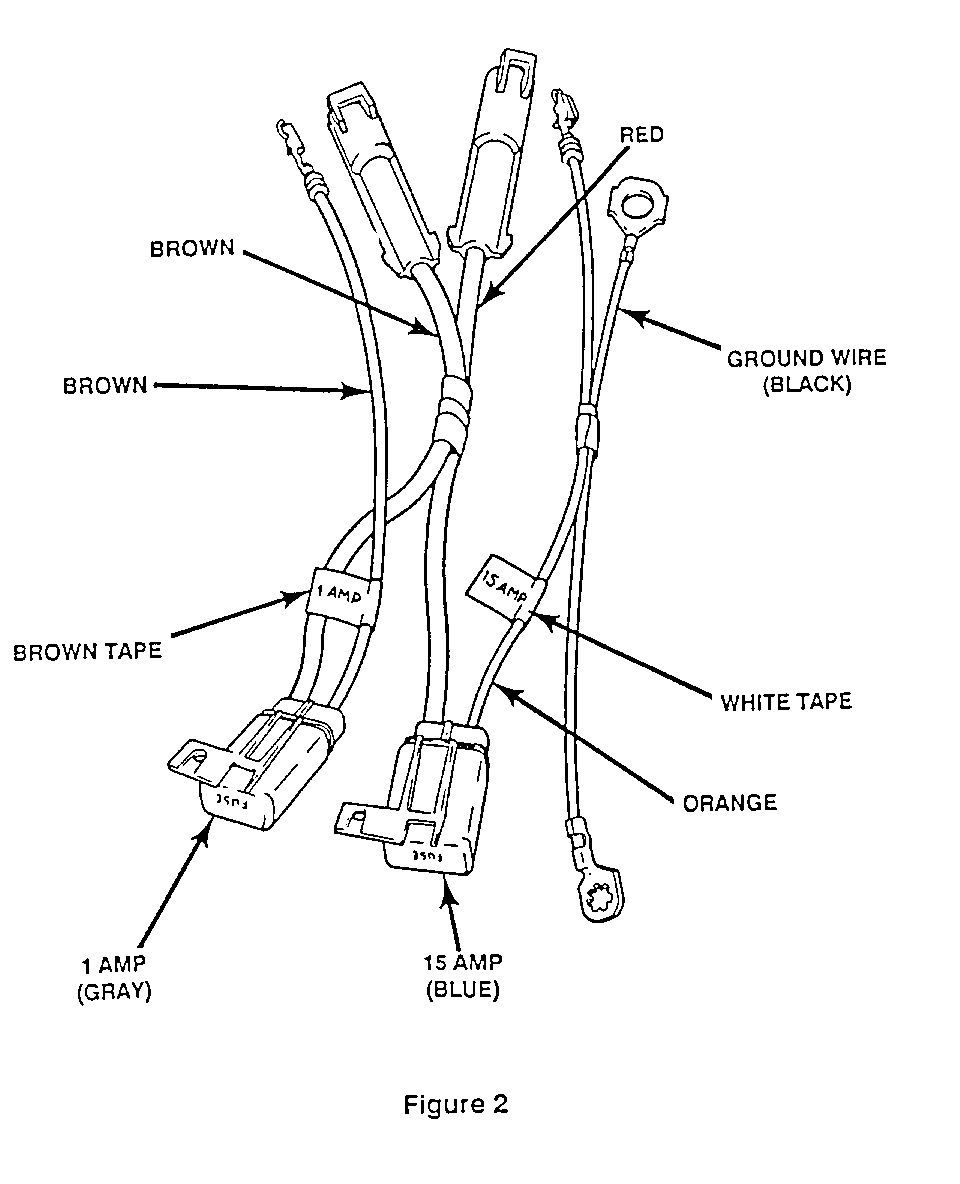
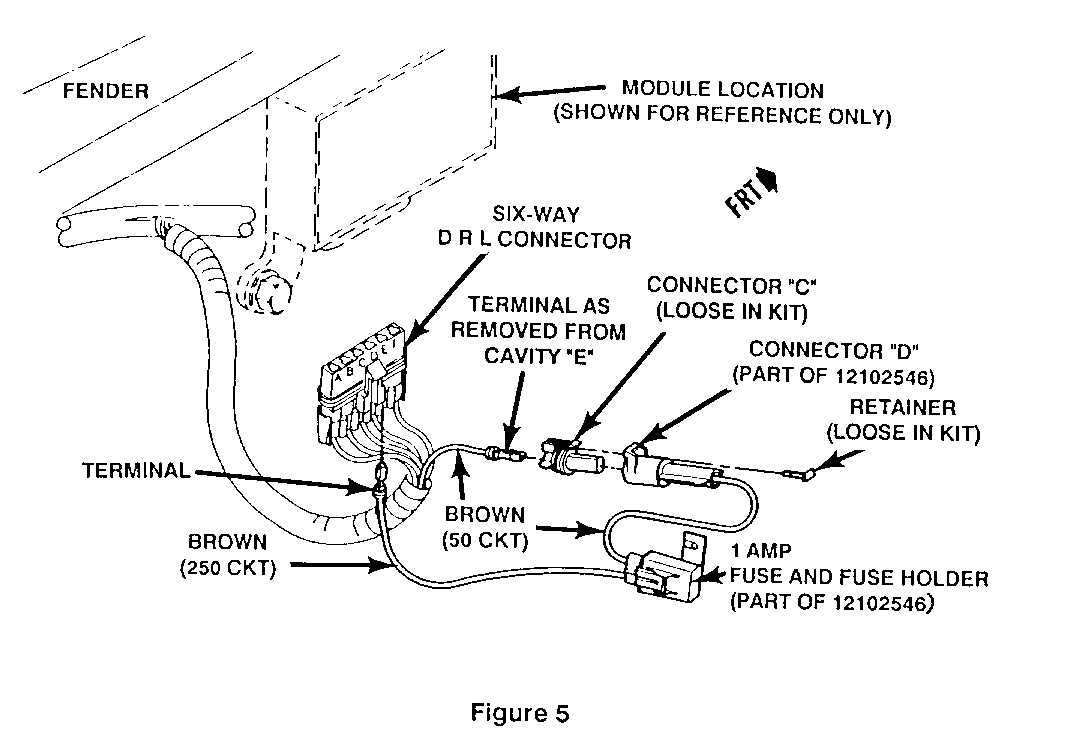
3. Obtain Kit.- DRL Module, P/N 22555657 and compare the parts with Figure 2. Remove the Wiring Harness Assembly - DRL Module (P/N 12102546) from the kit. Also remove the following loose parts from the kit: Connectors "A" & "C" and the two retainers shown in figures 4 & 5.
NOTE: The correct wire colours must be connected as instructed in this procedure or the one-amp fuse on the brown & brown side of the harness will "blow" when the ignition is turned on.
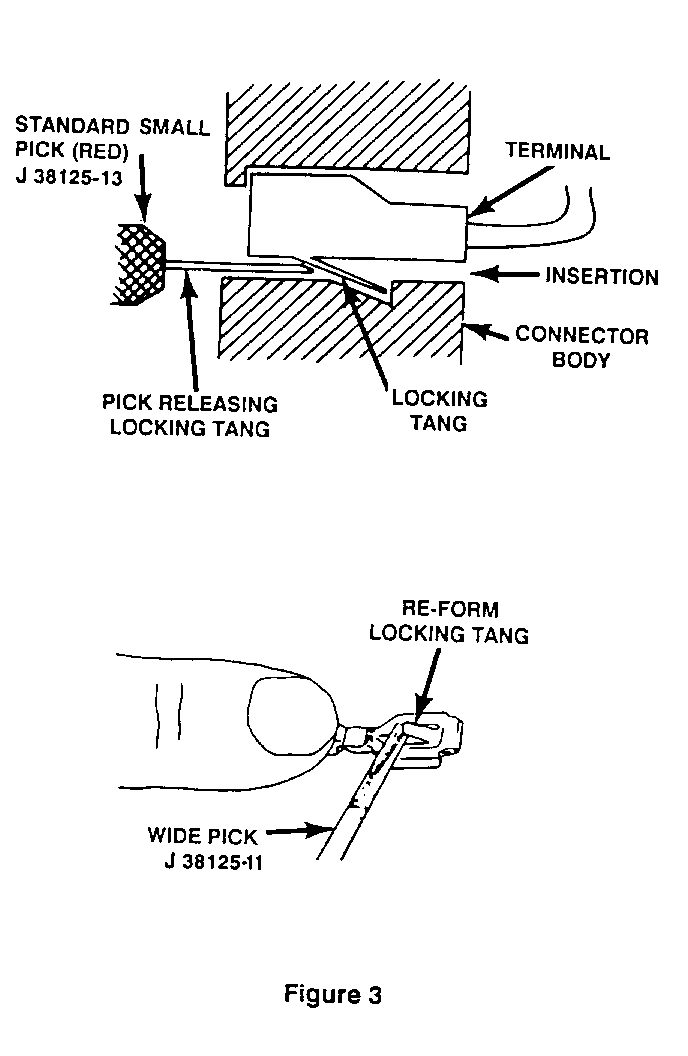
NOTE: The proper technique and tools for backing terminals out of the six-way DRL connector and reforming the locking tangs are shown in Figure 3.
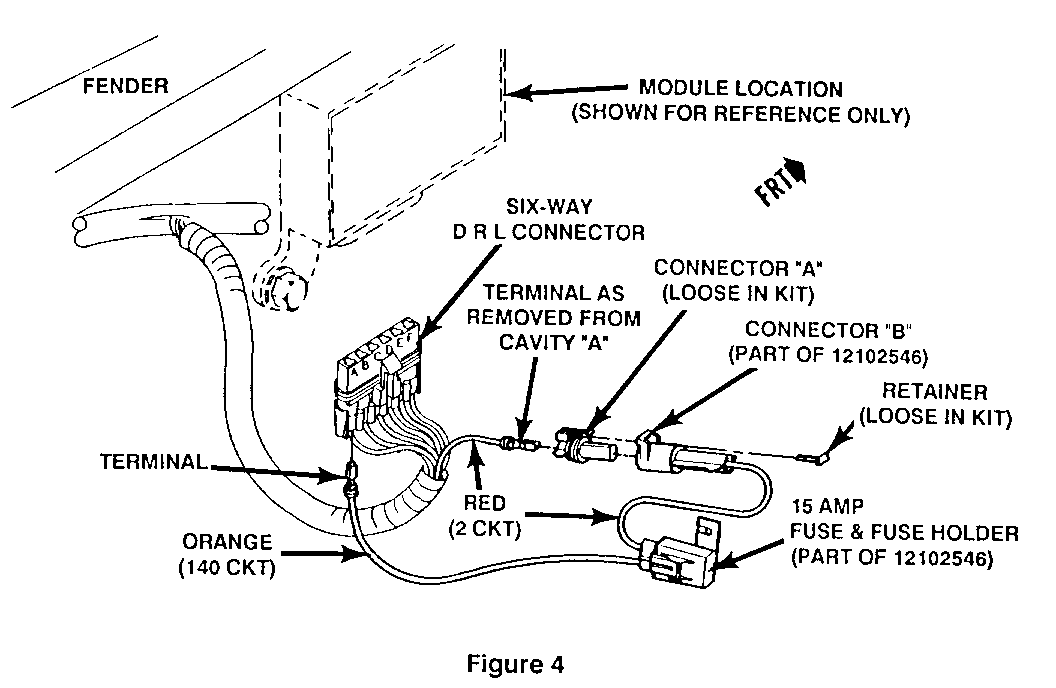
4. Back out the number two circuit (red) from cavity "A" of the six-way DRL connector (see Figure 4).
Seat this terminal in the female half of connector "A," as shown in Figure 4. Then plug connector "A" into connector "B;" the wire colour on both sides of the mated connectors must be RED. Install a retainer into the mated connectors "A" & "B."
NOTE: Connectors "A" & "C" in the kit are identical and interchangeable.
5. Seat the terminal with the orange wire into cavity "A" of the six-way DRL connector.
6. Back out the number 50 circuit (brown) from cavity "E" of the six-way DRL connector. See Figure 5.
7. Seat this terminal in the female half of connector "C," as shown in Figure 5. Then plug connector "C" into connector "D;" the wire colour on both sides of the mated connectors must be BROWN. Install a retainer into the mated connectors "C" & "D".
8. Seat the terminal with the brown wire into cavity "E" of the six-way DRL connector.
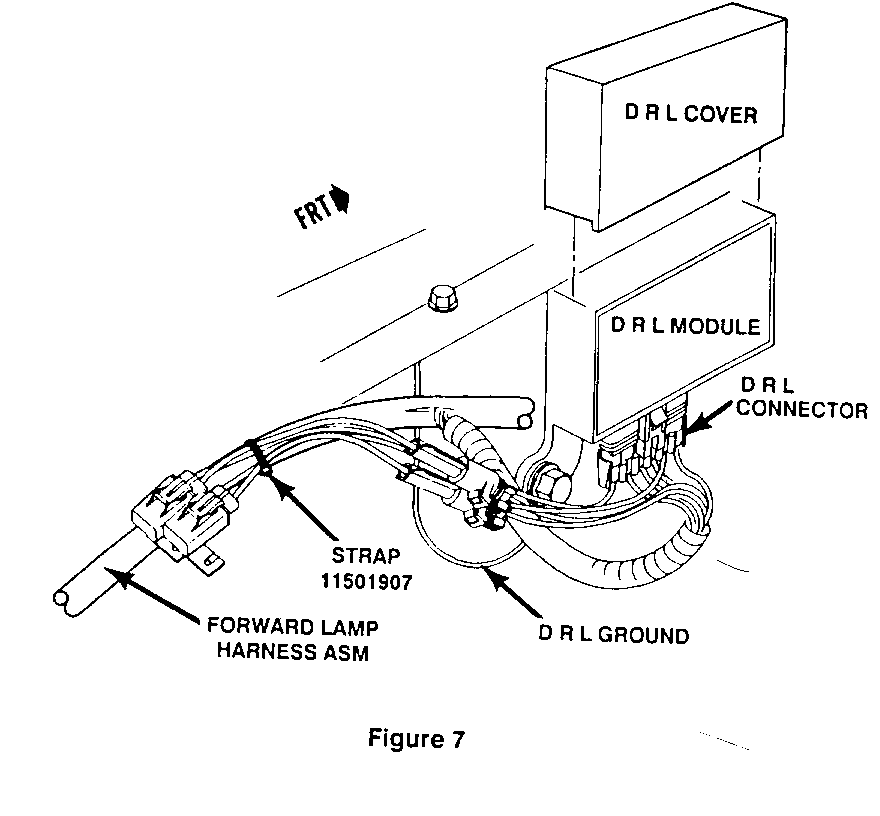
9. Using strap (P/N 11501907) from the DRL Module Kit, secure the two inline fuse holders to the forward lamp harness between the washer reservoir and the battery, as shown in Figure 7.
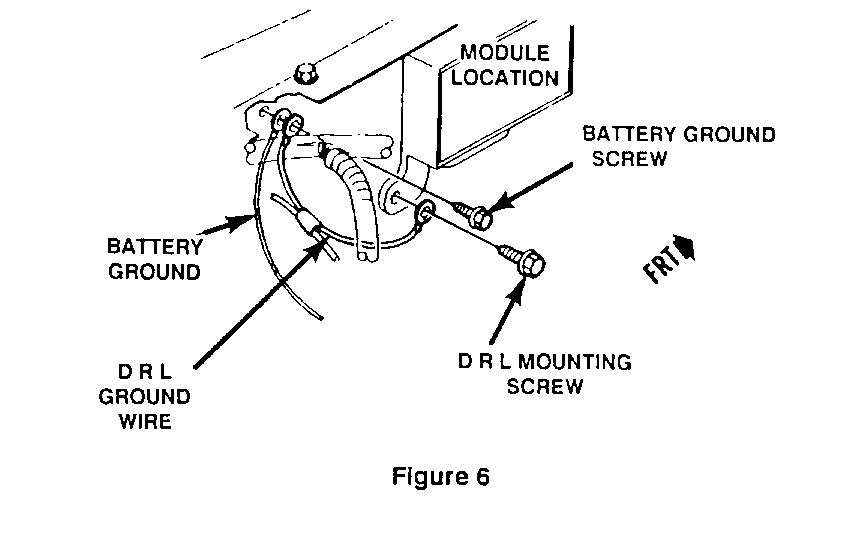
10. Unscrew the battery ground located on the fender rail between the DRL module and the washer reservoir. Screw down a ring terminal on the DRL Ground Wire with this battery ground (see Figure 6).
NOTE: Use the terminal on the long end of the wire from the harness tape.
11. Attach the new DRL module (P/N 22555621) using the two Screw & Washer Assemblies (P/N 11505209) from the kit, into the J-nuts on the left fender assembly as shown in Figure 1. Torque the screws to 9 N.m (80 lbs. in.).
NOTE: When attaching the module rear attaching screw, screw down the other end of the DRL Ground Wire on the wiring harness with the rear leg, making sure that the terminal is between the screw head and the rear leg (as shown in Figure 6). This should be the short end of the ground wire from the harness tape. Take care not to pinch any wires or hoses behind the module.
12. Install the DRL cover (P/N 22555598) by placing it approximately 2.5 mm (one inch) higher than the DRL module and pushing it into location against the front face of the DRL module and then pushing it downward fully such that it completely covers the connector. See Figure 7.
13. Replace and secure the battery. Connect the positive battery cable, then connect the negative battery cable.
14. Turn on ignition, wait three (3) seconds for the Daytime Running Light Module to power up, then confirm the headlamps are on.
NOTE: If the Wiring Harness Assembly - DRL Module was not wired according to this procedure, the one-amp fuse will blow and the headlamp low beams will not light up for the Daytime Running Light function.
NOTICE: Use ONLY the fuse ratings specified. Otherwise a fire or internal damage to the module may occur.
15. Reprogram memory functions in the vehicle, including radio presets.
16. Install Campaign Identification Label.
Installation of Campaign Identification Label
Clean surface of radiator upper mounting panel and apply a Campaign Identification Label. make sure the correct campaign number is inserted on the label. This will indicate that the campaign has been completed.
Dear General Motors Customer:
September 1989 General Motors of Canada notified dealers that a defect existed in some 1990 Chevrolet Cavalier and Pontiac Sunbird LE models equipped with "Daytime Lights" (DRL). Under certain conditions the DRL module which is located near battery, could overheat resulting in an engine compartment fire.
At the time of the notification, replacement parts were not available to correct the defect; therefore dealers were instructed to remove the connector from the module. Vehicles shipped from the assembly plants thereafter were equipped with an inoperative module. Either of these actions render the Daytime Running Lights inoperative and prevent the possibility of a fire. Your vehicle was one of the vehicles where the Daytime Running Lights were rendered inoperative.
The purpose of this letter is to advise you that parts are now available to your General Motors dealer to restore the Daytime Running Light function on your vehicle. Your dealer will perform this service for you at no charge.
Please contact your GM dealer as soon as possible to arrange a service date,
This letter identifies your vehicle. Presentation of this letter to your dealer will assist their Service personnel in completing the necessary correction to your vehicle in the shortest possible time.
Further assistance, if required, may be obtained from our Customer Assistance Centre, toll free, by calling 1-800-263-3777, or if you live in Quebec, 1-800-263-7854.
We are sorry to cause you this inconvenience; however, we have taken this action in the interest of your continued satisfaction with our products.
General Motors bulletins are intended for use by professional technicians, not a "do-it-yourselfer". They are written to inform those technicians of conditions that may occur on some vehicles, or to provide information that could assist in the proper service of a vehicle. Properly trained technicians have the equipment, tools, safety instructions and know-how to do a job properly and safely. If a condition is described, do not assume that the bulletin applies to your vehicle, or that your vehicle will have that condition. See a General Motors dealer servicing your brand of General Motors vehicle for information on whether your vehicle may benefit from the information.
