Clunk/Creak Noise from Front End During Low Speed Turns or Maneuvers (Transfer Replacement Rear Transmission Mount Bushing to Side Transmission Mount)

| Subject: | Clunk/Creak Noise from Front End During Low Speed Turns or Maneuvers (Transfer Replacement Rear Transmission Mount Bushing to Side Transmission Mount) |
| Models: | 2000-2005 Chevrolet Cavalier |
| 2000-2005 Pontiac Sunfire |
| with 5-Speed Manual Transmission (RPO MM5) |
This bulletin is being revised to add model years and revise the title line. Please discard Corporate Bulletin Number 03-07-29-005A (Section 07-Transmission/Transaxle)
Condition
Some customers may comment on a clunk noise from the front of the vehicle. This condition is most common during a hard left or right turn when starting from a complete stop.
Cause
The side (front driver's location) transmission mount is a "floating" or adjustable type of mount which may, under certain conditions, bind within the mount, causing a clunk.
Correction
To correct the creak or clunk, remove the side transmission mount and transfer a replacement rear transmission mount bushing to the existing side transmission mount. Use the procedure below.
- Open the vehicle hood and remove the washer fluid reservoir cap.
- Suitably support and raise the vehicle.
- Remove the driver's side front wheel and tire assembly.
- Remove the inner wheel well shroud bolts and retainers. Remove the inner shroud.
- Remove the outer wheel well shroud bolts and retainers. Remove the outer shroud.
- Remove the left fender support bolt.
- Remove the washer fluid reservoir retainers, the electrical connector and the hose. Remove the reservoir.
- Support the transmission using a transmission jack and a block of wood to prevent possible pan damage.
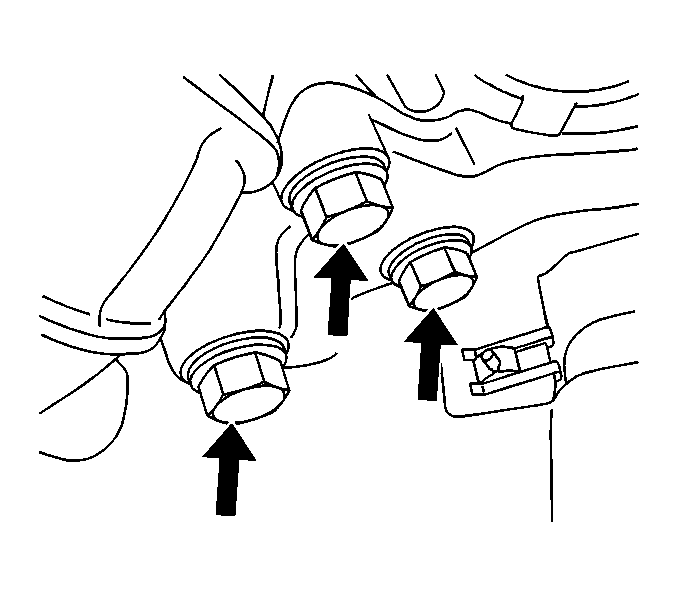
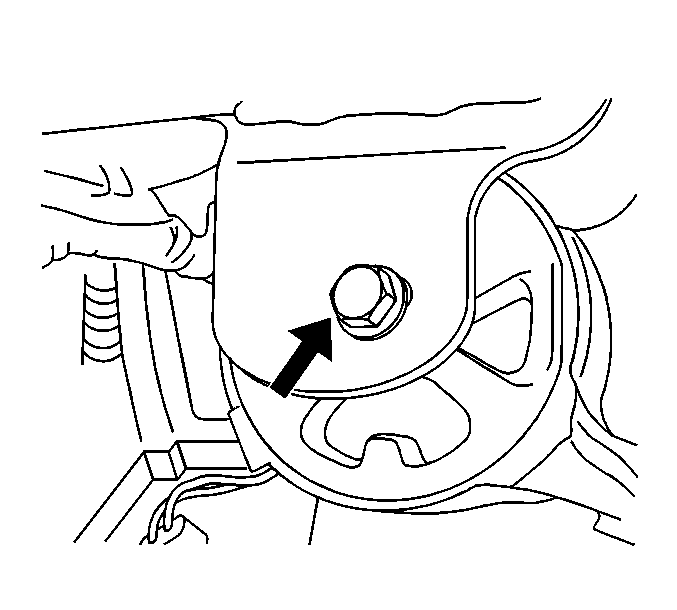
- Remove the side transmission mount bolts and transmission mount through bolt. Refer to the illustrations above. Remove the mount from the vehicle.
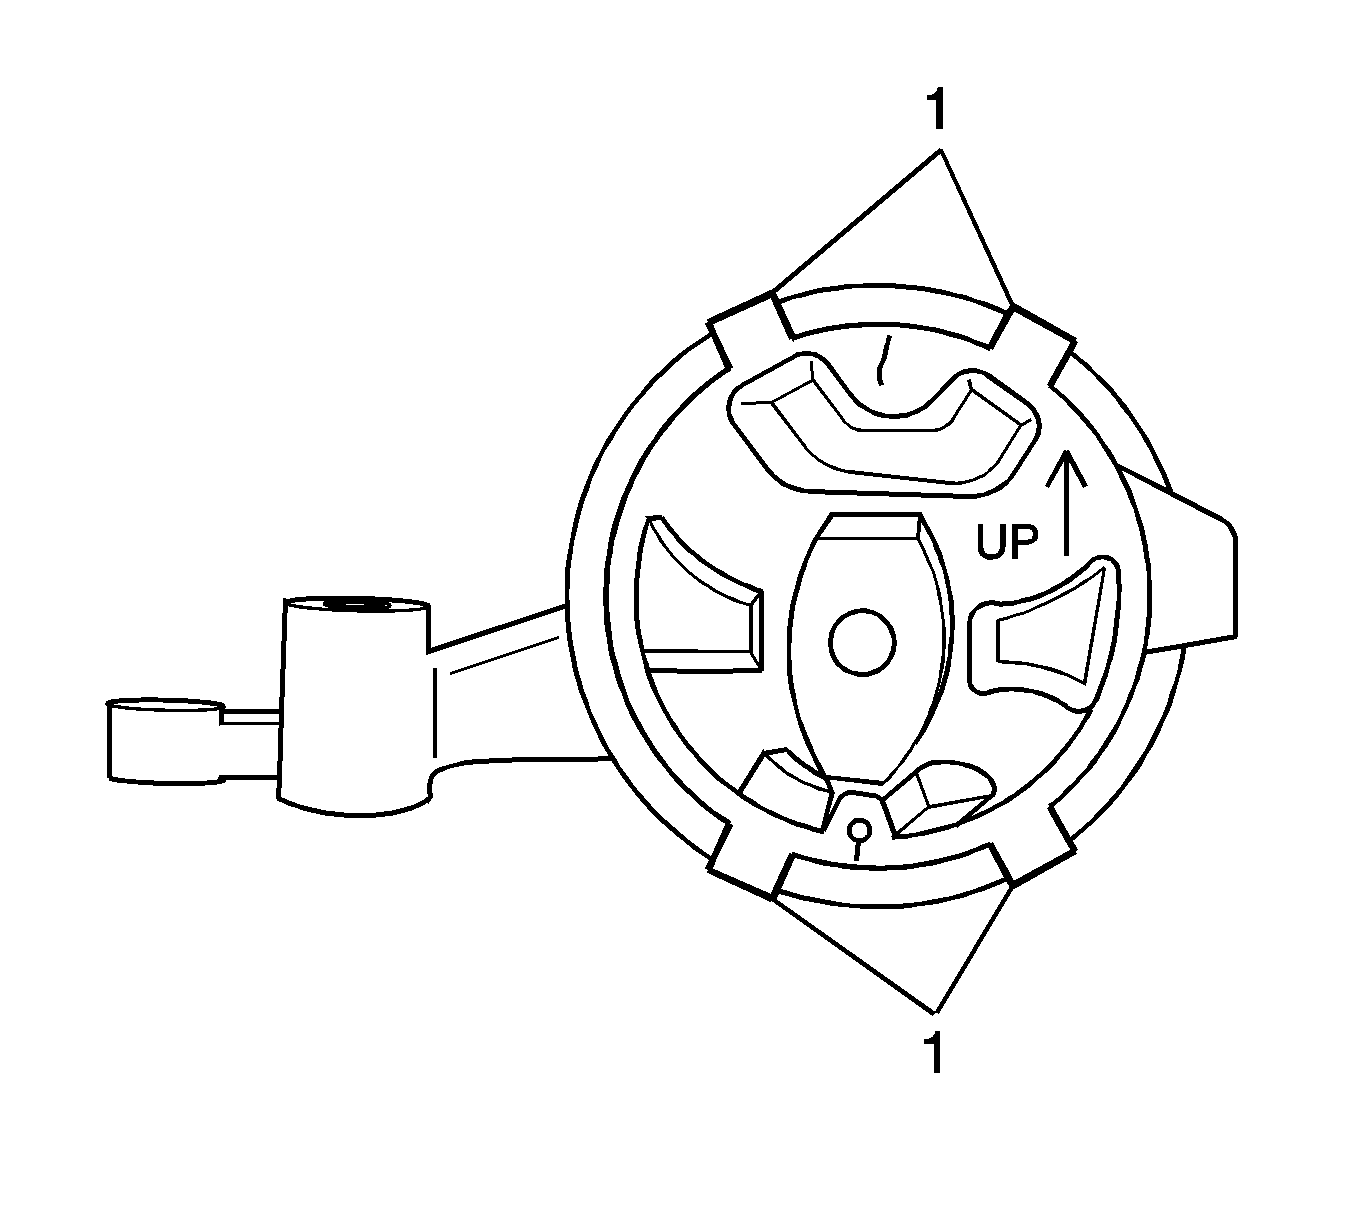
- Referring to the illustration above, observe the up arrow on the illustration along with the rubber molding dimples at the 12 and 6 o'clock positions. Mark the metal portion of the mount using one or all of these indicators. You will use the marks as a guide when installing the new transmission mount bushing.
- Locate the 4 metal tabs (1) in the illustration. You must bend all 4 tabs 90 degrees to facilitate the removal of the bushing.
- With the 4 tabs bent in, tap the opposite side of the bushing to slide it out of the mount. You may clamp the mount in a vise if required to accomplish this task. Retention force on the bushing is low so this can be accomplished with little force.
- Repeat the same procedure with the replacement rear transmission mount. You will remove the bushing in the same manner but you will not need to mark the metal mount body as it will be discarded.
- Transfer the rubber bushing from the new rear transmission mount and install it to the original side transmission mount. Use your alignment marks to orient the new bushing in exactly the same way as the original. You must be certain that the bushing is installed in the same direction as the original or you may increase the amount of engine vibration passed to the passenger compartment.
- Bend the 4 metal retaining tabs down 90 degrees until flat to the metal mount.
- Install the side transmission mount and secure the bolts.
- Tighten the side transmission mounting bolts.
- Tighten the transmission mount thru bolt.
- Remove the transmission jack and wood block.
- Install the washer fluid reservoir retainers, electrical connector and hose.
- Install the fender brace support bolt.
- Install the outer wheel well shroud and retainers.
- Install the inner wheel well shroud and retainers.
- Install the driver's side front tire and wheel assembly.
- Lower the vehicle
- Install the washer fluid reservoir cap.
- Close the hood.
Notice: Use a block of wood in conjunction with the transmission jack to prevent possible powertrain damage.

Important: The transmission mount is directional. It is designed to absorb powertrain vibrations in one direction only. Incorrect orientation of the replacement bushing may noticeably increase engine/powertrain vibration in the passenger compartment.
Important: The transmission mount is directional. It is designed to absorb powertrain vibrations in one direction only. Incorrect orientation of the replacement bushing may noticeably increase engine/powertrain vibration in the passenger compartment.

Tighten
Tighten the mounting bolts to 75 N·m
(60 lb ft).

Tighten
Tighten the thru bolt to 60 N·m (44 lb ft).
Parts Information
Part Number | Description |
|---|---|
22617128 | Mount, Transmission |
Parts are currently available from GMSPO.
Warranty Information
For vehicles repaired under warranty use:
Labor Operation | Description | Labor Time |
|---|---|---|
K2281 | Mount, Transmission/Transaxle Left -- Replace | 0.8 hr |
