Product Campaign 1D21 - Unexpected Hood Opening

| Subject: | Unexpected Hood Opening |
| Models: | 1987-88 Chevrolet Corsica/Beretta Models |
| 1987-88 Pontiac Tempest Models |
Defect Involved
General Motors of Canada Limited has decided that a defect which related to Motor Vehicle Safety exists in certain 1987-88 Chevrolet Corsica/Beretta and Pontiac Tempest model vehicles. The secondary hood latch assemblies on some of these vehicles is not properly adjusted and can result in the secondary latch becoming bent. A bent secondary latch can lead to a condition where full primary latch engagement is not attained.
If the secondary hood latch is not properly engaged and the primary hood latch was also not engaged, the hood could open unexpectedly. If this were to occur while the vehicle was in motion, the hood may contact the windshield, reducing the forward vision area of the driver and a vehicle crash without prior warning could result.
To prevent this condition from occurring, dealers are to replace the primary hood latch assembly, the secondary hood latch assembly, and the latch support bracket.
Vehicles Involved
Involved are certain 1987-88 Chevrolet Corsica/Beretta and Pontiac Tempest model vehicles built within the following VIN breakpoints:
Year | Division | Model | Plant | Plant Code | From | Through |
|---|---|---|---|---|---|---|
1987 | Chevrolet | Corsica/Beretta | Linden | E | SOP | HE110671 |
1987 | Chevrolet | Corisca/Beretta | Wilmington | Y | SOP | HY106246 |
1987 | Pontiac | Tempest | Wilmington | Y | SOP | HY700523 |
1988 | Chevrolet | Corsica/Beretta | Linden | E | SOP | JE541533 |
1988 | Chevrolet | Corsica/Beretta | Wilmington | Y | SOP | JY551659 |
1988 | Pontiac | Tempest | Wilmington | Y | SOP | JY903818 |
All affected vehicles have been identified by the VIN listing provided to involved dealers with this bulletin. Any dealer not receiving a listing was not shipped any of the affected vehicles.
Dealer Campaign Responsibility
Dealers are to perform this campaign on all involved vehicles at no charge to owners, regardless of kilometers traveled, age of vehicle, or ownership, from this time forward.
Whenever a vehicle subject to this campaign is taken into your new or used vehicle inventory, or it is in your dealership for service, you are to ensure the campaign correction has been made before selling or releasing the vehicle.
Owners of vehicles recently sold from your new vehicle inventory are to be contacted by the dealer, and arrangements made to make the required modification according to instructions contained in this bulletin.
Campaign Procedure
Refer to Section 4 of the Service Policies and Procedures Manual for the detailed procedure on handling Product Campaigns. Dealers are requested to completed the campaign on all transfers as soon as possible.
Owner Notification
All customers of record at the time of campaign release are shown on the attached computer listing and have been notified by first class mail from General Motors. The listings provided are for campaign activity only and should not be used for any other purpose.
Parts Information
Parts required to complete this campaign should be ordered through regular channels, as follows:
Part Number | Description | Qty/ Vehicle |
|---|---|---|
22579922 | Kit-Hood Latch Components (Corsica & Tempest) - Consisting of: Secondary Hood Latch Assembly Latch Support Bracket with Label Instruction Sheet | 1 |
22579923 | Kit-Hood Latch Components (Beretta Only) - Consisting of: Secondary Hood Latch Assembly Latch Support Bracket with Label Instruction Sheet | 1 |
22578167 | Primary Latch Assembly | 1 |
992723 Or Equivalent | Lubricant | As Required |
Instructional Video
Each dealer will be shipped an instructional video tape for this campaign. This tape demonstrates the service procedure described below. Mechanics should be certain to view this tape prior to attempting to perform this procedure.
Each video tape package is being furnished to dealers at no charge. This video tape will be in a blue sleeve and labeled "1987-88 L-Car Hood Latch System Replacement Procedure."
Parts and Labour Claim Information
Credit for the campaign work performed will be paid upon receipt of a properly completed campaign card or DCS transmission in accordance with the following:
Repair Code | Description | Time Allowance |
|---|---|---|
2A | Install New Latch Assy. Corsica & Tempest | 0.8 hr |
3A | Install New Latch Assy. Beretta | 0.8 hr |
Tine allowance includes 0.1 hr for dealer administrative detail associated with this campaign. Repair Code 2A and 3A includes $4.00 for lubricant. Parts credit will be based on dealer net plus 30% to cover parts handling. | ||
Service Procedure
Corsica and Tempest
- Open the hood and support the hood using the support rod.
Figure 1 -- Corsica/Tempest

Beretta
- Open the hood and support the hood using the support rod.
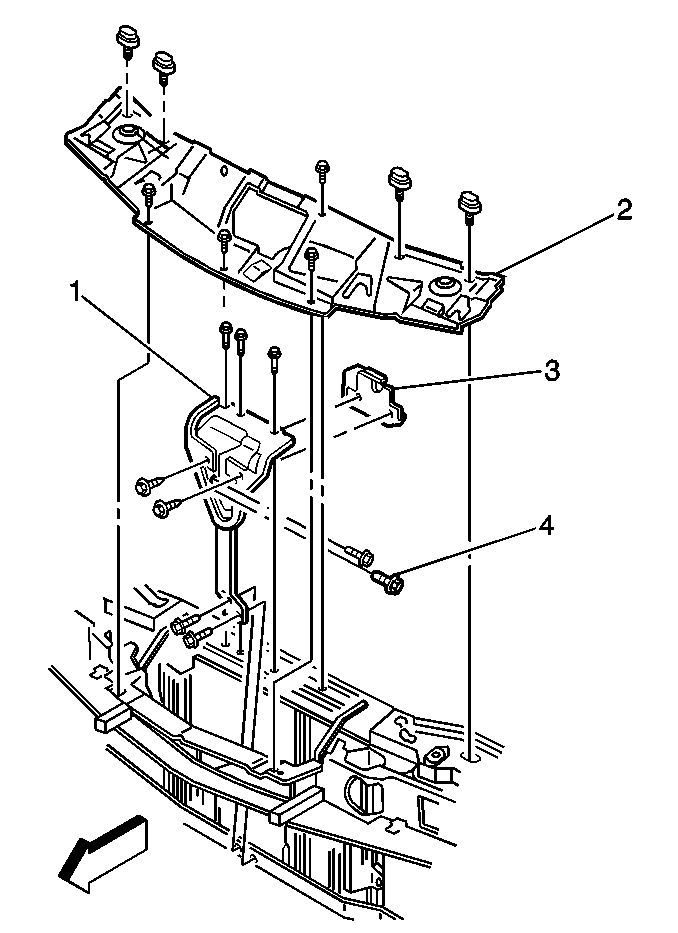
- Remove the two (2) push-in retainers, three (3) hex head screws, and loosen the four (4) thumb screw retainers from the upper radiator baffle. Remove the upper radiator baffle. Refer to Figure 2.
- Disconnect the hood release cable from the primary latch assembly.
- Remove the two (2) latch support-to-lower tie bar screws.
- Remove the two (2) latch support-to-headlamp carrier screws.
- Remove the three (3) latch support-to-upper tie bar screws.
- Remove the primary latch assembly from the hood latch support bracket. Save the two (2) attaching bolts for attaching the new primary latch assembly to the new hood latch support bracket.
- Remove the two (2) U-nuts from the old hood latch support bracket and install them onto the new hood latch support bracket.
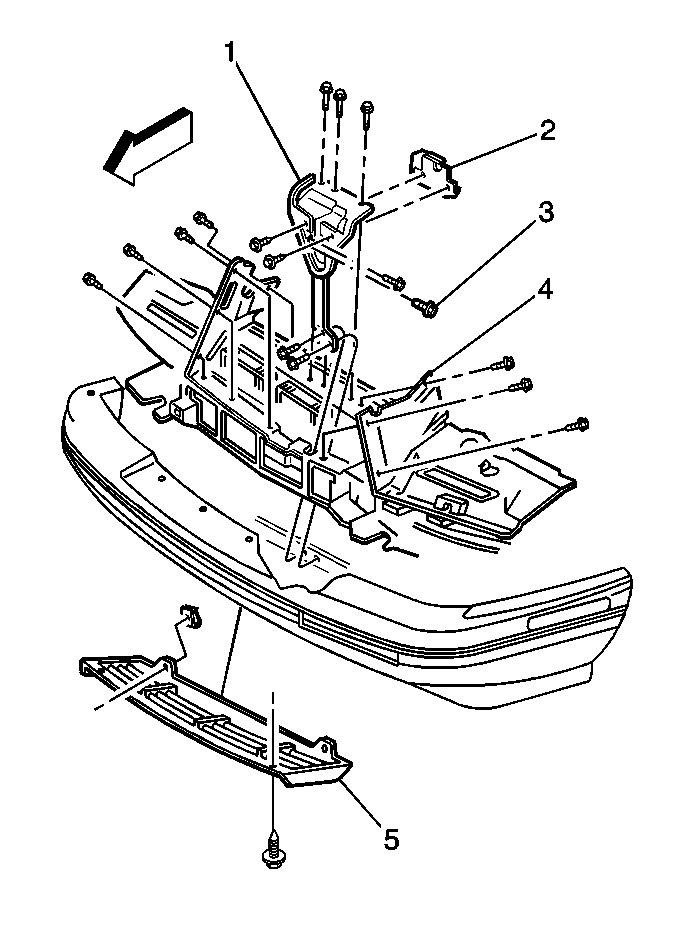
- Remove the secondary hood latch assembly. Refer to Figure 3.
- Loosely assemble the new primary latch assembly to the new hood latch support using the bolts previously removed.
- Install the new hood latch support bracket with the loosely assembled primary hood latch assembly using the previously removed screws.
- Reinstall the two (2) headlamp carrier-to-latch support screws.
- Reconnect the hood release cable to the primary latch assembly.
- Adjust the primary hood latch assembly as required in order to provide the correct hood alignment.
- Loosely assemble the new secondary hood latch assembly to the hood using the two (2) previously removed bolts.
- While slowly lowering the hood, visually verify the alignment of the new secondary latch. The secondary latch assembly must be aligned so the pin fits into the hole in the hood latch support bracket when the hood is closed. Refer to Figure 4 or the label on the hood latch support bracket. Adjust the secondary latch as required for proper alignment and tighten the two (2) attaching bolts. After tightening the bolts, verify the proper alignment before letting the hood slam. Do NOT reinstall the set screw that was previously removed.
- Remove the small instruction label from the new hood latch support bracket.
- Inspect the hood latches for the proper operation.
Figure 2 -- Beretta

| (1) | Hood Latch Support Assembly |
| (2) | Upper Radiator Baffle |
| (3) | Hood Primary Latch |
| (4) | Headlamp Carrier-to-Latch Support Bolt |
Important: All seven (7) hood latch support bracket attaching screws can be removed and reinstalled from the top side of the vehicle after the upper radiator air baffle is removed.
Some vehicles may have only two (2) screws at this location.
The old hood latch support bracket and the primary latch assembly will NOT be reused.
The secondary hood latch assembly will NOT be reused.
Tighten
Tighten all the screws to 10 N·m (89 lb in).
Tighten
Tighten all the screws to 10 N·m (89 lb in).
Tighten
Tighten the primary hood latch assembly bolts to 27 N·m
(20 lb ft).
Notice: The new secondary hood latch must be properly aligned before attempting to close the hood by slamming it or letting it drop into the closed position. Failure to have the secondary latch properly aligned before attempting to forcefully close the hood may result in damage to the hood, the secondary hood latch assembly, and the hood latch support bracket. Refer to Figure 4 or the instruction label on the new latch support bracket.
Tighten
Tighten all the screws to 10 N·m (89 lb in).
| 18.1. | Close the hood completely by "dropping" the hood from 12"-18". |
| 18.2. | Release the hood primary latch using the interior hood release lever/handle. |
| 18.3. | Test the secondary latch engagement by lifting the partially open hood. The secondary latch should keep the hood from opening until the secondary latch release lever is depressed. |
If the secondary latch is not properly aligned, adjust as required and re-verify the hood latches for proper operation.
| 18.4. | Reinstall the lower air baffle and the upper radiator baffle. |
| 18.5. | Install the Campaign Identification Label. |
Campaign Identification label
Clean the surface of the radiator upper mounting panel and apply a Campaign Identification Labe. Make sure the correct campaign number is inserted on the label. This will indicate that the campaign has been completed.
General Motors of Canada bulletins are intended for use by professional technicians, NOT a "do-it-yourselfer." They are written to inform these technicians of conditions that may occur on some vehicles, or to provide information that could assist in the proper service of a vehicle. Properly trained technicians have the equipment, tools, safety instructions, and know-how to do a job properly and safely. If a condition is described, DO NOT assume that the bulletin applies to your vehicle, or that your vehicle will have that condition. See your General Motors dealer for information on whether your vehicle may benefit from the information.
