CAMPAIGN: MODULAR REAR SEAT LATCHES

Models: 1990 Chevrolet Lumina and Pontiac Trans Sport APV Models
General Motors of Canada has determined that certain 1990 Chevrolet Lumina and Pontiac Trans Sport APV model vehicles may fail to conform to Canada Motor Vehicle Safety Standard (CMVSS) 207, "Anchorage Of Seats". The rear modular seat frame hold down hooks may not meet the required pull force at the rear seat anchorage.
To correct this condition, dealers are to replace the two rear hold down hooks and pivot rivets with (heat treated) hold down hooks, bolts, bushings and nuts on each rear modular seat (up to 5 rear seats per involved unit).
VEHICLES INVOLVED:
Involved in the following breakpoints are only certain Chevrolet Lumina and Pontiac Trans Sport APV models. Involved dealers have been notified and sent a listing of their V.I.N.'s by D.C.S. message.
MODEL/YEAR PLANT FROM THROUGH ----------- ----- ---- ------- CHEV U 1990 Tarrytown LT100064 LT104969
PONT U 1990 Tarrytown LT200001 LT200821
All affected vehicles have been identified by the VIN listing provided to involved dealers with this bulletin. Any dealer not receiving a listing was not shipped any of the affected vehicles.
DEALER CAMPAIGN RESPONSIBILITY:
Dealers are to service all vehicles subject to this campaign at no charge to owners, regardless of mileage, age of vehicle, or ownership, from this time forward.
Whenever a vehicle subject to this campaign is taken into your new or used vehicle inventory, or it is in your dealership for service in the future, you should take the steps necessary to be sure the campaign correction has been made before reselling or releasing the vehicle.
owners of vehicles recently sold from your new vehicle inventory are to be contacted by the dealer, and arrangements made to make the required modification according to instructions contained in this bulletin.
CAMPAIGN PROCEDURE:
Refer to Section 4 of the Service Policies and Procedures Manual for the detailed procedure on handling Product Campaigns. Dealers are requested to complete the campaign on all transfers as soon as possible.
OWNER NOTIFICATION:
All owners of record at the time of campaign release are shown on the attached computer listing and have been notified by first class mail from General Motors. The listings provided are for campaign activity only and should not be used for any other purpose.
PARTS INFORMATION:
Parts required to complete this campaign will be shipped directly to involved dealers. Parts are identified by V.I.N. and will be shipped on a 'NO CHARGE' basis.
PARTS AND LABOUR CLAIM INFORMATION:
Credit for the campaign work performed will be paid upon receipt of a properly completed campaign claim card, RAPID terminal or DCS transmission in accordance with the following:
Repair Code Description Time Allowance ----------- ----------- --------------- 2A Install 3 sets 1.0 (3 modular seats)
3A Install 4 sets 1.3 (4 modular seats)
4A Install 5 sets 1.6 (5 modular seats)
An amount of $6.00 is included in all Repair Codes for dealer handling.
SERVICE PROCEDURE:
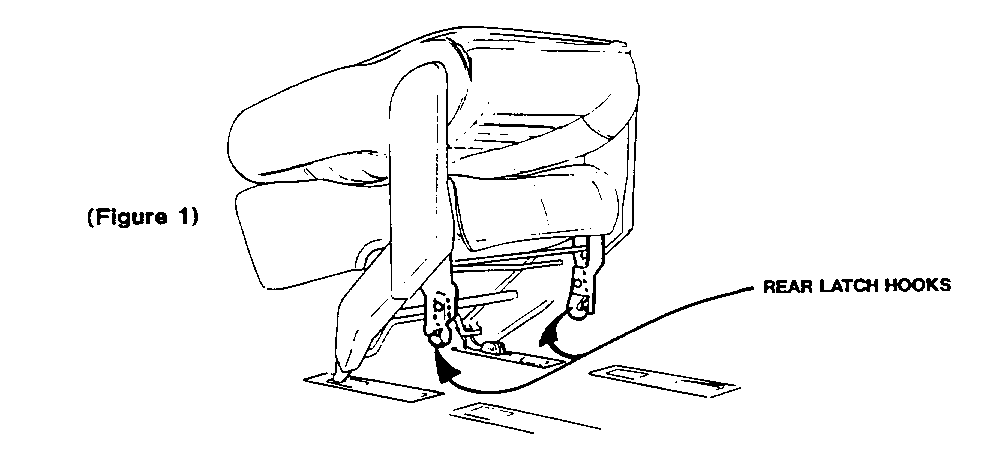
1. Remove seat, place on a clean surface (Figure 1). Position seat on side for better access.
NOTE: IT IS NECESSARY TO COMPLETE NEW LATCH REPLACEMENT COMPLETELY ON ONE SIDE OF THE SEAT BEFORE PROCEEDING TO THE OPPOSITE SIDE DUE TO RIGHT HAND AND LEFT HAND SPRINGS. REPAIR PROCEDURES ARE IDENTICAL FOR ALL REAR MODULAR SEATS.
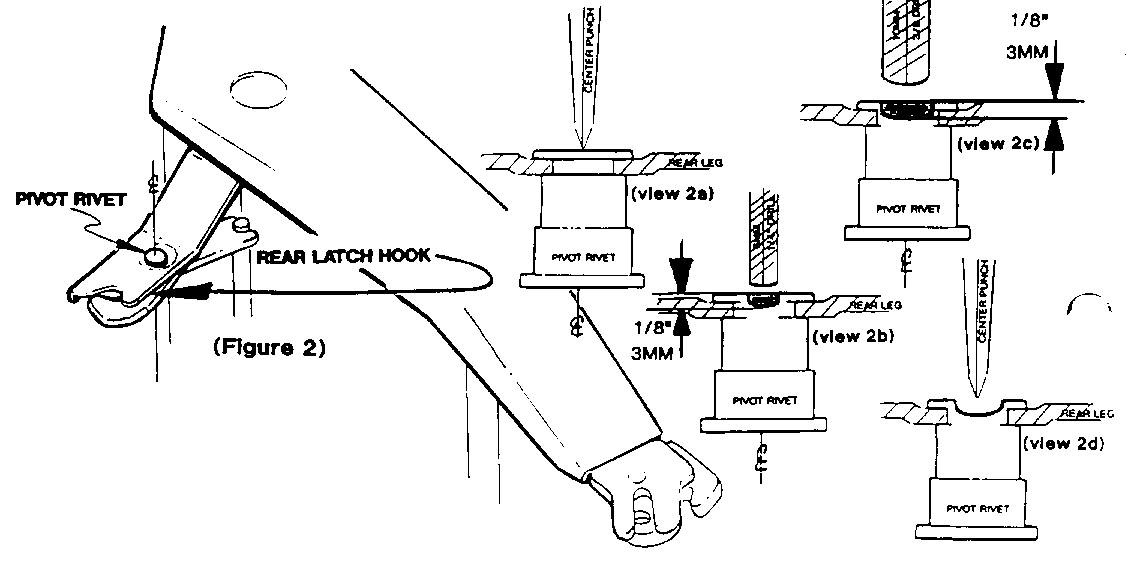
2. Remove rear hook pivot rivet by the following procedure (Figure 2). (Note position of latch spring):
a) Centre punch rivet from outboard side.
b) Drill centre of rivet using 1/4" (6mm) drill bit (view 2a).
c) Drill centre of rivet using 3/8" (10mm) drill bit (view 2b).
d) Use centre punch to drive pivot rivet out (view 2c) taking care not to bend seat leg. (Note: spring may fall out).
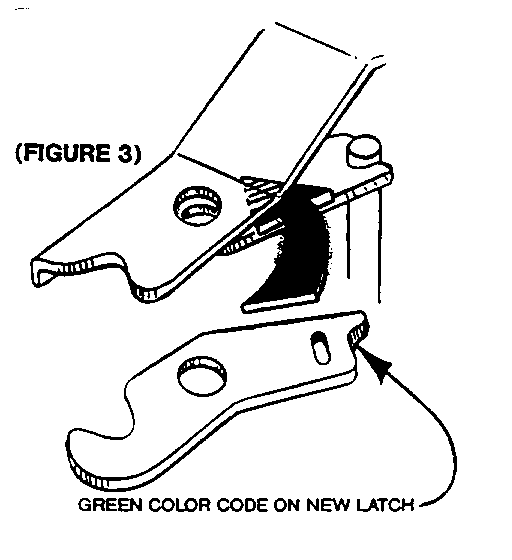
3. Remove old rear latch hook then install new rear latch hook (supplied). Note: New latch is colour coded with a green dab of paint (Figure 3).
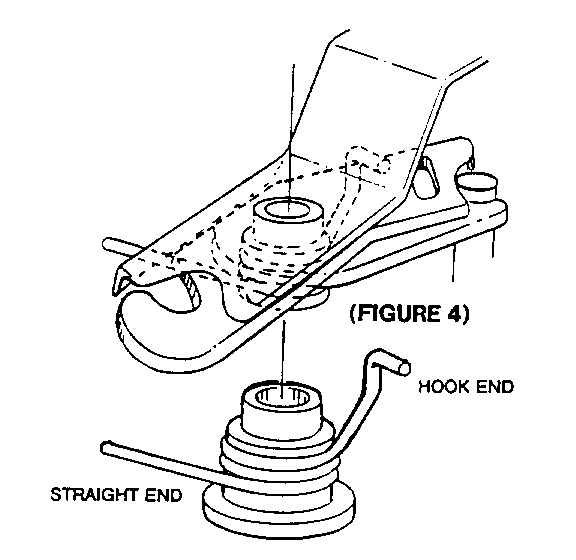
4. Place latch spring on new bushing (supplied) as shown (Figure 4) and insert from inside of seat through hole engaging hook end of spring to new rear latch. DO NOT OVERBEND SPRING.
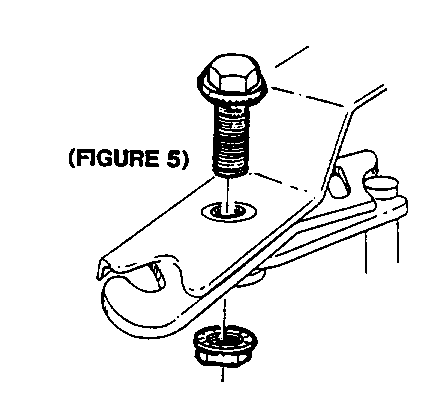
5. Insert bolt from outboard side (Figure 5) and install nut (finger tighten only at this time). Make sure bushing has passed completely through the latch.
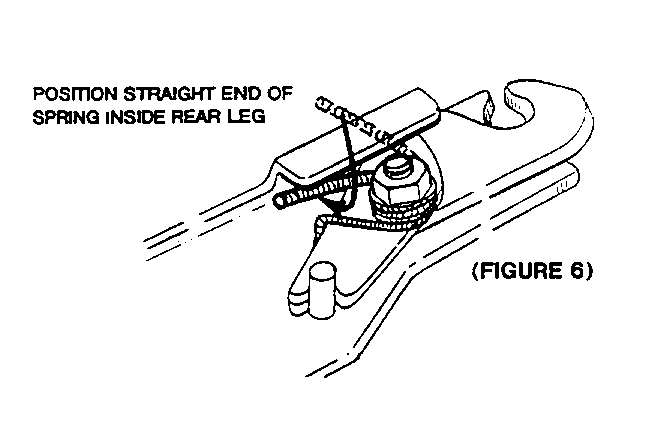
6. Position straight end of spring inside of rear leg using needle nose pliers (Figure 6). Assure that spring holds latch closed. Torque bolt and nut to 25 lb. ft. (34 N.m).
7. Turn seat to opposite side and repeat step 1 through 6 on remaining rear leg. When completed, check function of latches to be sure they move freely.
8. Reinstall seat and repeat above procedures on all remaining rear bucket seats.
9. Cycle seat in vehicle to assure proper operation.
10. Install Campaign Identification Label.
INSTALLATION OF CAMPAIGN IDENTIFICATION LABEL
Clean surface of radiator upper mounting panel and apply a Campaign Identification Label. Make sure the correct campaign number is inserted on the label. This will indicate that the campaign has been completed.
General Motors bulletins are intended for use by professional technicians, not a "do-it-yourselfer". They are written to inform those technicians of conditions that may occur on some vehicles, or to provide information that could assist in the proper service of a vehicle. Properly trained technicians have the equipment, tools, safety instructions and know-how to do a job properly and safely. If a condition is described, do not assume that the bulletin applies to your vehicle, or that your vehicle will have that condition. See a General Motors dealer servicing your brand of General Motors vehicle for information on whether your vehicle may benefit from the information.
