For 1990-2009 cars only
Removal Procedure
- Raise the vehicle. Support the vehicle. Refer to Lifting and Jacking the Vehicle in General Information.
- Place a drain pan or suitable container under the differential carrier.
- Remove the differential carrier drain plug.
- Drain the differential carrier.
- Remove the propeller shaft from the vehicle. Refer to Two-Piece Propeller Shaft Replacement in Propeller Shaft.
- Remove the rear tire and wheel assemblies. Refer to Tire and Wheel Removal and Installation in Tires and Wheels.
- Remove the left and right rear knuckles from the vehicle. Refer to Knuckle Replacement in Rear Suspension.
- Remove the left and right rear wheel drive shafts from the vehicle. Refer to Rear Wheel Drive Shaft Replacement in Wheel Drive Shafts.
- Remove the catalytic converter. Refer to Catalytic Converter Replacement in Engine Exhaust.
- Position a suitable jack under the differential assembly.
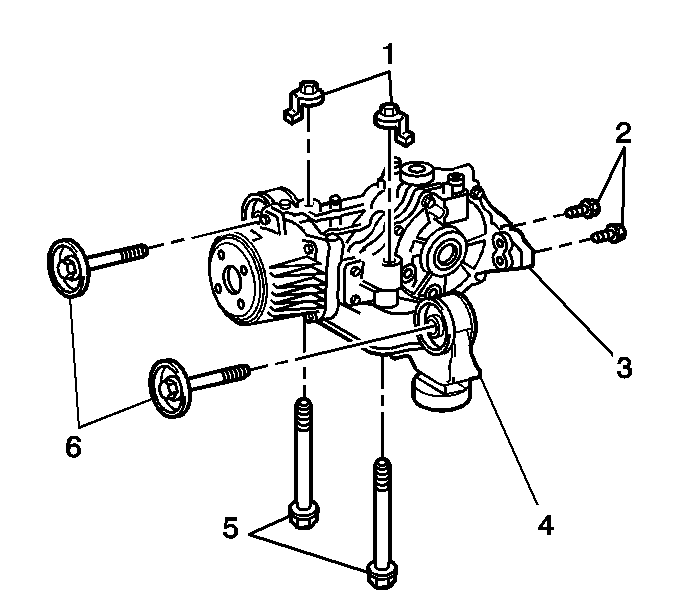
- Remove the 2 rear differential support bracket bolts (2).
- Loosen the lefthand lower differential support bolt (6).
- Remove the righthand lower differential support bolt (6).
- Carefully lower the differential assembly with differential support (4) from the vehicle.
- Remove the 2 bolts (5) and 2 nuts (1) from the differential, then remove the differential support from the differential carrier.
- Remove the 3 rear differential support bolts from the differential carrier, then remove the rear differential support (3).
Installation Procedure
- Position the differential support to the differential carrier, then install the 2 bolts (5) and 2 nuts (1).
- Position the rear differential support (3) on the differential carrier, then install the 3 bolts.
- Carefully raise the differential assembly with differential support into the vehicle.
- Install the 2 differential support to rear suspension crossmember bolts (6).
- Install the 2 rear differential support retaining bolts (2).
- Install the left and right rear wheel drive shafts from the vehicle. Refer to Rear Wheel Drive Shaft Replacement in Wheel Drive Shafts.
- Install the left and right rear knuckles from the vehicle. Refer to Knuckle Replacement in Rear Suspension.
- Install the propeller shaft from the vehicle. Refer to Two-Piece Propeller Shaft Replacement In Propeller Shaft.
- Install the catalytic converter. Refer to Catalytic Converter Replacement in Engine Exhaust.
- Install the rear tire and wheel assemblies. Refer to Tire and Wheel Removal and Installation in Tires and Wheels.
- Install the drain plug with a new gasket into the differential carrier.
- Refill the differential carrier with approximately 0.5 liters (1.05 pts) of 80W-90 GL5 lubricant GM P/N 12345977 (Canadian P/N 10953482), or equivalent. The oil level should be even with the bottom of the differential carrier oil level/filler plug hole.
- Install the oil level/filler plug with a new gasket into the differential carrier.
- Remove the drain pan from under the rear axle housing.
- Lower the vehicle.
Notice: Refer to Fastener Notice in the Preface section.
Tighten
Tighten the bolts to 103 N·m (76 lb ft).
Tighten
Tighten the bolts to 167 N·m (123 lb ft).
Tighten
Tighten the bolts to 118 N·m (87 lb ft).
Tighten
Tighten the bolts to 137 N·m (101 lb ft).
Tighten
Tighten the differential carrier drain plug to 39 N·m (29 lb ft).
Tighten
Tighten the differential oil level/filler plug to 39 N·m (29 lb ft).
