Tools Required
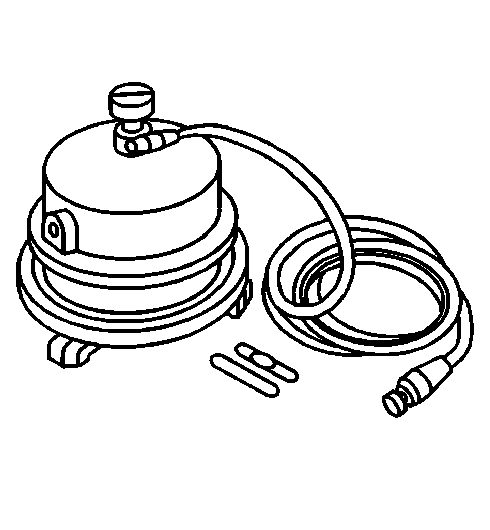
| • | J 29532 Diaphragm Pressure Bleeder |
| • | J 39801-VIBE Pressure Bleeder Adapter |
Caution: Do not move the vehicle until a firm brake pedal is obtained. Air in the brake system can cause the loss of brakes with possible personal injury.
Caution: Remove all the air from the hydraulic brake system anytime the hydraulic brake system is opened for repair. The entire bleeding procedure must be followed. Failure to remove all the air in the hydraulic brake system will result in reduced braking performance and possible personal injury.
Caution: Refer to Brake Fluid Irritant Caution in the Preface section.
Caution: Refer to Brake Fluid Caution in the Preface section.
Notice: Refer to Filling the Master Cylinder Notice in the Preface section.
Notice: Refer to Brake Fluid Effects on Paint and Electrical Components Notice in the Preface section.
Important: Bleed the hydraulic brake system in the following sequence:
If air enters the hydraulic brake system due to low brake fluid level, bleed the system at the master cylinder and at the 4 bleeder valves.
If you disconnect a brake pipe from the master cylinder, bleed the system at the master cylinder and at the 4 bleeder valves.
If you disconnect a brake pipe or a fitting between the master cylinder and the wheels, bleed the system at the bleeder valve served by the brake pipe or fitting.
If you disconnect a brake pipe or brake hose at only 1 wheel, bleed the system at the bleeder valve for that wheel.
Master Cylinder On-vehicle Bleeding Procedure
- Place a clean shop cloth under the master cylinder in order to absorb brake fluid spills.
- With the ignition switch in the OFF position and the brakes cool, press the brake pedal several times in order to deplete the vacuum assist system reserve.
- Clean the master cylinder.
- Fill the reservoir with brake fluid. Refer to Master Cylinder Reservoir Filling .
- Have an assistant slowly press the brake pedal and maintain pressure on the brake pedal.
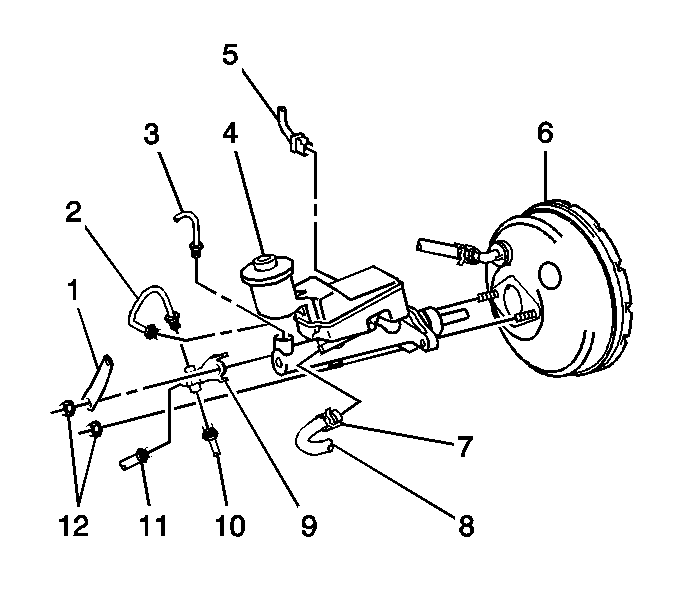
- Loosen the flare nut for the front brake pipe (3) in order to purge air from the front of the master cylinder.
- Tighten the flare nut.
- Have the assistant slowly release the brake pedal.
- Wait 15 seconds.
- Repeat this procedure until air is purged from the front of the master cylinder.
- Remove the rear brake pipe (2) from the master cylinder.
- Allow a small amount of brake fluid to drip from the open port of the master cylinder.
- Install the brake pipe to the master cylinder.
- Have the assistant slowly press the brake pedal and maintain pressure on the brake pedal.
- Loosen the flare nut for the rear brake pipe in order to purge air from the rear of the master cylinder.
- Tighten the flare nut.
- Have the assistant slowly release the brake pedal.
- Wait 15 seconds.
- Repeat this procedure until air is purged from the rear of the master cylinder.
Important: Maintain the fluid level above the MIN mark during the bleeding procedure.
Notice: Refer to Fastener Notice in the Preface section.
Tighten
Tighten the flare nut to 15.2 N·m (11.2 lb ft).
Tighten
Tighten the flare nut to 15.2 N·m (11.2 lb ft).
Tighten
Tighten the flare nut to 15.2 N·m (11.2 lb ft).
Manual Bleeding Procedure
- With the ignition switch in the OFF position and the brakes cool, press the brake pedal several times in order to deplete the vacuum assist system reserve.
- Fill the reservoir with brake fluid. Refer to Master Cylinder Reservoir Filling .
- Remove the bleeder valve cap.
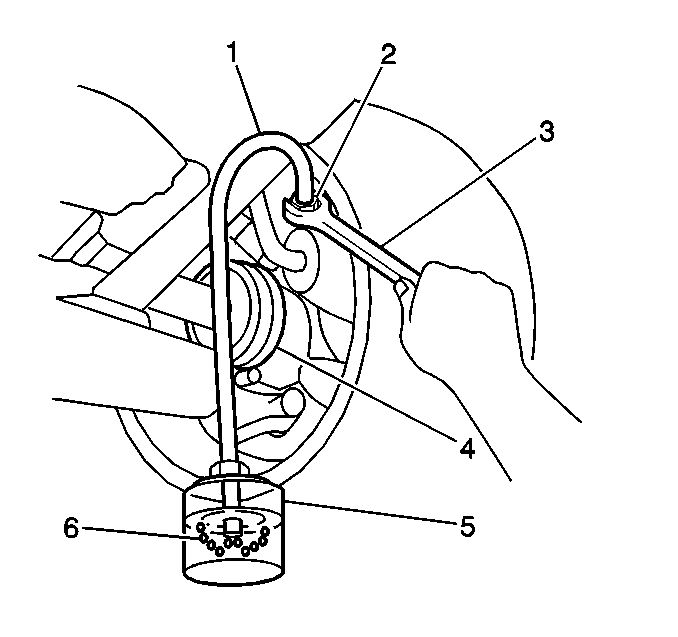
- Install a transparent hose (1) over the end of the bleeder valve (2). Submerge the other end of the hose in a transparent container (5) partially filled with brake fluid.
- Have the assistant slowly press the brake pedal and maintain pressure on the brake pedal.
- Loosen the bleeder valve in order to purge air from the wheel hydraulic circuit.
- Close the bleeder valve.
- Have the second technician slowly release the pedal.
- Wait 15 seconds.
- Repeat this procedure until air (6) is purged from the wheel hydraulic circuit.
- Install the bleeder valve cap.
- Repeat this procedure at all bleeder valves that require bleeding.
- Replenish the brake fluid in the master cylinder reservoir to the MAX mark and install the cap. Refer to Master Cylinder Reservoir Filling .
- Slowly press and release the brake pedal. Observe the feel of the brake pedal.
- If the brake pedal feels spongy, repeat the bleeding procedure.
- Inspect the hydraulic brake system for external leaks. Refer to Brake System External Leak Inspection .
- Turn the ignition switch to the ON position with the engine OFF. Inspect the instrument cluster.
- If the brake system warning lamp remains illuminated, refer to Symptoms - Hydraulic Brakes .
Important: Maintain the fluid level above the MIN mark during the bleeding procedure.
Tighten
Tighten the bleeder valve to 8.3 N·m (73.5 lb in).
Pressure Bleeding Procedure
Notice: Pressure bleeding equipment must be the diaphragm type and must have a rubber diaphragm between the air supply and the brake fluid. Air, moisture, oil and other contaminants can damage the hydraulic system.
- Clean the outside of the brake fluid reservoir and the cap.
- Remove the reservoir cap.
- Remove the reservoir diaphragm.
- Install the J 39801-VIBE , or equivalent, to the reservoir.
- Add brake fluid to the J 29532 , or equivalent, in order to raise the fluid level above the half mark.
- Connect the J 29532 , or equivalent, to the J 39801-VIBE , or equivalent.
- Charge the J 29532 , or equivalent, to 175-205 kPa (25-30 psi).
- Open the fluid tank valve for the J 29532 , or equivalent, in order to allow pressurized brake fluid to enter the hydraulic brake system.
- Wait 30 seconds.
- Inspect the hydraulic brake system for external leaks. Refer to Brake System External Leak Inspection .
- Remove the bleeder valve cap.
- Install a transparent hose (1) over the end of the bleeder valve (2). Submerge the other end of the hose in a transparent container (5) partially filled with brake fluid.
- Loosen the bleeder valve in order to purge air from the wheel hydraulic circuit.
- Close the bleeder valve.
- Repeat this procedure until air (6) is purged from the wheel hydraulic circuit.
- Install the bleeder valve cap.
- Repeat this procedure at all bleeder valves that require bleeding.
- Close the fluid tank valve for the J 29532 , or equivalent.
- Remove the J 29532 , or equivalent, from the J 39801-VIBE , or equivalent.
- Remove the J 39801-VIBE , or equivalent, from the reservoir.
- Replenish the brake fluid in the master cylinder reservoir to the MAX mark and install the cap. Refer to Master Cylinder Reservoir Filling .
- Slowly press and release the brake pedal. Observe the feel of the brake pedal.
- If the brake pedal feels spongy, repeat the bleeding procedure.
- Inspect the hydraulic brake system for external leaks. Refer to Brake System External Leak Inspection .
- Turn the ignition switch to the ON position with the engine OFF. Inspect the instrument cluster.
- If the brake system warning lamp remains illuminated, refer to Symptoms - Hydraulic Brakes .
Tighten
Tighten the bleeder valve to 8.3 N·m (73.5 lb in).
