Removal Procedure
- Disconnect the negative battery cable.
- Discharge and recover the refrigerant. Refer to Refrigerant Recovery and Recharging.
- Drain the engine cooling system. Refer to Cooling System Draining and Filling.
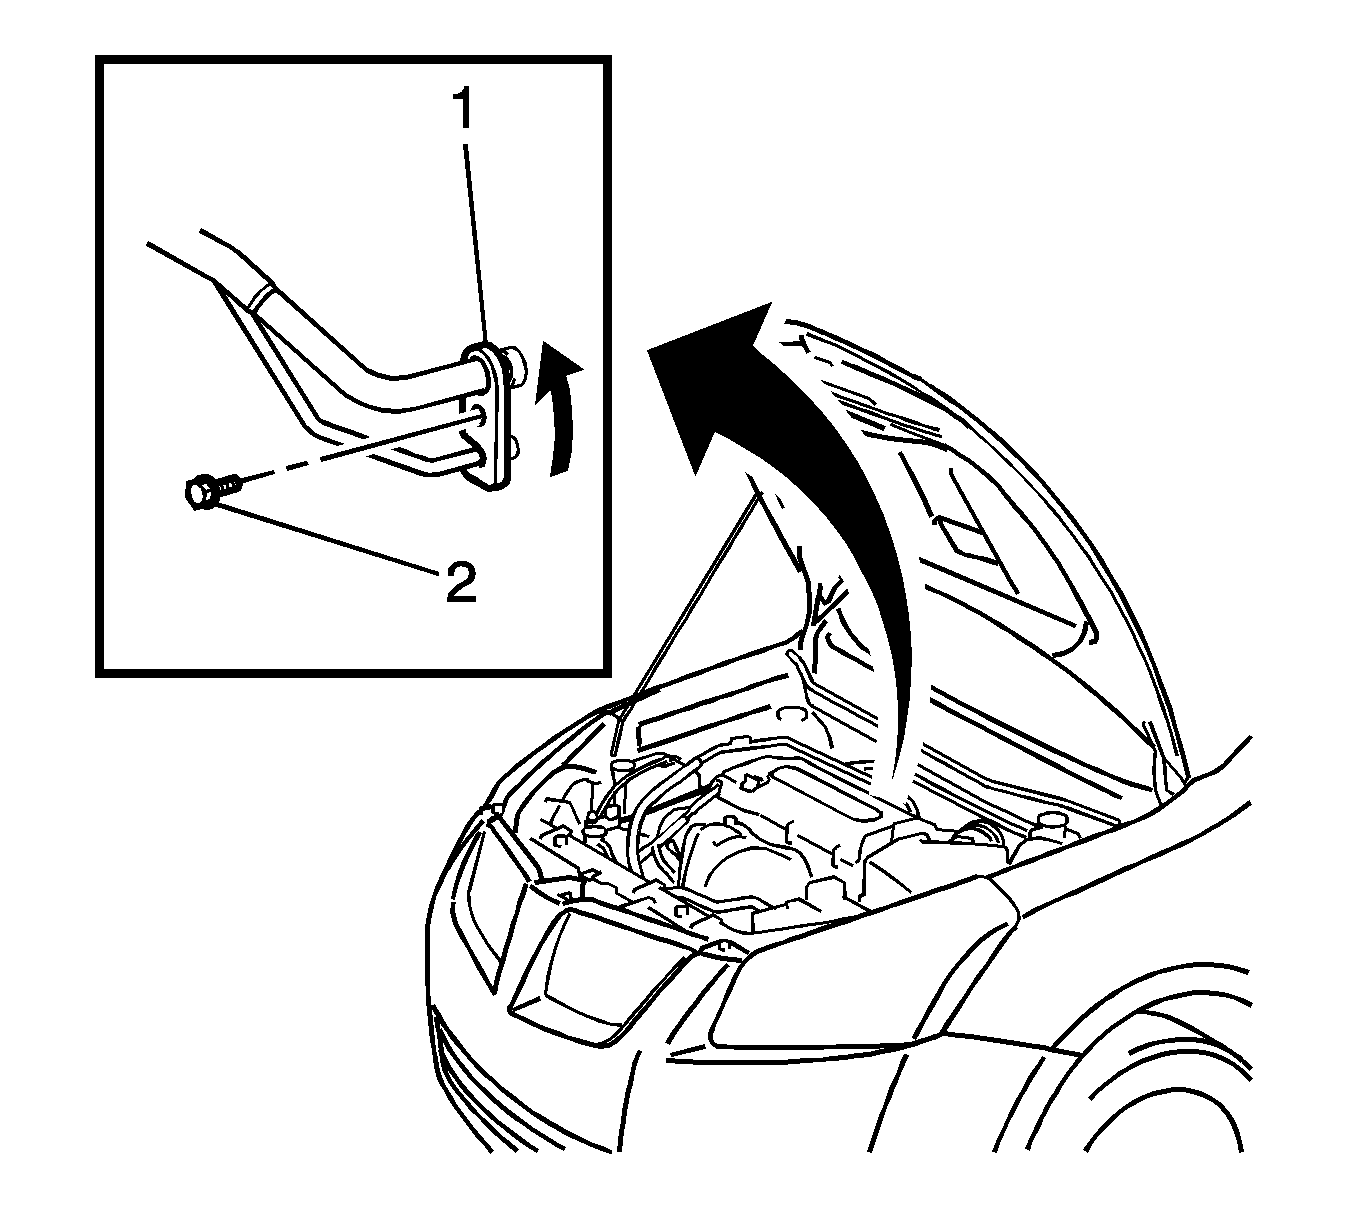
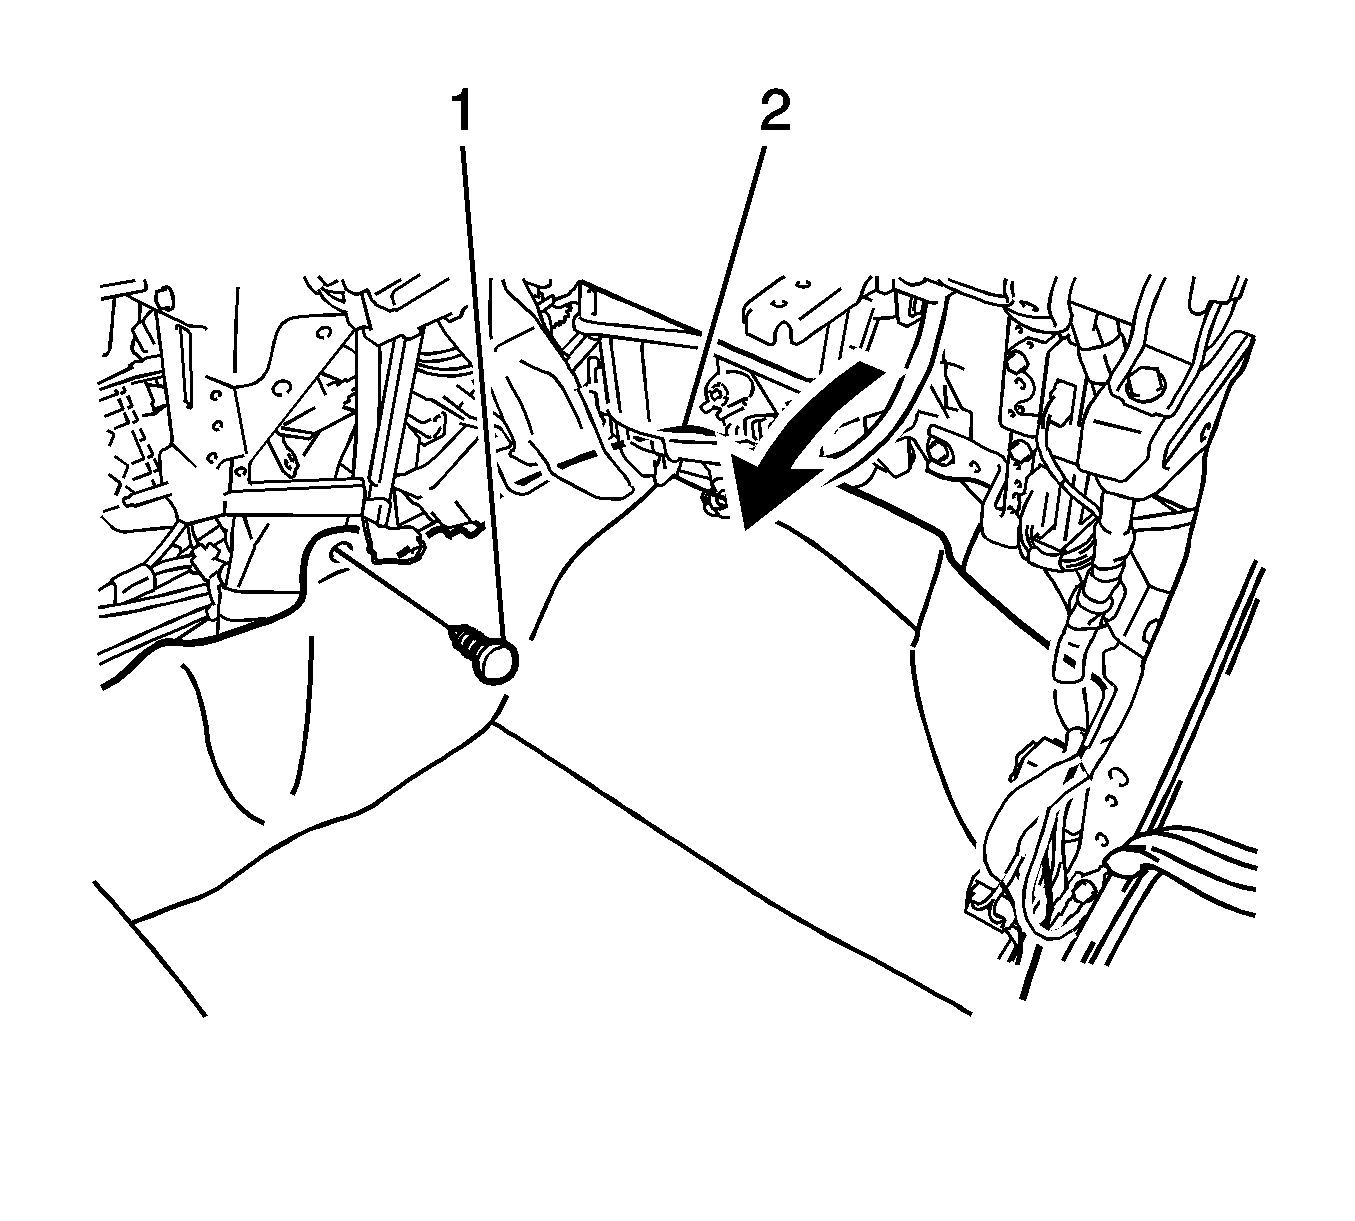
- Remove the bolt (1) and slide the hook connector.
- Remove the evaporator inlet and outlet tubes (1) from the evaporator.
- Remove the O-ring from the tube assembly.
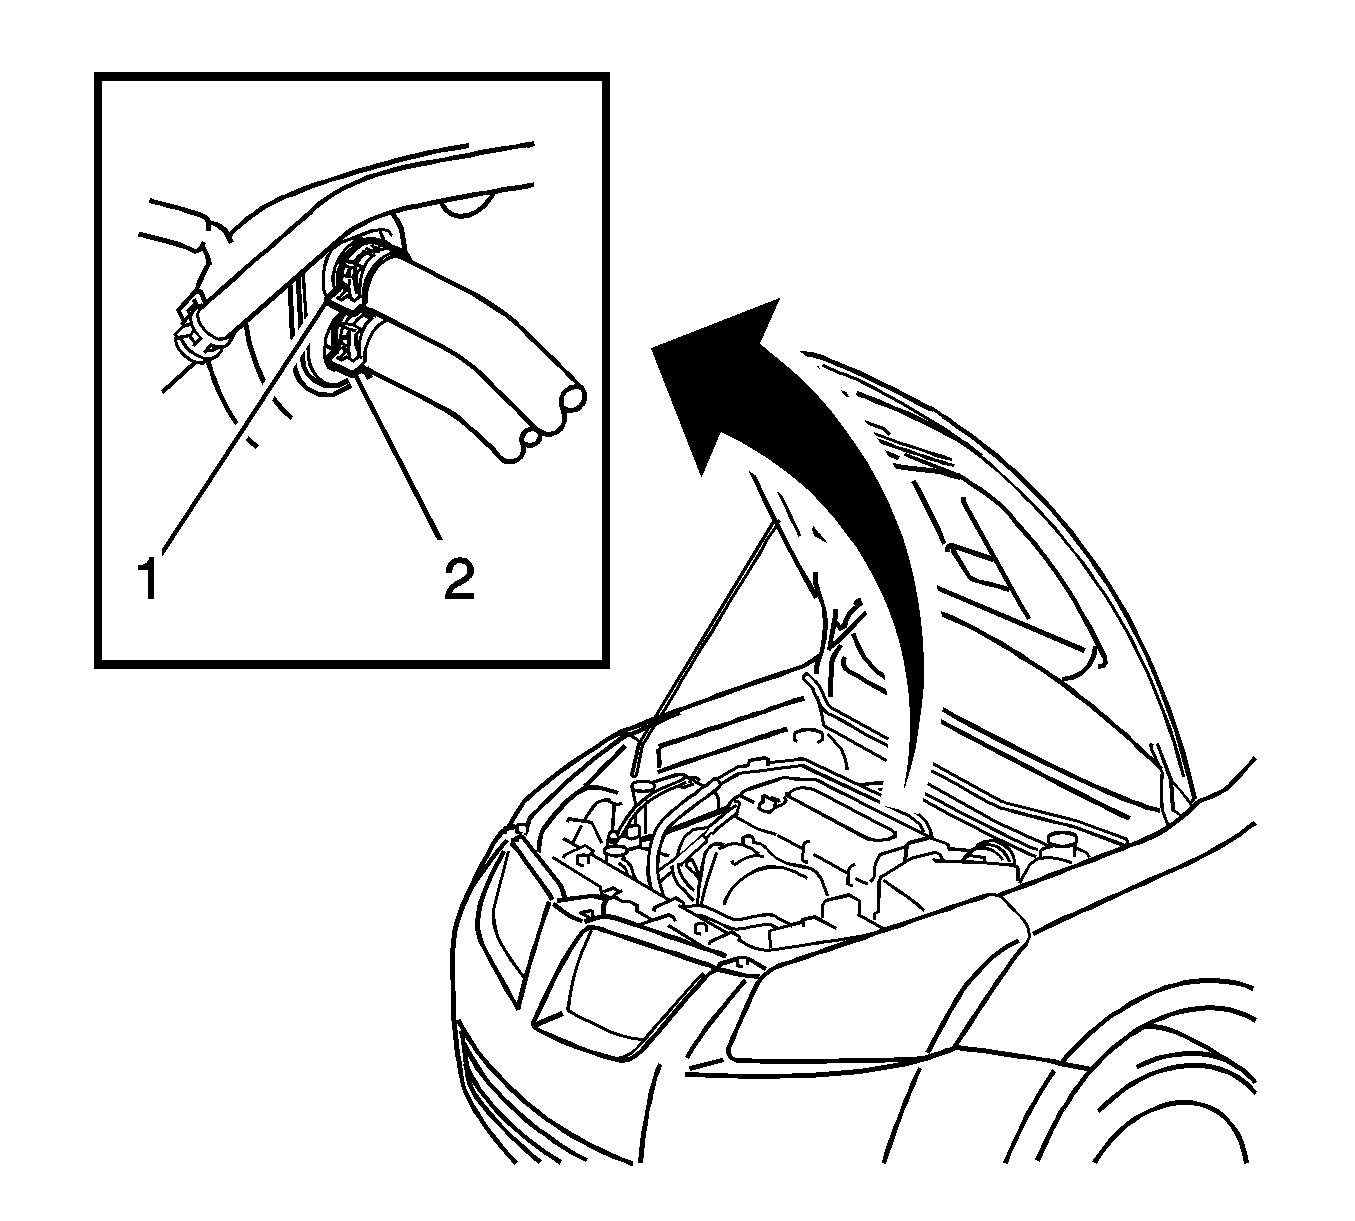
- Remove the heater hoses (1, 2) at the heater core.
- Remove the instrument panel assembly. Refer to Instrument Panel Upper Trim Pad Replacement and Instrument Panel Lower Trim Panel Replacement.
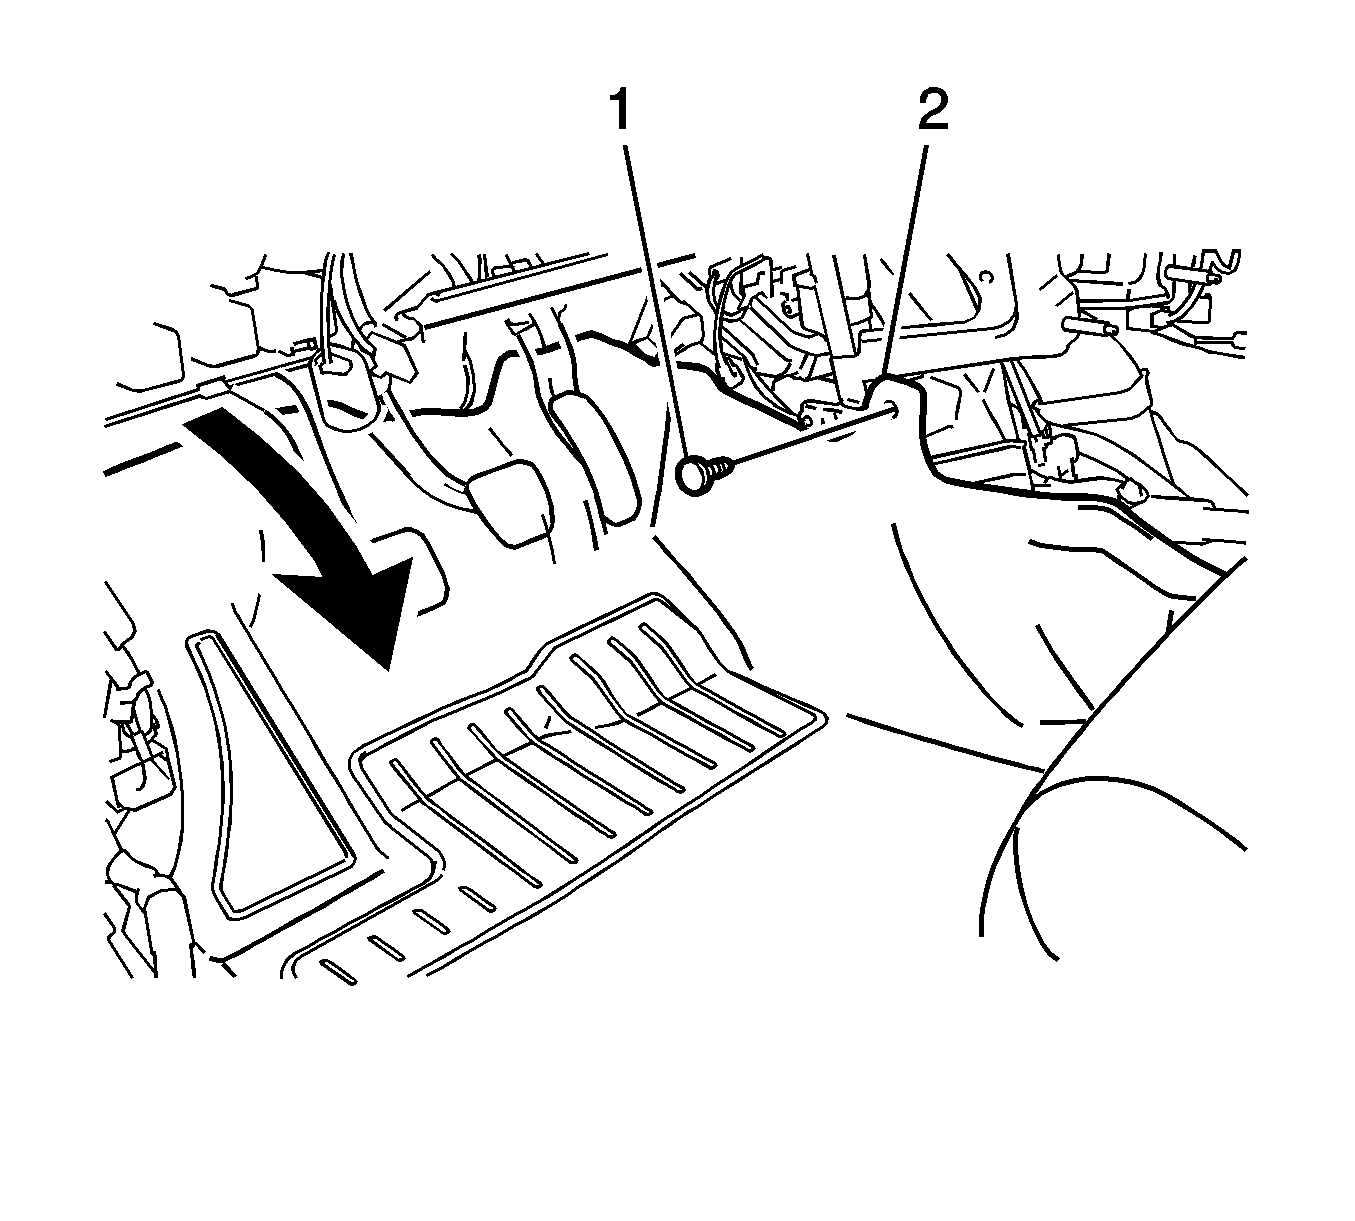
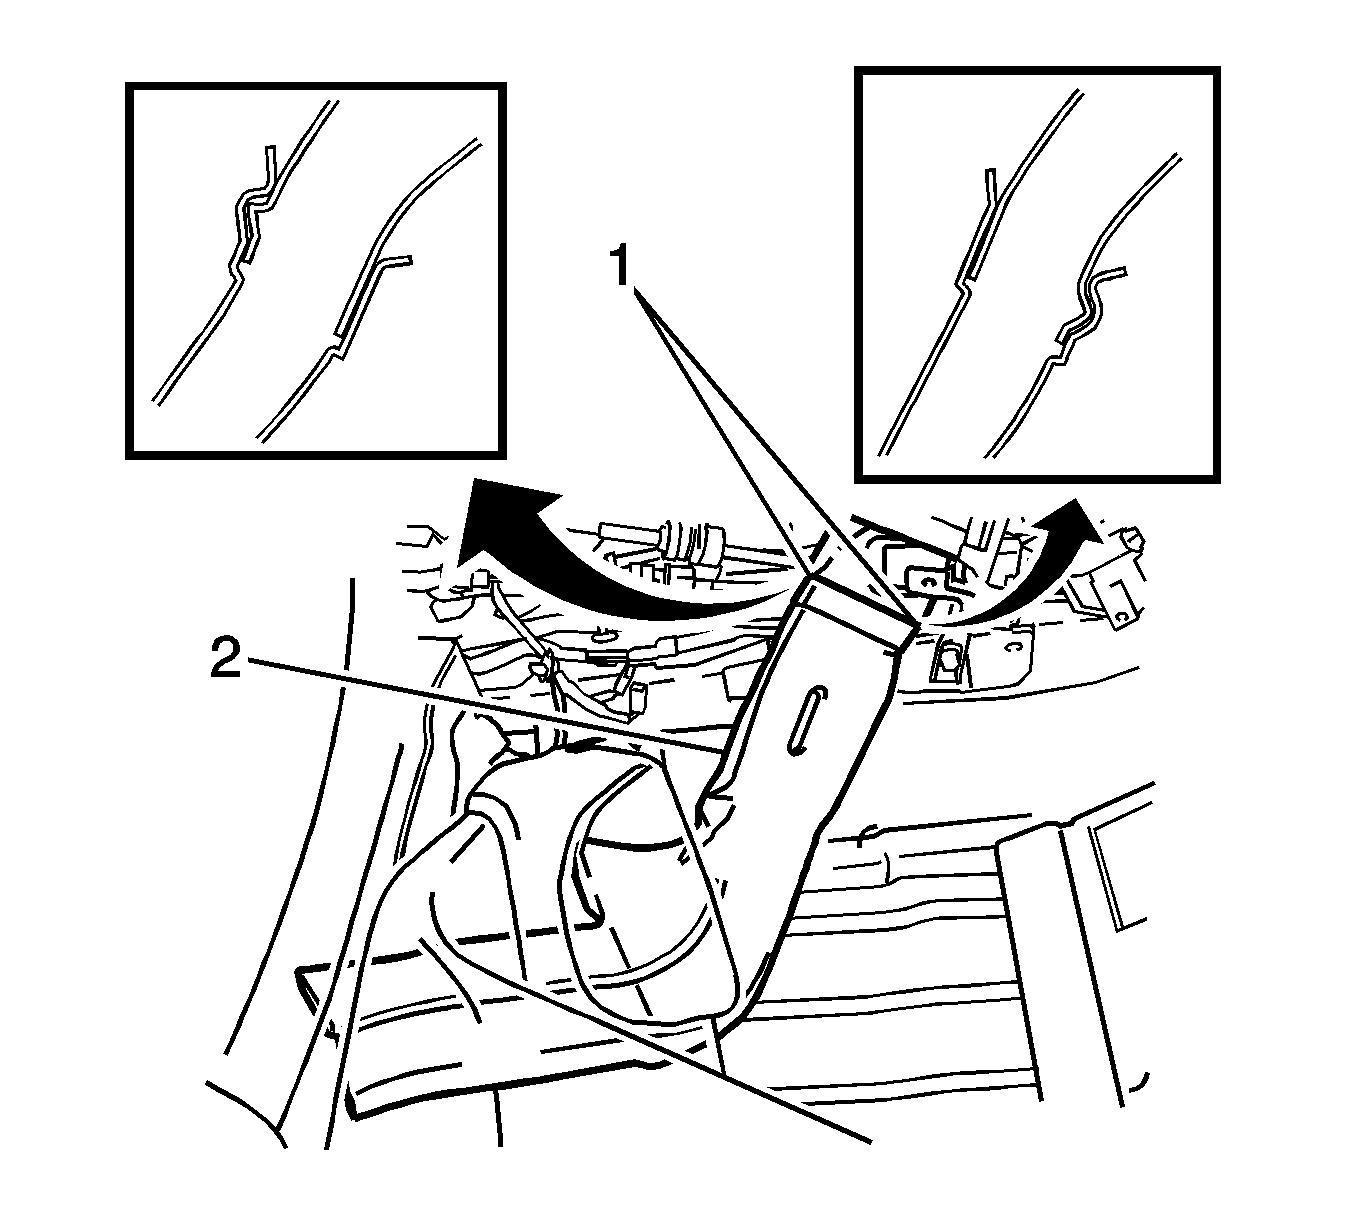
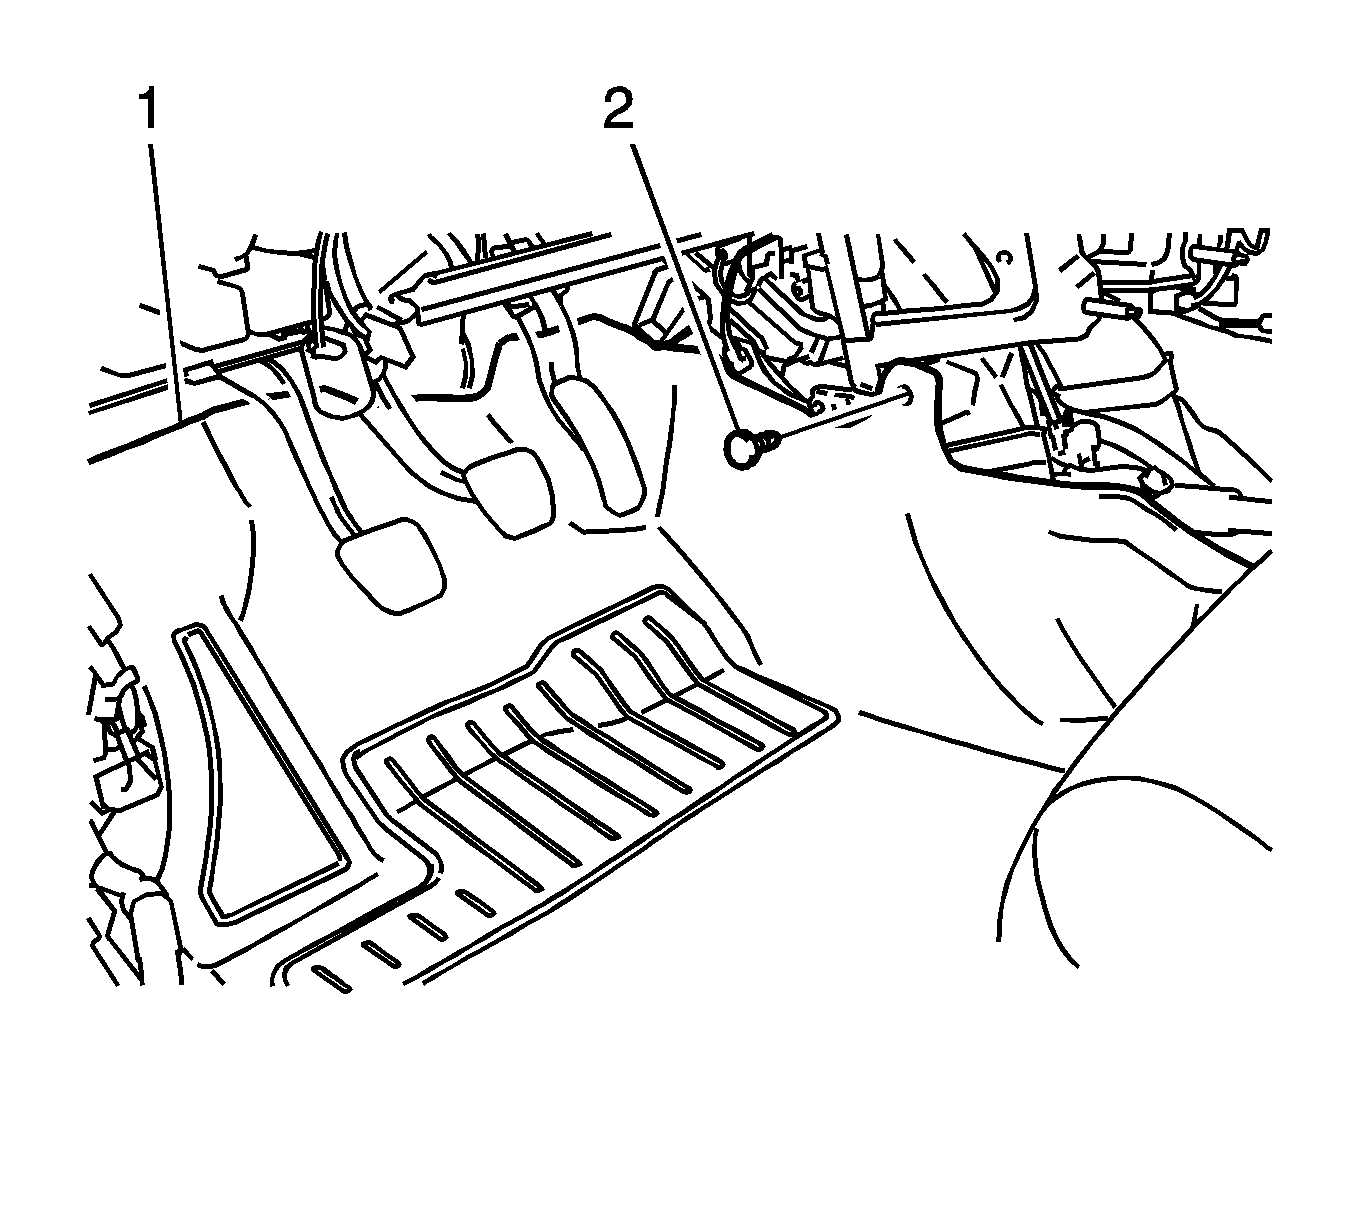
- Remove the clip (1).
- Turn back the driver side floor carpet (2).
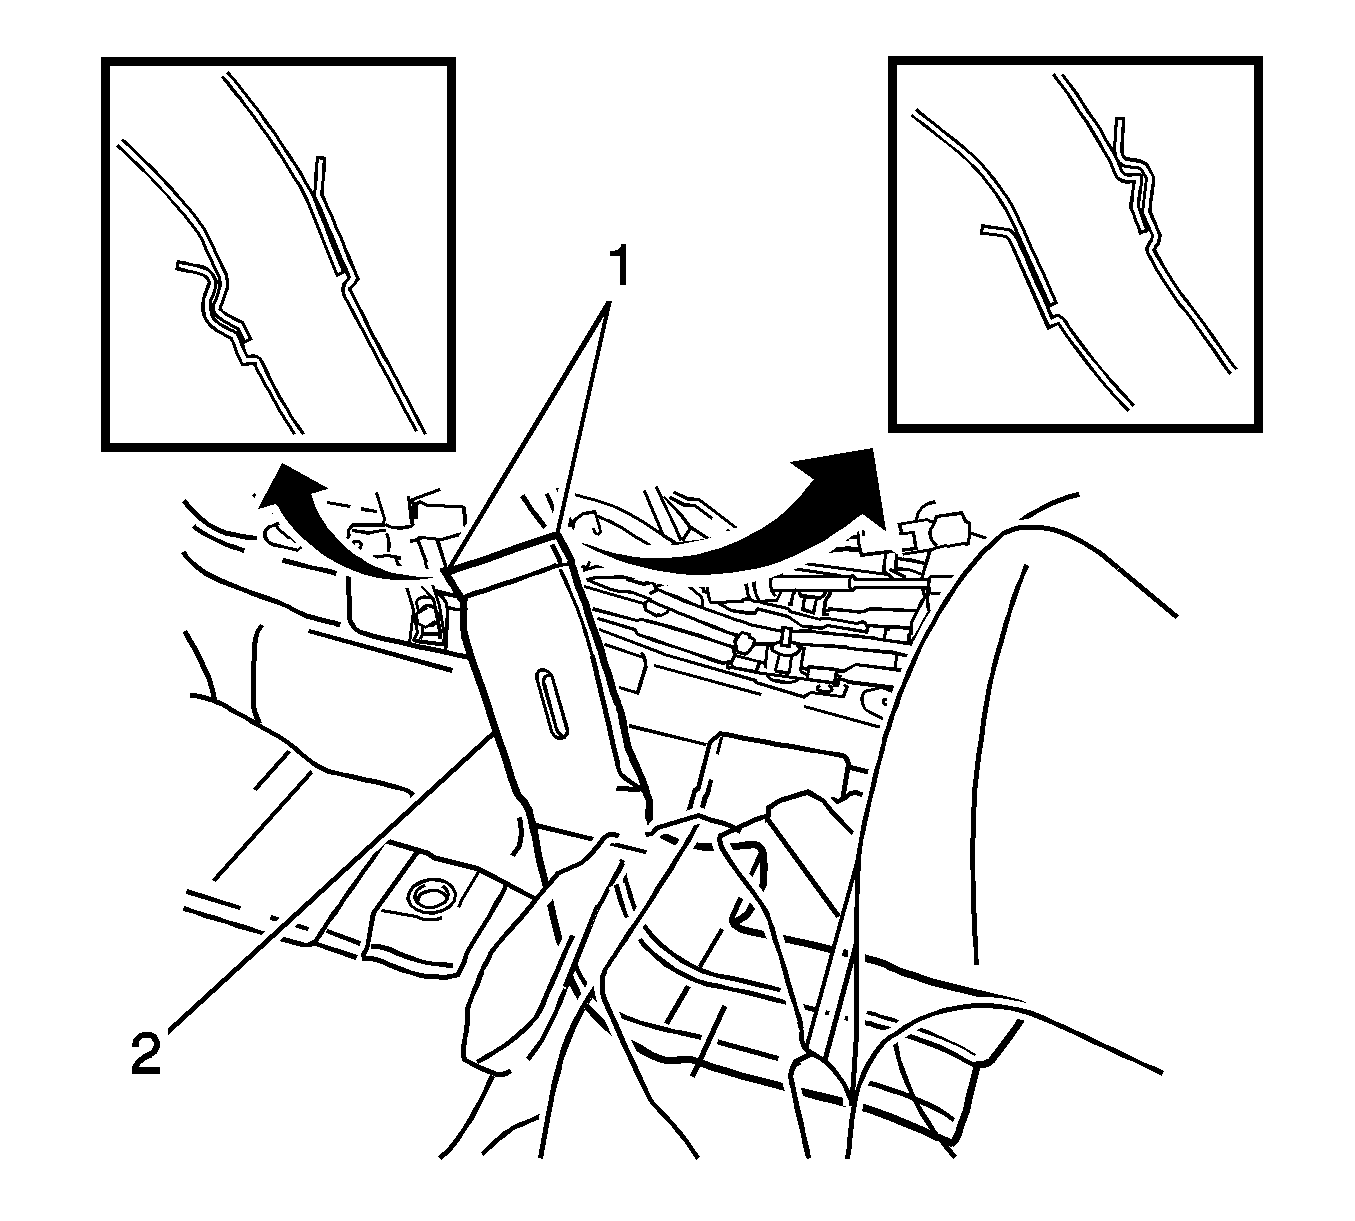
- Disengage the two clips (1) and remove the driver side rear air duct (2).
- Remove the clip (1).
- Turn back the passenger side floor carpet (2).
- Disengage the two clips (1) and remove the passenger side rear air duct (2).
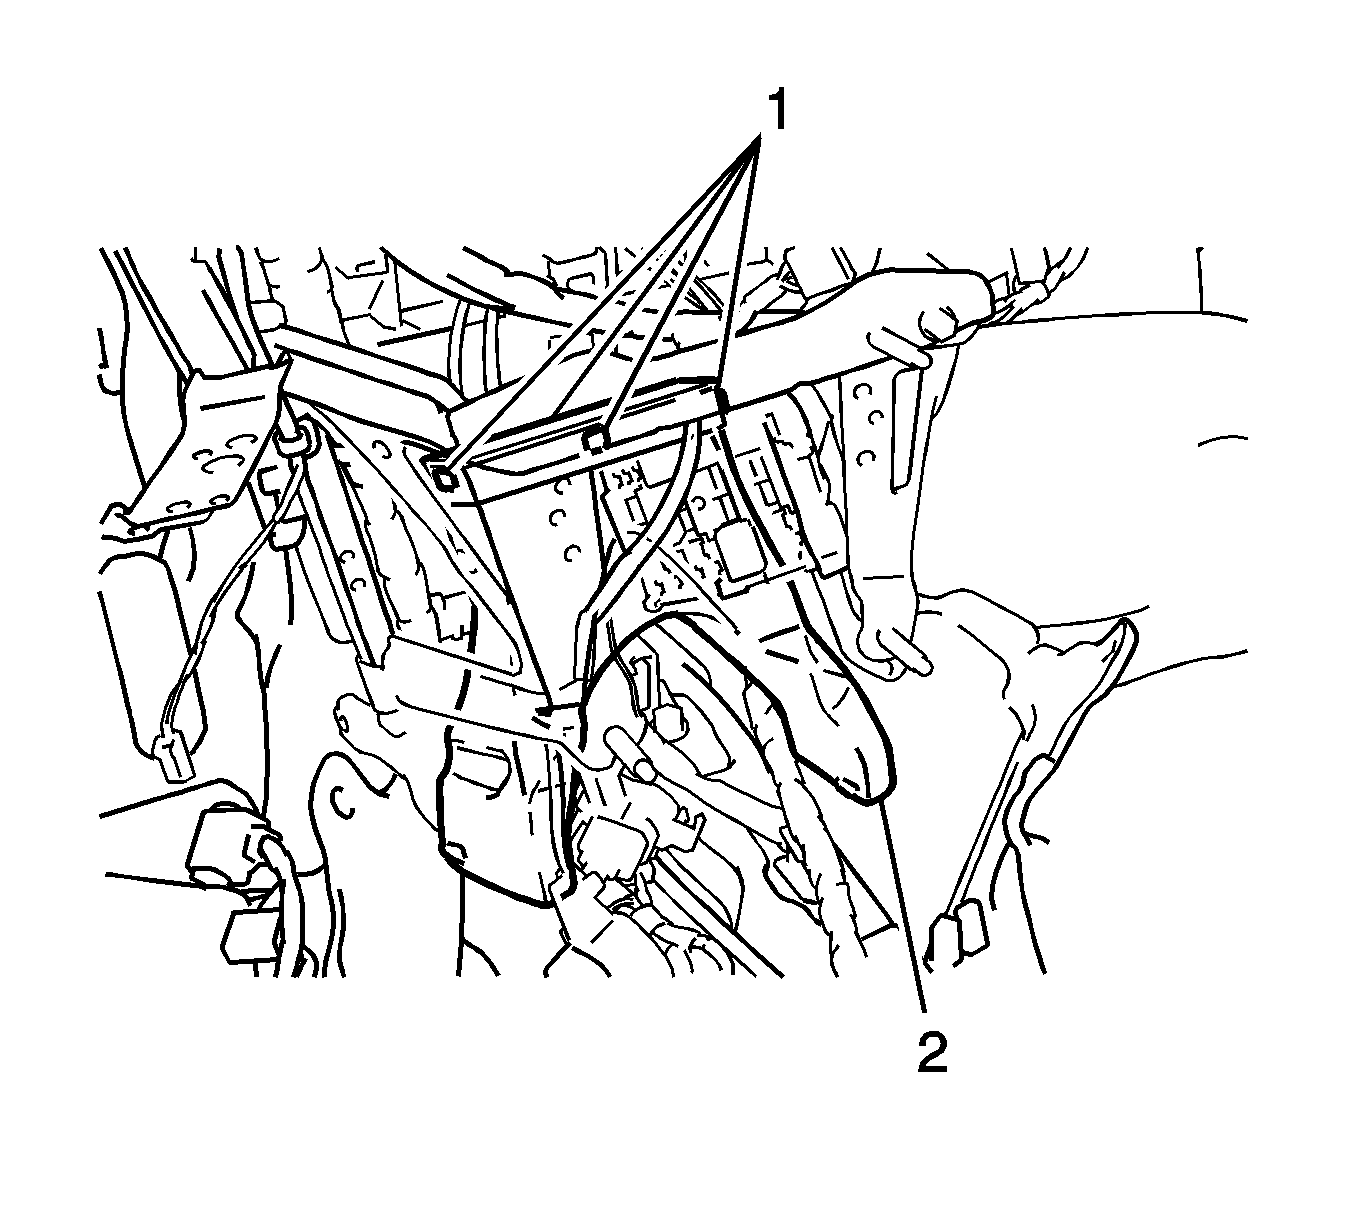
- Disengage the four clips (1) and remove the center air duct (2).
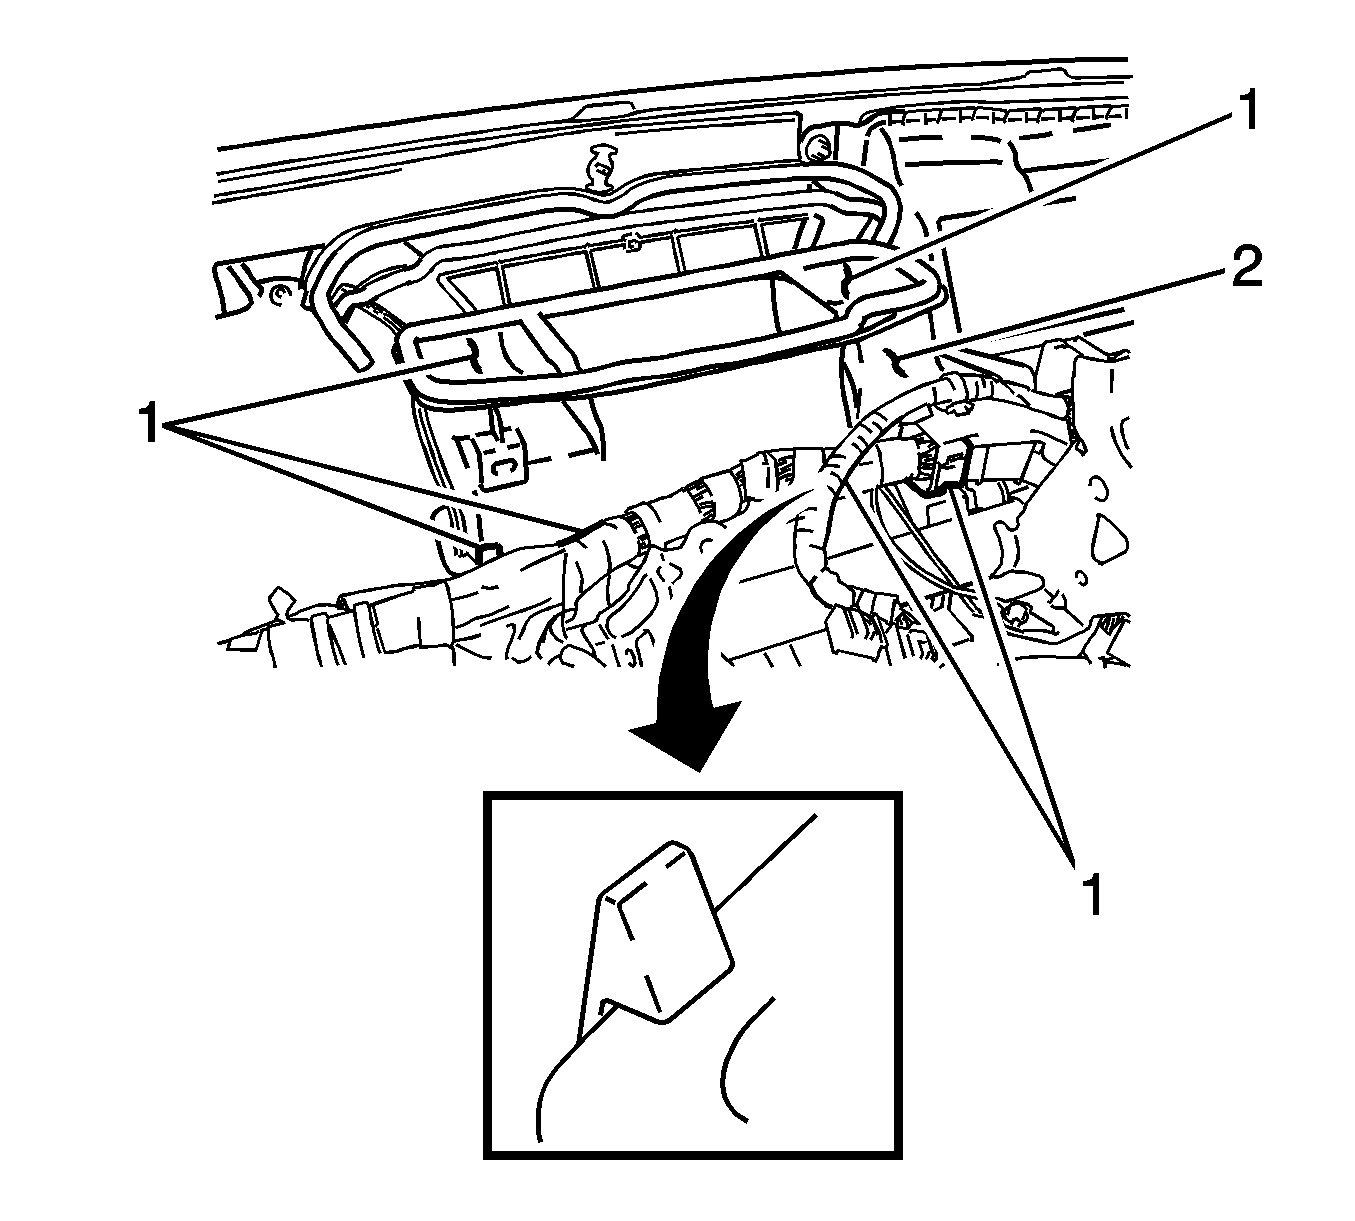
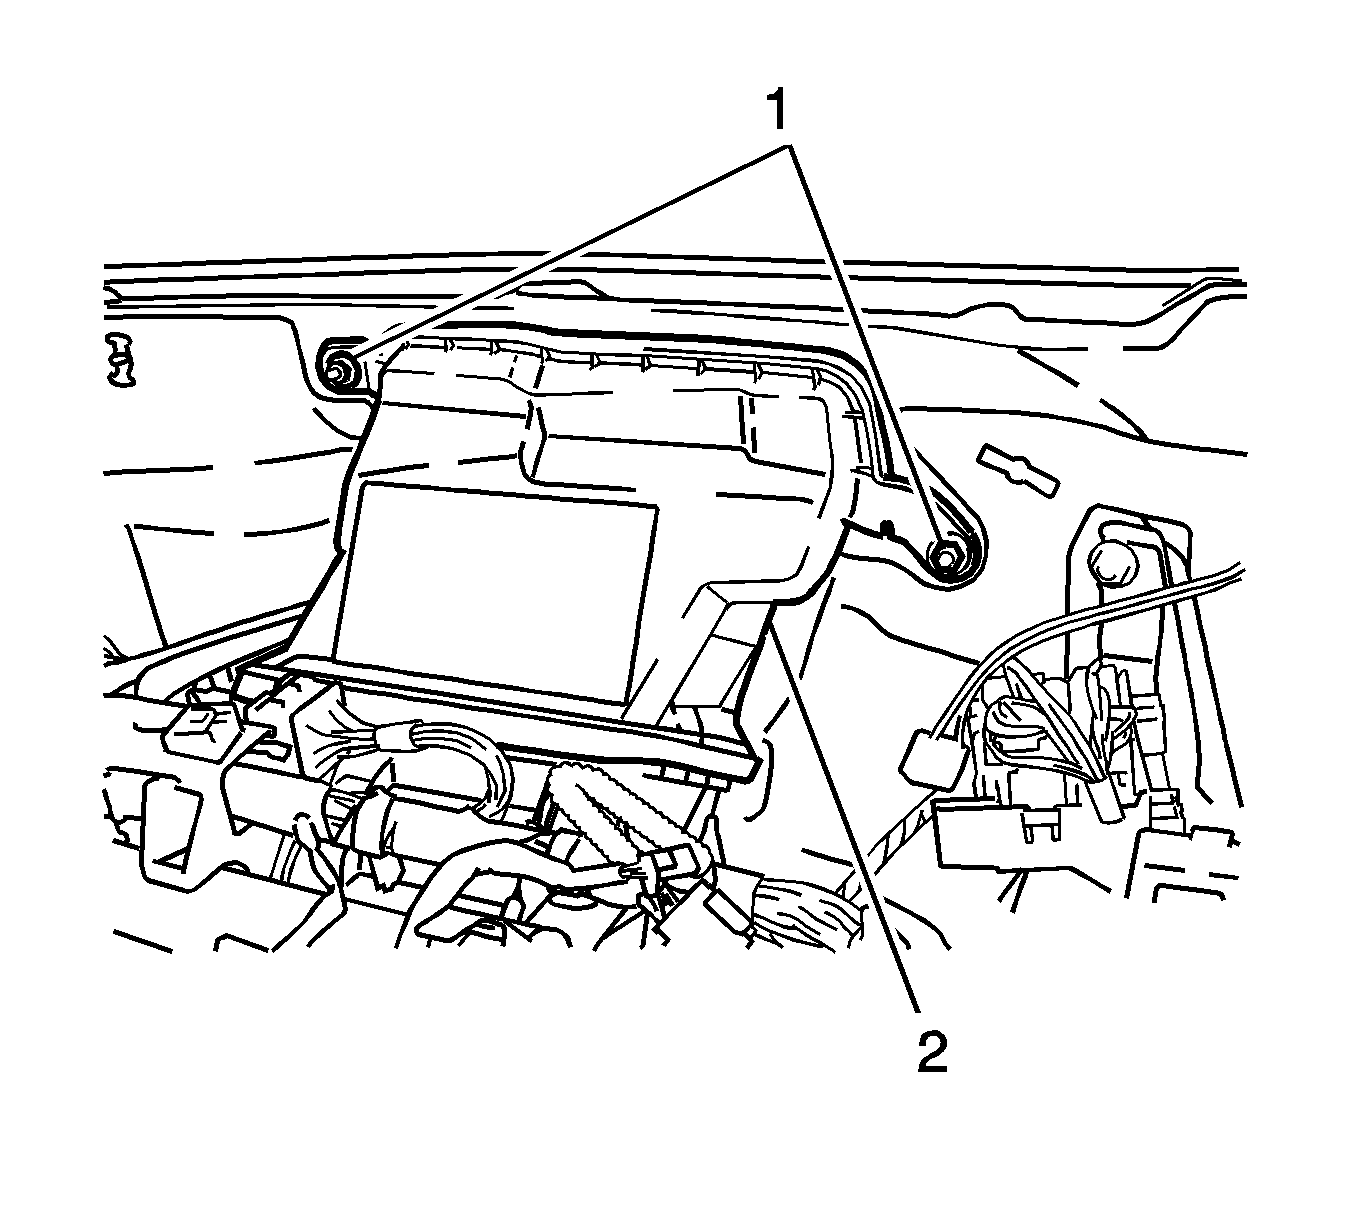
- Disengage the six retainers (1) from the defroster air duct (2).
- Remove the two nuts (1).
- Remove the defroster air duct (2).
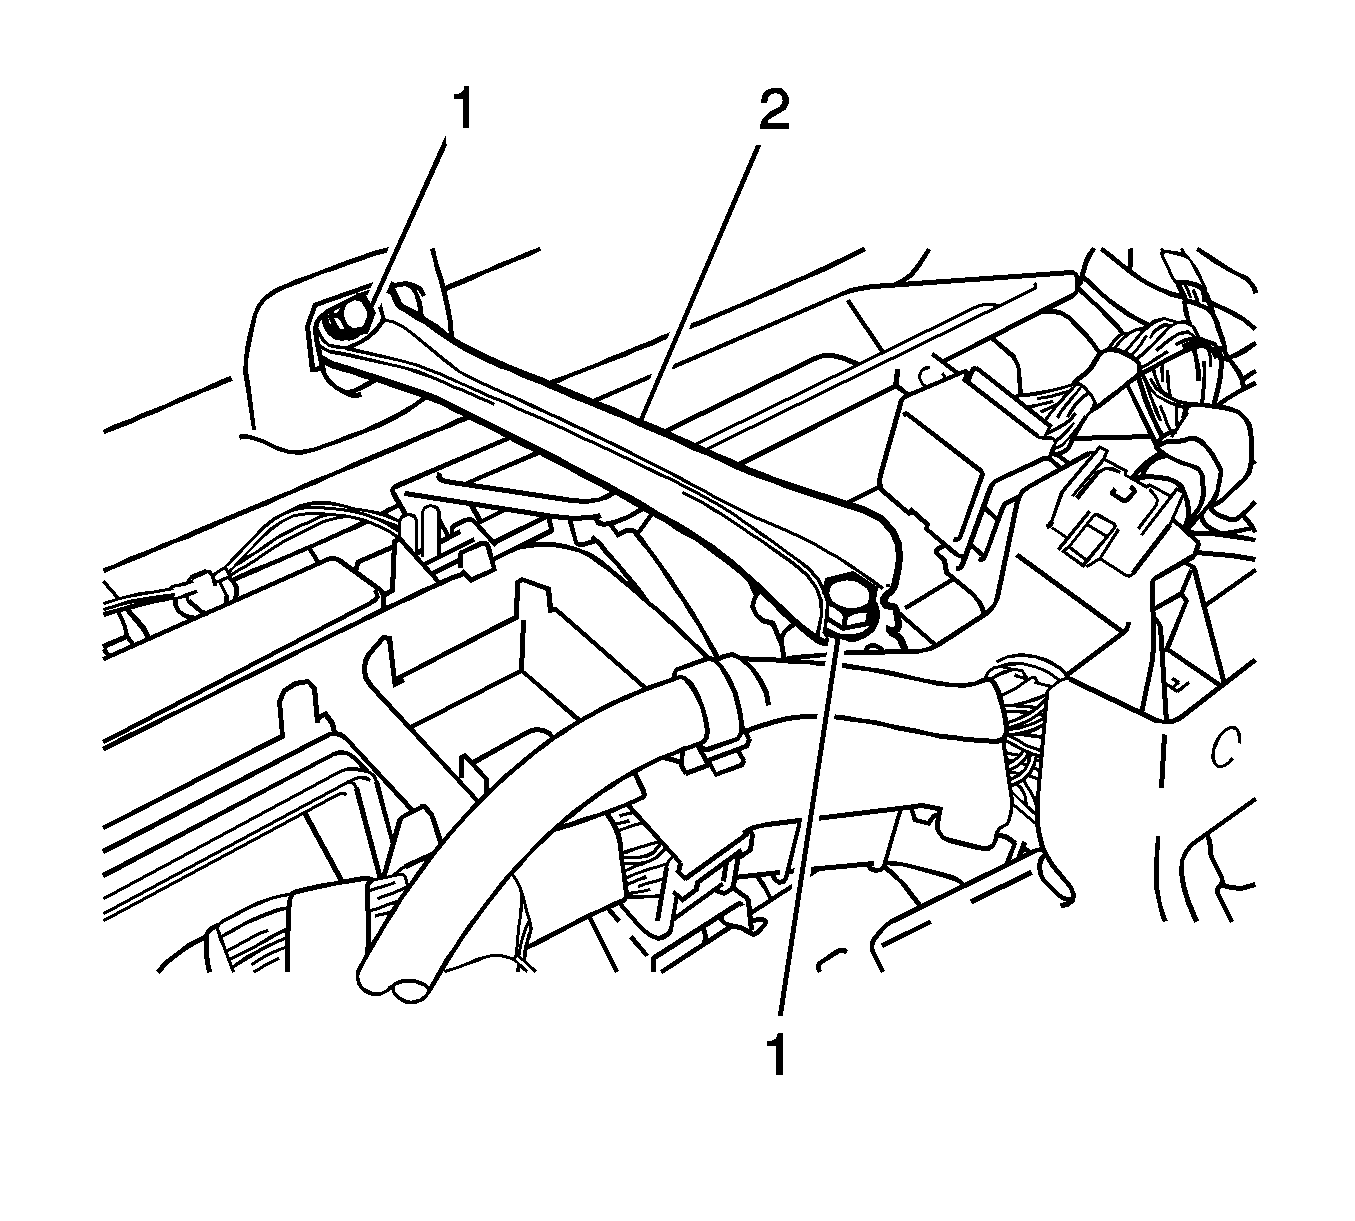
- Remove the two bolts (1) and the center instrument panel to cowl brace (2).
- Remove the theft deterrent module. Refer to Theft Deterrent Module Replacement.
- Remove the power steering control module. Refer to Electronic Power Steering Motor Control Module Replacement.
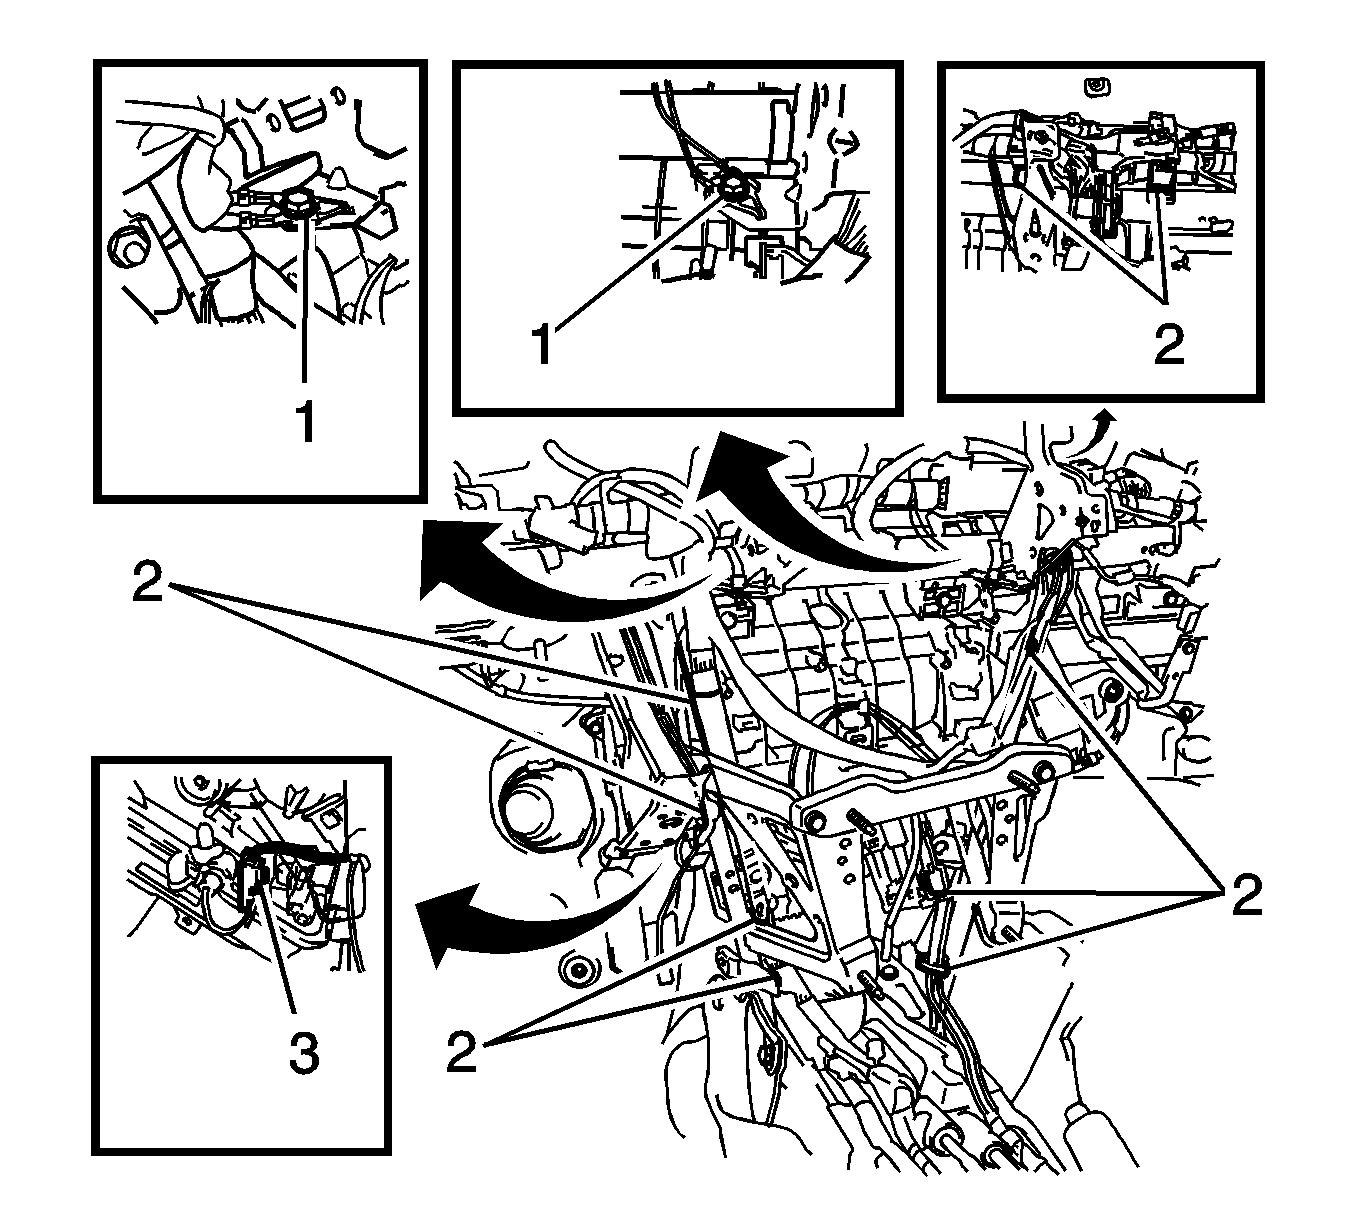
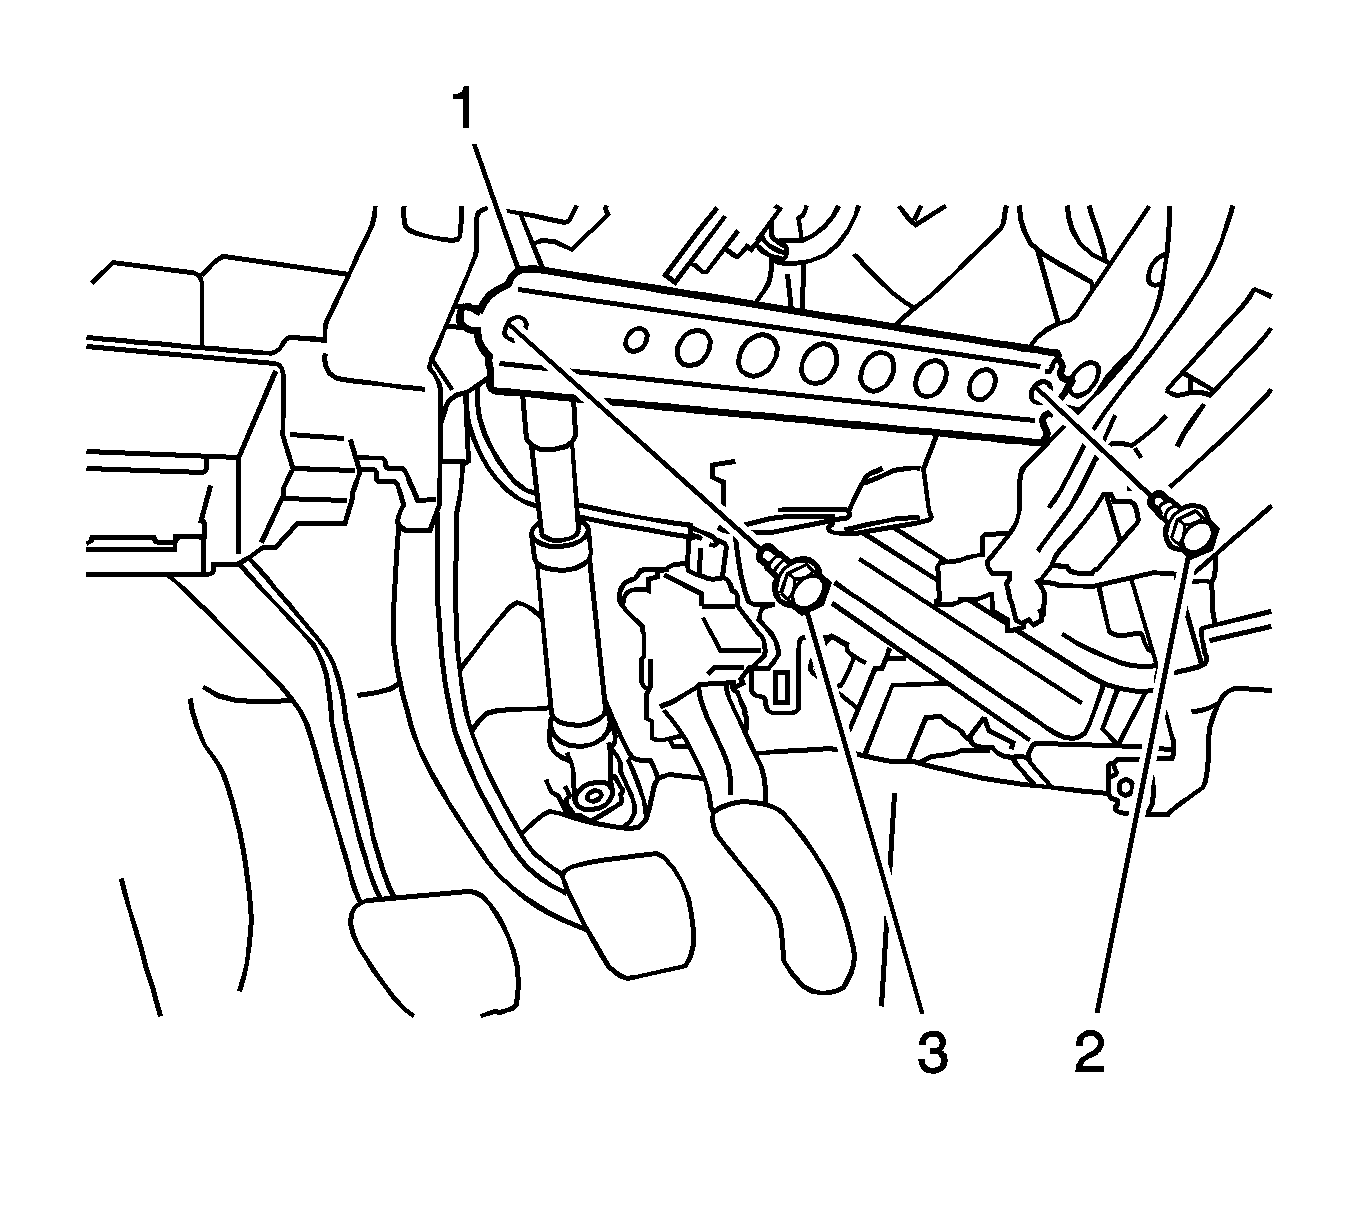
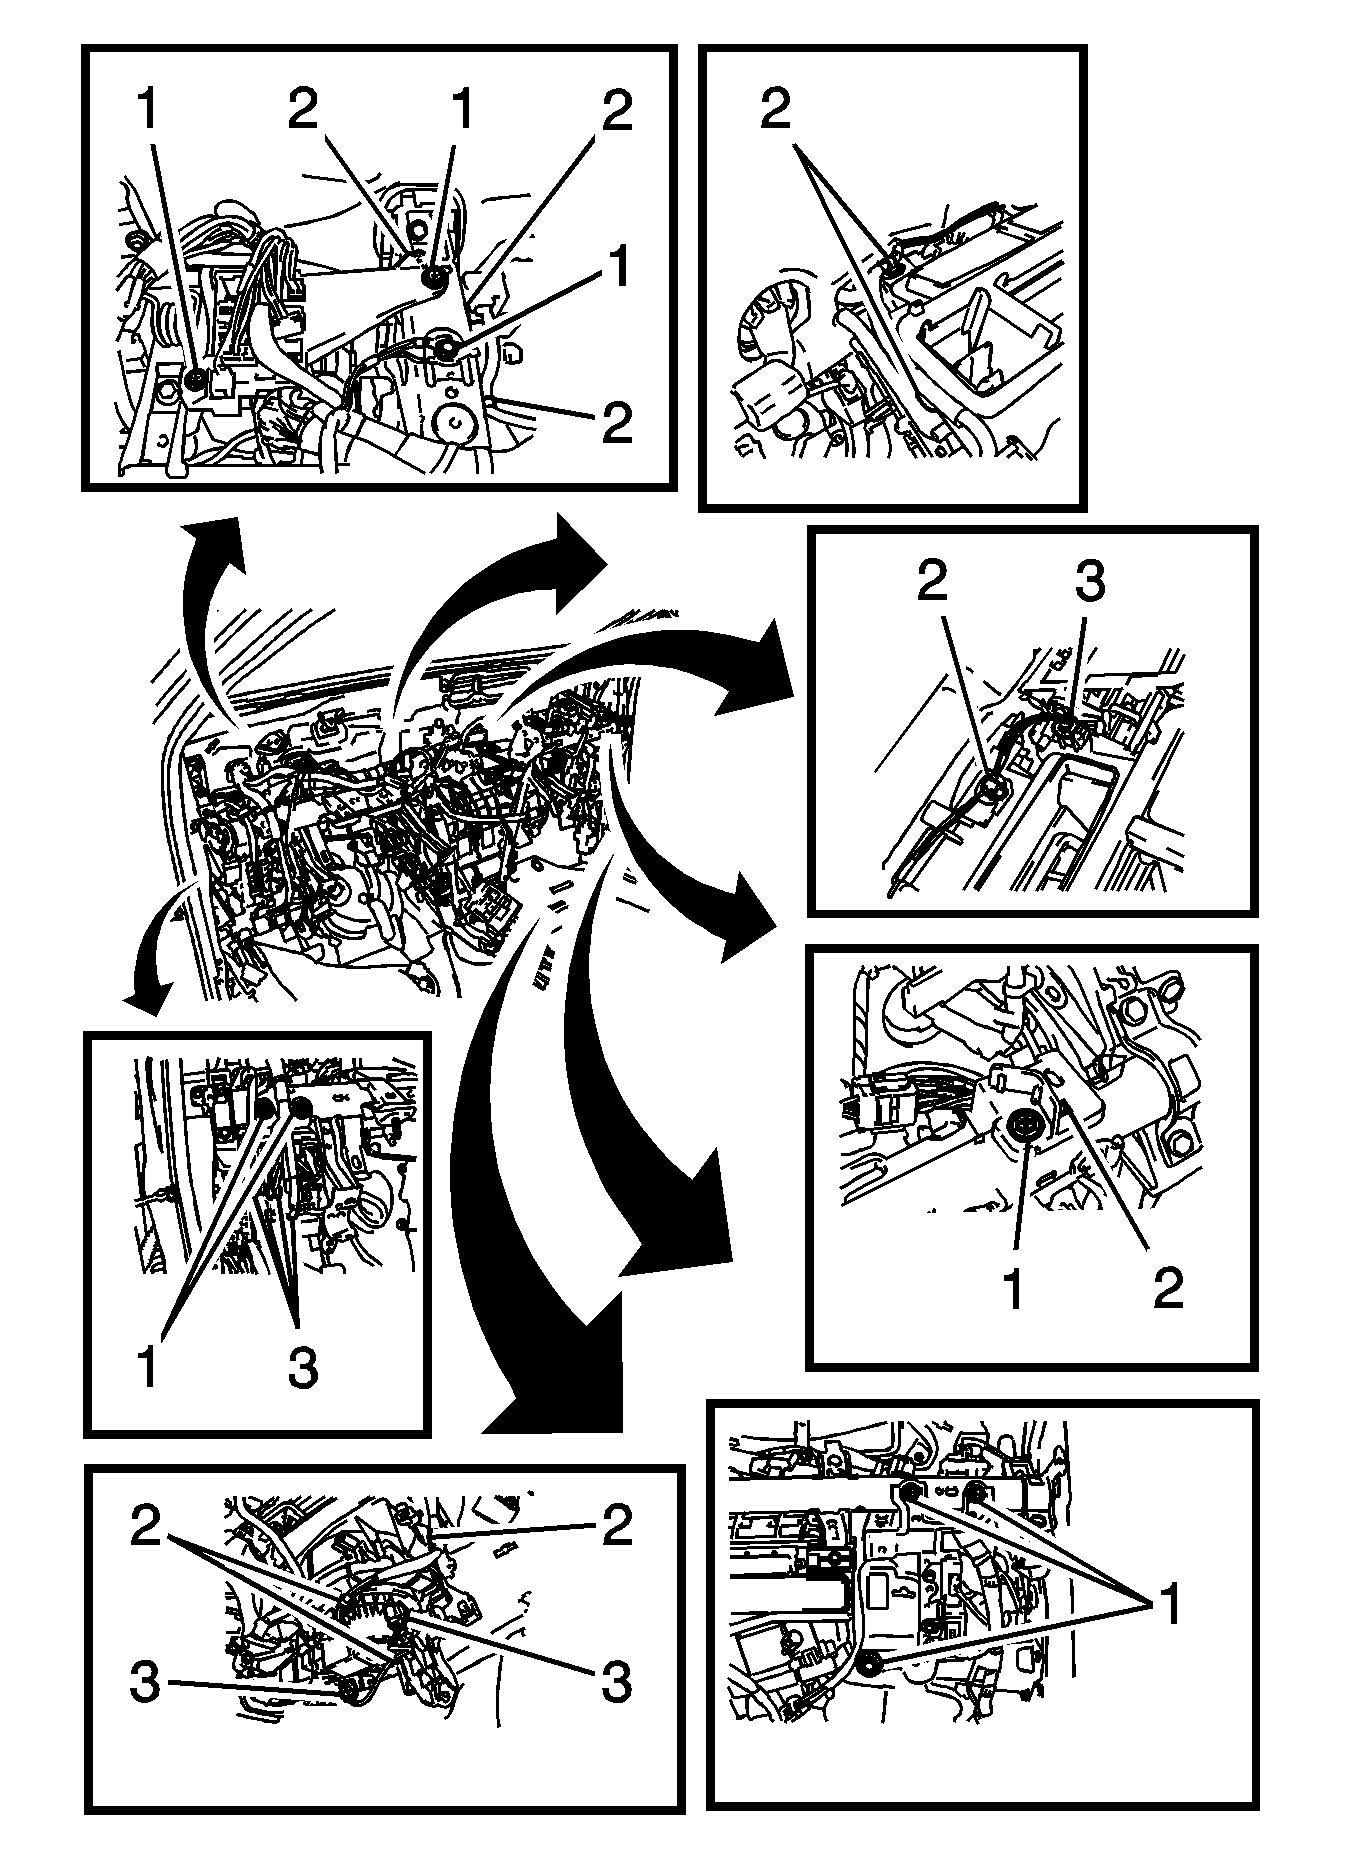
- Remove the two bolts (1).
- Disconnect the electrical connector (3).
- Disengage the clamps (2).
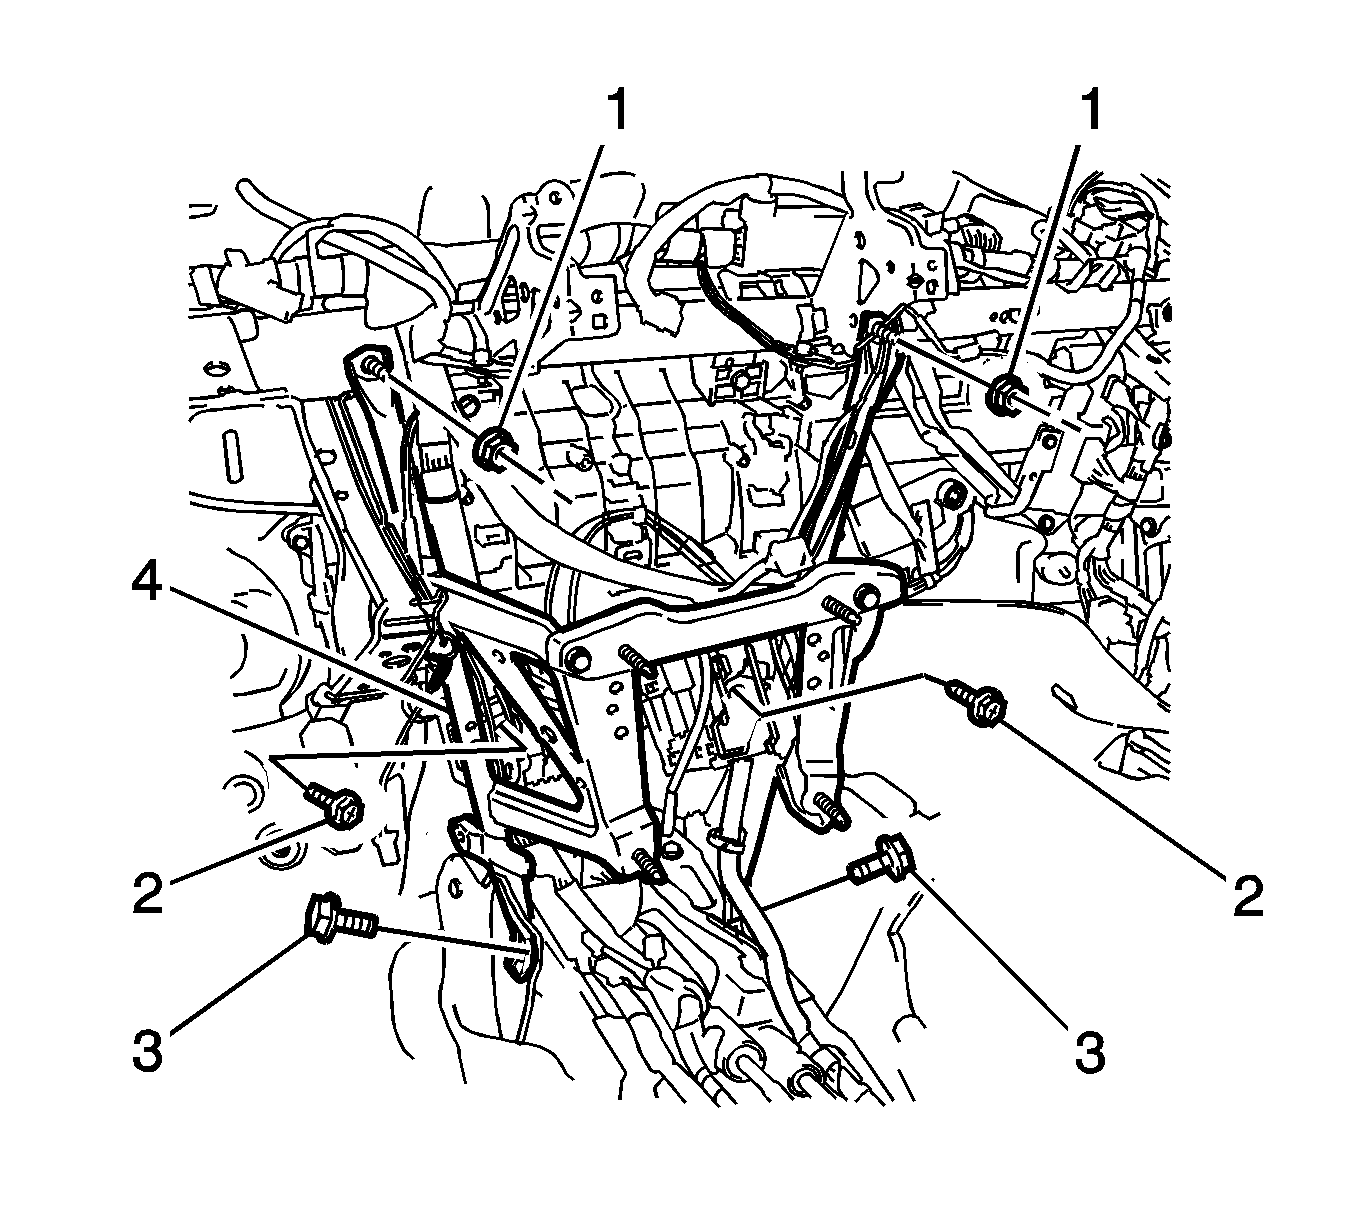
- Remove the two screws (2).
- Remove the two bolts (3).
- Remove the two nuts (1).
- Remove the instrument panel brace (4).
- Remove the 2 bolts (2), (3) and instrument panel sub reinforcement (1).
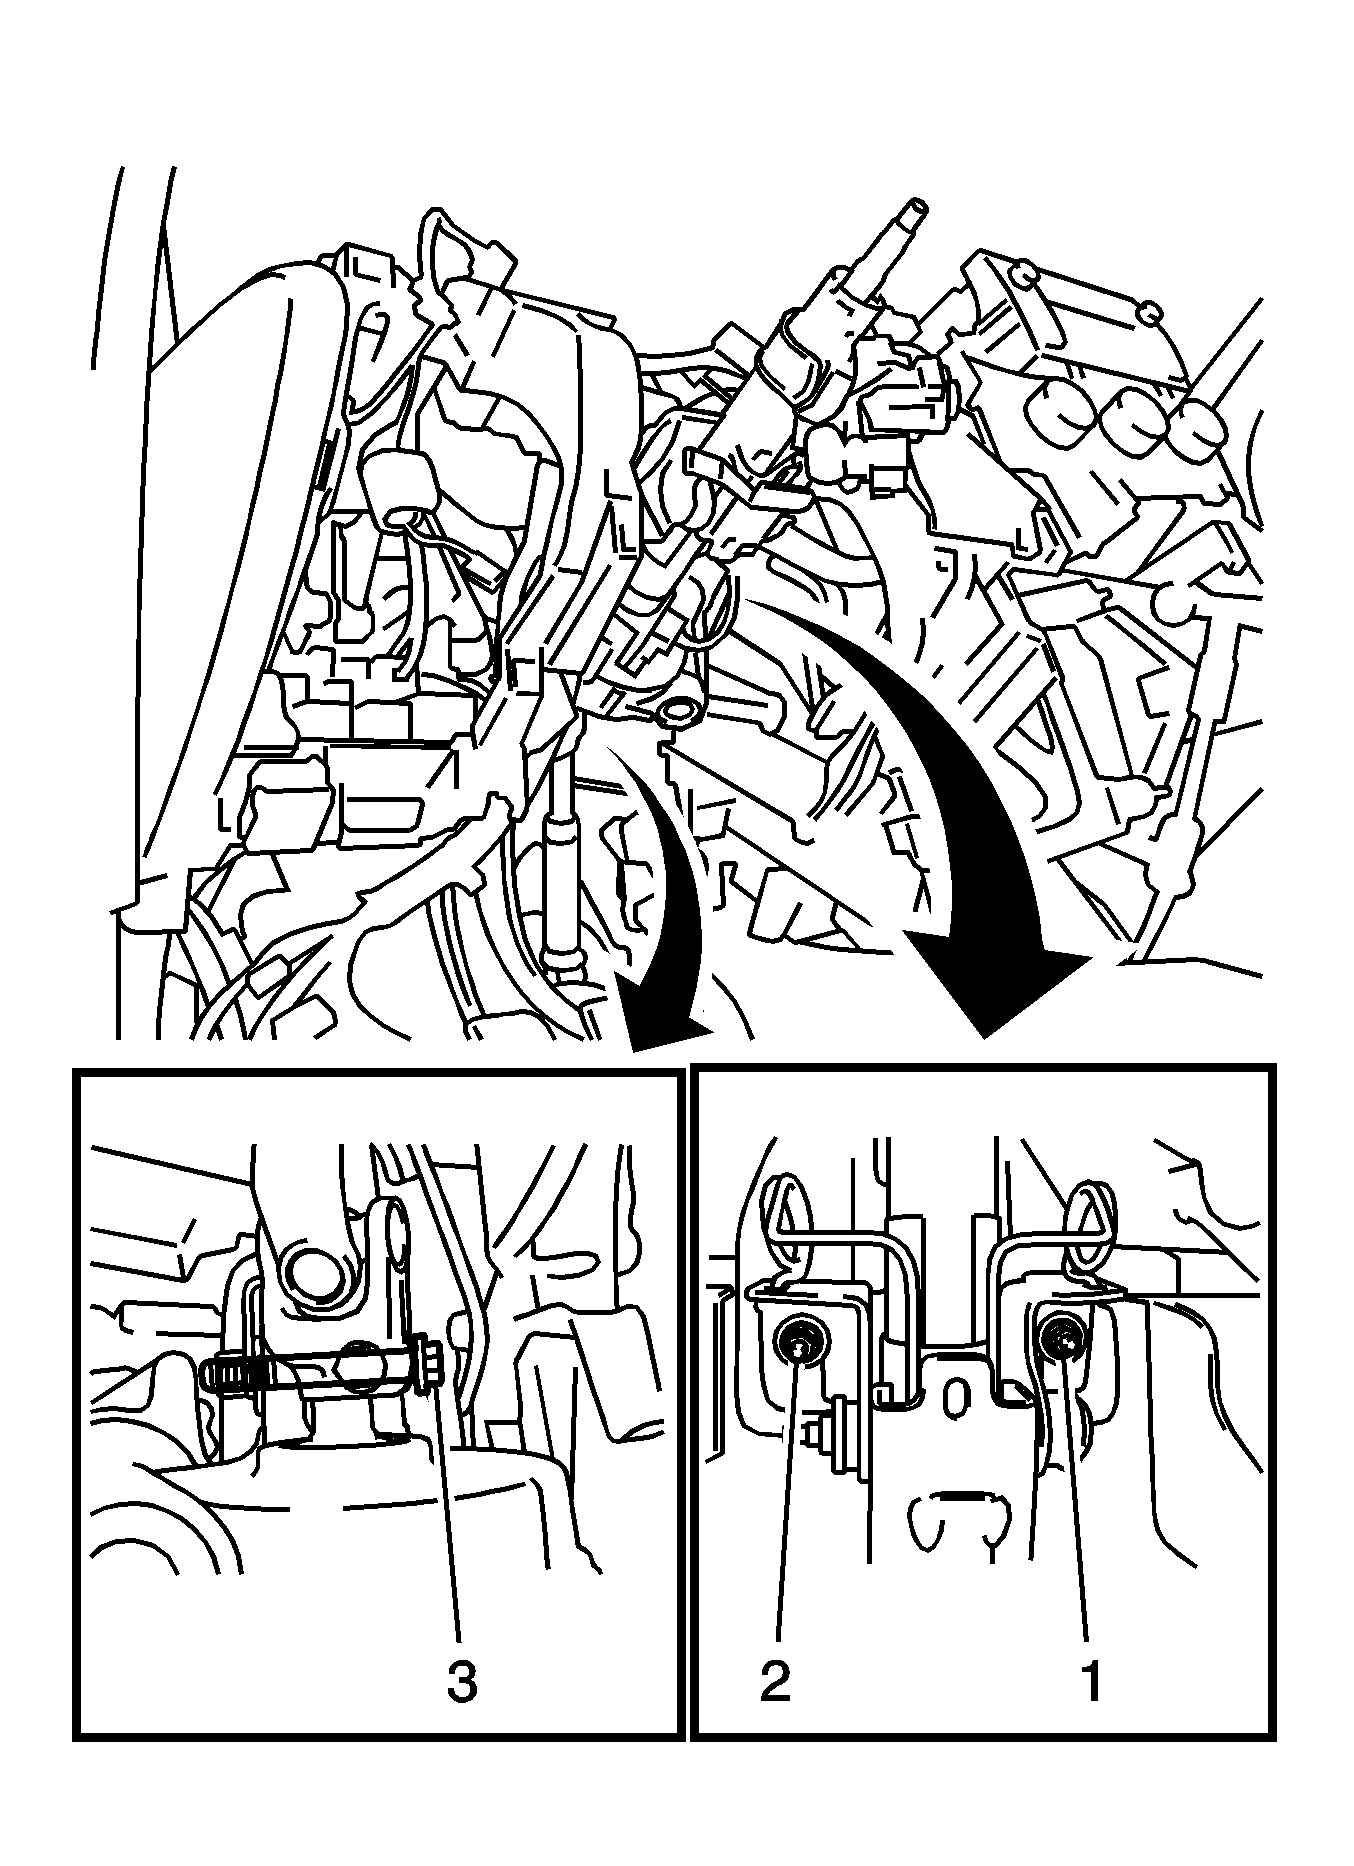
- Separate the wire harness clamps from the steering column.
- Remove the bolt (3) and the 2 nuts (1, 2) from the steering column assembly.
- Lower the steering column.
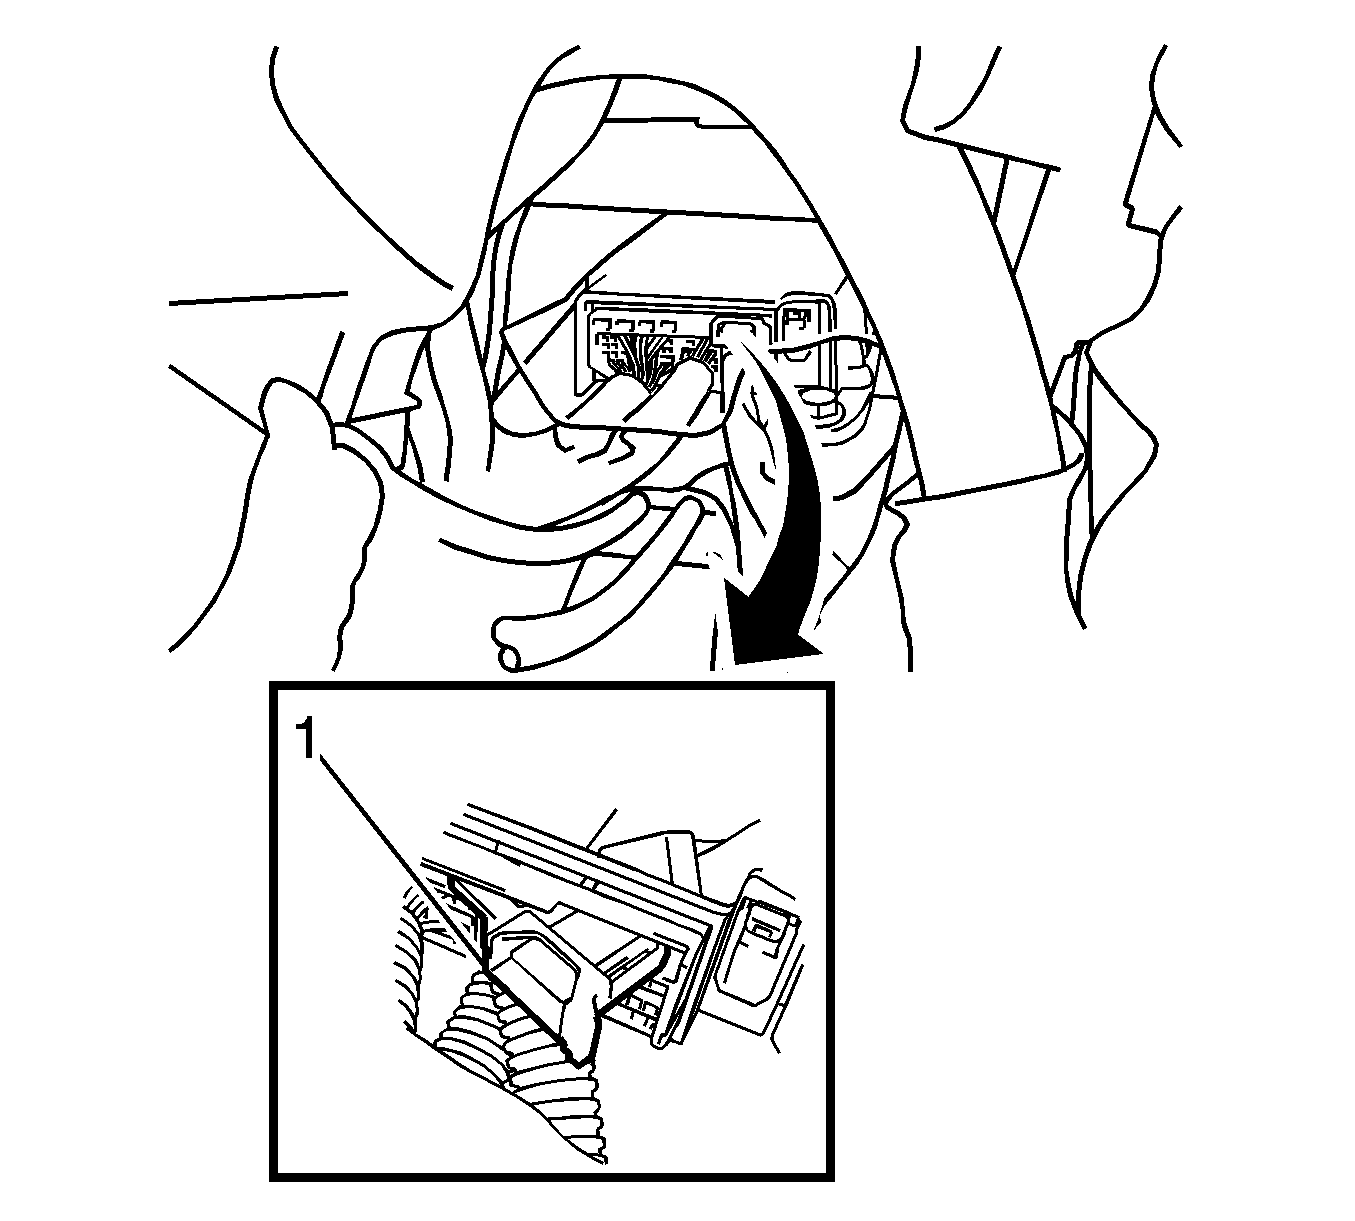
- Disconnect the SDM connectors (1).
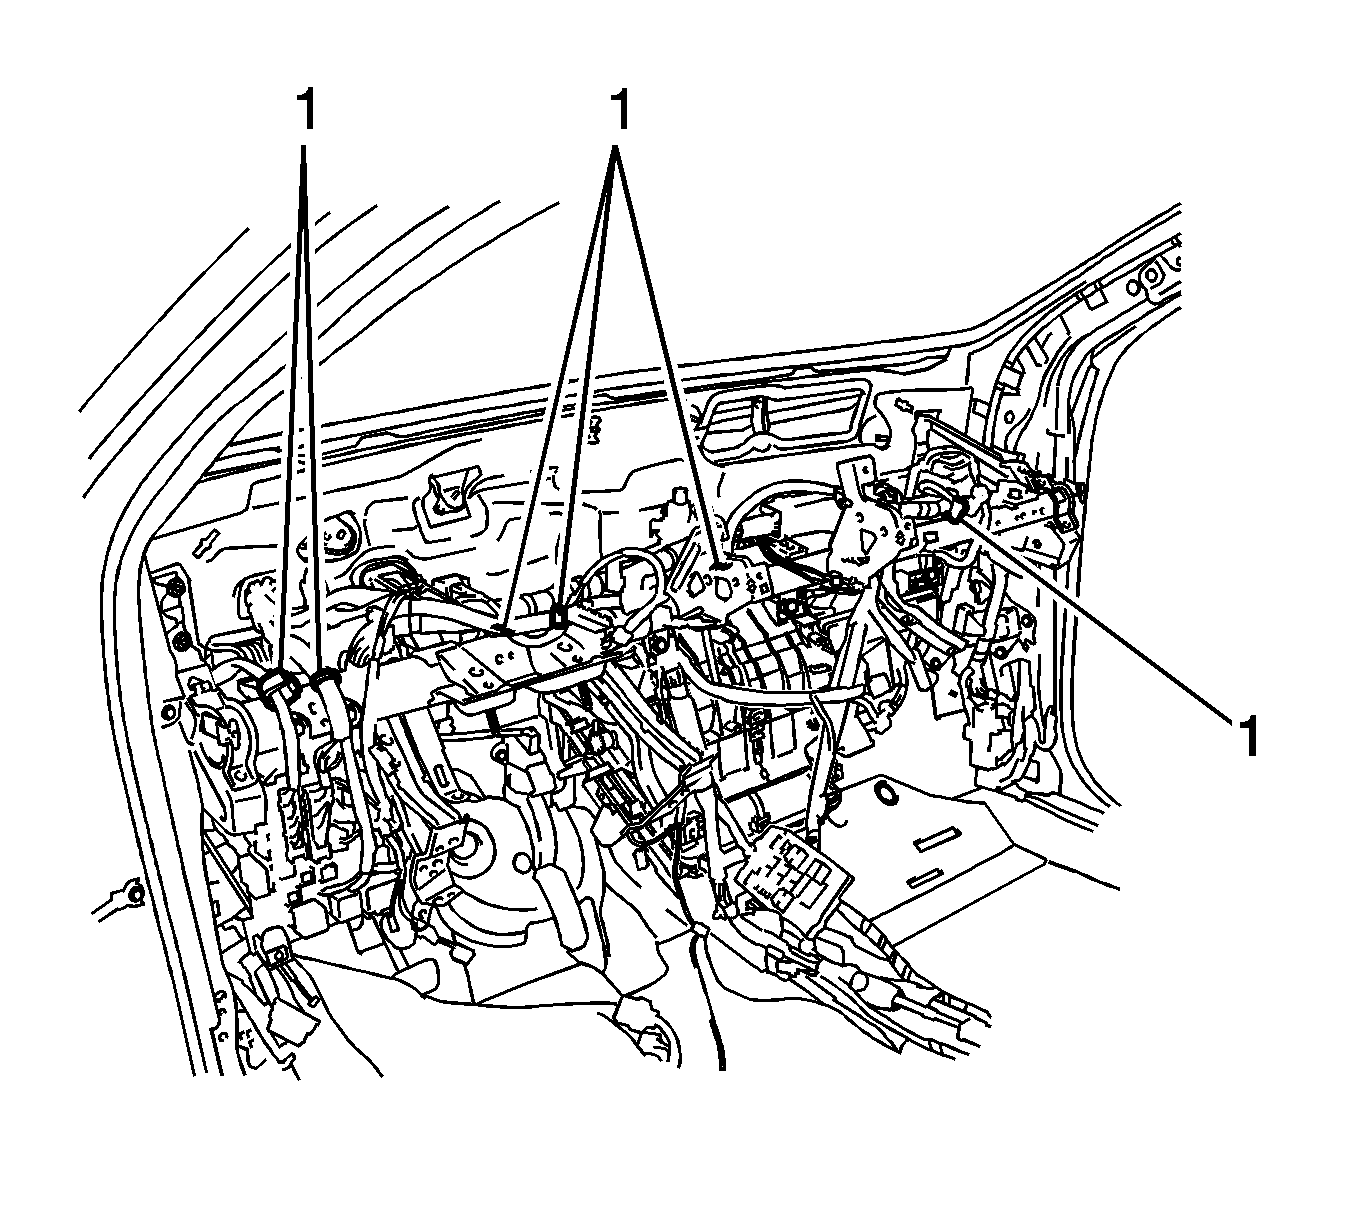
- Disengage the clamps (1) and the wire harness.
- Disconnect the electrical connectors (3).
- Disengage the clamps (2).
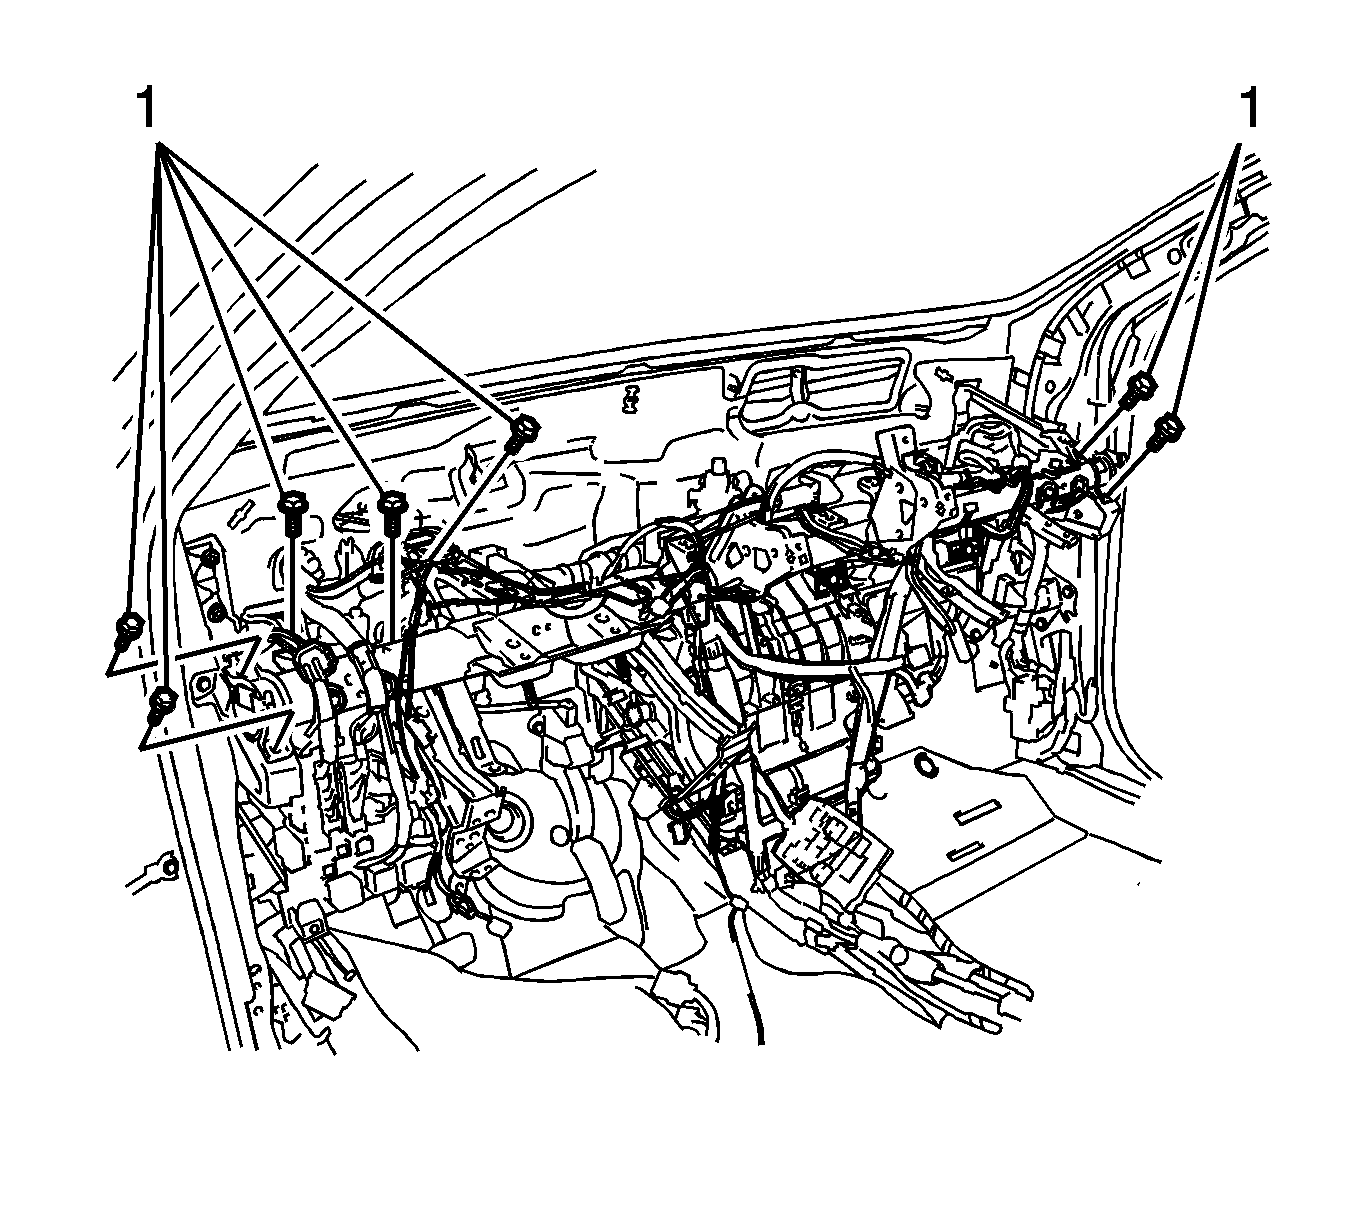
- Remove the nine bolts (1) and disengage wire harness and junction block.
- Remove the seven bolts (1).
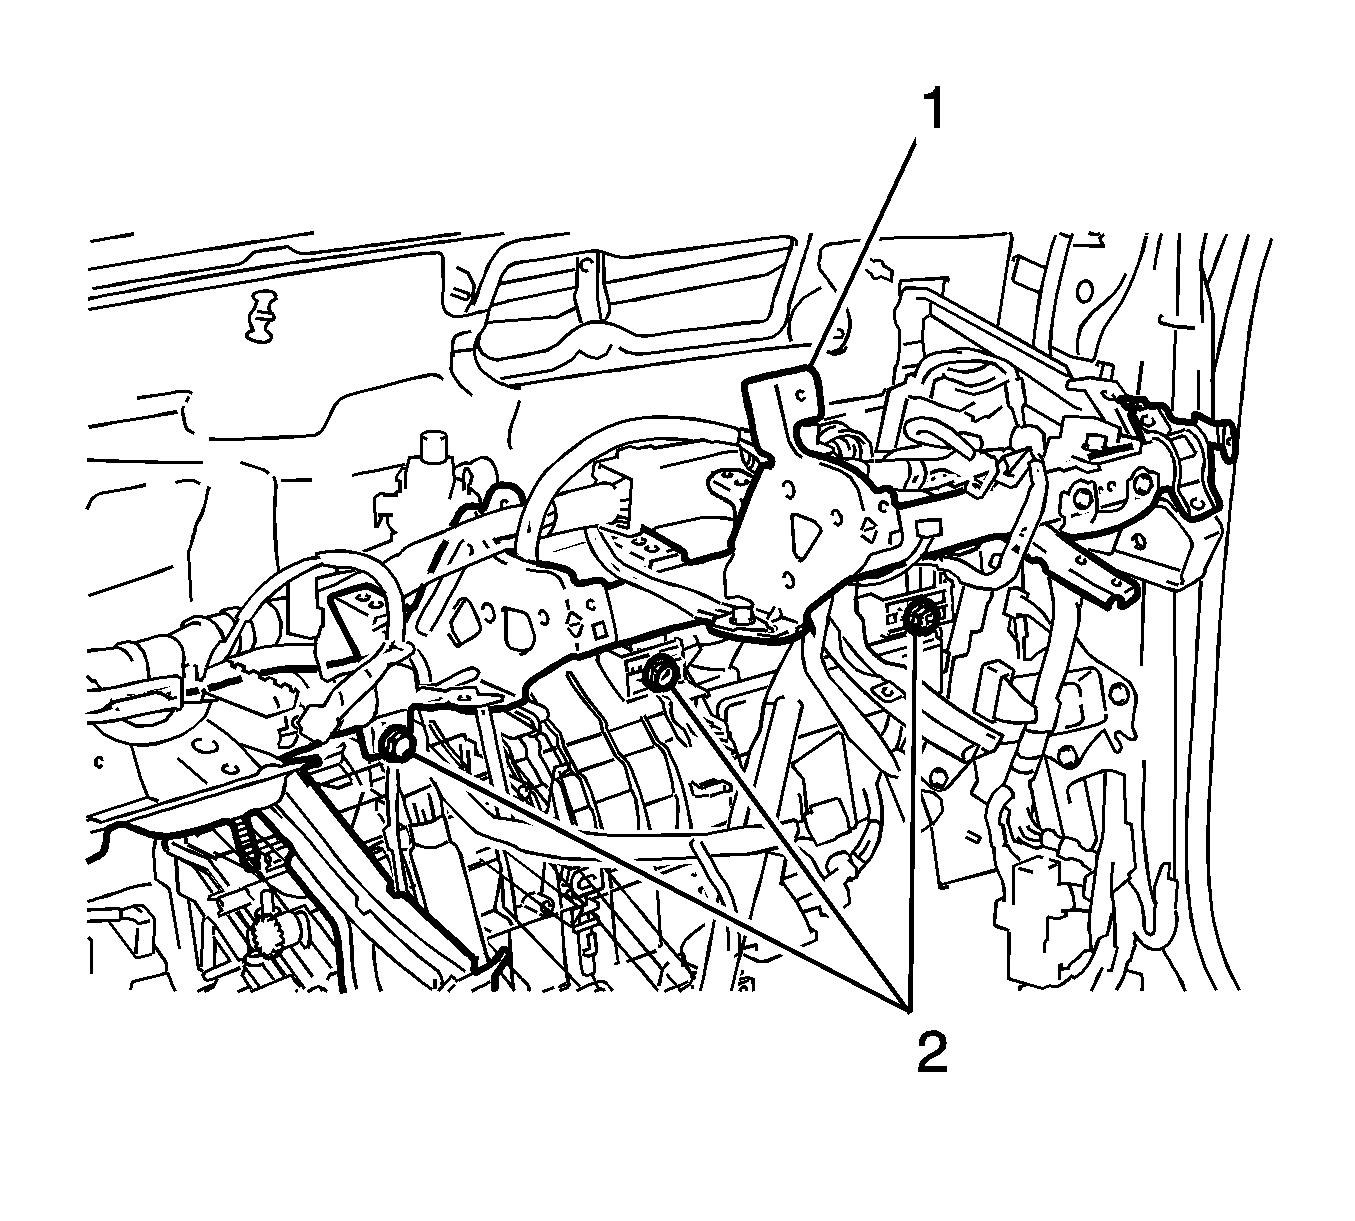
- Remove the three bolts (2).
- Remove the instrument panel reinforcement assembly (1).
- Disengage the drain cooler hose.
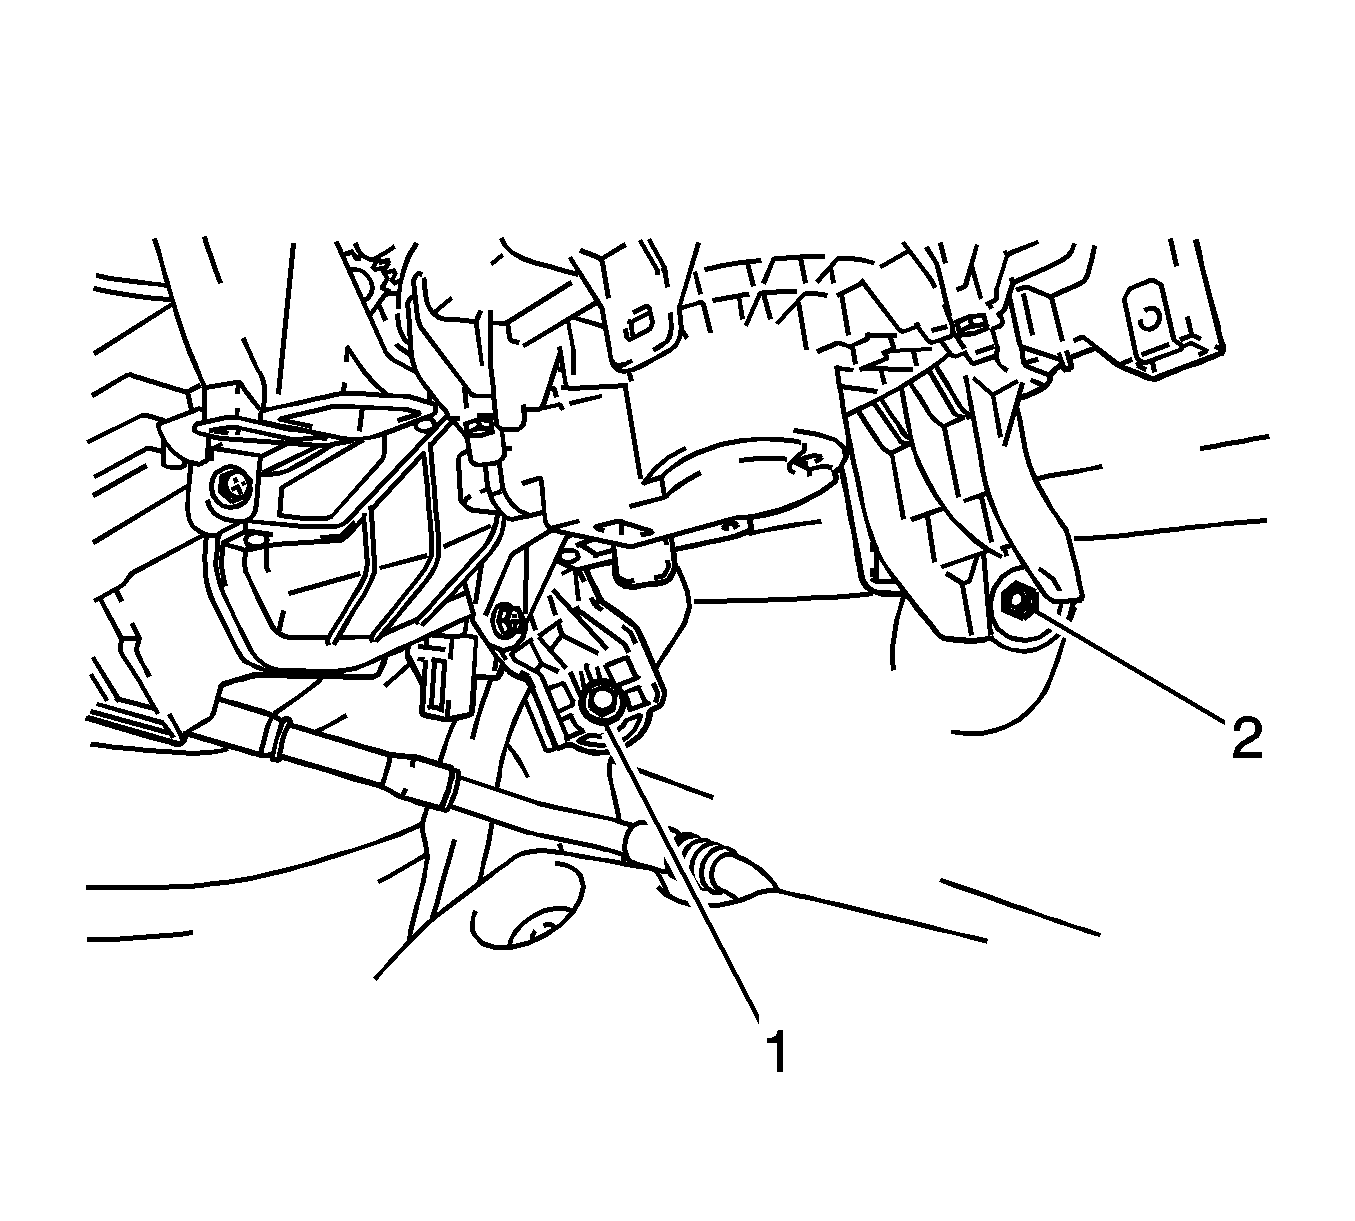
- Remove the bolt (1).
- Remove the nut (2).
- Remove the HVAC module assembly from the vehicle.
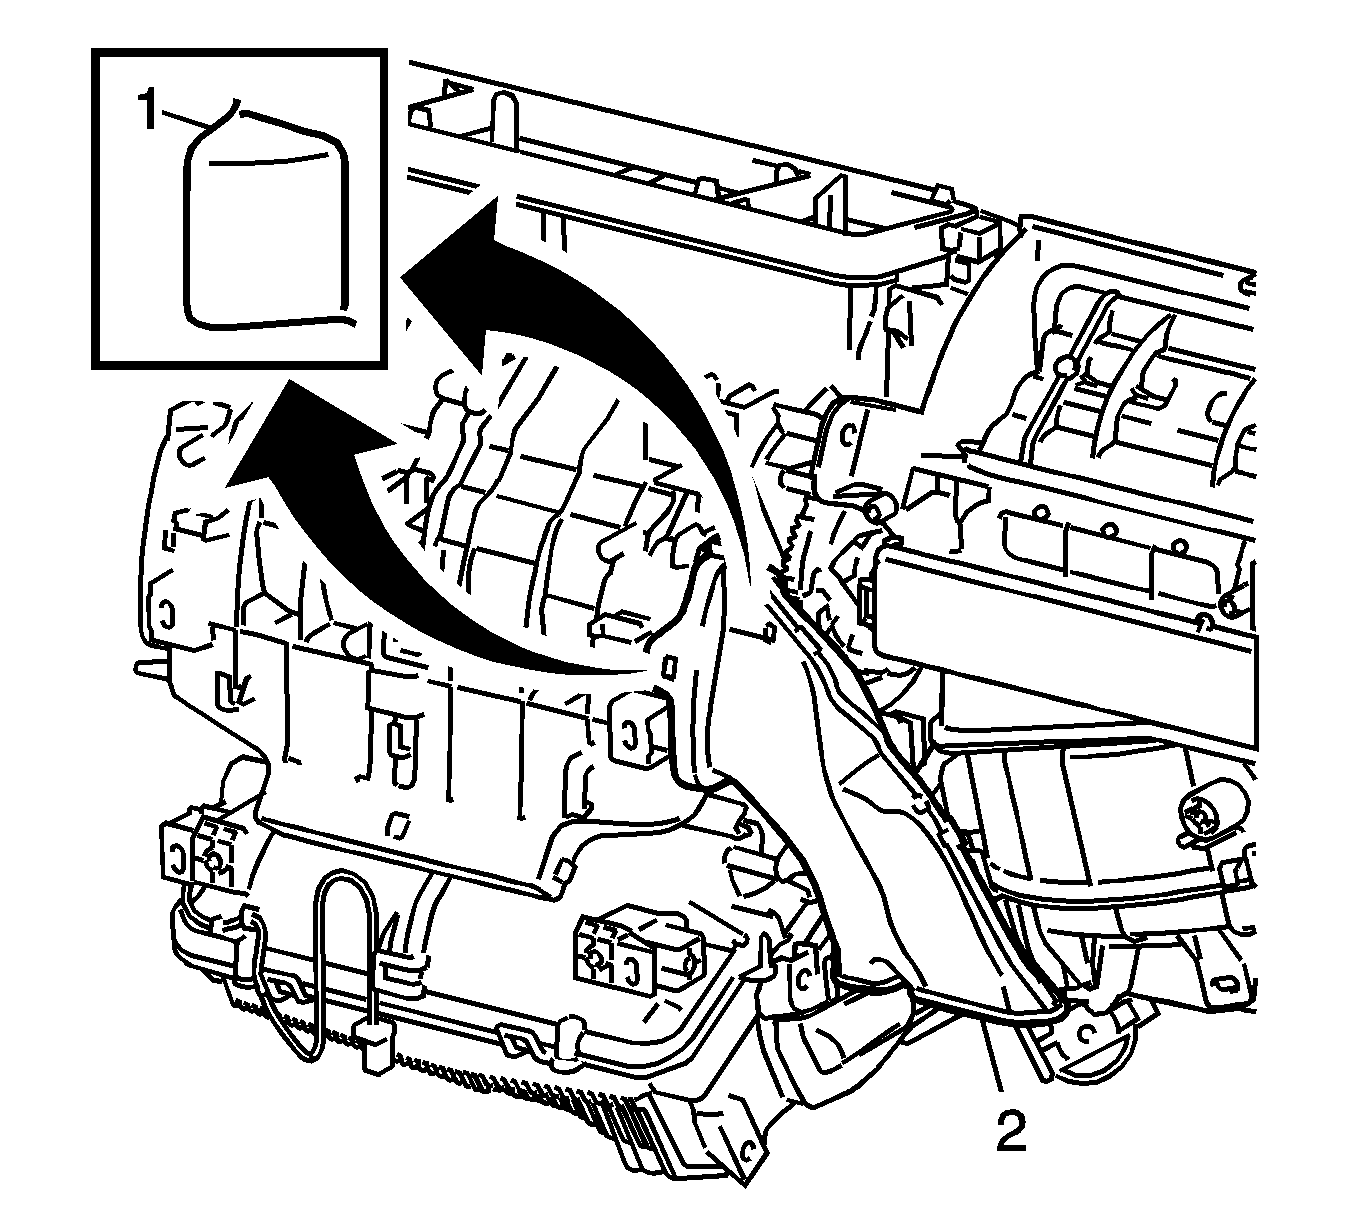
- Disengage the two clips (1).
- Remove the air duct (2) from the HVAC module.
- Remove the blower case from the HVAC module. Refer to Blower Case Replacement.
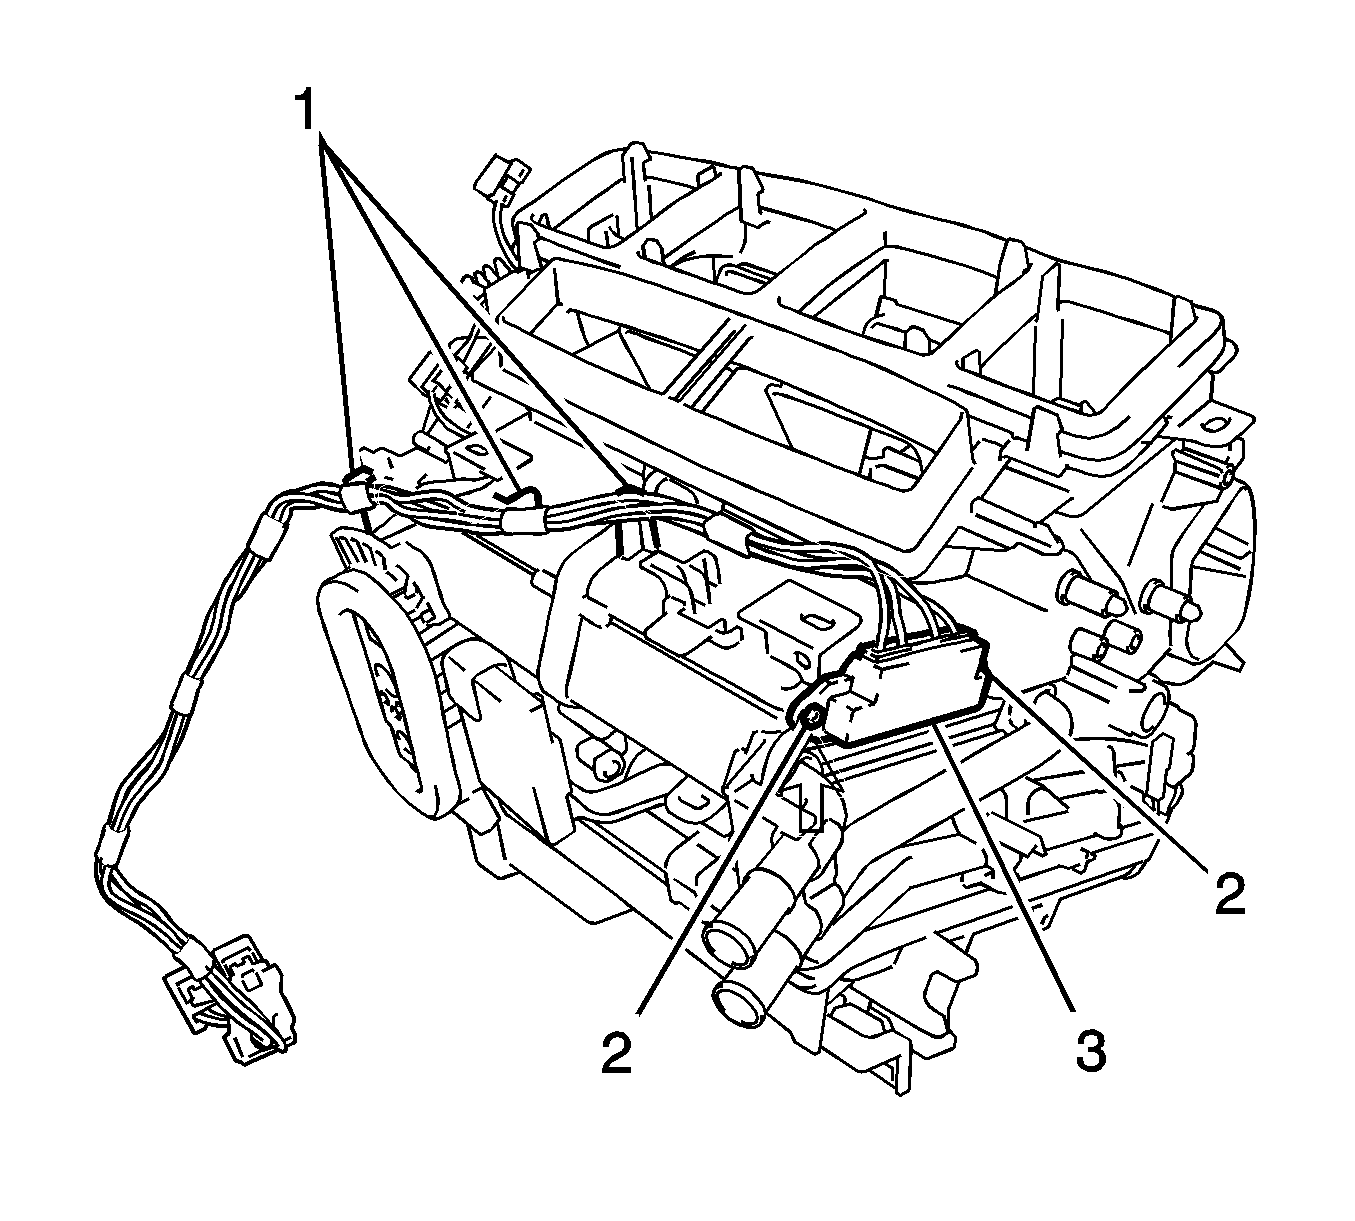
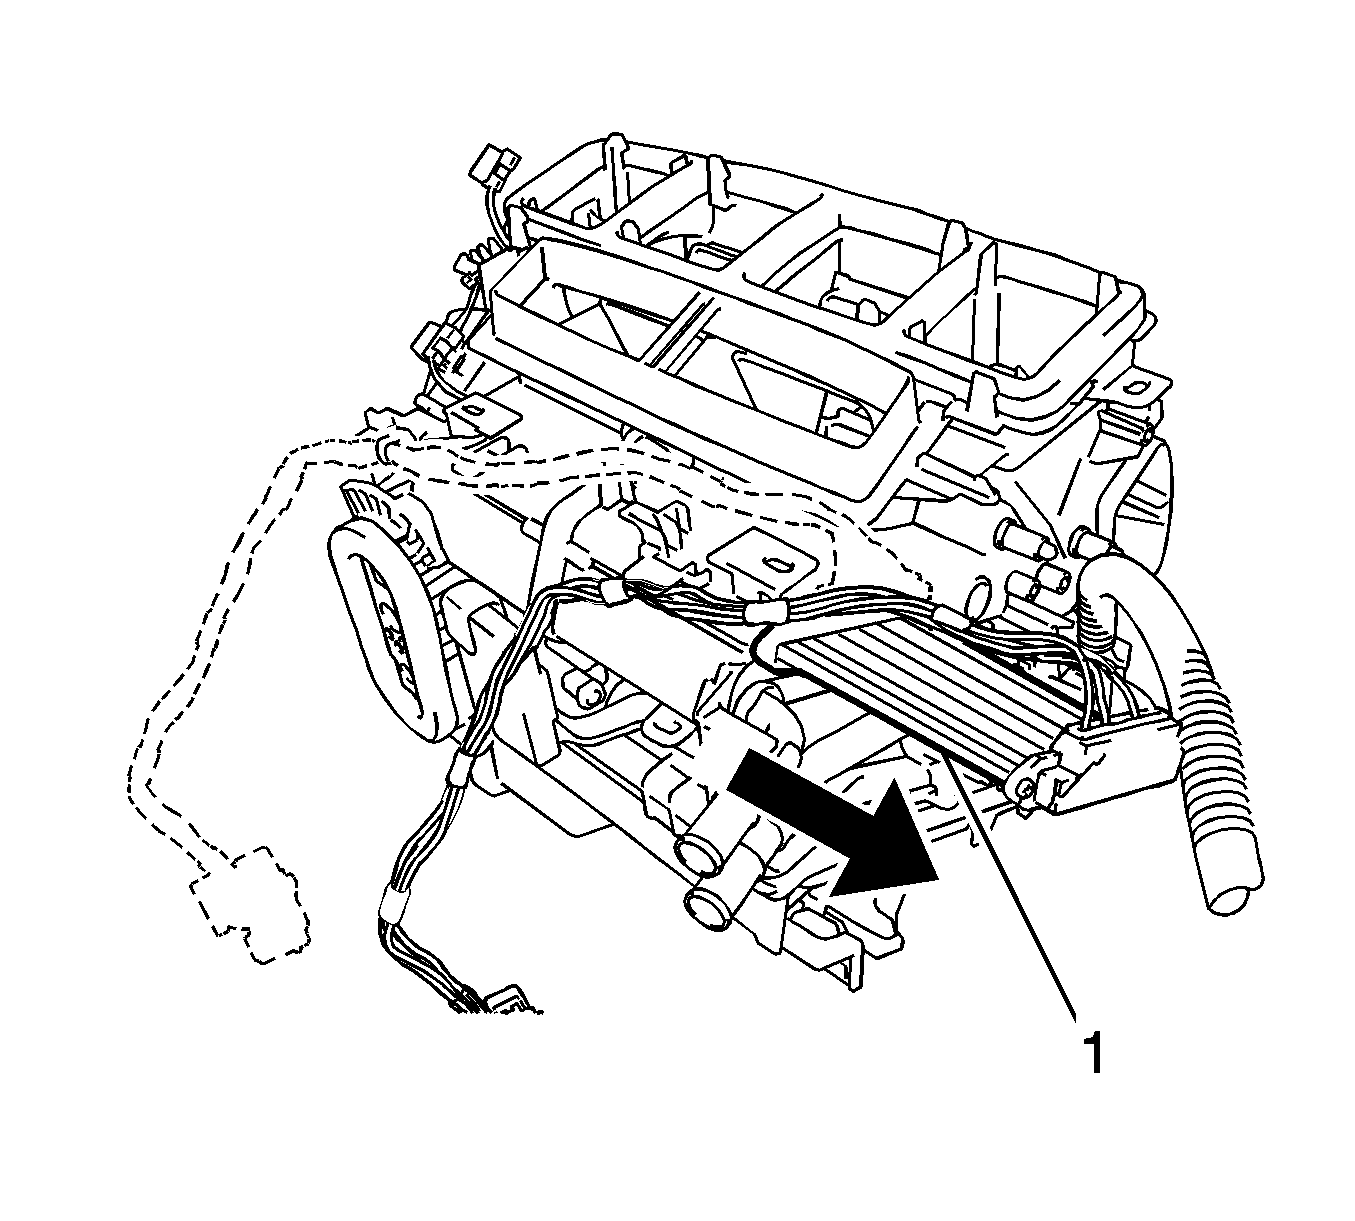
- Disengage the clamps (1) from the PTC quick heater harness, if equipped.
- Remove the two screws (2) from the PTC quick heater, if equipped.
- Remove the PTC quick heater (1) from the HVAC module, if equipped.
Warning: Refer to Battery Disconnect Warning in the Preface section.
Note: Cap the open fittings in order to prevent dirt and moisture from entering the refrigeration system.
Note: Be sure to support the HVAC module assembly when removing it because failure to do so may cause the bracket of the HVAC module assembly to break.
Note: When disassembling the HVAC module assembly, eliminate static electricity by touching the vehicle body to prevent the components from being damaged.
Installation Procedure
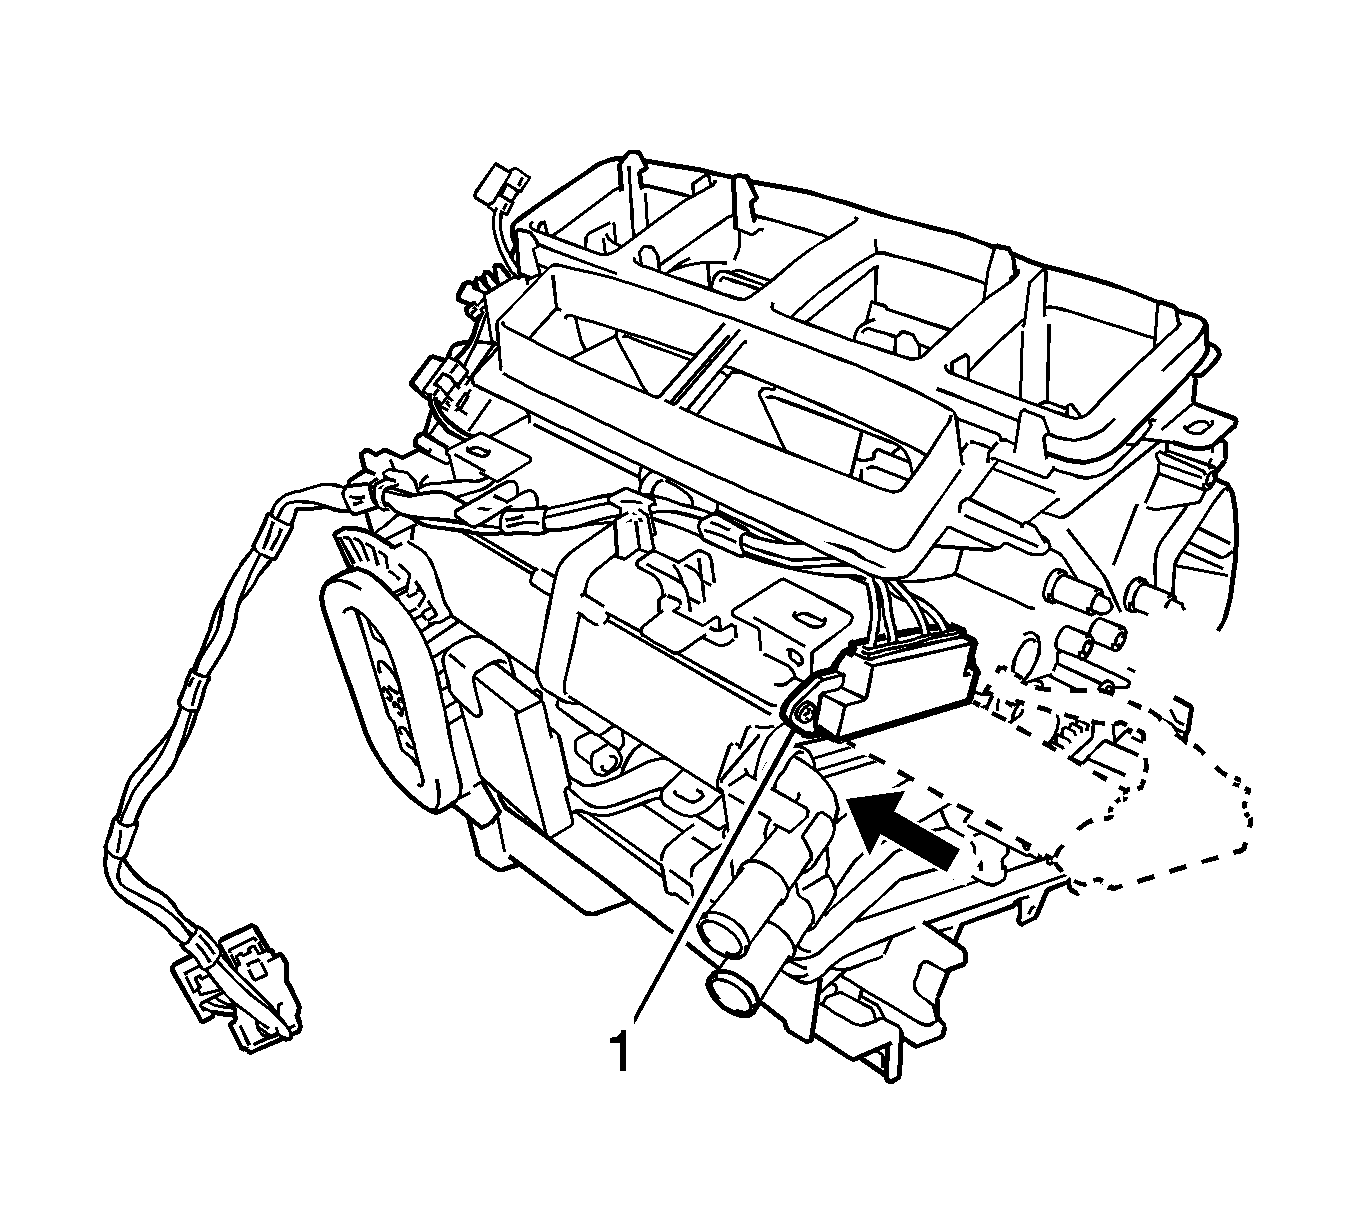
- Install the PTC quick heater (1) to the HVAC module, if equipped.
- Install the two screws (2) to the PTC quick heater, if equipped.
- Engage the clamps (1) to the PTC quick heater harness, if equipped.
- Install the blower case to the HVAC module. Refer to Blower Case Replacement.
- Install the air duct (2) to the HVAC module.
- Engage the two clips (1).
- Install the HVAC module assembly (1) to the vehicle.
- Engage the drain cooler hose.
- Install the HVAC module nut (2) and bolt (3), do not tighten at this time.
- Install the instrument panel reinforcement assembly (1).
- Install the seven bolts.
- Connect the electrical connectors (3).
- Engage the clamps (2).
- Engage wire harness and junction block with the nine bolts (1).
- Engage the clamps (1) and the wire harness.
- Connect the SDM connectors (1).
- Install the steering column assembly with the bolt (3) and the 2 nuts (1, 2).
- Connect the connectors and engage the wire harness clamps to the steering column assembly.
- Ensure the front wheels are in the straight ahead position.
- Install the instrument panel sub reinforcement (1) with the 2 bolts (2), (3).
- Install the center bolt (2) to the instrument panel reinforcement.
- Install the right outer bolt (3) to the instrument panel reinforcement.
- Install the left outer bolt (1) to the instrument panel reinforcement.
- Install the nut (2).
- Tighten the bolt (1).
- Install the instrument panel brace (4).
- Install the two nuts (1).
- Install the two bolts (3).
- Instal the two screws (2).
- Engage the clamps (2).
- Connect the electrical connector (3).
- Install the two bolts (1).
- Install the theft deterrent module. Refer to Theft Deterrent Module Replacement.
- Install the two bolts (1) and the center instrument panel to cowl brace (2).
- Install the defroster air duct (2).
- Install the two nuts (1).
- Install the power steering control module. Refer to Electronic Power Steering Motor Control Module Replacement.
- Engage the six retainers (1) to the defroster air duct (2).
- Engage the four clips (1) and install the center air duct (2).
- Engage the two clips (1) and install the passenger side rear air duct (2).
- Install the passenger side carpet (2) and install the clip (1).
- Engage the two clips (1) and install the driver side rear air duct (2).
- Install the passenger side carpet (1) and install the clip (2).
- Install the instrument panel assembly. Refer to Instrument Panel Upper Trim Pad Replacement and Instrument Panel Lower Trim Panel Replacement.
- Install the heater hoses (1, 2) at the heater core.
- Install new O-rings lubricated with mineral base 525 viscosity refrigerant oil.
- Install the evaporator inlet and outlet tubes (1) to the evaporator.
- Install the bolt (1) and slide the hook connector.
- Fill the cooling system. Refer to Cooling System Draining and Filling.
- Evacuate and Recharge the A/C system. Refer to Refrigerant Recovery and Recharging.
- Connect the negative battery cable.
- Operate the A/C system and test for refrigerant leaks. Refer to Leak Testing.


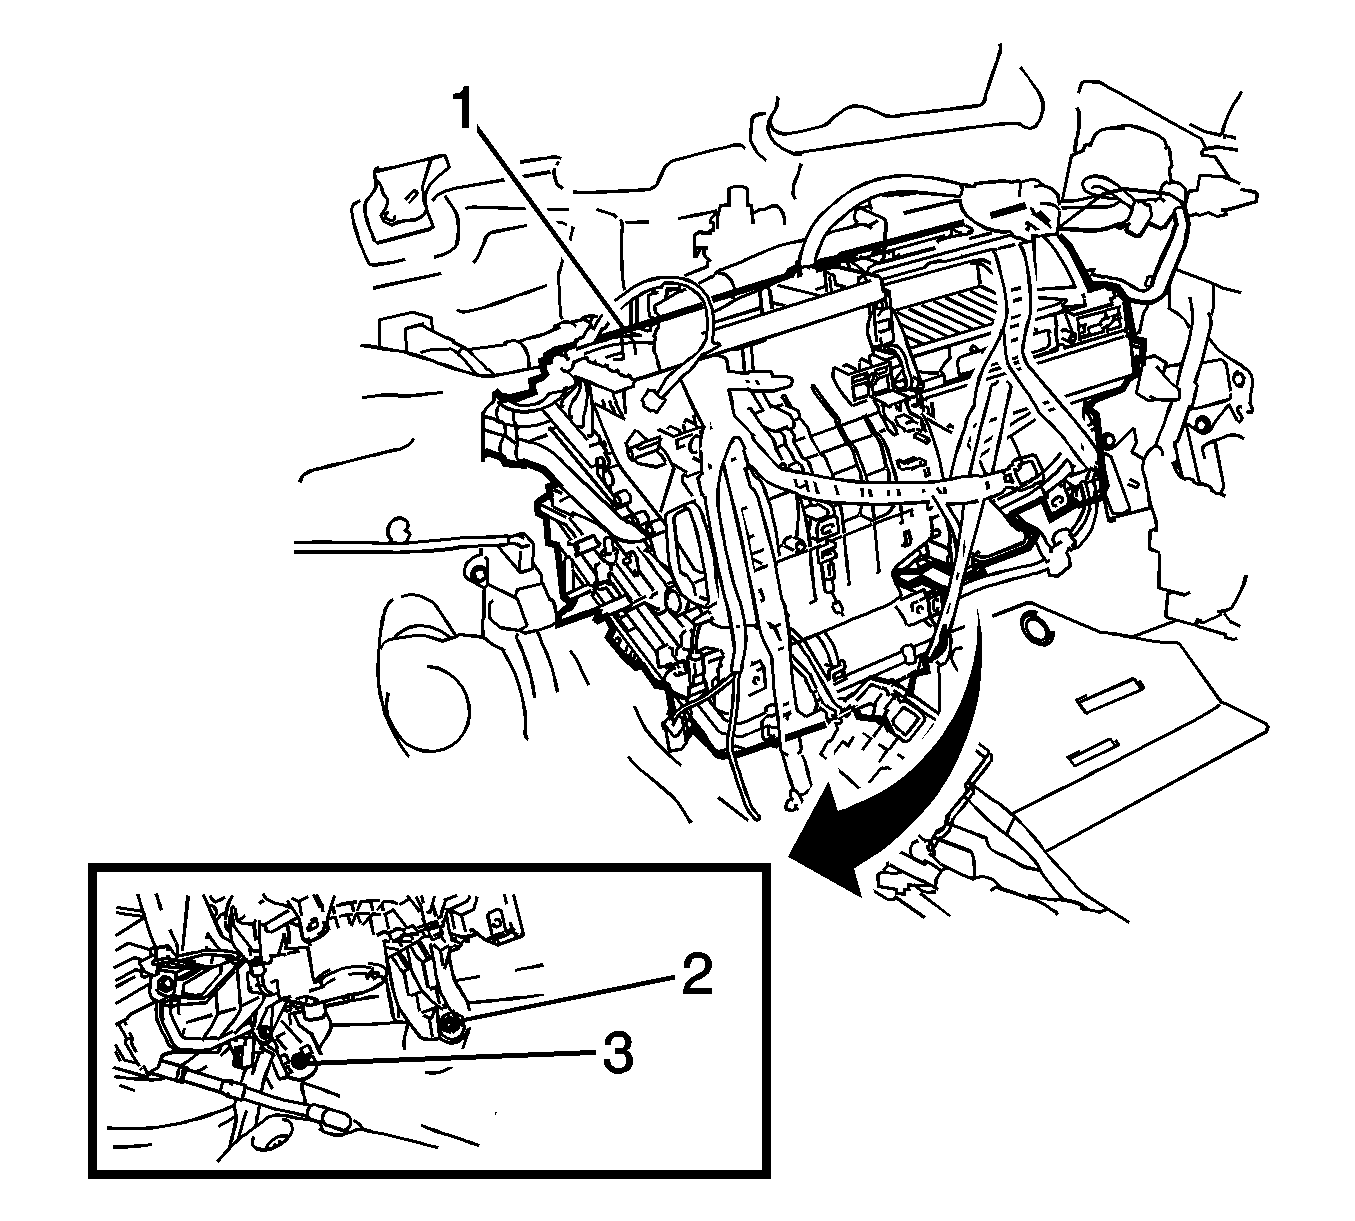
Note: Be sure to support the HVAC module assembly when removing it because failure to do so may cause the bracket of the HVAC module assembly to break.
Note: When disassembling the HVAC module assembly, eliminate static electricity by touching the vehicle body to prevent the components from being damaged.
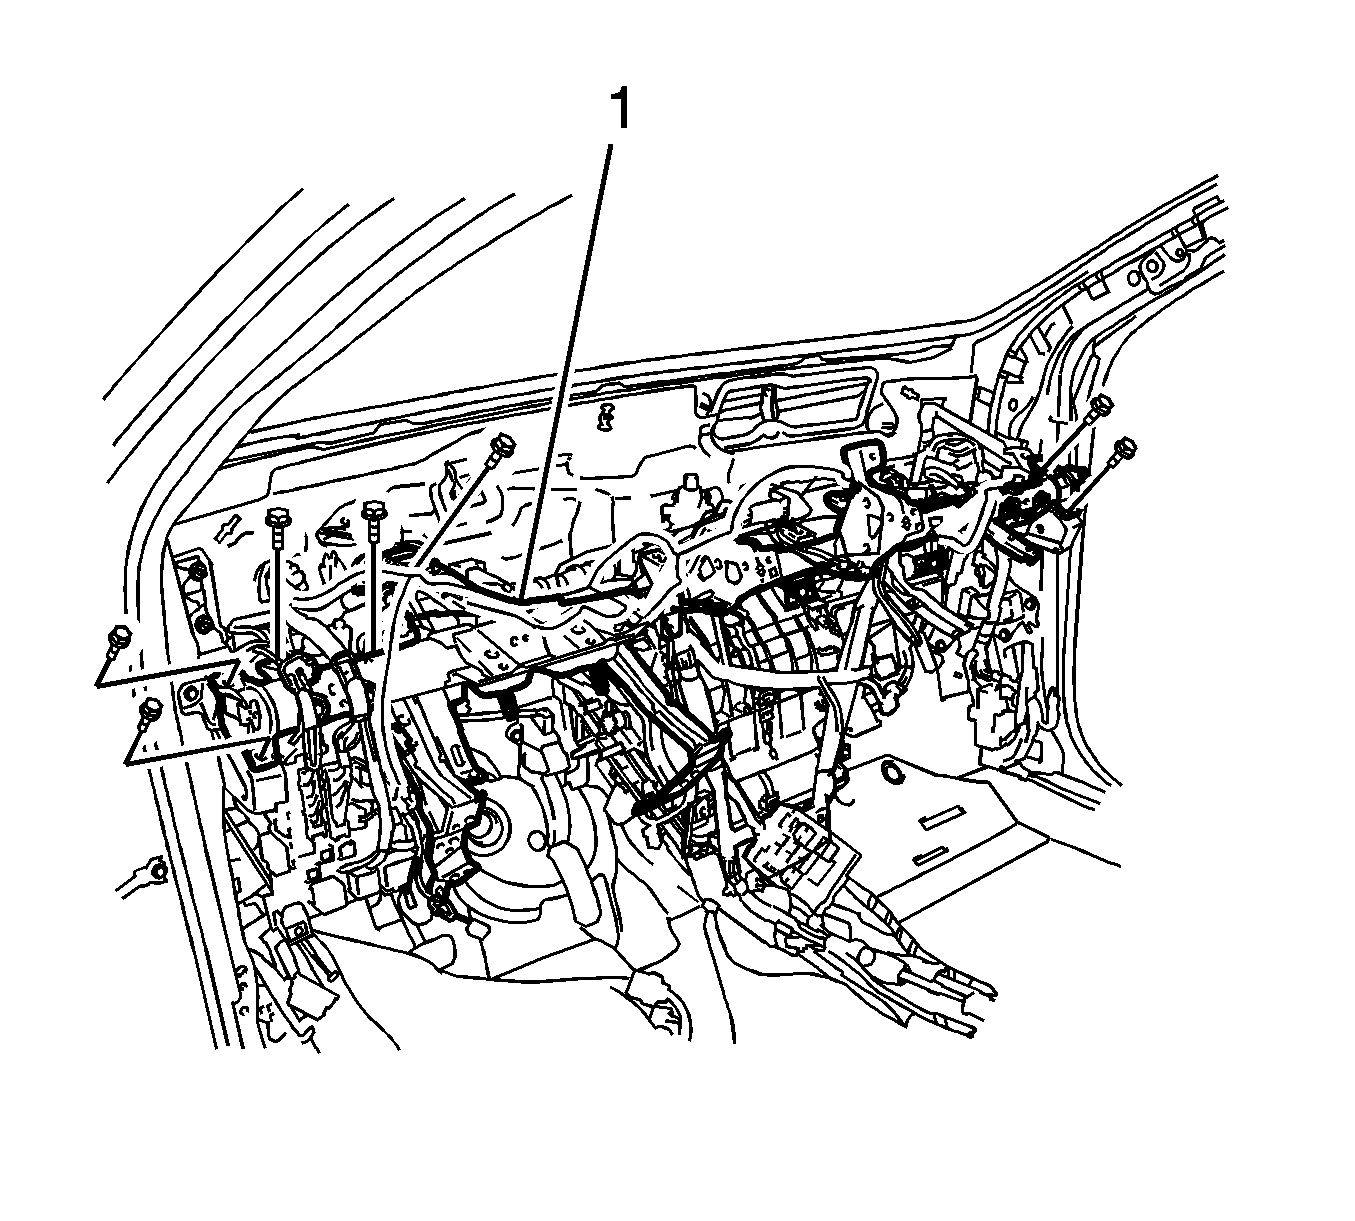
Caution: Refer to Fastener Caution in the Preface section.
Tighten
Tighten the seven bolts to 24 N·m (18 lb ft).

Tighten
Tighten the nine bolts (1) to 8.4 N·m (74 lb in).


Note: Do not line-up the bolt hole by prying on the collar or bushings. Only install the bolt in straight, without applying any force to the bushings.
Tighten
Tighten the steering column bolts and nuts to 25 N·m (18 lb ft)

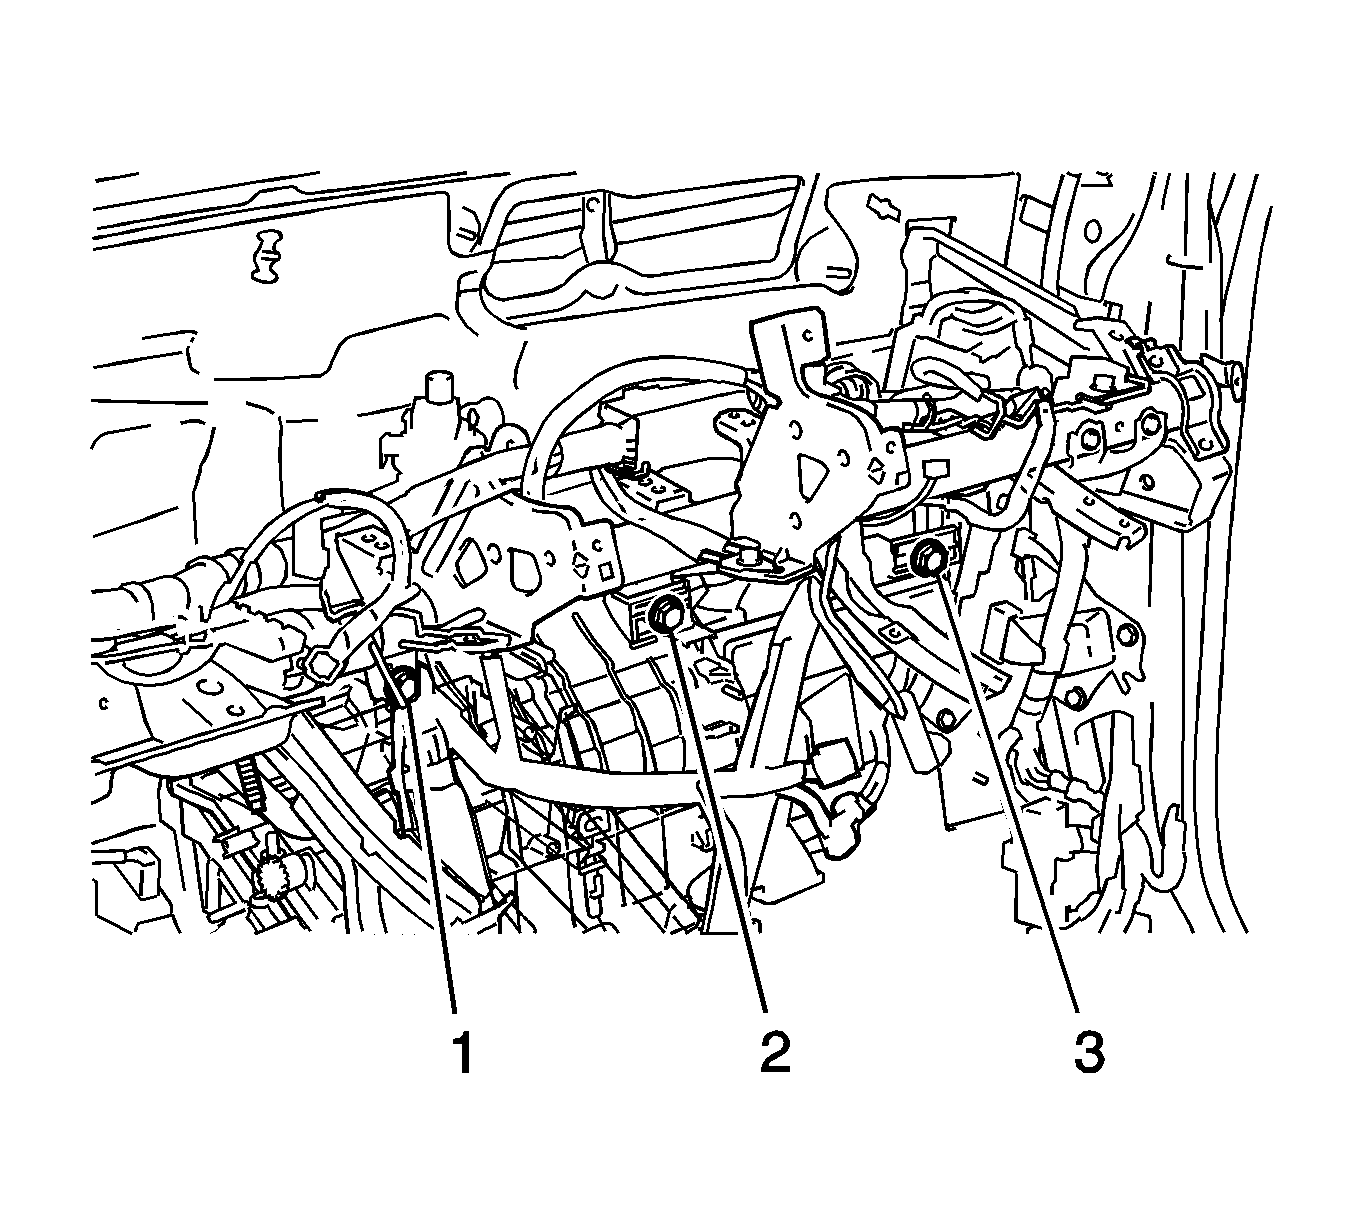
Tighten
Tighten the center bolt (2) to 9.8 N·m (87 lb in).
Tighten
Tighten the right outer bolt (3) to 9.8 N·m (87 lb in).
Tighten
Tighten the right outer bolt (1) to 9.8 N·m (87 lb in).

Tighten
Tighten the nut (2) to 9.8 N·m (87 lb in).
Tighten
Tighten the bolt (1) to 9.8 N·m (87 lb in).

Tighten
Tighten the nuts (1) to 9.8 N·m (87 lb in).
Tighten
Tighten the bolts (3) to 9.8 N·m (87 lb in).
Tighten
Tighten the screws (2) to 9.8 N·m (87 lb in).

Tighten
Tighten the bolts (1) to 8.4 N·m (74 lb in).


Tighten
Tighten the nuts (1) to 9.8 N·m (87 lb in).


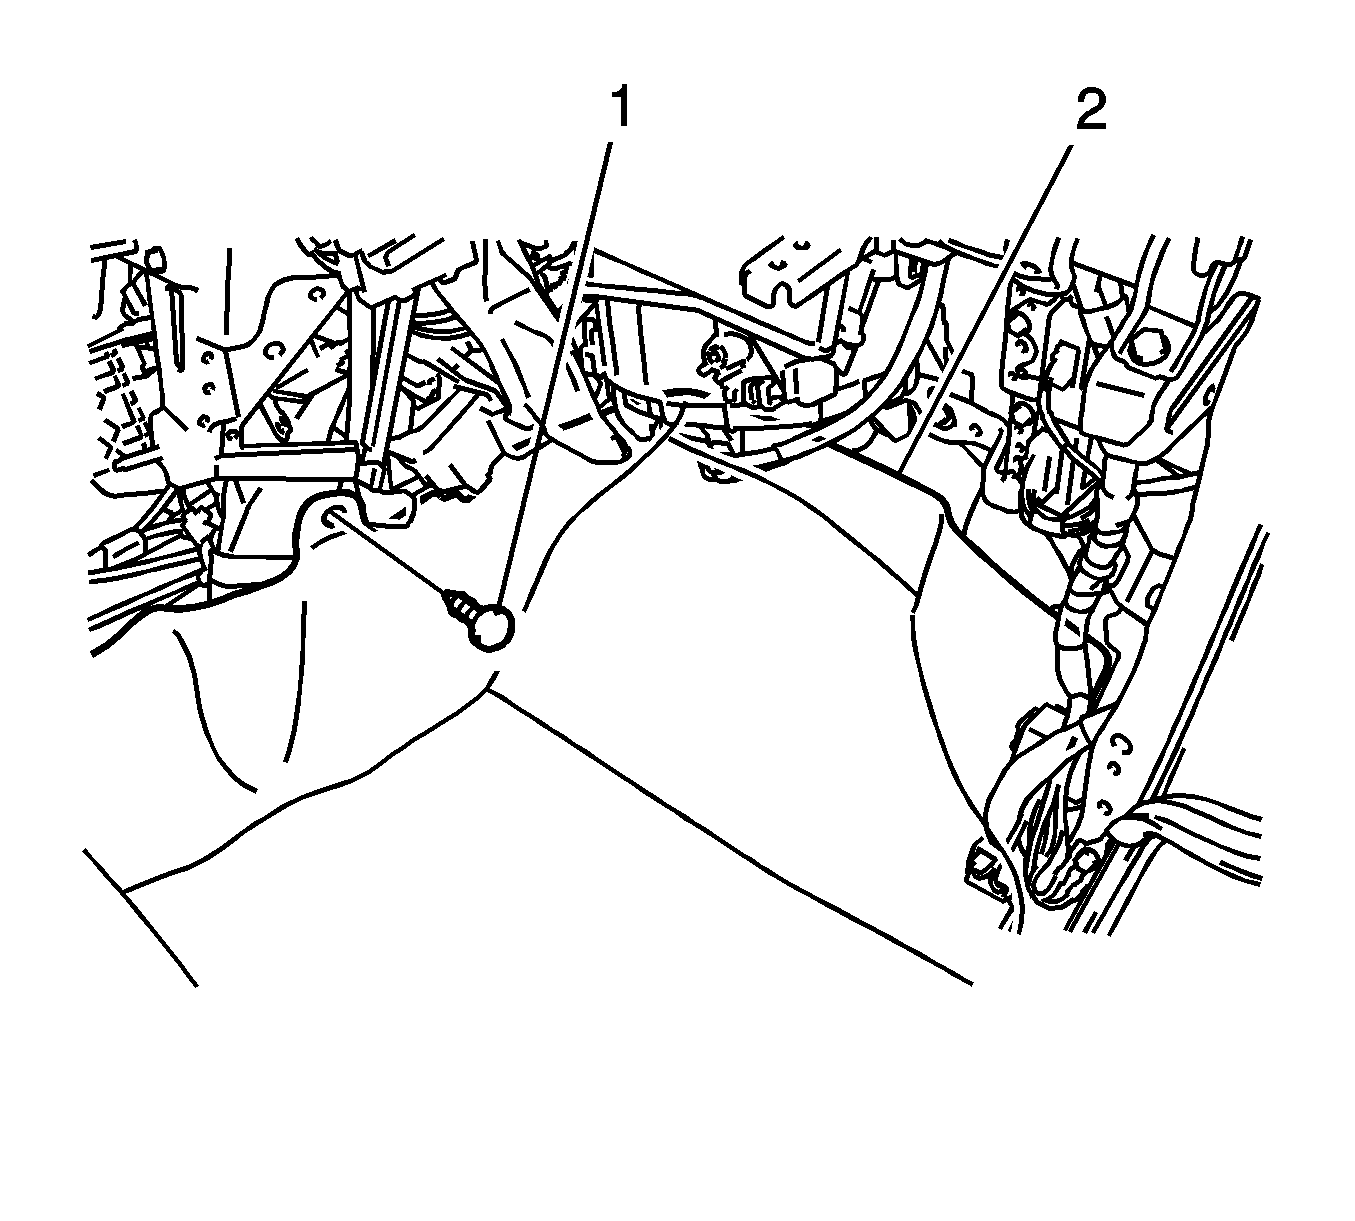


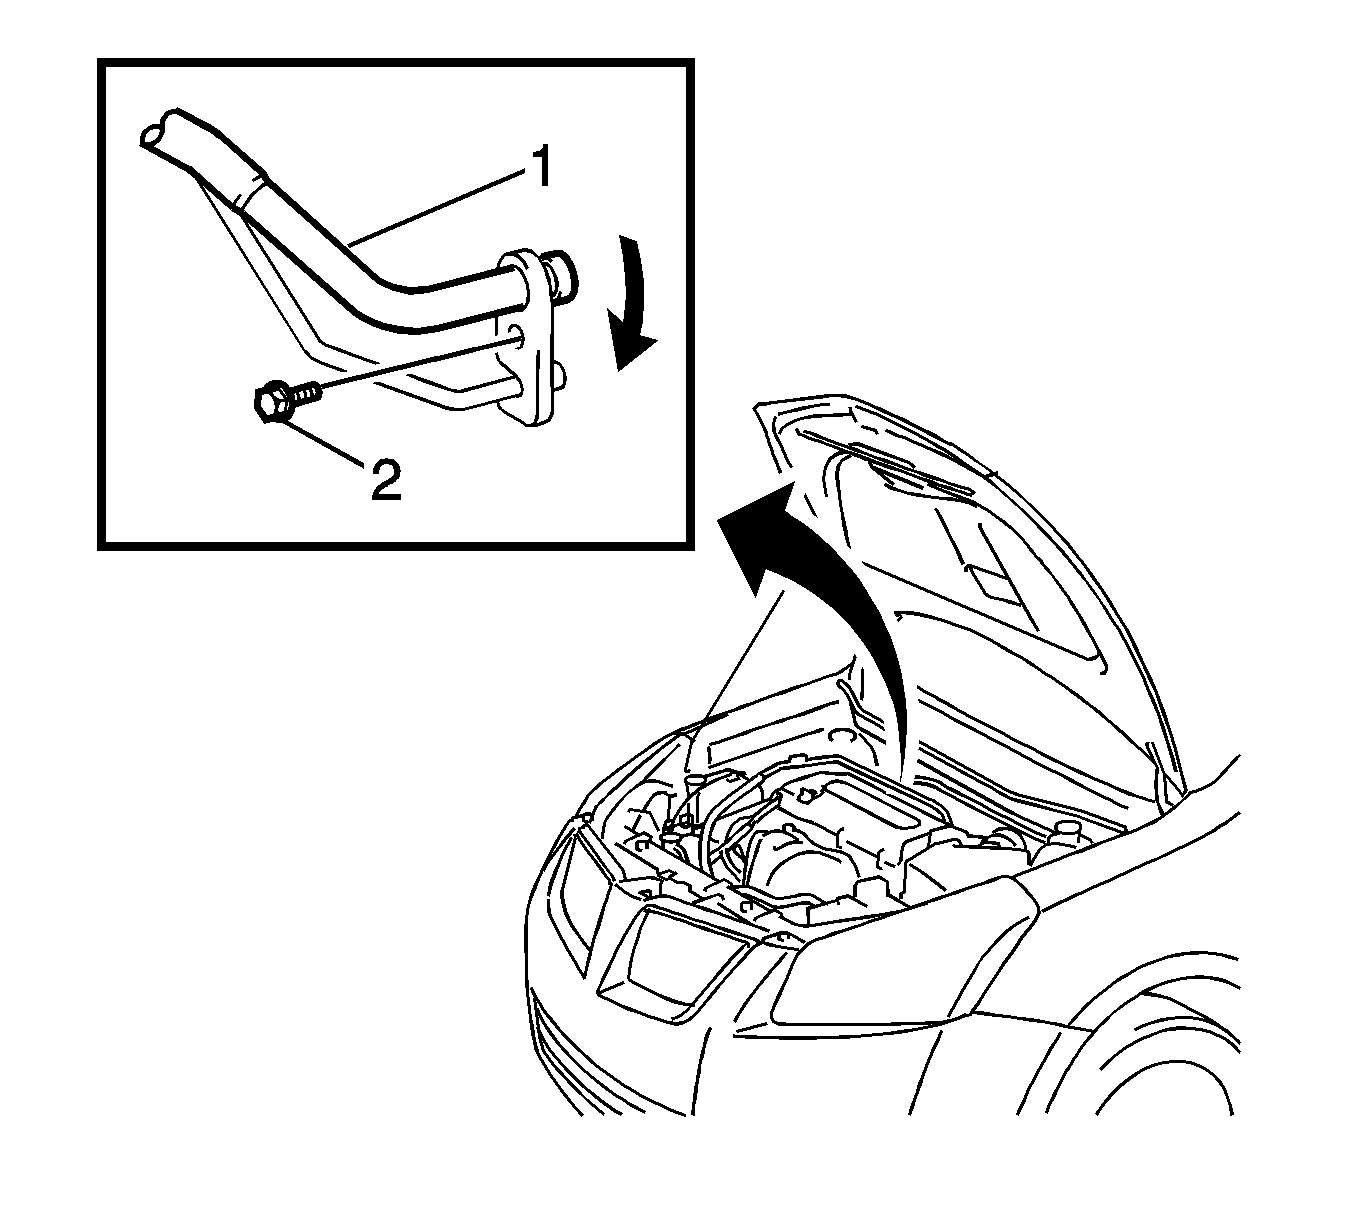
Tighten
Tighten the bolt (1) to 9.8 N·m (87 lb in).
Tighten
Tighten the negative battery cable to 15 N·m (11 lb ft).
