Cupholder Broken, Inoperative, Will Not Deplay, Rubs on Instrument Panel (IP) Trim Plate, Fails to Latch When Stored and Information on Avoiding IP Cover Damage (Replace or Align Cupholder)

| Subject: | Cupholder Broken, Inoperative, Will Not Deploy, Rubs on Instrument Panel (IP) Trim Plate, Fails to Latch When Stored and Information on Avoiding IP Cover Damage (Replace or Align Cupholder) |
| Models: | 2005-2007 Saab 9-7X |
This bulletin is being revised to add the 2007 model year and to eliminate the previous directions to order one part directly from the GM Warranty Parts Center (WPC). Please discard Corporate Bulletin Number 05-08-49-024 (Section 08 -- Body & Accessories).
Condition
Some customers may comment that the cupholder located in the IP may fail to deploy, deploy slowly, rub against the IP trim plate or fail to latch when stored.
Cause
Several different assembly concerns or causes, internal to the cupholder, create the above conditions but all will result in realignment or replacement of the cupholder.
Correction
Use the following guidelines when servicing the cupholder. A cupholder that deploys slowly in cold weather, or fails to latch when stored, should be replaced. Cupholders that rub or contact the IP should be aligned to the IP opening. It is very important to follow the complete instructions below when servicing the cupholder. Specific instructions are given below to both correct the condition and to remove the IP trim plate, minimizing the risk of damage to the soft IP cover.
Use the procedure below to correct all customer concerns.
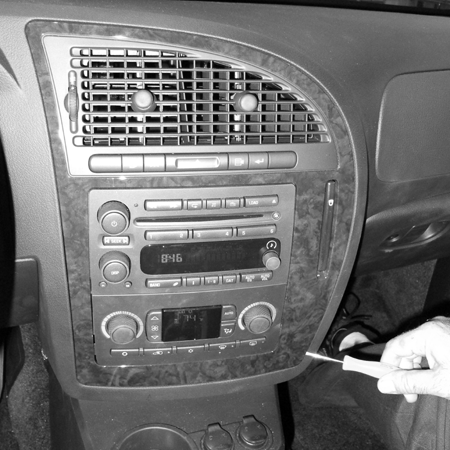
- Remove the IP trim panel by using a tool that has a wide base and shaft. DO NOT pry directly on the surface of the soft IP cover. Protect the IP cover by laying something down on the surface such as a shop cloth. Refer to Figure 1 for the position to start prying.
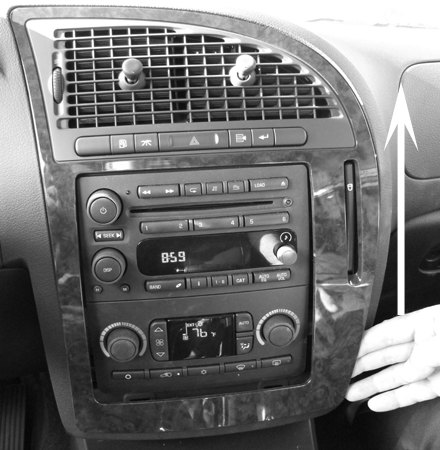
- Begin prying the trim panel out, from the lower right side near the corner and work your way up the right hand side. The right side of the trim plate has stiffening ribs molded to the back side that should aid in removing the panel without damage. Pull on the panel using your hand to release the retainers. As soon as you can, get your hand behind the panel. Work your way upwards. Refer to Figure 2.
- If the cupholder deploys slowly, will not deploy or will not latch, replace the cupholder and skip to Step 5.
- If the cupholder was contacting the IP trim panel while deploying, you may want to try removing and reinstalling the cupholder.
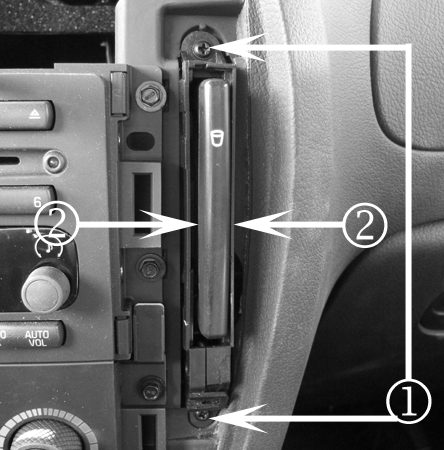
- When reinstalling or replacing the cupholder, please note the two clips that the posi-screws fasten to on the IP carrier. These clips have a small range adjustment. In cases of misalignment, you may try to move the clips slightly to align the cupholder to the trim panel.
- In all cases, when installing the cupholder you must make sure not to build up any torque on the body of the cupholder. If any tension exists between the upper and lower attachment points, the cupholder will hang up during deployment. The best way to avoid building-up tension in the cupholder is to loosely install the cupholder and then "wiggle" it gently grasping at the center. Refer to Figure 3, callout #2. Immediately and without moving the cupholder, snug the two screws. Do not over-tighten the screws. Overtightening will cause the cupholder to bind. Operate the cupholder and verify proper operation. Repeat above if required.
- Reinstall the IP trim plate by lining up the A/C ducts and slowly, but firmly, seat the retaining clips.
- Deploy the cupholder to ensure that it aligns properly with the slot in the IP trim plate.
- If the cupholder is not aligned with the IP trim plate, repeat the above steps.
Figure 1

Notice: The IP trim plate is fit flush to the IP pad and is retained very securely. It is very easy to damage the soft material of the IP cover if proper precautions are not taken.
Figure 2

Important: Please note the clips that provide attachment points for the cupholder are very easy to dislodge when removing the cupholder. It is possible that they may fall into the IP if dislodged, so use care not to lose the clips. If the clips are lost, you will have to replace the clips using the P/N below.
Figure 3

Important: It is possible to disconnect some items during previous removal of the IP trim panel that can be overlooked. To prevent comebacks, before installing the IP trim plate please confirm the following:
• Operate the thumbwheel that opens and closes the vent air shutter. Confirm the linkage on the left side is connected. The linkage just slides together. Place the finger of the thumbwheel arm in the groove of the air shutter receiver. Verify operation. • Verify that the Driver Information Center buttons are properly retained. The two retaining fingers near the air duct can dislodge if the IP panel is distorted during removal. Confirm retention of the buttons.
Parts Information
Part Number | Description |
|---|---|
15827957 | Cup Holder - IP |
19122350 | Clip, Retaining |
Warranty Information (excluding Saab U.S. Models)
For vehicles repaired under warranty, use:
Labor Operation | Description | Labor Time |
|---|---|---|
C2085 | Cup Holder - Replace | 0.2 hr |
Warranty Information (Saab U.S. Models)
For vehicles repaired under warranty, use:
Labor Operation | Description | Failed Object | Fault/Reason Code | Location Code | Warranty Type | Repair/Action Code | Labor Time |
|---|---|---|---|---|---|---|---|
8599601 | Replace part, IP Cup Holder | 85996 | 23 | 0 | 01 | 01 | 0.2 hr |
