Product Emission - Loss of Hybrid Function - Voltage Imbalance

| Subject: | 07318A -- Loss of Hybrid Function - Voltage Imbalance |
| Models: | 2007-2008 Saturn AURA Green Line Hybrid |
| 2007 Saturn VUE Green Line Hybrid |
The service procedure has been revised to include shipping information for Canadian dealers. Please discard all copies of bulletin 07318, issued February 2008.
This recall covers the condition for a period of 8 years or 100,000 miles (160,000 km), whichever occurs first, from the date the vehicle was originally placed in service, regardless of ownership.
Due to part availability, this recall is being administered in phases. This is the third and final phase.
Condition
General Motors has decided to conduct a Voluntary Emission Recall involving all 2007 model year Saturn AURA Green Line Hybrid and VUE Green Line Hybrid vehicles and certain 2008 Saturn AURA Green Line Hybrid vehicles. A battery case condition on these vehicles may cause a voltage imbalance in the hybrid battery. If the imbalance exceeds 0.6 volts, the check engine light will illuminate and hybrid function will be disabled. If this occurs, the charge/assist gage would show no movement, the fuel economy light (ECO) would not illuminate, and the vehicle will be powered by the gasoline engine only.
Correction
Retailers are to replace the 3 hybrid cassettes that make up the battery assembly. This recall covers the condition for a period of 8 years or 100,000 miles (160,000 km), whichever occurs first, from the date the vehicle was originally placed in service.
Vehicles Involved
Involved are all 2007 model year Saturn AURA Green Line Hybrid and VUE Green Line Hybrid vehicles and certain 2008 Saturn AURA Green Line Hybrid vehicles built within these VIN breakpoints
Year | Division | Model | From | Through |
|---|---|---|---|---|
2007 | Saturn | AURA | 7F226712 | 7F317994 |
2008 | Saturn | AURA | 8F146863 | 8F148973 |
2007 | Saturn | VUE | 7S800023 | 7S880949 |
Important: Retailers are to confirm vehicle eligibility prior to beginning repairs by using the system(s) below. Not all vehicles within the above breakpoints may be involved.
-- Canadian retailers should use GMVIS. -- US retailers should use the "Investigate Vehicle History" link on the Global Warranty Management application within DealerWorld.For retailers with involved vehicles, a listing with involved vehicles containing the complete vehicle identification number, customer name, and address information has been prepared and will be provided through the applicable system listed below. Retailers will not have a report available if they have no involved vehicles currently assigned.
-- Canadian retailers - GMinfoNet Recall Reports
-- US retailers - GM DealerWorld Recall Information
The listing may contain customer names and addresses obtained from Motor Vehicle Registration Records. The use of such motor vehicle registration data for any purpose other than follow-up necessary to complete this recall is a violation of law in several states/provinces/countries. Accordingly, you are urged to limit the use of this report to the follow-up necessary to complete this recall.
Parts Information
Saturn Canada Only: Parts required to complete this program are to be obtained from General Motors Service and Parts Operations (GMSPO). Please refer to your "involved vehicles listing" before ordering parts. Normal orders should be placed on a DRO = Daily Replenishment Order. In an emergency situation, parts should be ordered on a CSO = Customer Special Order.
Saturn US Only: A pre-shipment of the required parts to perform this recall has been sent to involved Saturn retailers from Saturn Service Parts Operations (SSPO).
Part Number | Description | Qty/ Vehicle |
|---|---|---|
25964892 | Battery, Generator (Battery Only w/3 Cassettes and Hardware | 1 |
11610091 | Nut, Battery Positive Cable (36V) (Note: This part will be used on a very limited number of vehicles. Refer to the Notice associated with the VUE, Step 68) | 1 (If Required) |
Service Procedure
Important: Please review the vehicle history to determine if one of the following battery cassettes or packs have been installed in the vehicle.
• AURA Pack, P/N 25922540 • VUE Pack, P/N 25953382 • VUE/AURA Cassette, P/N 25964892
Battery Cassette Replacement - VUE
- Remove the ignition key from the ignition switch. Secure the ignition key in order to ensure that the key CANNOT be reinstalled without your knowledge.
- Disconnect the 12-volt negative battery cable.
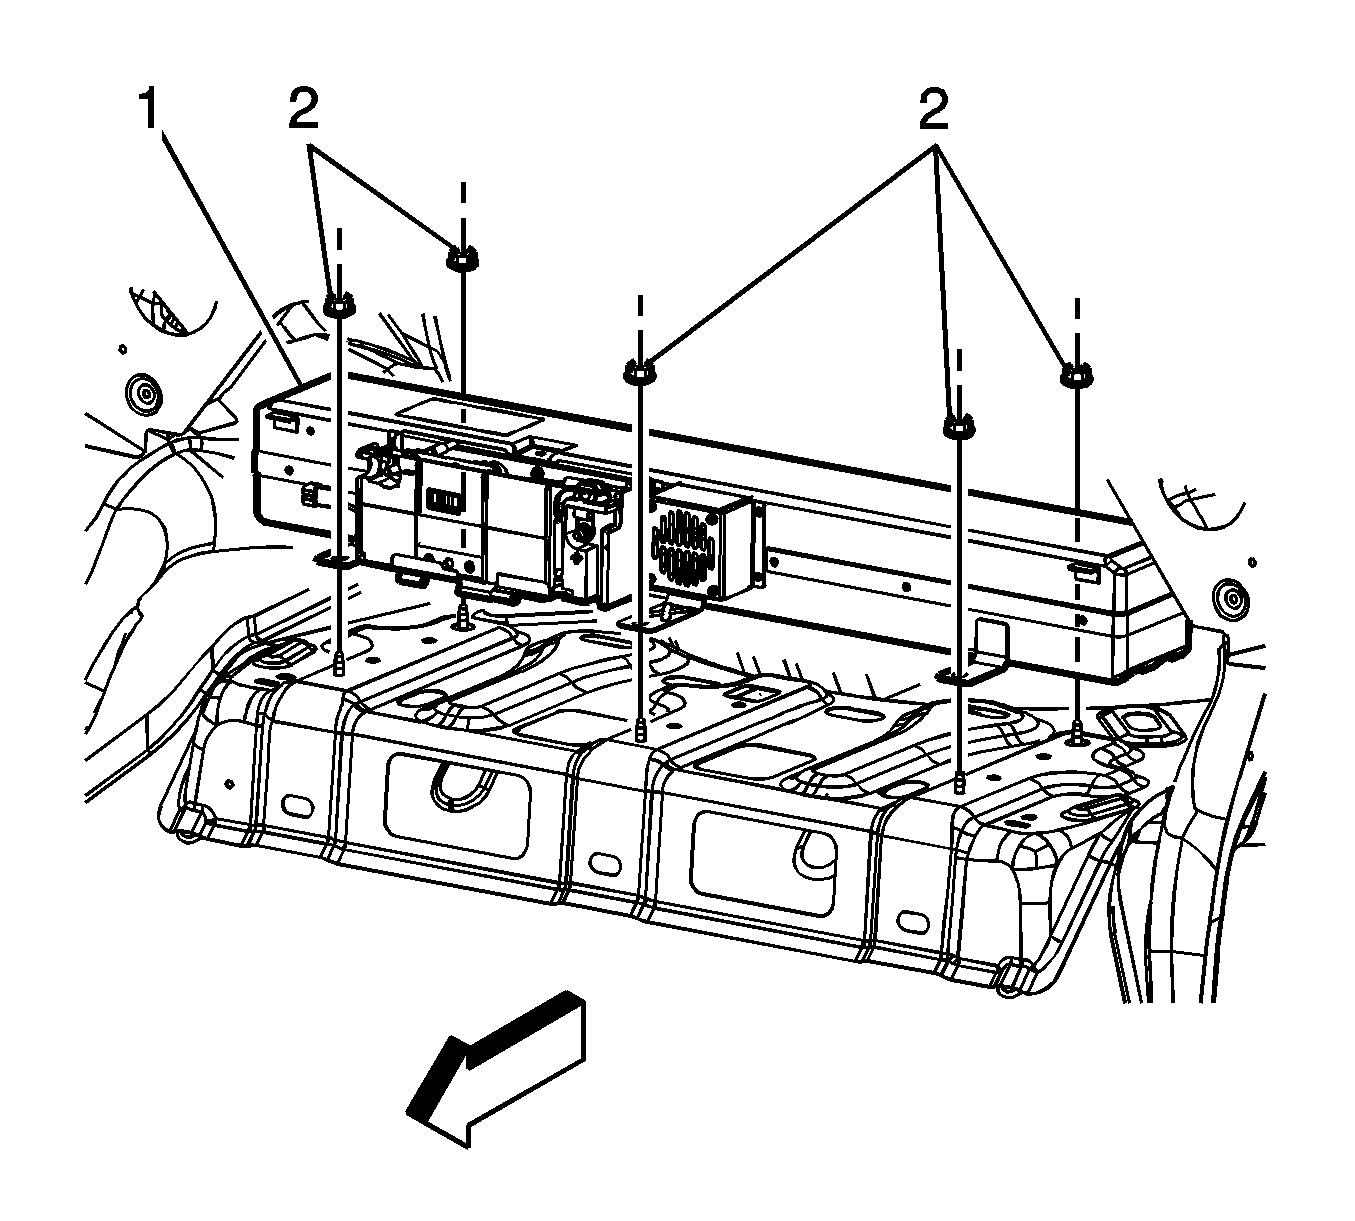
- Remove the rear compartment closeout panels.
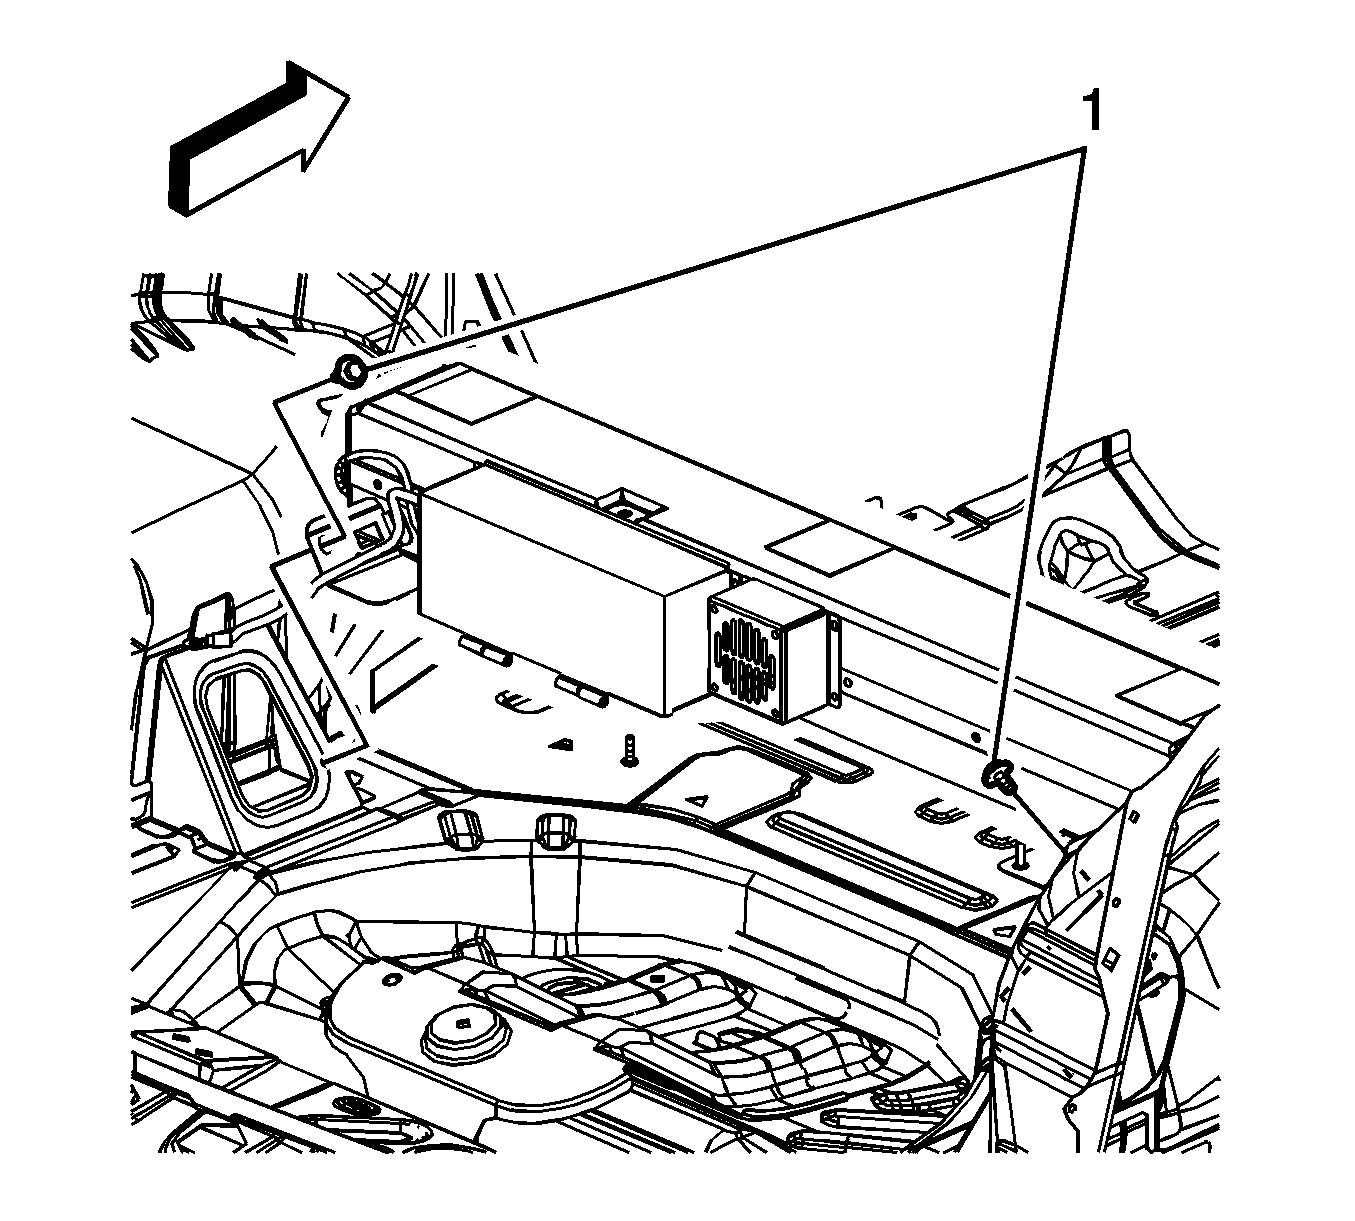
- Remove the generator battery disconnect control module cover bolt.
- Slide the generator battery disconnect control module cover to the right and remove the cover.
- WAIT at least 5 minutes in order to allow the generator control module capacitors to discharge.
- The generator battery will have to be checked for voltage potential using a voltmeter. First, verify that the voltmeter works.
- Now, check the generator battery for voltage potential in order to ensure that the generator battery has been disabled.
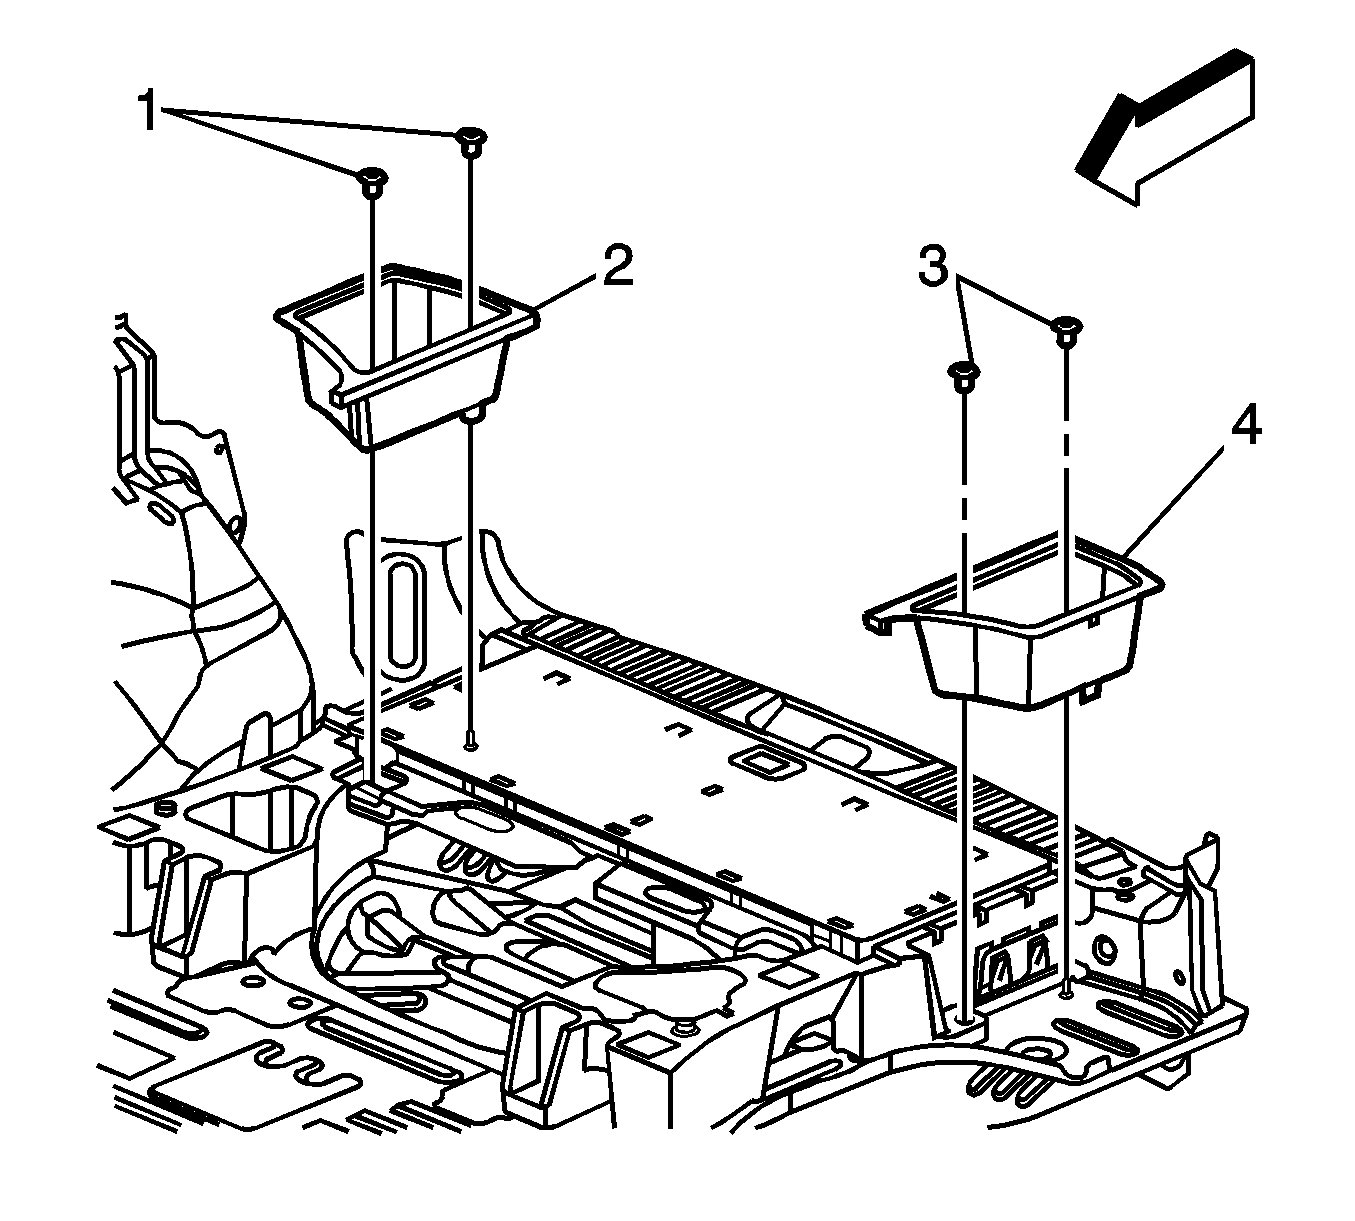
- Remove the driver and passenger side rear compartment load floor stowage tray retainers (1, 3).
- Remove the driver and passenger side rear compartment load floor stowage trays (2, 4).
- Carefully remove the driver and passenger side foam insulators.
- Fold down the rear seat back.
- Remove the rear seat rear bolts.
- Partially remove the left side rear quarter lower trim panel.
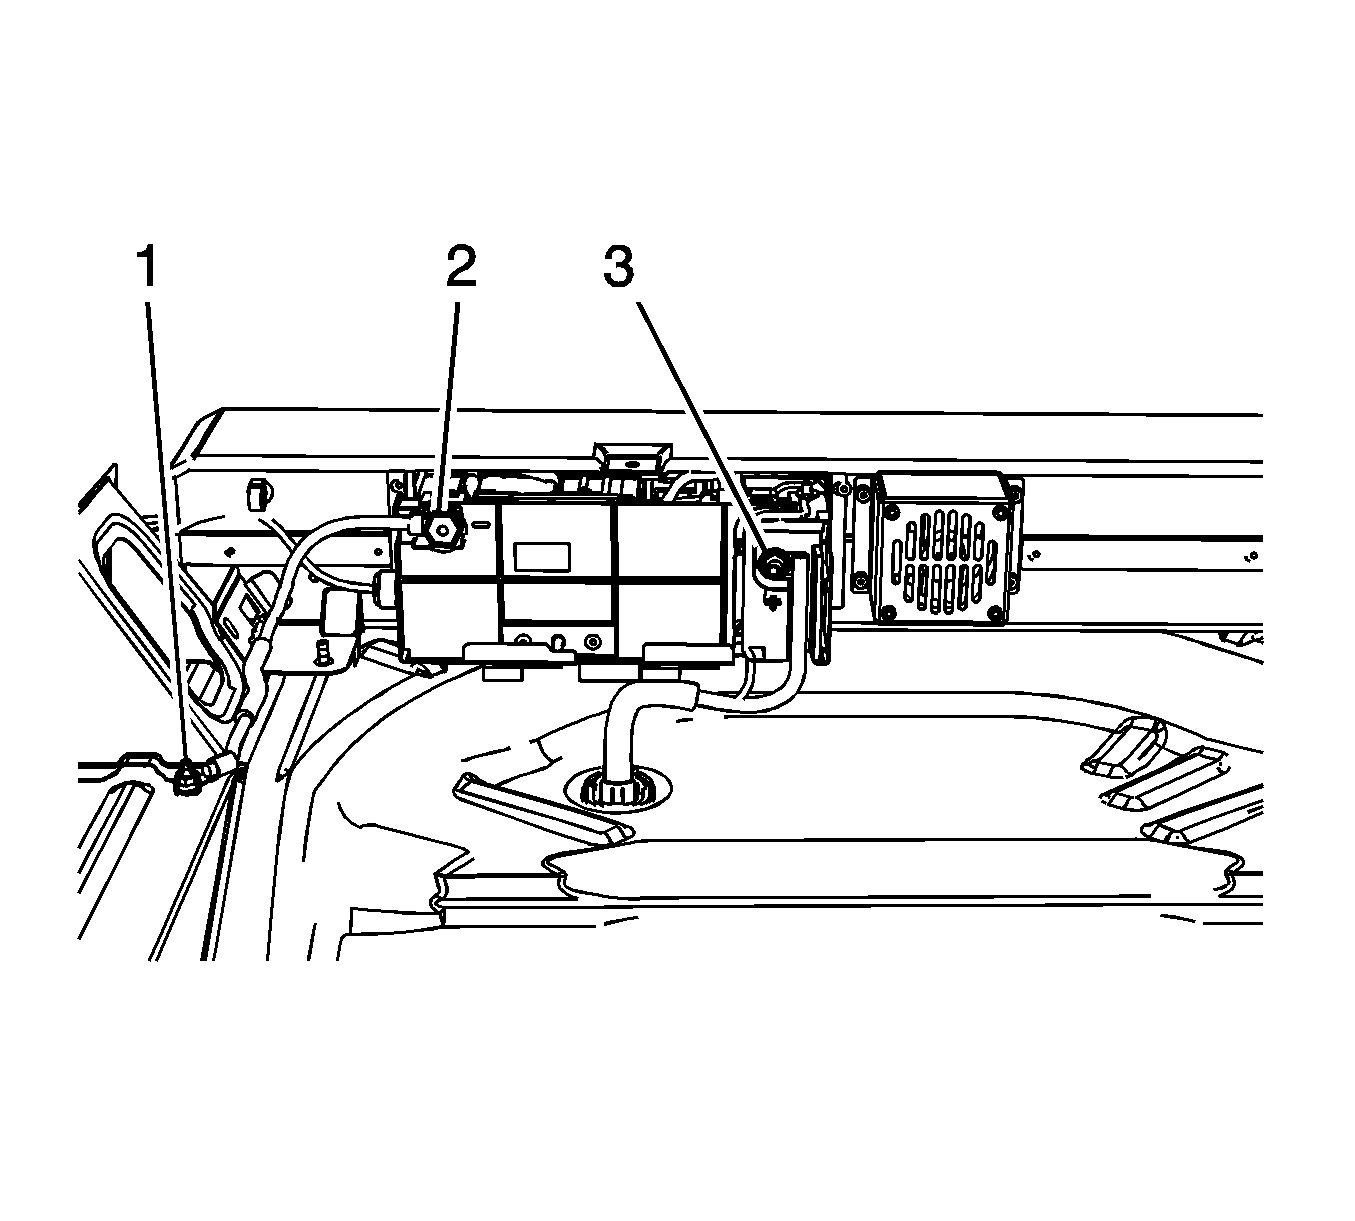
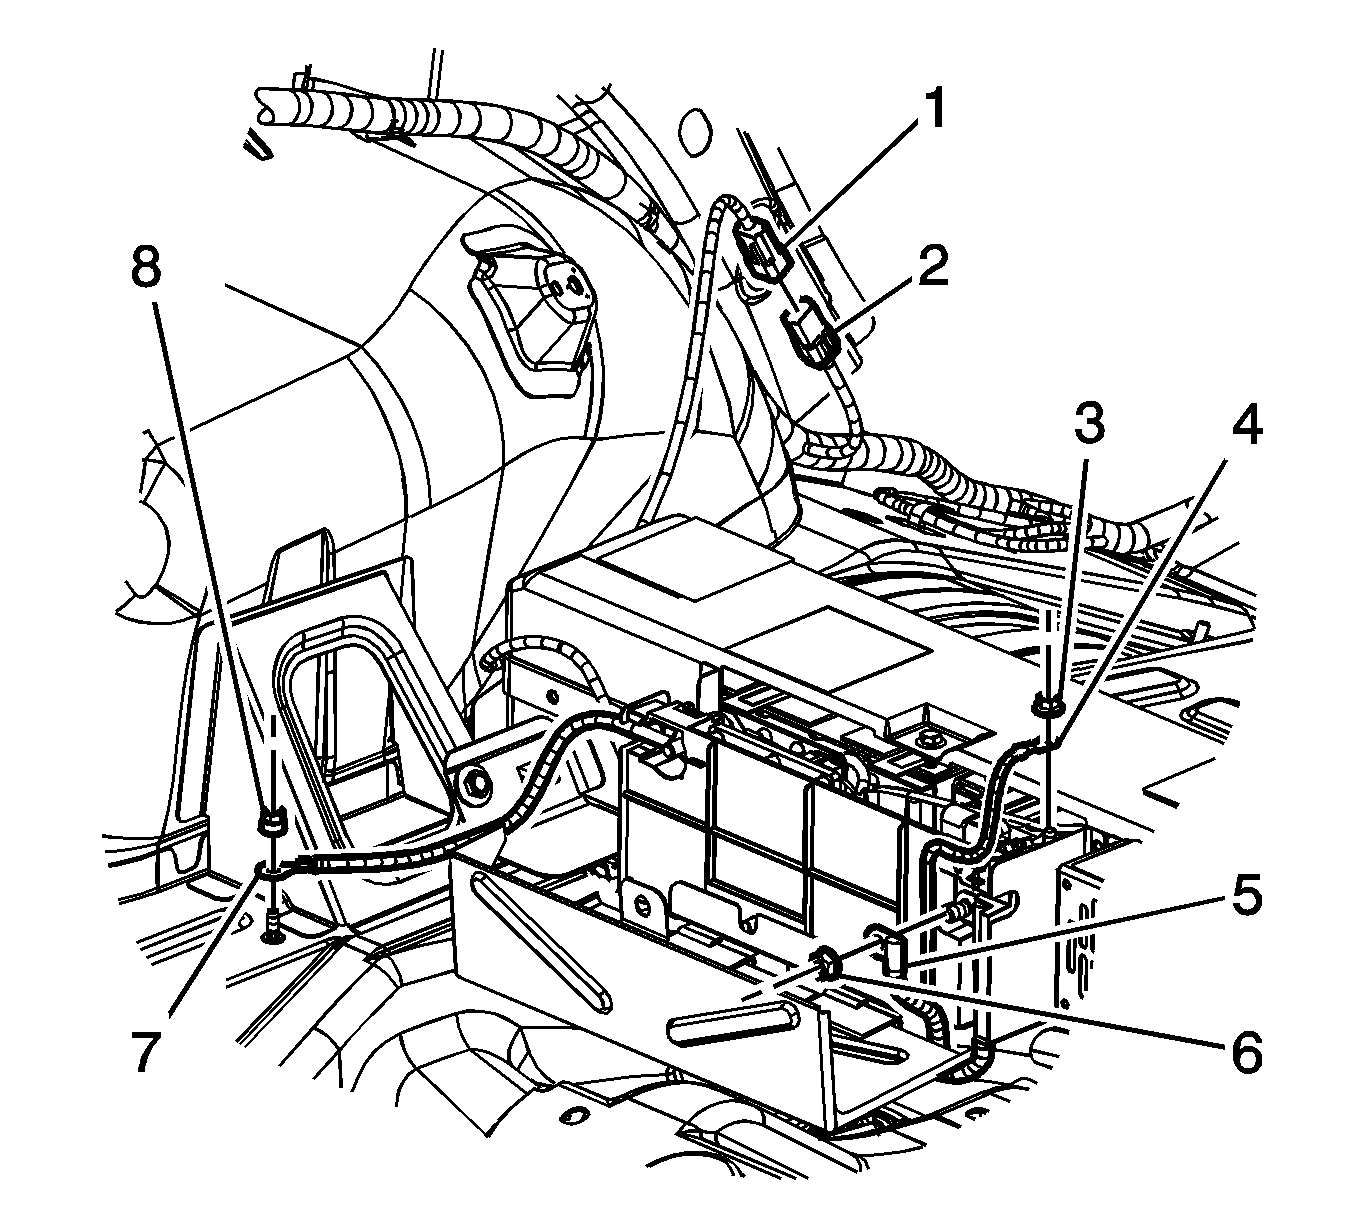
- Disconnect the generator battery wiring harness electrical connector (1) from the body wiring harness electrical connector (2).
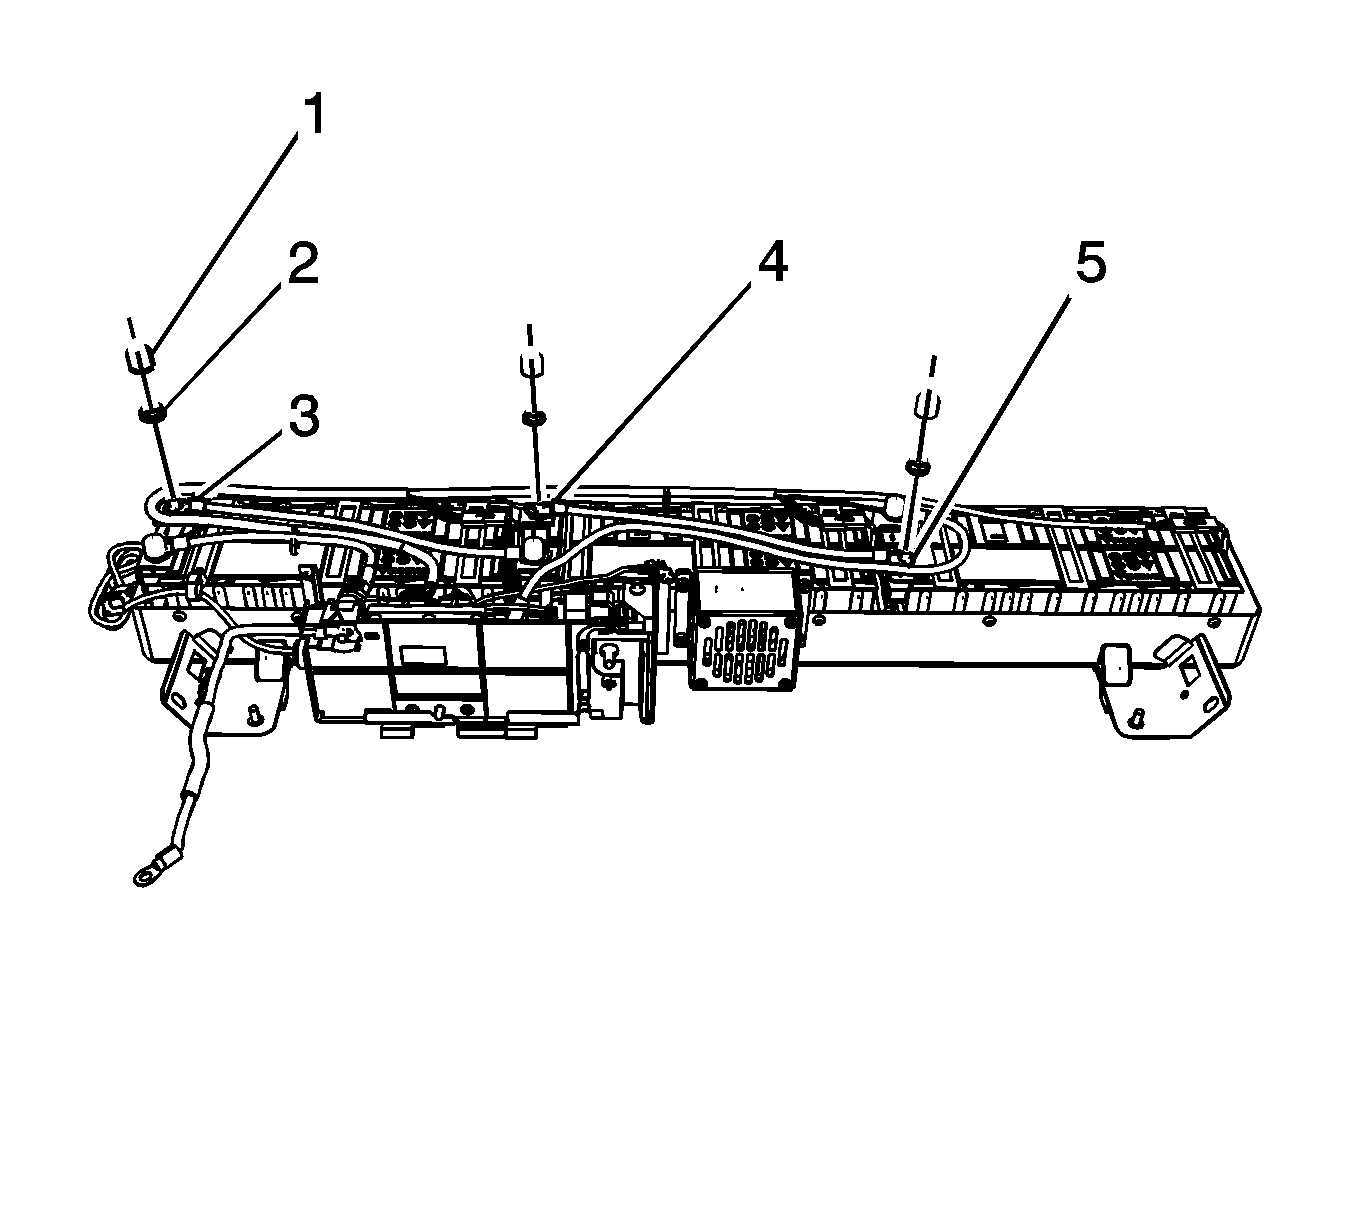
- Remove the 36-volt negative battery cable ground nut (8) and cable from the body stud.
- Remove the cable shield lead nut (3) and cable lead (4) from the carrier.
- Remove the 36-volt positive battery cable lead nut (6).
- Remove the 36-volt positive battery cable lead (5).
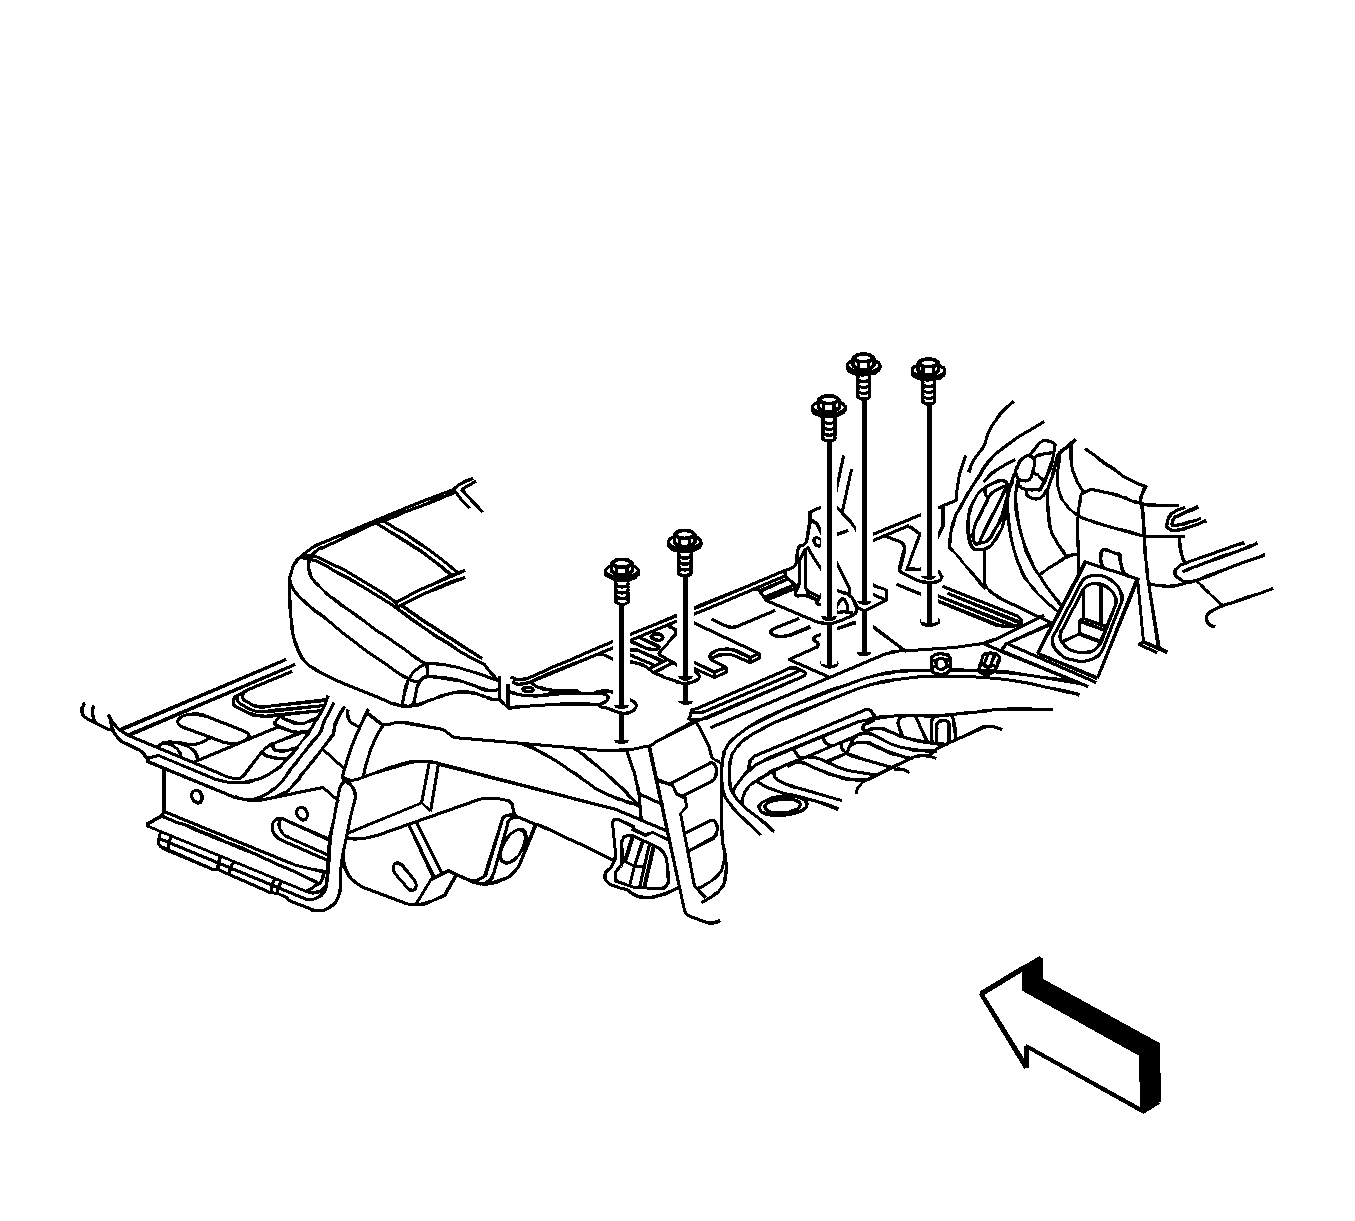
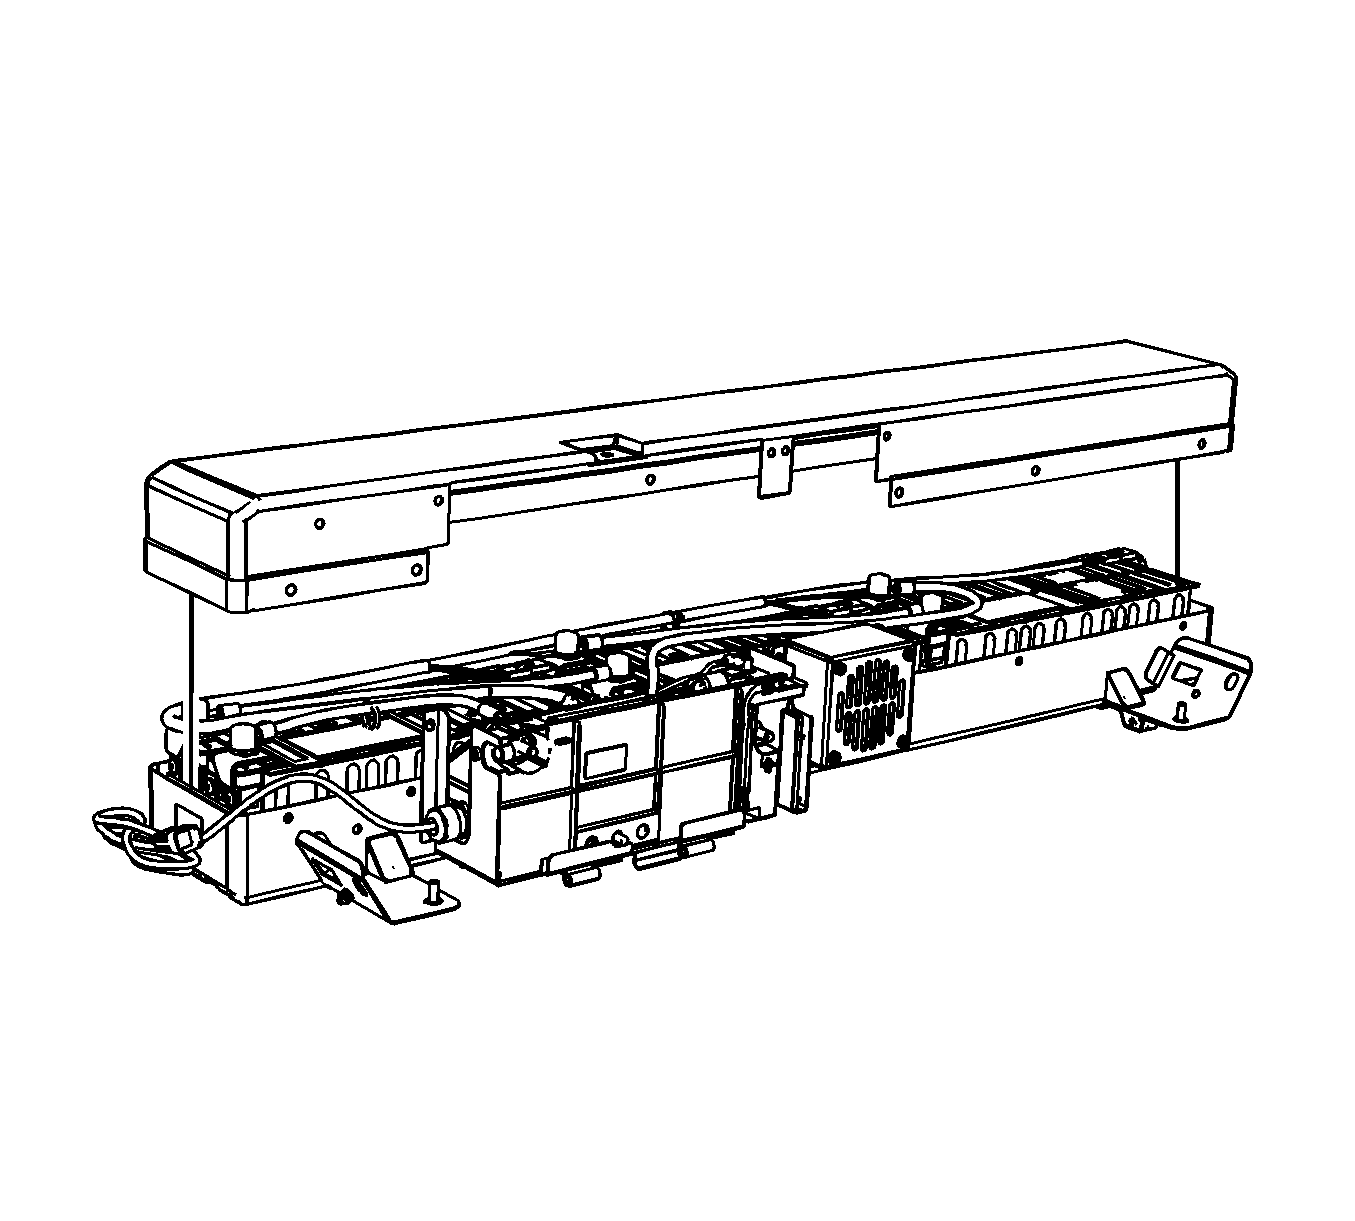
- Remove the generator battery front bolts (1) at the shock towers.
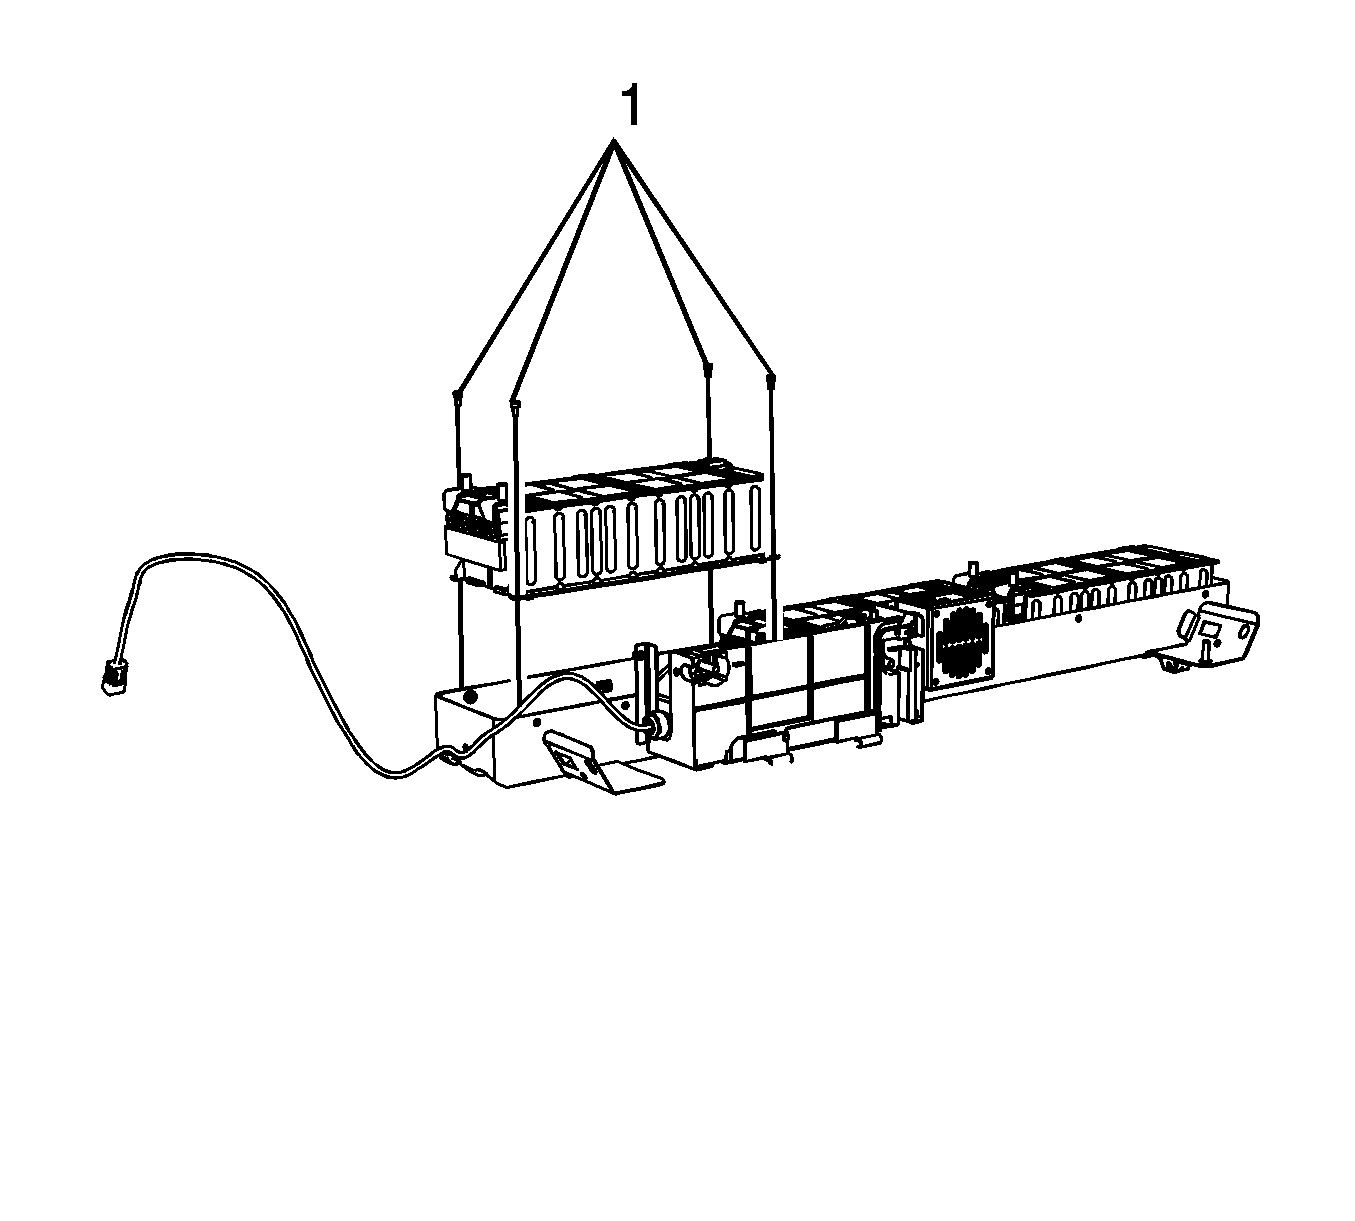
- Pull the generator battery carrier towards the rear of the vehicle and carefully remove the carrier from the vehicle. Place the carrier assembly on a workbench.
- Remove the two upper generator battery fan bolts (2).
- Remove the 12 generator battery cover bolts (1).
- Remove the generator battery wiring harness from the clip (3) on the generator battery cover.
- Remove the generator battery cover.
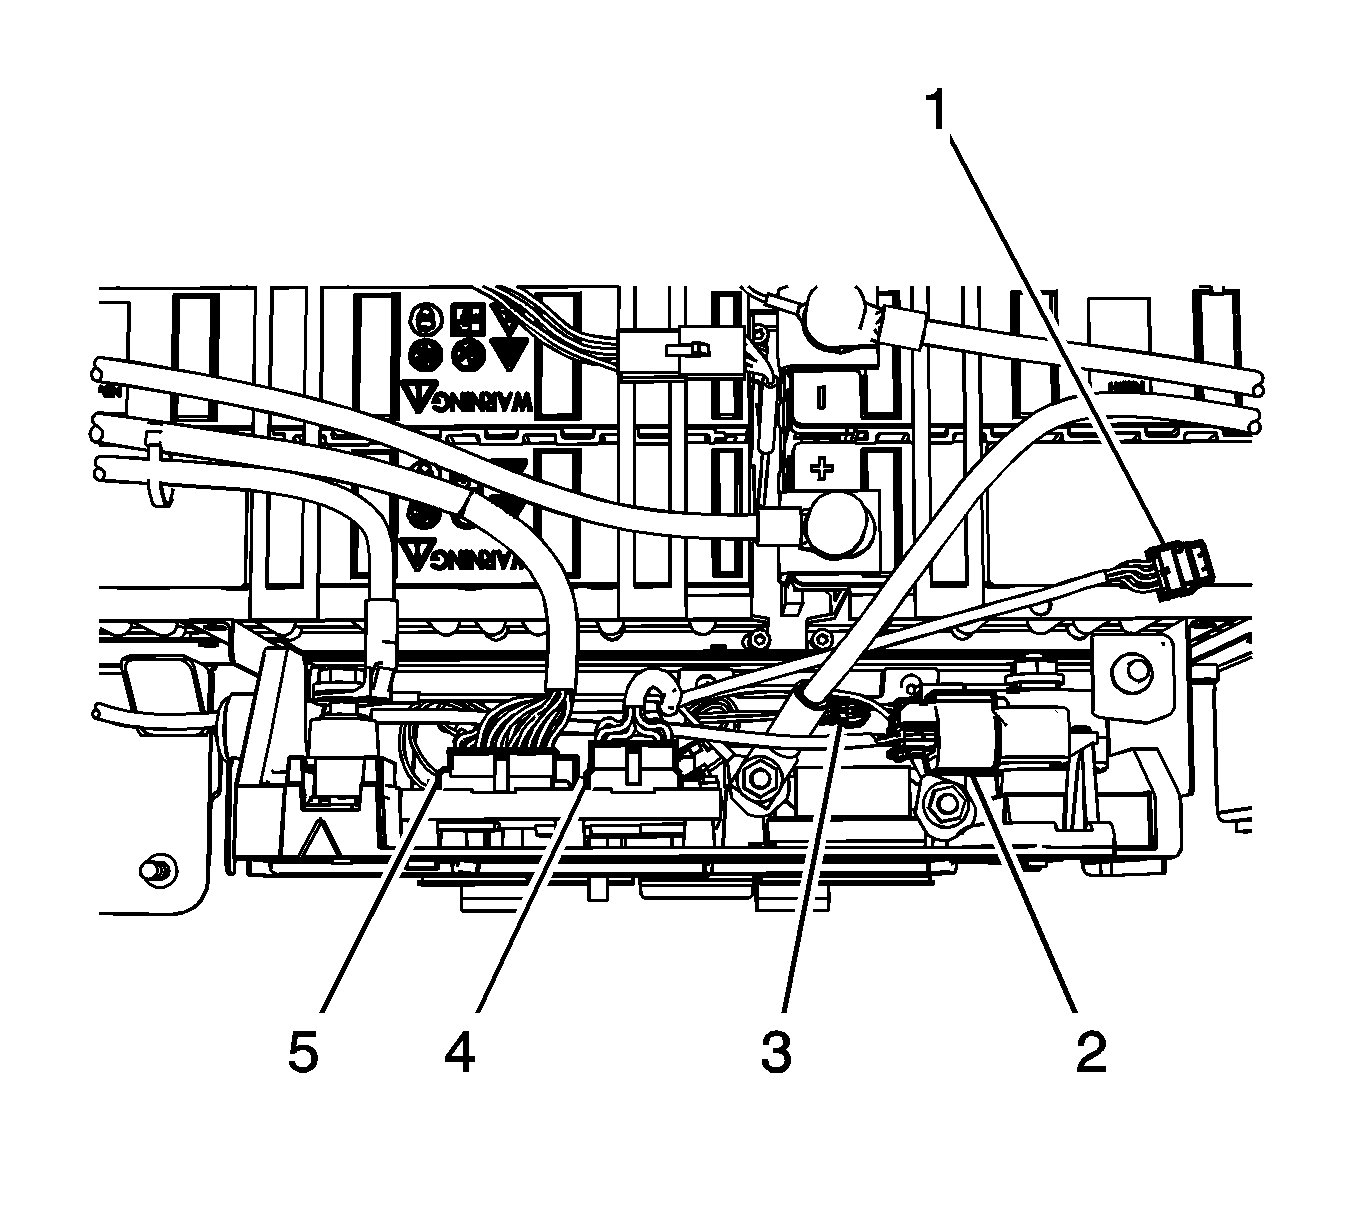
- Remove the generator battery terminal covers (1).
- Remove the generator battery cable nuts (2).
- Remove and reposition the generator battery cable leads (3, 4, 5) from the batteries.
- Disconnect the generator battery temperature sensor wiring harness electrical connectors (1) from the battery temperature sensors.
- Cut the tie straps securing the battery cables to the generator battery temperature sensor wiring harness.
- Disconnect the generator battery temperature sensor wiring harness electrical connectors (2, 5) from the generator control module.
- Remove the generator battery temperature sensor wiring harness.
- Remove the remaining generator battery cable from the battery.
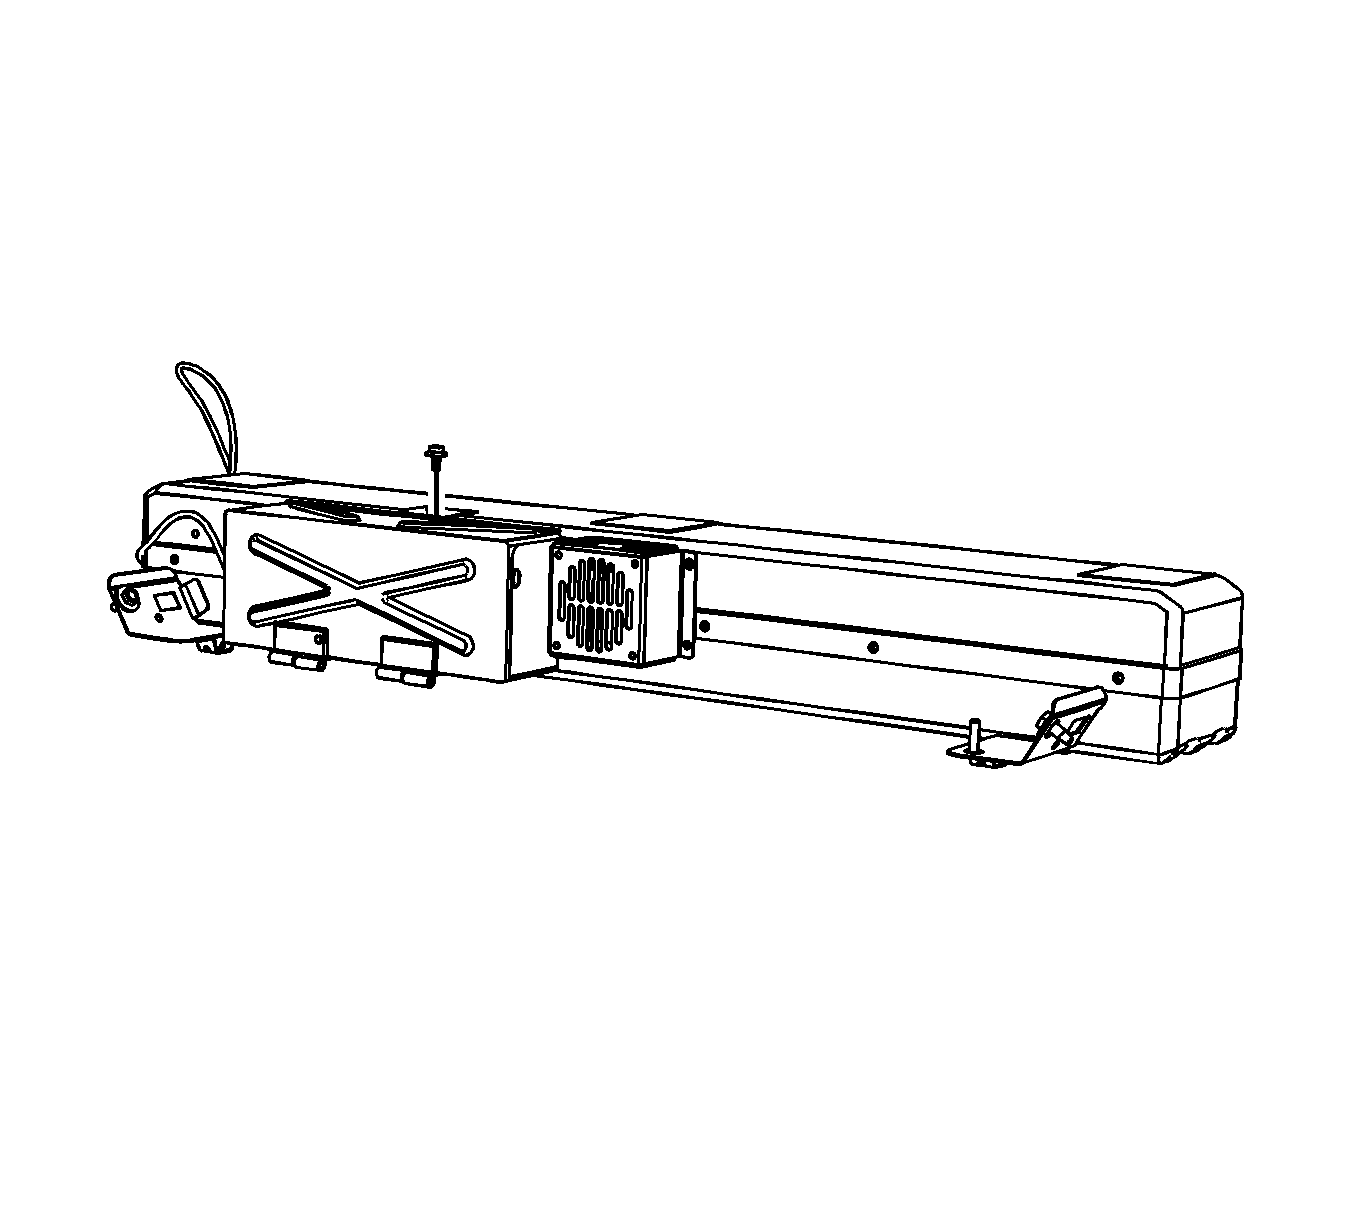
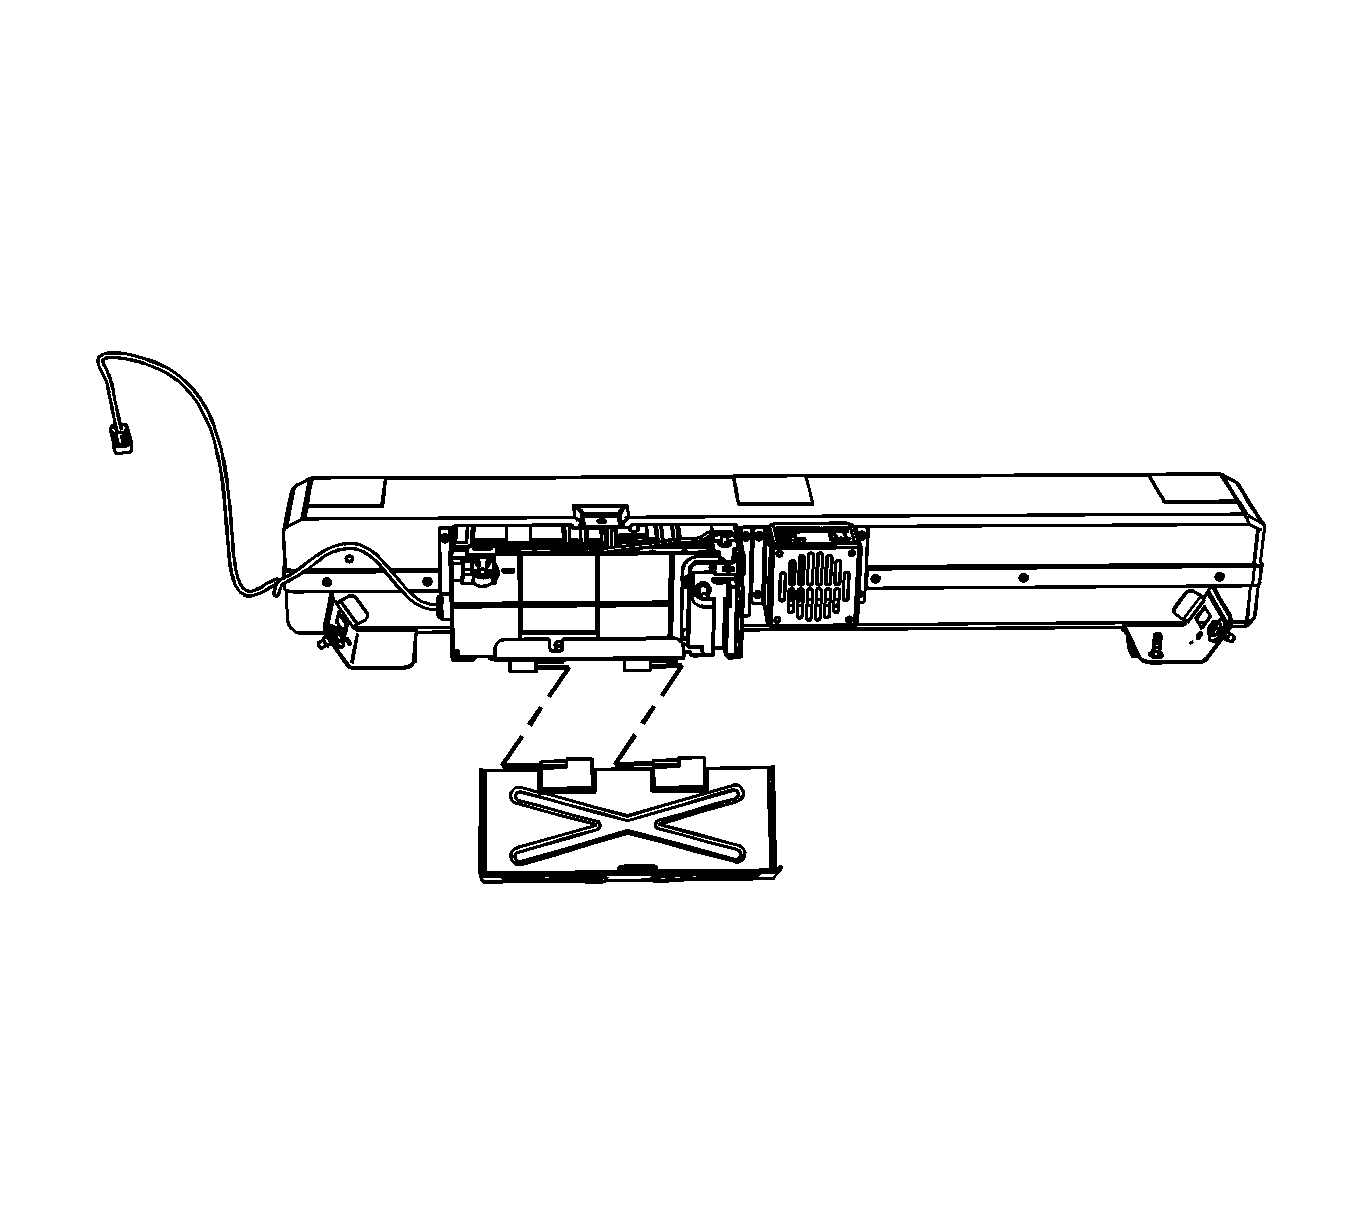
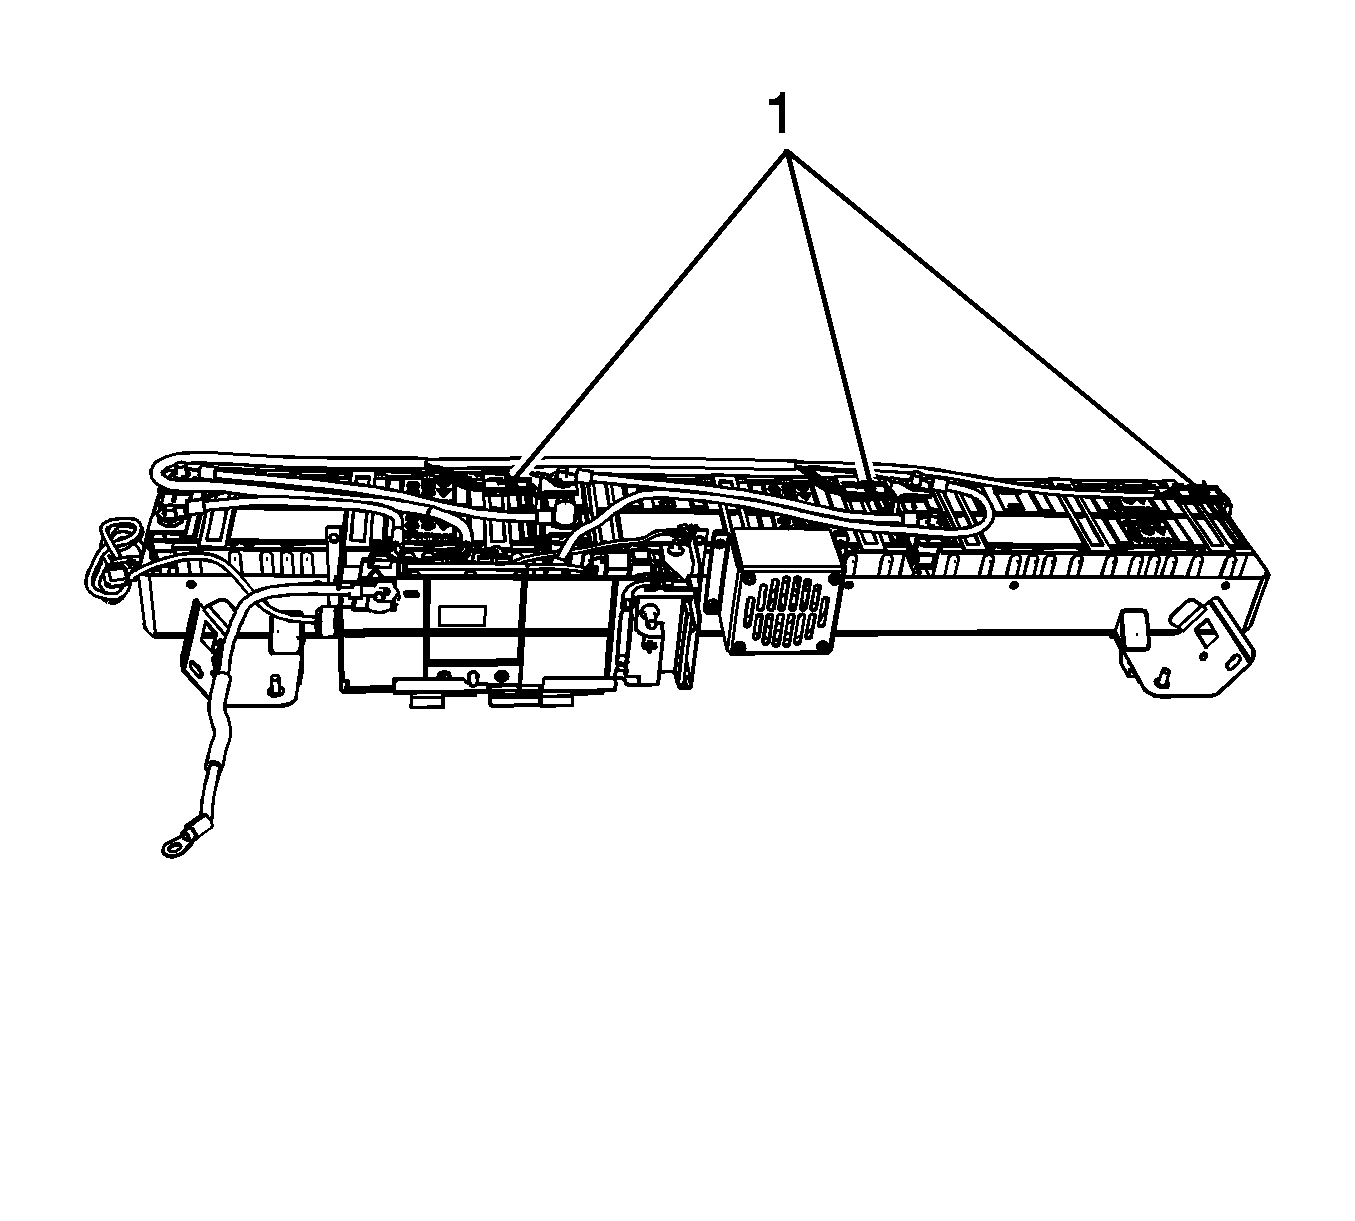
- Remove all the mounting bolts (1) from the 3 generator batteries.
- Remove all 3 generator batteries.
- Remove the 3 temperature sensors from the batteries.
- Remove the four generator battery control module assembly bolts.
- Remove the generator battery control module assembly from the carrier.
- Remove the two remaining lower vent fan bolts and fan from the carrier.
- Clean any corrosion or battery acid that is present on the inside of the hybrid battery case by using a sponge that is lightly dampened with soapy water. It is not necessary to use a neutralizer, such as baking soda.
- Dry the inside of the hybrid battery case using several shop towels.
- Apply black paint to any areas inside of the hybrid battery case where bare metal is present.
- Install the vent fan to the carrier and secure with two lower bolts.
- Install the generator battery control module assembly to the carrier.
- Install the generator battery control module assembly bolts.
- Install the 3 temperature sensors to the new batteries. Polarity does NOT matter.
- Install the new generator batteries.
- Install the generator battery bolts.
- Position and install the generator battery temperature sensor wiring harness.
- Connect the generator battery temperature sensor wiring harness electrical connectors to the battery temperature sensors.
- Connect the generator battery temperature sensor wiring harness electrical connectors to the generator control module.
- Position and install the generator battery cable leads to the battery terminals.
- Install the generator battery cable nuts to the batteries.
- Install the generator battery terminal covers.
- Install NEW tie straps in order to secure the battery cables to the generator battery temperature sensor wiring harness.
- Install the generator battery cover.
- Install the 12 generator battery cover bolts.
- Install the two generator battery fan bolts.
- Carefully install the generator battery carrier to the vehicle.
- Loosely install the generator battery front bolts at the shock towers.
- Connect the generator battery wiring harness electrical connector to the body wiring harness electrical connector.
- Reinstall the left side rear quarter lower trim panel.
- Install the rear seat rear bolts.
- Lift up the rear seat back.
- Tighten the generator battery bolts at the rear shock towers to 10 N·m(89 lb in).
- Install the 36-volt negative battery cable to the body ground stud and reinstall the nut.
- Install the 36-volt positive battery cable lead to the generator battery.
Important: Dust may be an irritant to skin and eyes. Avoid skin and eye contact. If battery dust is present, remove carefully to avoid inhalation. Wear safety glasses and butyl rubber, natural rubber, neoprene, nitrile or Tyvek protective gloves when handling any corroded hybrid batteries, and when cleaning the inside of the hybrid battery case. Discard the gloves after each use and dispose of any corrosion material that was removed from the case.
Important: Never assume the battery pack is disabled when the generator battery disconnect control module cover is opened.
| 7.1. | Set the voltmeter to DC voltage. |
| 7.2. | Measure the vehicle's 12-volt battery voltage (at 12-volt positive jumper location and negative battery cable). |
| 7.3. | The meter should read greater than +12 volts DC. |
| 8.1. | Measure from the positive (3) stud to the negative stud (2). The voltage should be less than 3 volts. |
| 8.2. | Measure from the positive (3) stud to the vehicle chassis ground (1). The voltage should be less than 3 volts. |
| 8.3. | Measure from the negative (2) stud to the vehicle chassis ground (1). The voltage should be less than 3 volts. |
| 8.4. | After verifying that there is no voltage present, the vehicle is now safe to work on. |
Important: Removing the interconnect cables will disable the 36 volts within the generator battery control module.
Important: Each hybrid battery must be placed in two (double) polyethylene 6 mil bags that were provided with the new batteries. If the bags were not included with the batteries, contact your Saturn Parts Service Analysis (PSA) or the Saturn Saab Service Parts Assistance Centre (SPAC) for Canadian retailers. This double bagging procedure must be performed as soon as the hybrid batteries are removed from the vehicle. After bagging the individual battery cassettes, place the batteries in the original shipping container.
Tighten
Tighten the bolts to 10 N·m(89 lb in).
Important: The cable leads must be installed correctly to prevent low voltage DTCs. It is recommended that the disassembly and reassembly be performed at the same time to ensure reinstalling the cables in the correct location. In the event that the battery cable routing is in question, it is important to remember that the battery cable stud and plate covers up (not visible) the polarity indicator in the plastic case. The polarity that is visible is for the terminal NEXT to the stud. This visible polarity indicator is NOT for the battery stud. This was covered in the BAS hybrid training.
Tighten
Tighten the nuts to 8 N·m(71 lb in).
Tighten
Tighten the bolts to 8 N·m (71 lb in).
Tighten
Tighten the bolts to 8 N·m (71 lb in).
Tighten
Tighten the rear seat rear bolts to 50 N·m (37 lb ft).
Tighten
Tighten the nut to 9 N·m(80 lb in).
Battery Cassette Replacement - AURA
- Remove the ignition key from the ignition switch. Secure the ignition key in order to ensure that the key CANNOT be reinstalled without your knowledge.
- Disconnect the 12-volt negative battery cable.
- Fold down both rear seat backs.
- Carefully lift up on the load floor rear compartment cover (1) at the retaining clip (2) locations.
- Tilt the load floor rear compartment cover (2) towards the rear of the vehicle slightly, disengaging the tabs (1) and remove the load floor rear compartment cover.
- Remove the generator battery disconnect control module cover bolt.
- Slide the generator battery disconnect control module cover to the right and remove the cover.
- WAIT at least 5 minutes in order to allow the generator control module capacitors to discharge.
- The generator battery will have to be checked for voltage potential using a voltmeter. First, verify that the voltmeter works.
- Now, check the generator battery for voltage potential in order to ensure that the generator battery has been disabled.
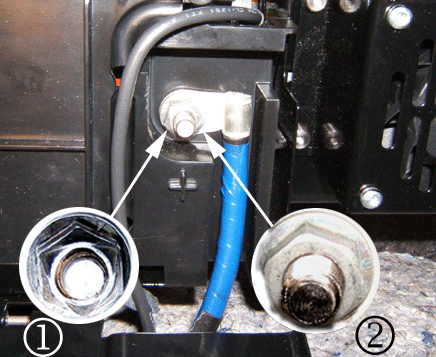
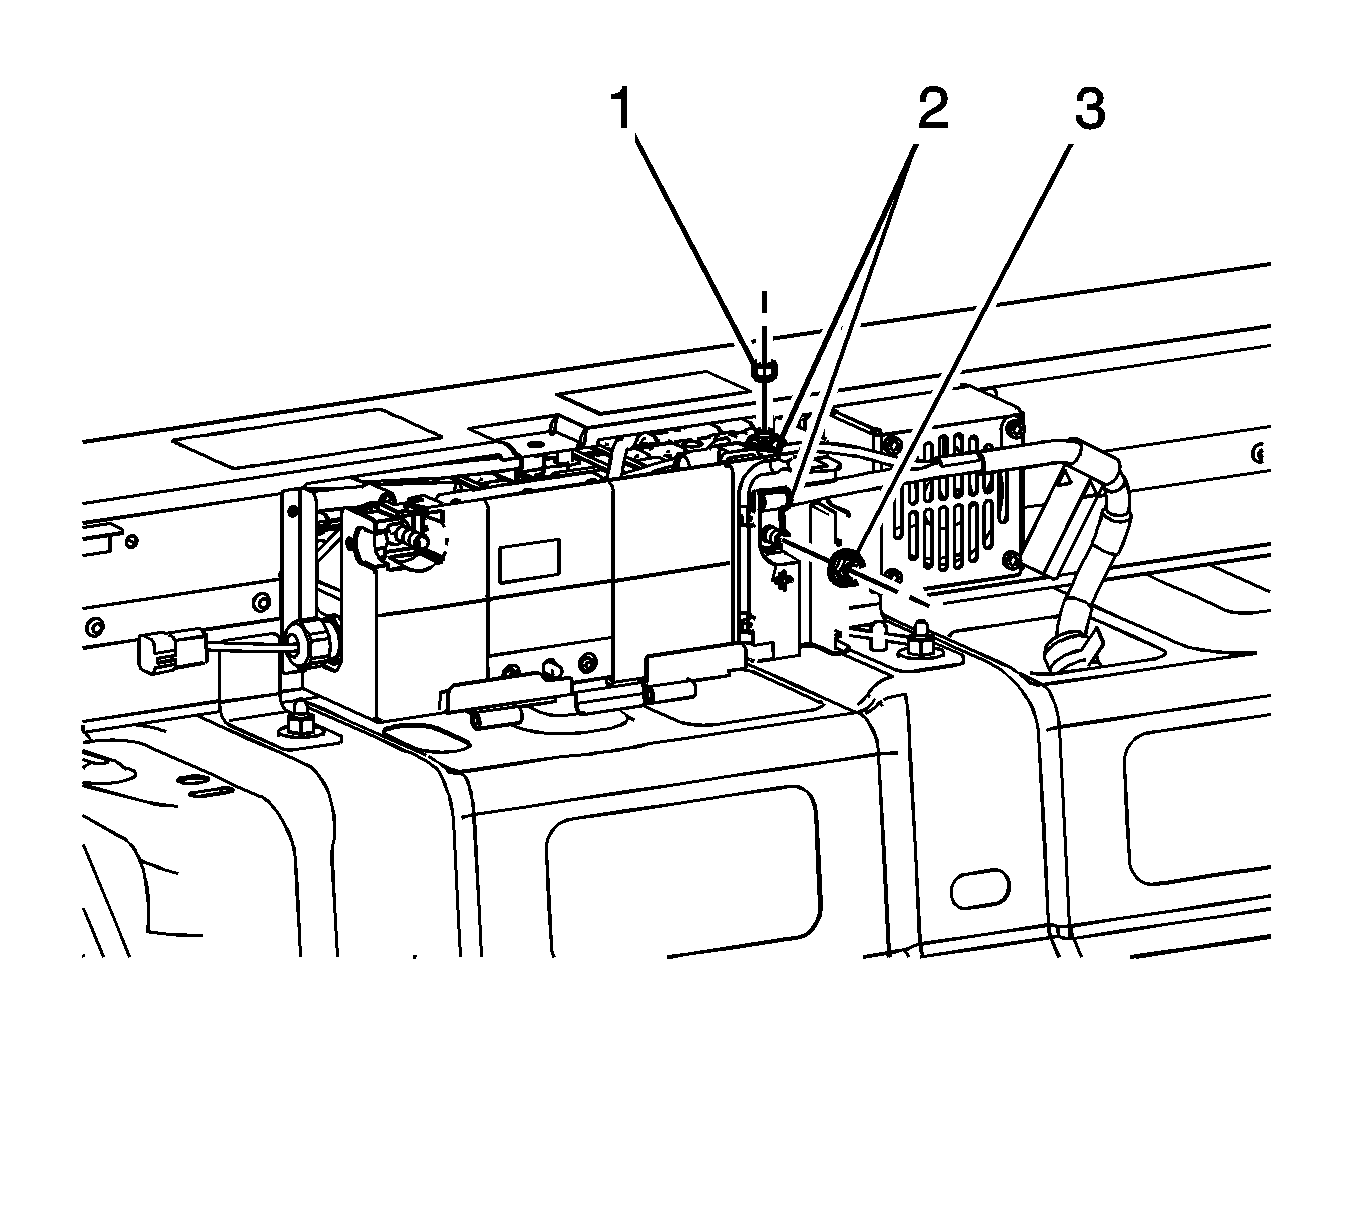
- Remove the 36-volt negative battery cable ground nut (1).
- Remove the 36-volt positive battery cable retainer bolt (1).
- Remove and discard the 36-volt positive battery cable lead nut (3).
- Remove the 36-volt positive battery cable lead nut (1).
- Remove the 36-volt positive battery cable leads (2).
- Secure the cables out of the way, ensuring that the cables CANNOT be reinstalled without your knowledge.
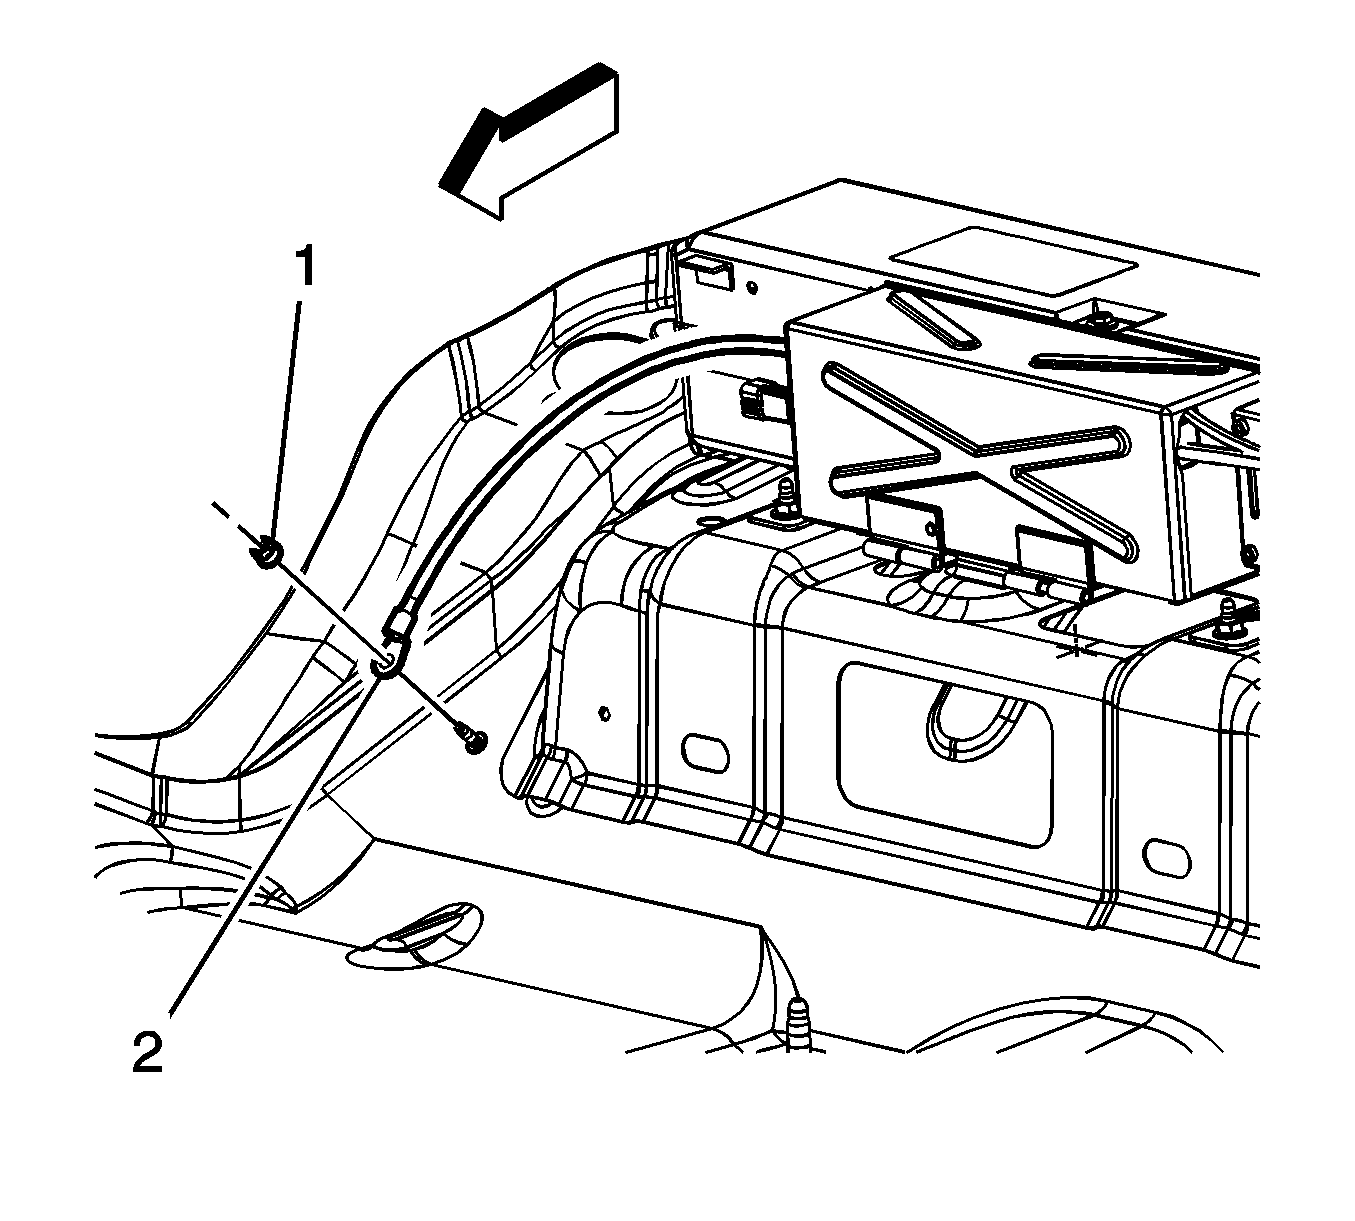
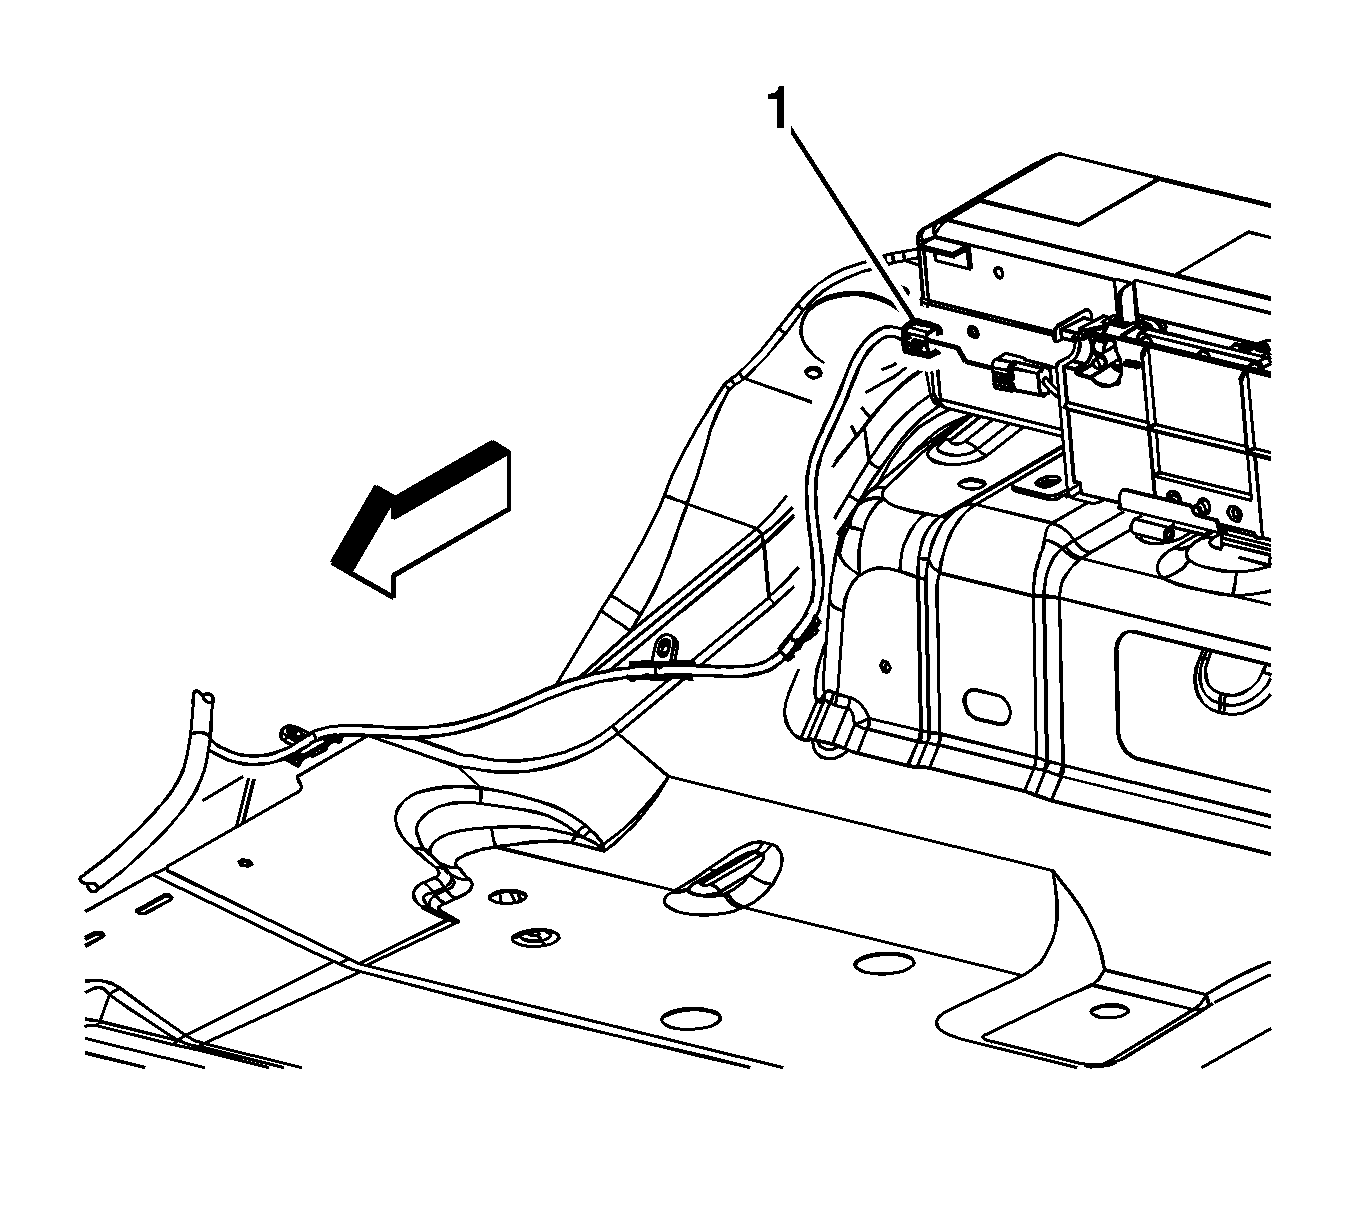
- Disconnect the body wiring harness electrical connector (1) from the generator battery disconnect control module pigtail.
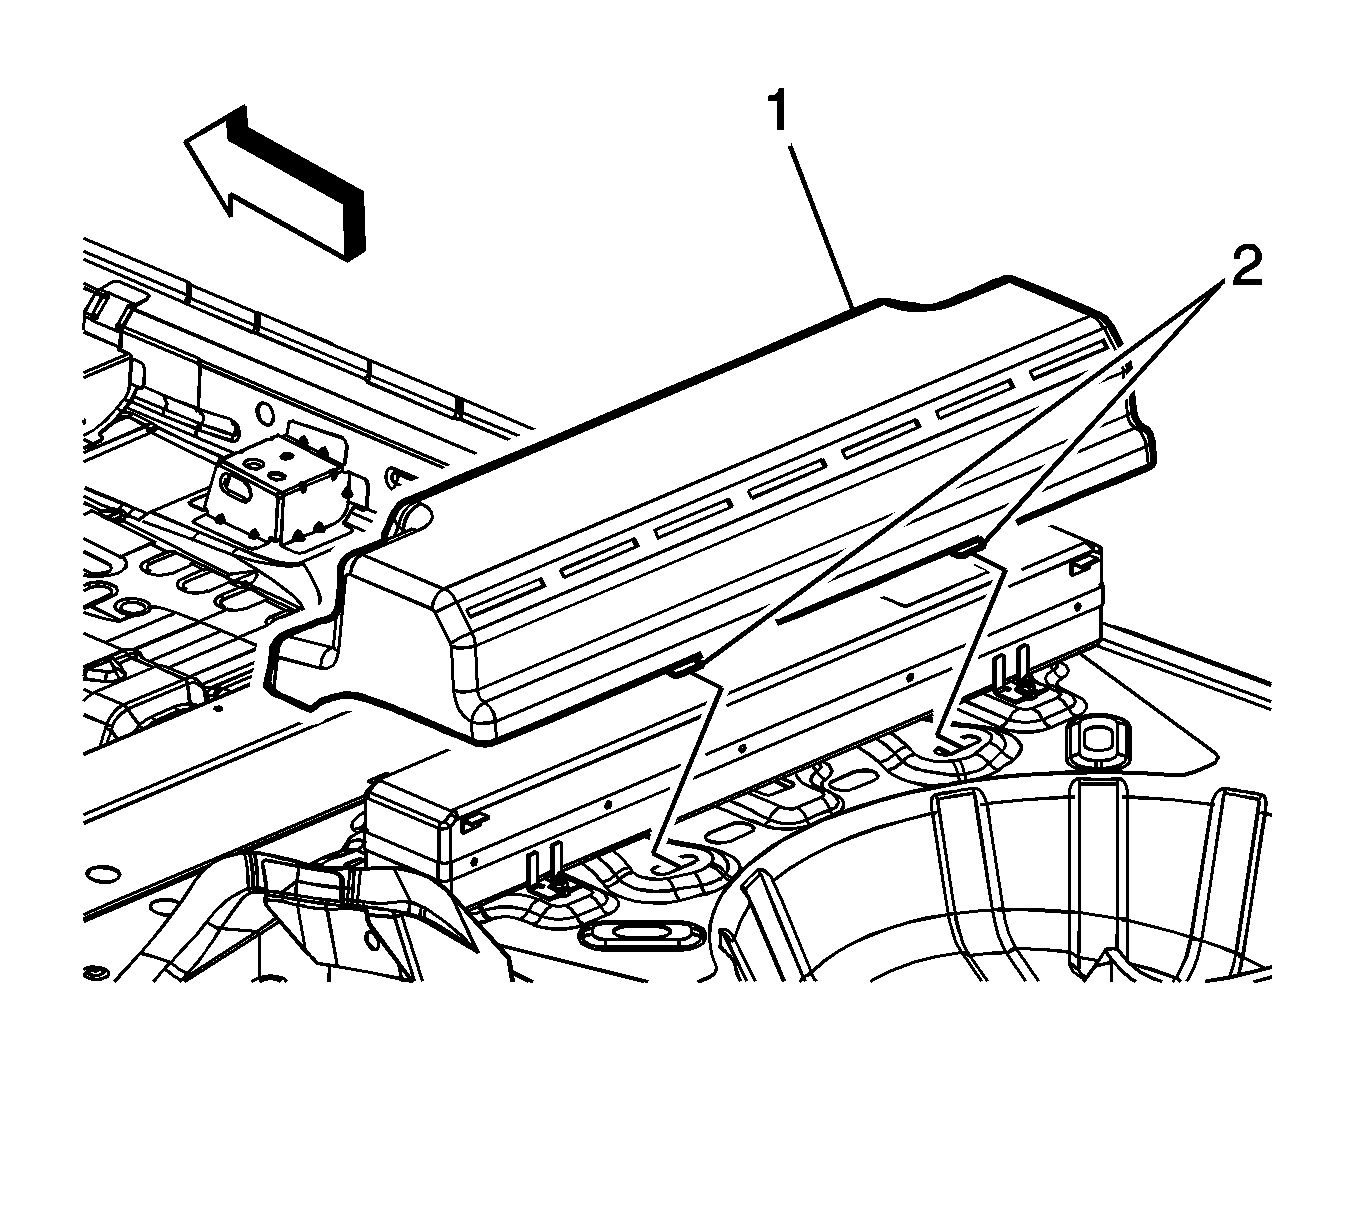
- Remove the generator battery carrier nuts (2).
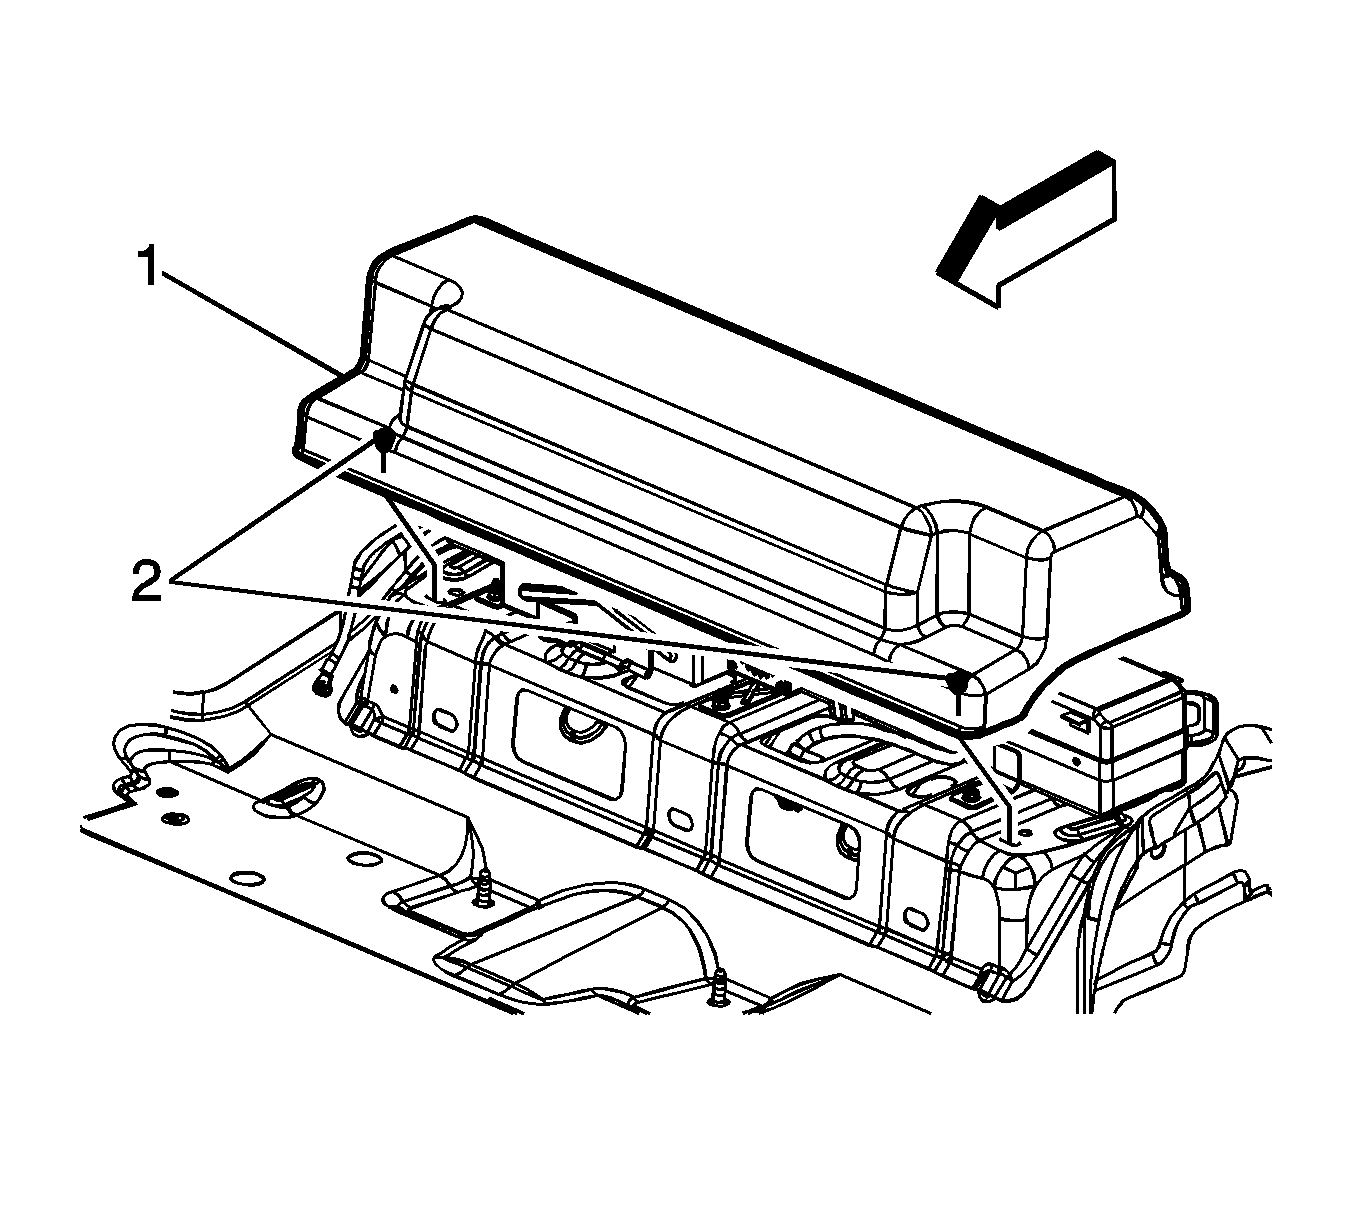
- With the aid of an assistant, lift the generator battery carrier up off of the studs, and rotate and position the carrier towards the rear of the vehicle.
- With the aid of an assistant, remove the generator battery carrier out through the truck opening. Place the carrier on a workbench.
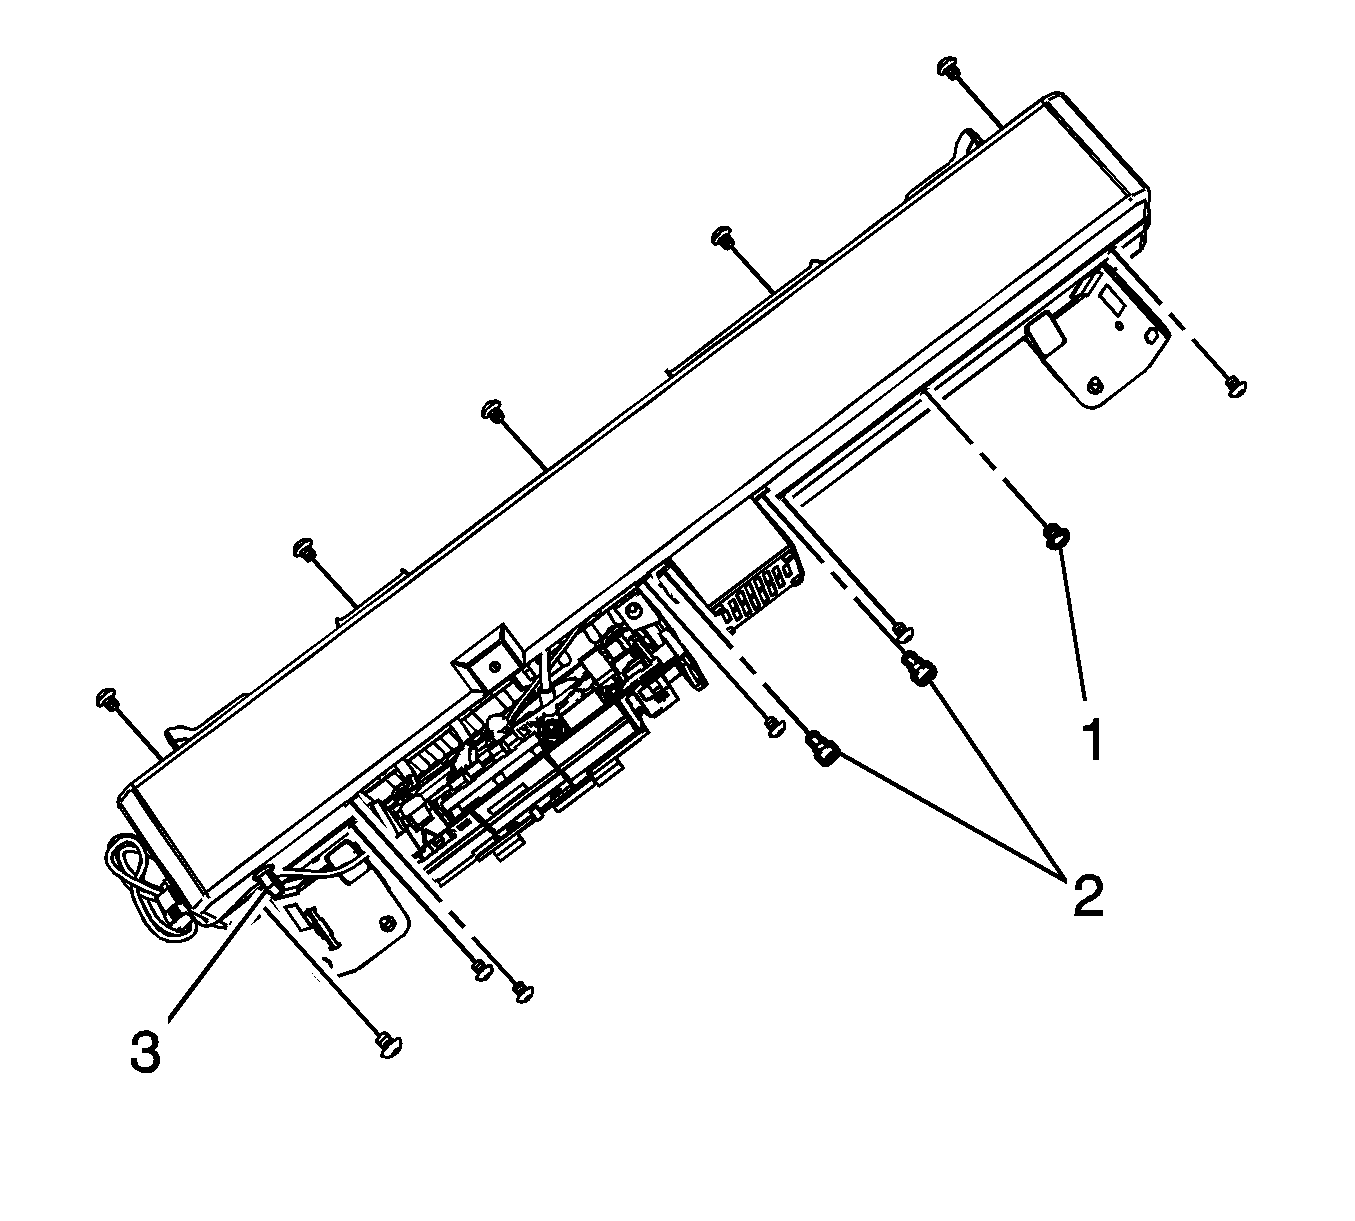
- Remove the two upper generator battery fan bolts (2).
- Remove the 12 generator battery cover bolts (1).
- Remove the generator battery wiring harness from the clip (3) on the generator battery cover.
- Remove the generator battery cover.
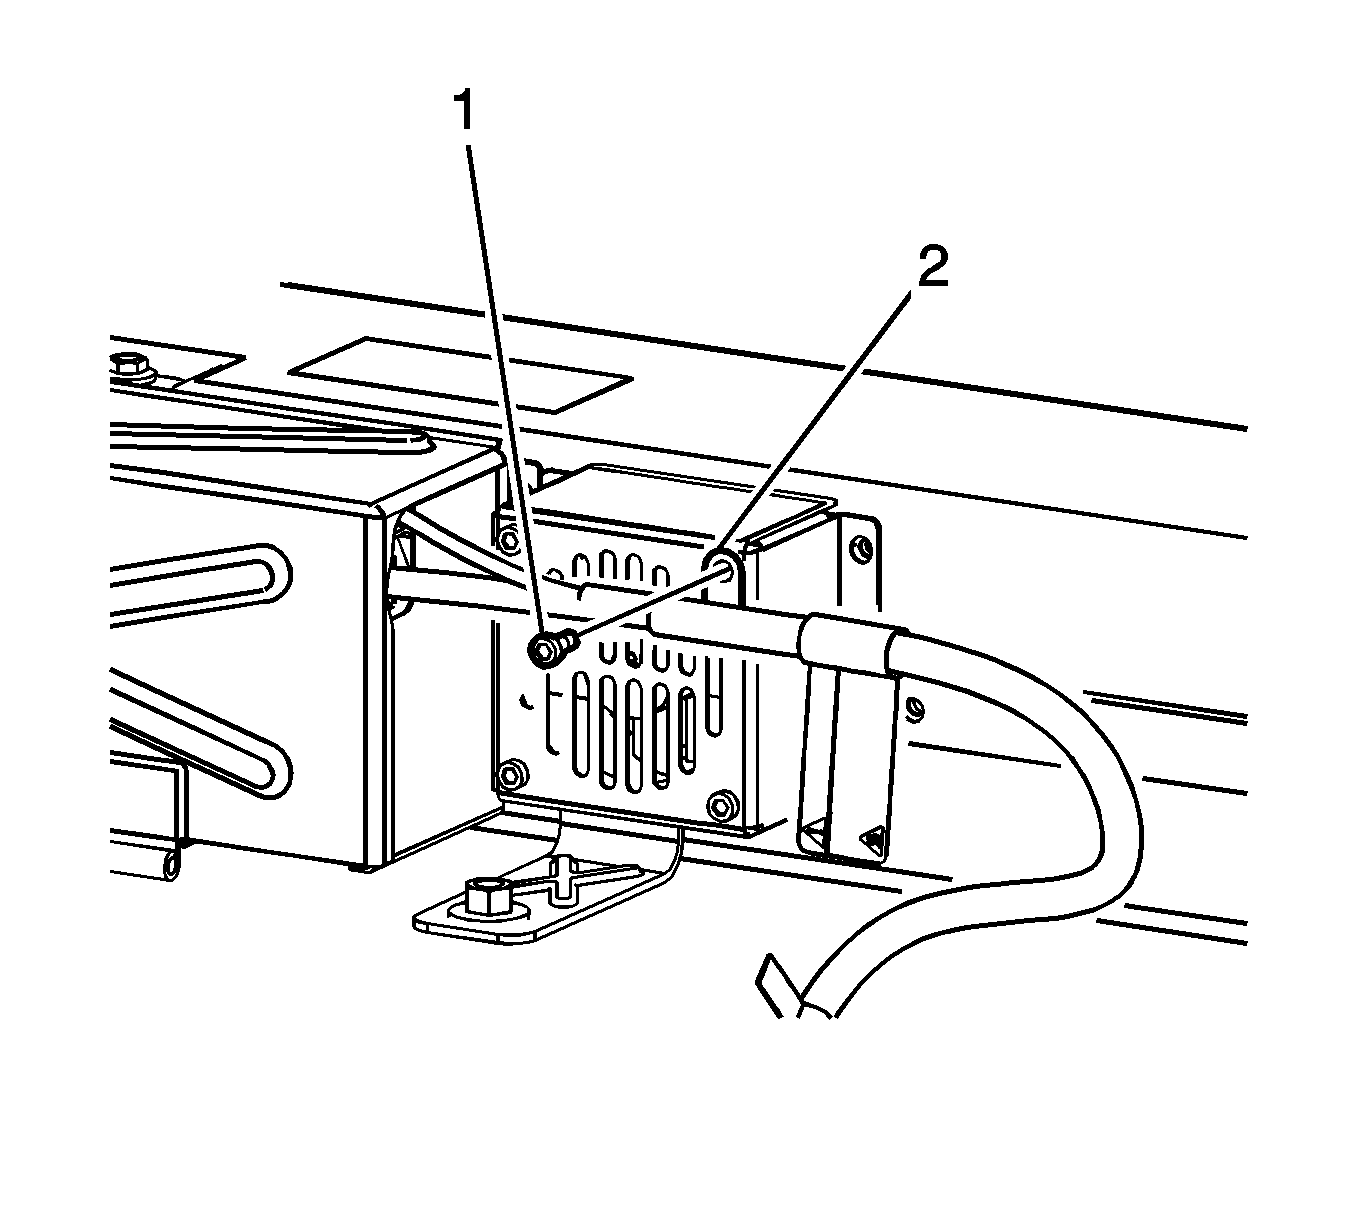
- Remove the generator battery terminal covers (1).
- Remove the generator battery cable nuts (2).
- Remove and reposition the generator battery cable leads (3, 4, 5) from the batteries.
- Disconnect the generator battery temperature sensor wiring harness electrical connectors (1) from the battery temperature sensors.
- Cut the tie straps securing the battery cables to the generator battery temperature sensor wiring harness.
- Disconnect the generator battery temperature sensor wiring harness electrical connectors (2, 5) from the generator control module.
- Remove the generator battery temperature sensor wiring harness.
- Remove the remaining generator battery cable from the battery.
- Remove all the mounting bolts (1) from the 3 generator batteries.
- Remove all 3 generator batteries.
- Remove the 3 temperature sensors from the batteries.
- Remove the four generator battery control module assembly bolts.
- Remove the generator battery control module assembly from the carrier.
- Remove the two remaining lower vent fan bolts and fan from carrier.
- Clean any corrosion or battery acid that is present on the inside of the hybrid battery case by using a sponge that is lightly dampened with soapy water. It is not necessary to use a neutralizer, such as baking soda.
- Dry the inside of the hybrid battery case using several shop towels.
- Apply black paint to any areas inside of the hybrid battery case where bare metal is present.
- Install the vent fan to the carrier and secure with two lower bolts.
- Install the generator battery control module assembly to the carrier.
- Install the generator battery control module assembly bolts.
- Install the 3 temperature sensors to the new batteries. Polarity does NOT matter.
- Install the new generator batteries.
- Install the generator battery bolts.
- Position and install the generator battery temperature sensor wiring harness.
- Connect the generator battery temperature sensor wiring harness electrical connectors to the battery temperature sensors.
- Connect the generator battery temperature sensor wiring harness electrical connectors to the generator control module.
- Position and install the generator battery cable leads to the battery terminals.
- Install the generator battery cable nuts to the batteries.
- Install the generator battery terminal covers.
- Install NEW tie straps in order to secure the battery cables to the generator battery temperature sensor wiring harness.
- Install the generator battery cover.
- Install the 12 generator battery cover bolts.
- Install the two generator battery fan bolts.
- With the aid of an assistant, install the generator battery carrier in through the truck opening and rotate and position the carrier towards the front of the vehicle.
- With the aid of an assistant, lift the generator battery carrier up onto the studs.
- Install the generator battery carrier nuts.
- Connect the body wiring harness electrical connector to the generator battery disconnect control module pigtail.
- Install the 36-volt positive battery cable leads.
- Install the 36-volt positive battery cable lead nut.
- Install a NEW 36-volt positive battery cable lead nut. Start the nut finger-tight, and then torque to the specification given
- Position the 36-volt positive battery cable retainer to the fan cover.
- Install the 36-volt positive battery cable retainer bolt.
- Install the 36-volt negative battery cable ground nut.
- Install the generator battery cover bolt.
- Tilt the load floor rear compartment cover towards the rear of the vehicle slightly in order to insert the tabs into the battery tray rear support.
- Set the load floor rear compartment cover down, ensuring that the retaining clips align to the proper locations, carefully push down, securing the cover.
- Return both rear seat backs to their proper positions.
- Connect the 12-volt negative battery cable.
- Reprogram the ECM with the latest calibrations if a P1A5A DTC was stored with the P1A59 DTC.
- After programming, clear any DTC codes that may be present.
- Click the Service Know-How/TECHAssist hyperlink on the left side of the screen.
- Click the Emerging Issues hyperlink in the center of the screen.
- Click the Searchable Streaming Video hyperlink in the center of the screen.
- Enter the course number 10207.10D in the search box on the left side of the screen and click Search.
- CALIFORNIA, MASSACHUSETTS, MAINE, & VERMONT VEHICLES ONLY: Install a Recall Identification Label. Also, for California vehicles complete a "Proof of Correction" certificate upon recall completion.
- Refer to the section below titled "Returning the Battery."
Important: Dust may be an irritant to skin and eyes. Avoid skin and eye contact. If battery dust is present, remove carefully to avoid inhalation. Wear safety glasses and butyl rubber, natural rubber, neoprene, nitrile or Tyvek protective gloves when handling any corroded hybrid batteries and when cleaning the inside of the hybrid battery case. Discard the gloves after each use and dispose of any corrosion material that was removed from the case.
Important: Never assume the battery pack is disabled when the generator battery disconnect control module cover is opened.
| 9.1. | Set the voltmeter to DC voltage. |
| 9.2. | Measure the vehicle's 12-volt battery voltage (at 12-volt positive jumper location and negative battery cable). |
| 9.3. | The meter should read greater than +12 volts DC. |
| 10.1. | Measure from the positive (3) stud to the negative stud (2). The voltage should be less than 3 volts. |
| 10.2. | Measure from the positive (3) stud to vehicle chassis ground (1). The voltage should be less than 3 volts. |
| 10.3. | Measure from the negative (2) stud to vehicle chassis ground (1). The voltage should be less than 3 volts. |
| 10.4. | After verifying that there is no voltage present, the vehicle is now safe to work on. |
Important: Removing the interconnect cables will disable the 36 volts within the generator battery control module.
Important: Each hybrid battery must be placed in two (double) polyethylene 6 mil bags that were provided with the new batteries. If the bags were not included with the batteries, contact your Saturn Parts Service Analysis (PSA) or the Saturn Saab Service Parts Assistance Centre (SPAC) for Canadian retailers. This double bagging procedure must be performed as soon as the hybrid batteries are removed from the vehicle. After bagging the individual battery cassettes, place the batteries in the original shipping container.
Important: Only perform Steps 39-41 if the corrosion or battery acid is present.
Tighten
Tighten the bolts to 10 N·m(89 lb in).
Important: The cable leads must be installed correctly to prevent low voltage DTCs. It is recommended that the disassembly and reassembly be performed at the same time to ensure reinstalling the cables in the correct location. In the event that the battery cable routing is in question, it is important to remember that the battery cable stud and plate covers up (not visible) the polarity indicator in the plastic case. The polarity that is visible is for the terminal NEXT to the stud. This visible polarity indicator is NOT for the battery stud. This was covered in the BAS hybrid training.
Tighten
Tighten the nuts to 8 N·m(71 lb in).
Tighten
Tighten the bolts to 8 N·m(71 lb in).
Tighten
Tighten the bolts to 8 N·m(71 lb in).
Tighten
Tighten the nuts to 25 N·m(18 lb ft).
Tighten
Tighten the nuts to 9 N·m (18 lb in).
Tighten
Tighten the nuts to 15 N·m(11 lb ft).
Tighten
Tighten the bolt to 8 N·m (71 lb in).
Tighten
Tighten the nut to 9 N·m(80 lb in).
Tighten
Tighten the bolt to 10 N·m(89 lb in).
Important: Hybrid parts are no longer on restriction through TAC. All hybrid parts can now be ordered through your parts department.
Important: For U.S. Retailers: Hybrid battery cassette replacement was recently covered in the October Emerging Issues Seminar (10207.10D). An archived copy of this training seminar should be stored on your Genesis IDL Box. It
is also available on the GM Training Website (www.gmtraining.com). This training seminar highlights BDU and hybrid battery cassette replacement. Once this video is loaded to the GM Training Website and you log in, you will be able to take the following path
to locate and view the October Emerging Issues Seminar (10207.10D):
Important: For Canadian Retailers, refer to December 2007 TAC TALK.
Returning the Battery (U.S. Retailers)
Return hybrid battery parts via dedicated delivery to SSPO following the existing Core Return Process. Place the batteries in cages along with the other return freight. While there is no core value for these batteries, returning them via the Core Return Process will ensure that the batteries will be recycled or disposed of properly.
Package the part to be returned in the same container that was used to deliver the replacement part. This container has specific labeling for a Class 8 hazardous materials that are exempt from a hazardous material classification for the purposes of transportation.
Returning the Battery (Canadian Retailers)
Each hybrid battery cassette must be placed in two (double) polyethylene 6 mil bags that were provided with the new replacement batteries. This double bagging procedure must be performed as soon as the hybrid batteries are removed from the vehicle. If the bags were not included with the batteries, contact your Saturn Saab Service Parts Assistance Centre (SPAC) before commencing with the removal of the hybrid battery. After bagging the individual battery cassettes separately, place the three bagged cassettes in the original cardboard shipping container (three cassettes per container), seal with packing tape and mark the repair date, repair order number, and your Retailer Code on the top of each container with a permanent marker.
Store/stack the shipping containers on a wood pallet located in a cool dry area inside the retailer shop facility (do not store outside). Arrange the shipping containers on the pallet with six (6) containers in each layer and maximum five (5) layers high. Ensure the pallet is secure from physical damage.
Note: Do not store any other batteries on the same skid as the Hybrid Batteries.
Once the skid is full (30 containers maximum) or every 6 months, whichever occurs first, contact Newalta Industrial Services at 1-888-772-2543 to arrange for pick-up. Please reference GM Recall 07318 during your conversation with the Newalta representative and provide him/her with a contact name and phone number for the retailer, and the number of containers to be collected. Newalta will prepare the necessary documentation and arrange to collect the batteries from the retailer and transport same to the arranged recycling facility at no cost to the retailer.
Following this procedure will ensure that the batteries are transported and recycled properly in accordance with Canadian laws.
Recall Identification Label - California/Massachusetts/Maine/Vermont Vehicles Only
Place a Recall Identification Label on each vehicle corrected in accordance with the instructions outlined in this Product Recall Bulletin. Each label provides a space to include the recall number and the five-digit retailer code of the retailer performing the recall service. This information may be inserted with a typewriter or a ballpoint pen.
Put the Recall Identification Label on a clean and dry surface of the radiator core support in an area that will be visible to people servicing the vehicle.
When installing the Recall Identification Label, be sure to pull the tab to allow adhesion of the clear protective covering. Additional Recall Identification Labels for US retailers can be obtained from Retailer Support Materials by ordering on the web from DWD Store, www.gmretailerworld.com, and then click on the DWD Store link. Request Item Number S-1015 when ordering.
Courtesy Transportation
The General Motors Courtesy Transportation program is intended to minimize customer inconvenience when a vehicle requires a repair that is covered by the New Vehicle Limited Warranty. The availability of courtesy transportation to customers whose vehicles are within the warranty coverage period and involved in a product program is very important in maintaining customer satisfaction. Retailers are to ensure that these customers understand that shuttle service or some other form of courtesy transportation is available and will be provided at no charge. Canada retailers should refer to applicable Home Office letter on this subject.
Claim Information - Canada Saturn Only
Submit a Product Recall Claim with the information indicated below:
Repair Performed | Part Count | Part No. | Parts Allow | CC-FC | Labor Op | Labor Hours | Net Item |
|---|---|---|---|---|---|---|---|
Inspect Battery Cassette/Packs - No Further Action Required | N/A | N/A | N/A | MA-96 | V1791 | 0.2 | N/A |
Inspect & Replace Hybrid Battery (inc. ECM Reprogramming) | 1-2 | -- | * | MA-96 | V1792 |
|
|
AURA | 1.8 | ||||||
VUE | 2.0 | ||||||
Add: Clean and Paint Battery Tray |
|
|
|
|
| 0.4 | ** |
* The "Parts Allowance" should be the sum total of the current GMSPO Retailer net price plus applicable Mark-Up for the battery, and nut if needed, to complete the repair. ** The amount identified in the "Net Item" column should represent the actual sum total of the current GMSPO Retailer net price for the touch-up paint needed to perform the required repairs plus applicable Mark-Up, not to exceeded $1.00. | |||||||
Refer to the General Motors WINS Claims Processing Manual for details on Product Recall Claim Submission.
Claim Information - US Saturn Only
1. To receive credit, submit a claim with the information below:
Repair Performed | Parts Allow. | Sale Type | Case Type | Labor Op. | Labor Hrs. | Admin Hrs.** | Net Item | Net Item Code |
|---|---|---|---|---|---|---|---|---|
Inspect Battery Cassette/Packs - No Further Action Required | N/A | WC | VC | V1791 | 0.2 | 0.1 | N/A | N/A |
Inspect & Replace Hybrid Battery (inc. ECM Reprogramming) | * | WC | VC | V1792 |
| 0.1 |
|
|
AURA | 1.8 | |||||||
VUE | 2.0 | |||||||
Add: Clean and Paint Battery Tray |
|
|
|
| 0.4 |
| *** | M |
Add: Administrative Allowance for Return of Battery |
|
|
|
| 0.2 |
|
|
|
* The parts allowance should be the sum total of the current SSPO retailer net price plus 40% of all parts required for the repair.
** Administrative allowance *** The amount identified in the "Net Item" column should represent the actual sum total of the current SSPO retailer net price plus 40% for the touch-up paint needed to perform the required repairs, not to exceeded $1.00.
2. Submit courtesy transportation using Net Item C.
Customer Notification
General Motors will notify customers of this recall on their vehicle (see copy of customer letter included with this bulletin).
In order to ensure full protection under the emission warranty, and the right to participate in future recalls, the customer notification letter recommends that customers have their vehicles serviced as soon as possible. It also advises that failure to do so could legally be determined to be lack of proper maintenance. The vehicle may fail a state or local emission inspection test if the recall work is not completed.
Retailer Recall Responsibility - All
All unsold new vehicles in retailers' possession and subject to this recall must be held and inspected/repaired per the service procedure of this recall bulletin before customers take possession of these vehicles.
Retailers are to service all vehicles subject to this recall at no charge to customers for a period of 8 years or 100,000 miles (160,000 km), whichever occurs first, from the date the vehicle was originally placed in service, regardless of ownership.
Customers who have recently purchased vehicles sold from your vehicle inventory, and for which there is no customer information indicated on the retailer listing, are to be contacted by the retailer. Arrangements are to be made to make the required correction according to the instructions contained in this bulletin. A copy of the customer letter is provided in this bulletin for your use in contacting customers. Recall follow-up cards should not be used for this purpose, since the customer may not as yet have received the notification letter.
In summary, whenever a vehicle subject to this recall enters your vehicle inventory, or is in your facility for service within 8 years or 100,000 miles (160,000 km), whichever occurs first, from the date the vehicle was originally placed in service, regardless of ownership, you must take the steps necessary to be sure the recall correction has been made before selling or releasing the vehicle.
***THE FOLLOWING 2 PARAGRAPHS ARE NOT FOR CANADA ***
When a California emissions recall is completed by a GM retailer, the retailer must provide the vehicle owner a "Proof of Correction Certificate" which the owner may need to present to the California Department Of Motor Vehicles (DMV) when renewing their vehicle registration. Without this correction certificate, the owner may be unable to renew their vehicle registration.
Additional Certificates can be obtained, at no charge, from Retailer Support Materials by ordering on the web from the DWD Store, www.gmretailerworld.com, and then click on the DWD Store link. Request GM Item Number 1825 when ordering.
February 2008Dear Saturn Customer:
Saturn is conducting a voluntary emission recall that includes your vehicle.
Reason For This Recall:
The recall includes all 2007 model year Saturn AURA Green Line Hybrid and VUE Green Line Hybrid vehicles and certain 2008 model year Saturn AURA Green Line Hybrid vehicles. There may be a voltage imbalance within the hybrid battery. If the imbalance exceeds 0.6 volts, the check engine light will illuminate and hybrid function will be disabled. If this occurs, the charge/assist gage would show no movement, the fuel economy light (ECO) would not illuminate, and the vehicle would be powered by the gasoline engine only.
What Will Be Done:
Your Saturn retailer will replace the three hybrid cassettes within the battery assembly. This one-time service will be performed for you at no charge within a period of 8 years or 100,000 miles, whichever occurs first, from the date your vehicle was originally placed in service.
How Long Will The Repair Take?
Because of service scheduling requirements, it is likely that your retailer will need your vehicle longer than the actual service correction time of approximately 2 to 3 hours.
Contacting Your Retailer:
Please contact your Saturn retailer to arrange a service date as well as get an estimate on how much time will be needed to schedule, process and repair your vehicle.
If you have any questions or need any assistance, just contact your retailer or the Saturn Customer Assistance Center at 1-800-972-8876, (1-800-833-6000, TTY).
Customer Reply Form:
The enclosed customer reply form identifies your vehicle. Please present this form to your retailer to help expedite the repair process. If you no longer own this vehicle, please let us know by completing the form and mailing it back to us.
Courtesy Transportation:
If your vehicle is within the New Vehicle Limited Warranty your retailer may provide you with shuttle service or some other form of courtesy transportation while your vehicle is at the facility for this repair. Please refer to your Owner’s Manual and your retailer for details on Courtesy Transportation.
Emission Law Information:
In order to ensure your full protection under the emission warranty made applicable to your 2007 model year Saturn AURA Green Line Hybrid or VUE Green Line Hybrid vehicle or 2008 model year Saturn AURA Hybrid vehicle by Federal Law, and your right to participate in future recalls, it is recommended that you have your 2007 model year Saturn AURA Green Line Hybrid or VUE Green Line Hybrid vehicle or 2008 model year Saturn AURA Hybrid vehicle serviced as soon as possible. Failure to do so could legally be determined to be lack of proper maintenance of your 2007 model year Saturn AURA Green Line Hybrid or VUE Green Line Hybrid vehicle or 2008 model year Saturn AURA Hybrid vehicle. Also, your vehicle may fail a state or local emission inspection if this recall is not accomplished.
IMPORTANT MESSAGE FOR CALIFORNIA RESIDENTS
The California Air Resources Board (CARB) requires vehicle emission recalls be completed prior to California registration renewal. Uncorrected emission recalls will result in the inability to renew your California vehicle registration.
At the time of emission recall completion, your California retailer will issue a "Proof of Correction Certificate". Keep this certificate and, if required, present it to the Department of Motor Vehicles when renewing your California registration as proof of recall completion.
We are sorry to cause you this inconvenience; however, we have taken this action in the interest of your continued satisfaction with our products.
Scott Lawson
General Director,
Customer and Relationship Services
Enclosure
07318
