Floor Panel Carpet Replacement Coupe
Removal Procedure
Warning: Refer to Battery Disconnect Warning in the Preface section.
- Disconnect the battery.
- Wait 1 minute for the air bag to deactivate.
- Position the seats to the forward-most position.

- Remove the drivers side front seat.
Remove the 2 bolts (1).
- Remove the passenger side front seat.
Remove the 2 bolts (1).
- Remove the driver side front seat.
| 6.1. | Remove from the front guide. |
| 6.2. | Release and disconnect the compact connector. |
- Remove the passenger side front seat.
| 7.1. | Remove from the front guide. |
| 7.2. | Release and disconnect the compact connector. |
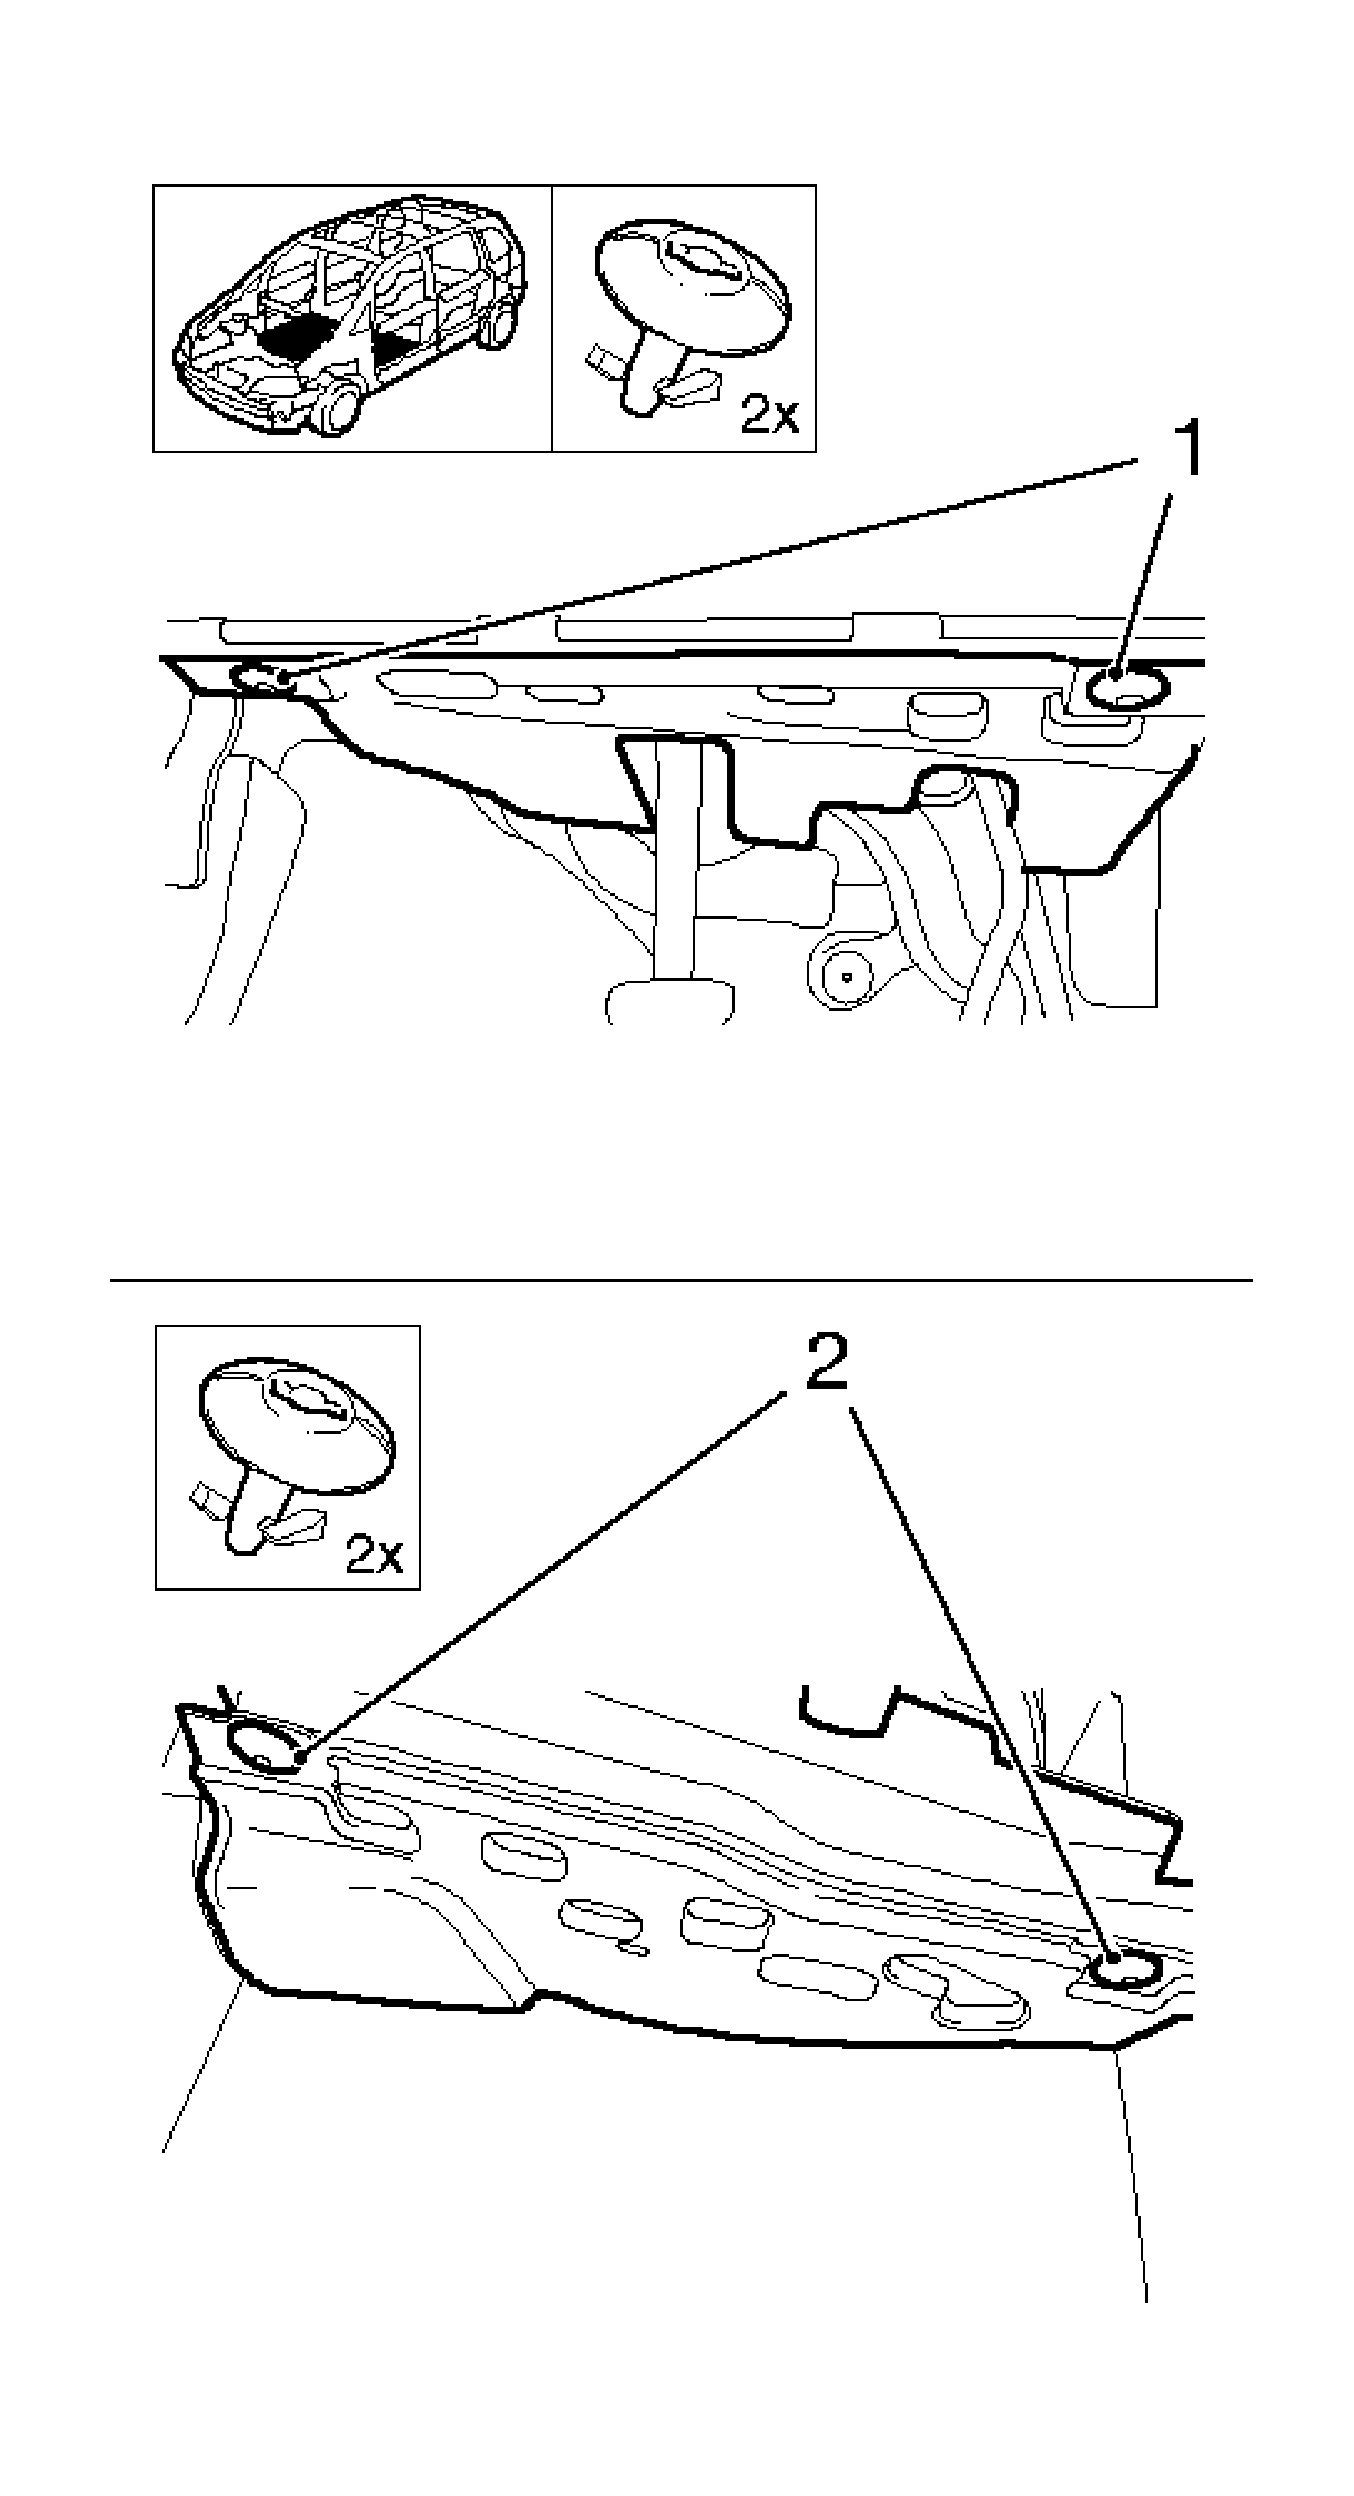
- Remove the instrument panel (I/P) insulator panel left and right.
| • | Remove the 2 screws on drivers side and remove the I/P from the bracket. |
| • | Remove the 2 screws on the passengers side and remove the I/P from the bracket. |
- Remove the front floor console. Refer to
Front Floor Console Replacement.
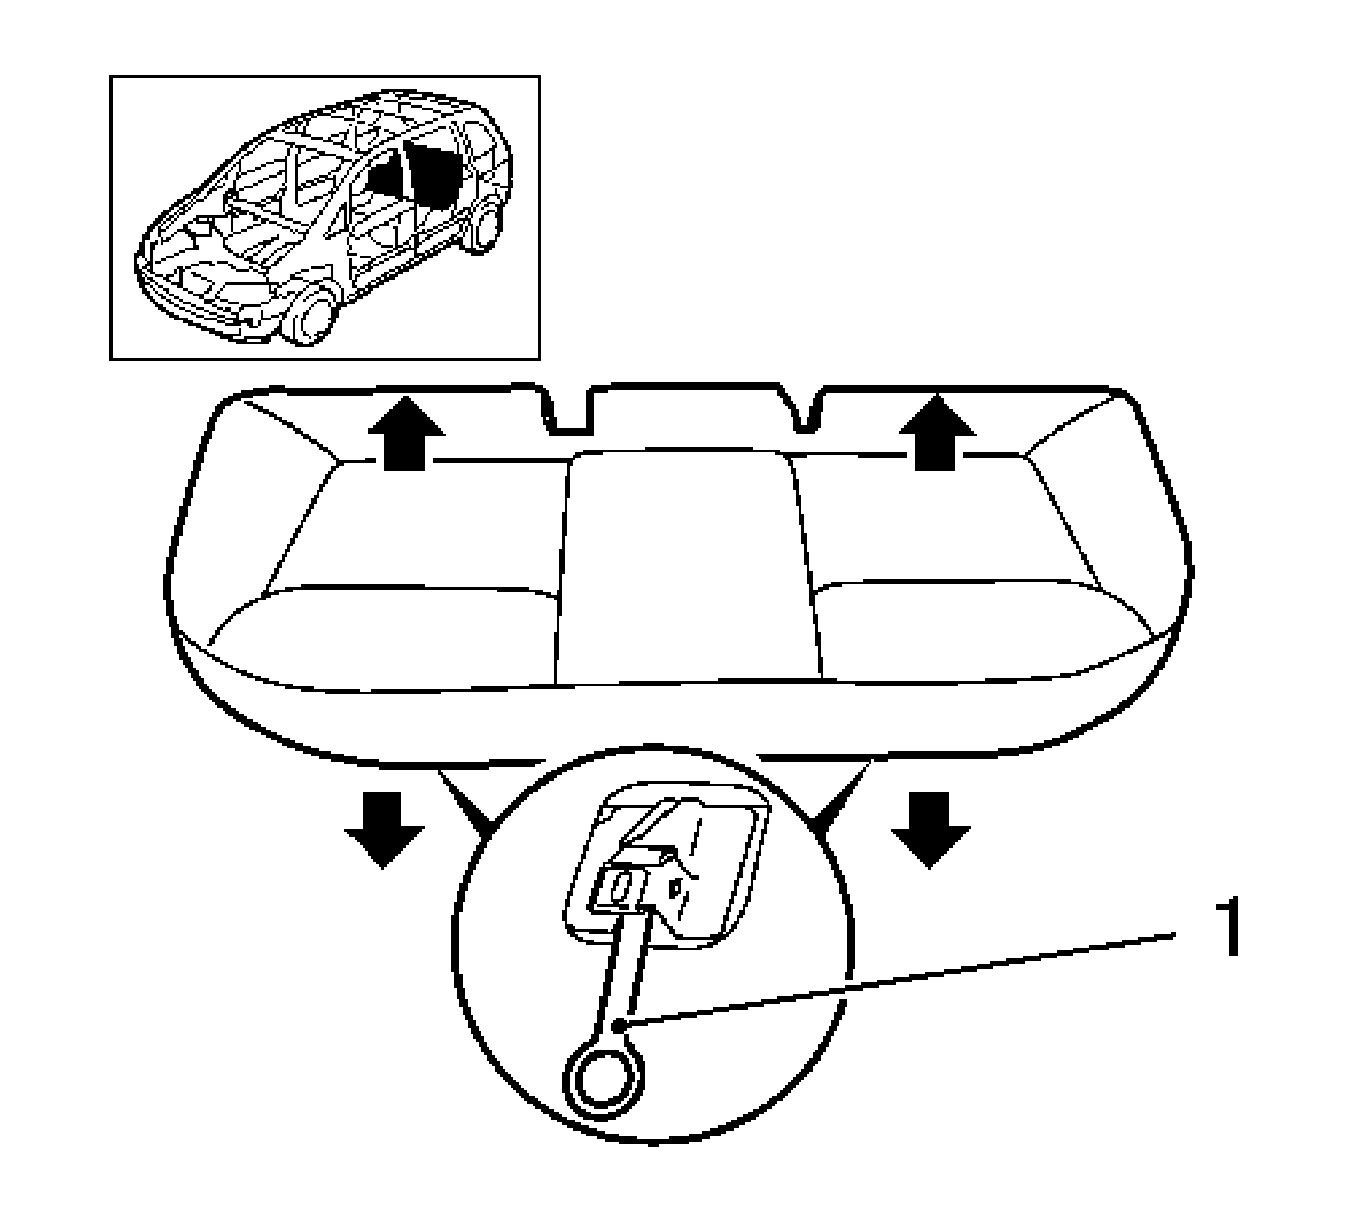
- Remove the bench seat.
| 10.1. | Release the front 2 brackets (1). |
| 10.2. | Support the 2 bench seats from the rear bracket. |
| 10.3. | Push the seat simultaneously backwards and upward. |
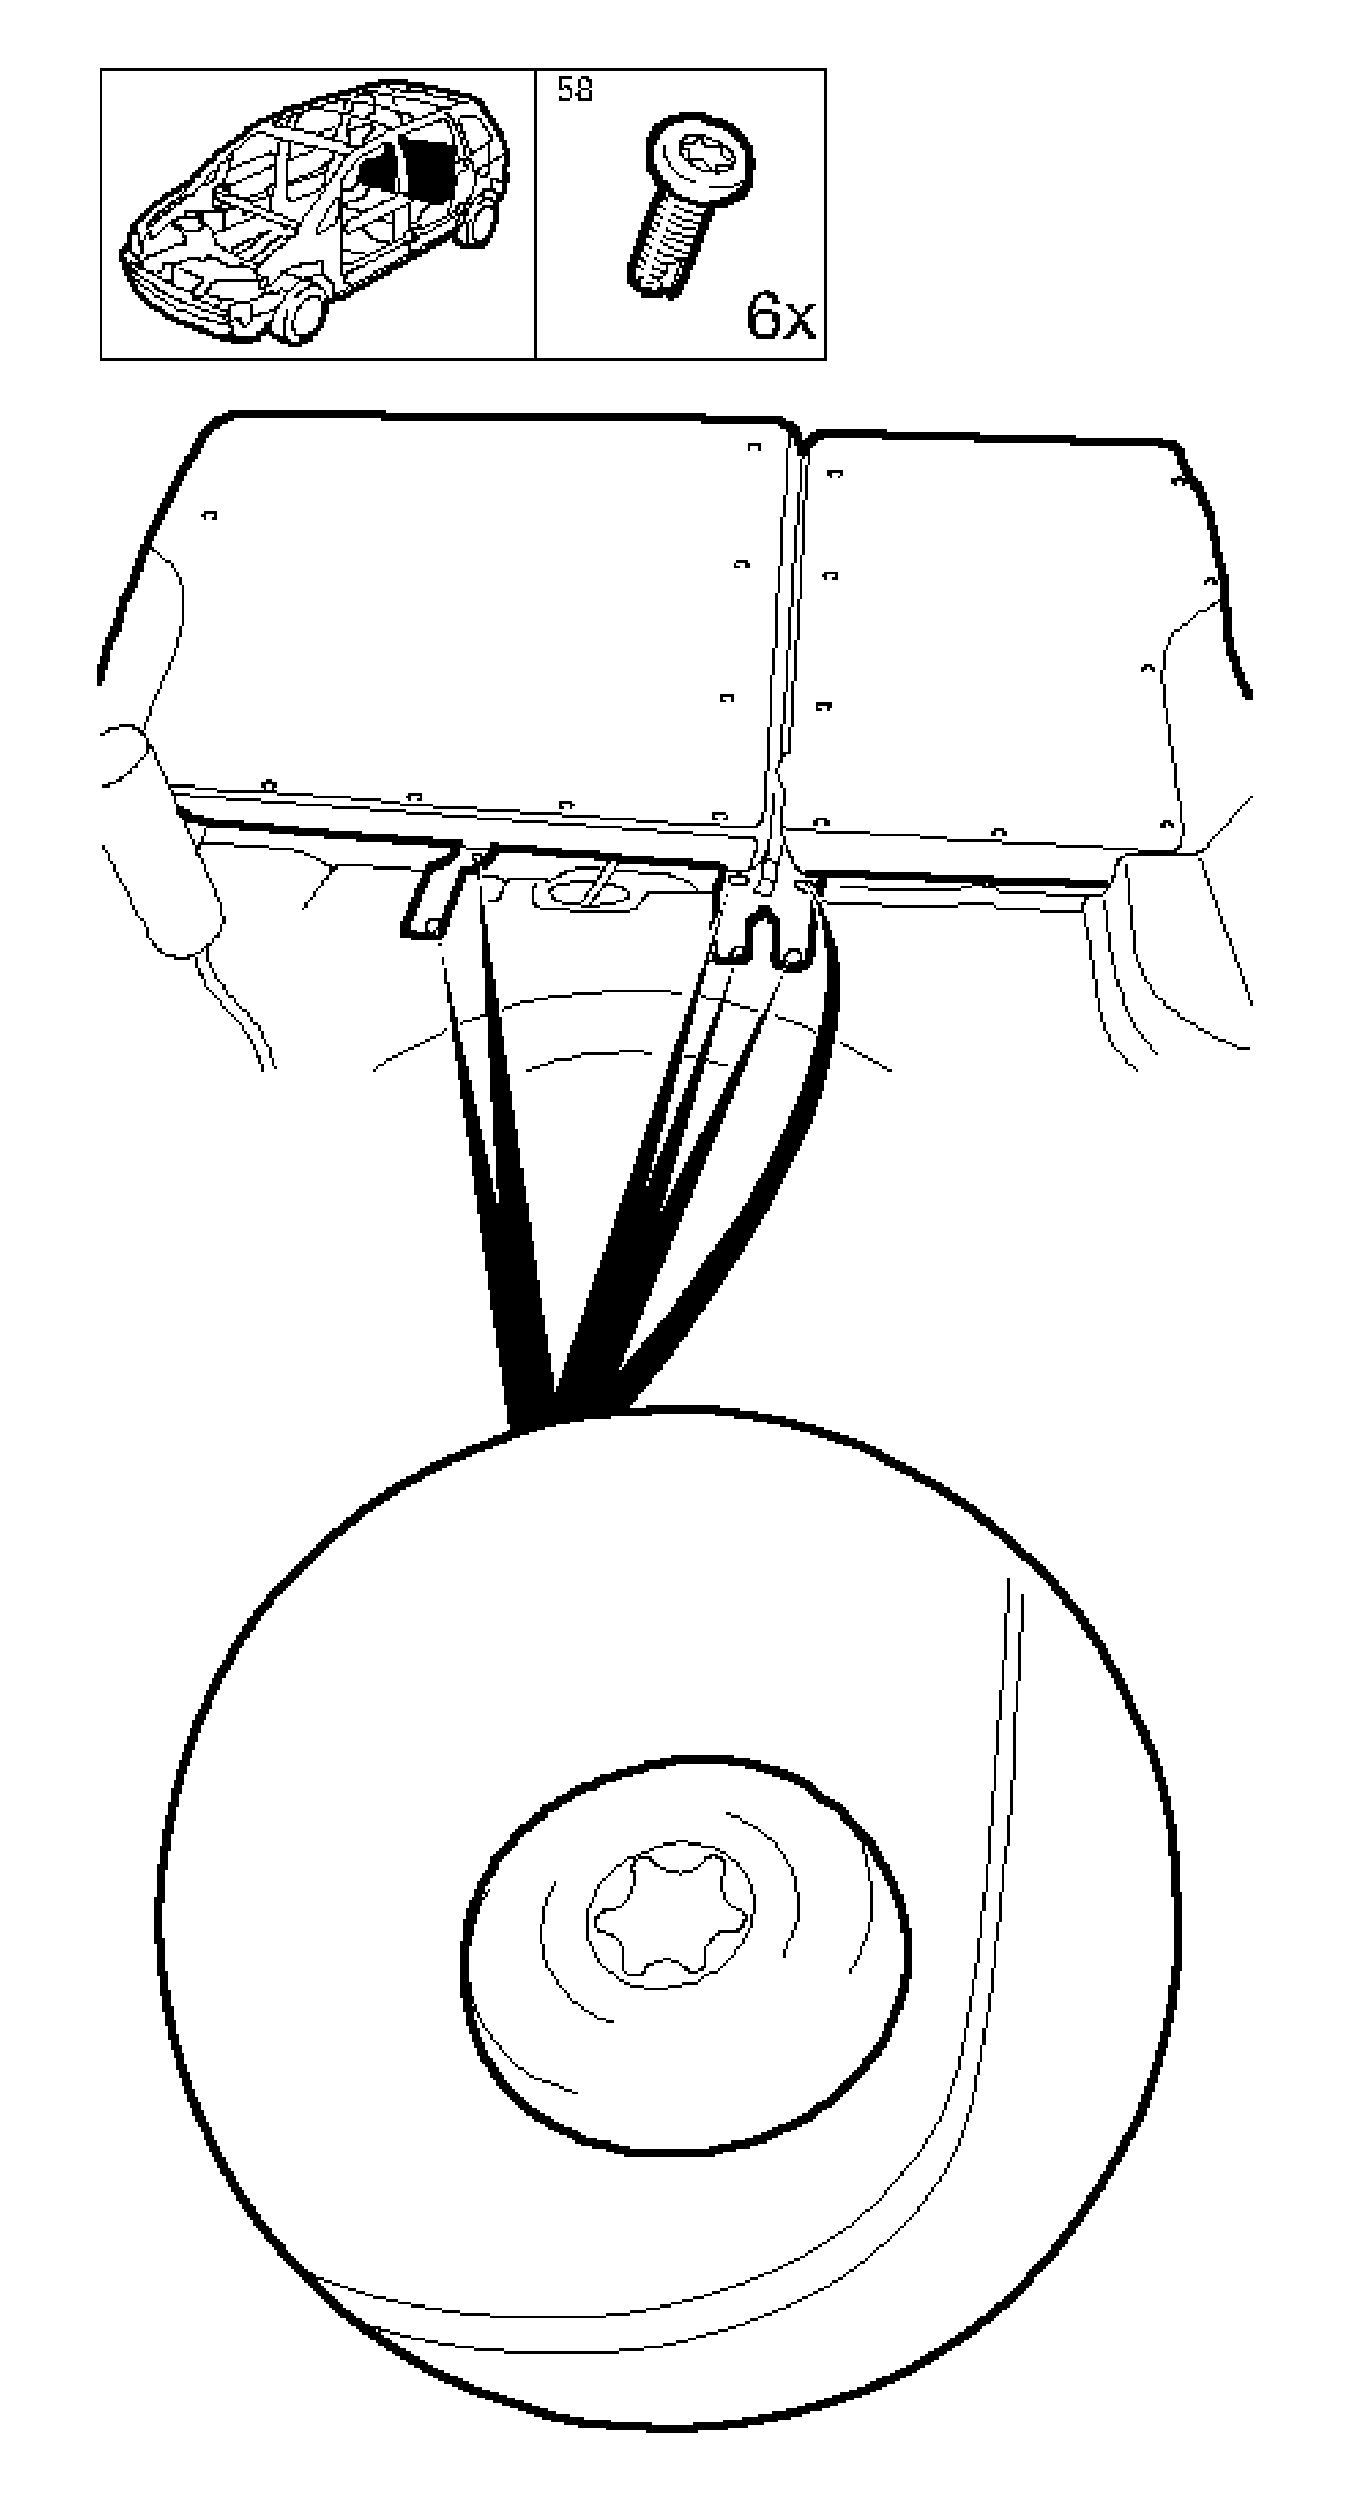
- Remove the rear seat backrest.
| 11.1. | Remove the 3 bolts at the front. |
| 11.2. | Remove the 3 belt buckles. |
| 11.3. | Fold down the rear seat backrest. |
| 11.4. | Remove the 3 bolts at the back. |
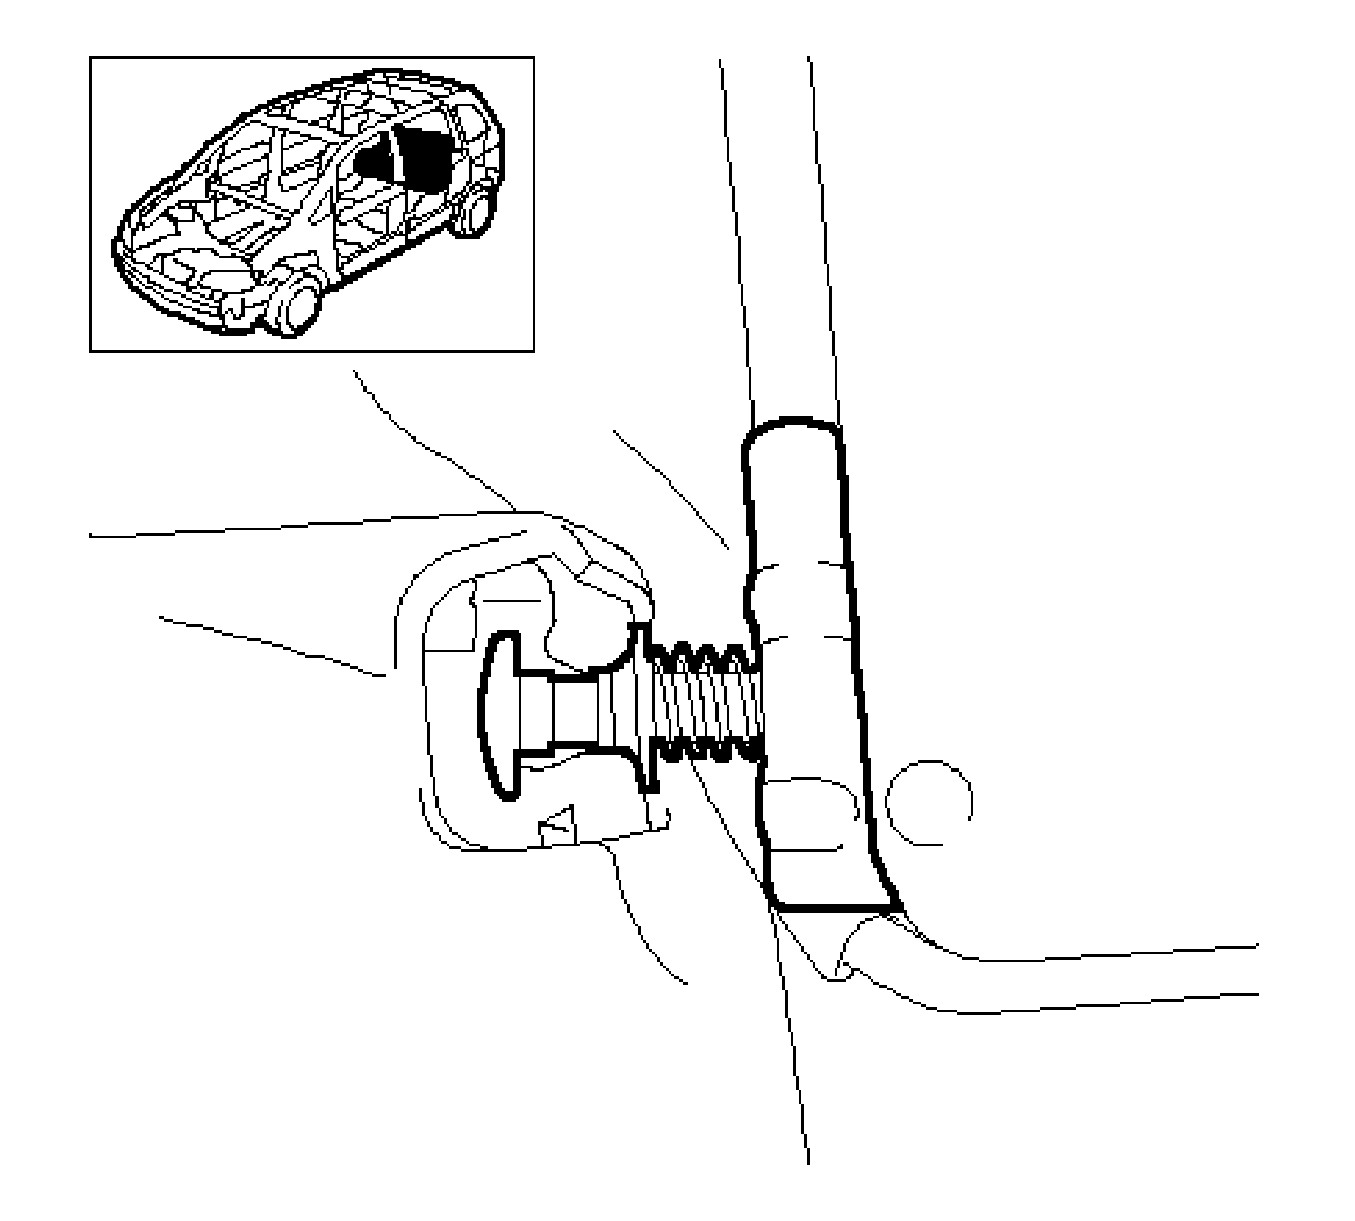
- Remove the rear seat backrest from the side guide.
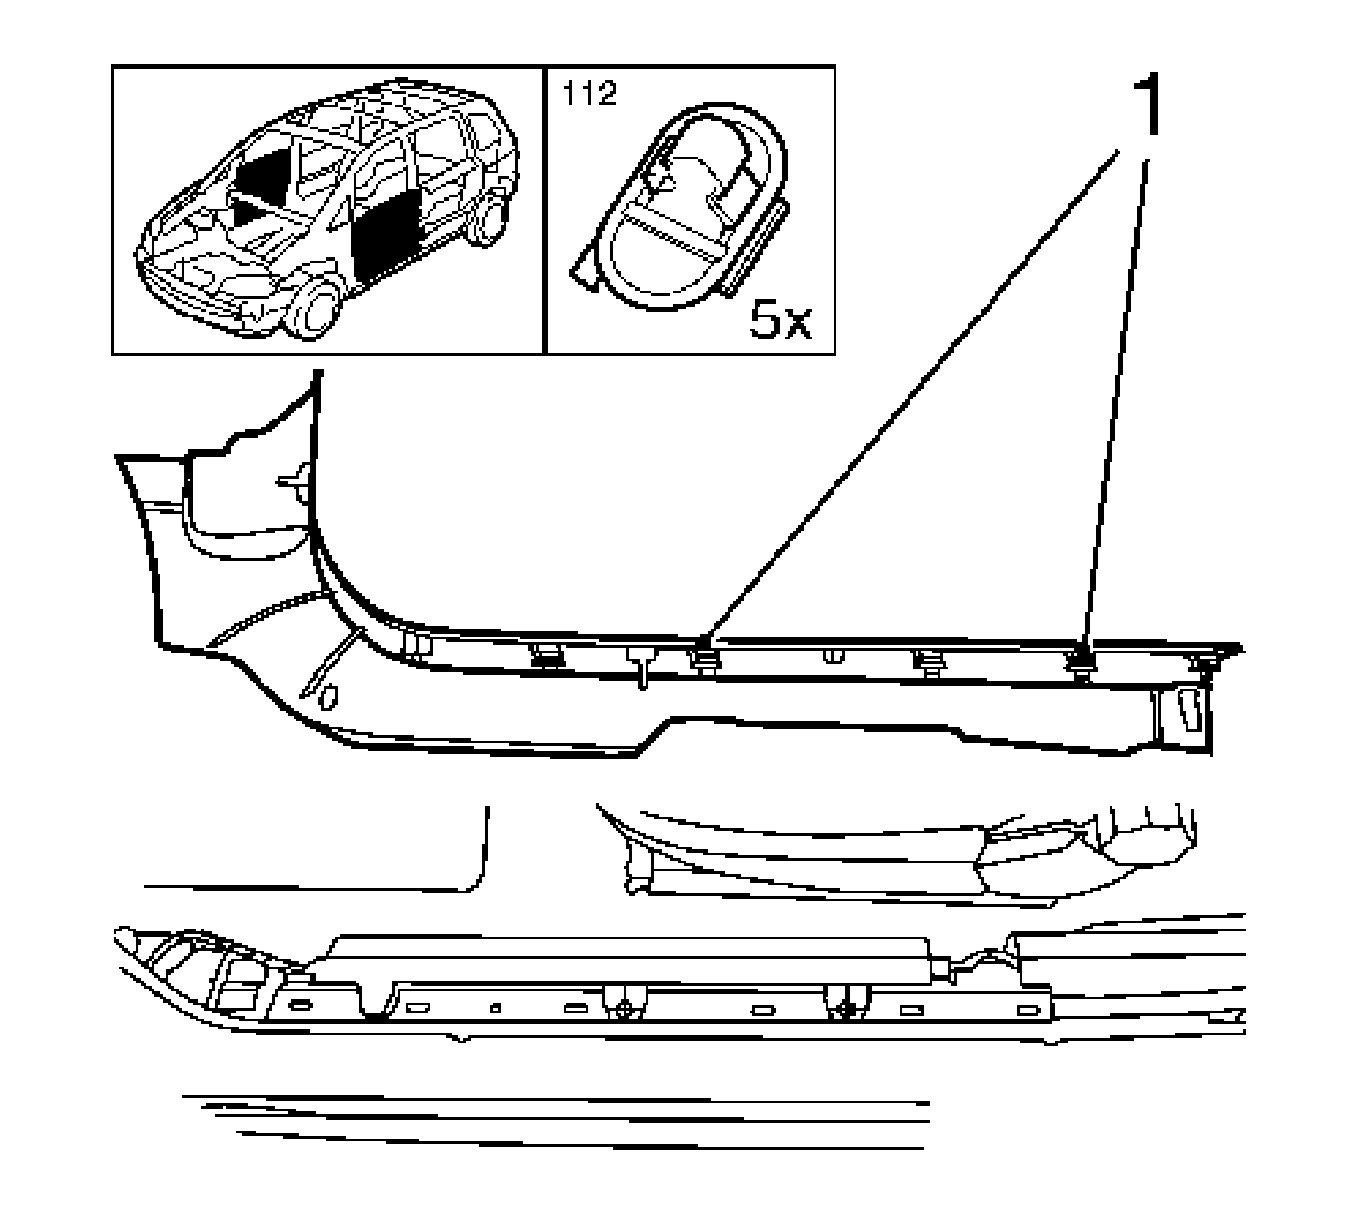
- Remove both door sill plates.
Release the 5 clips (1).
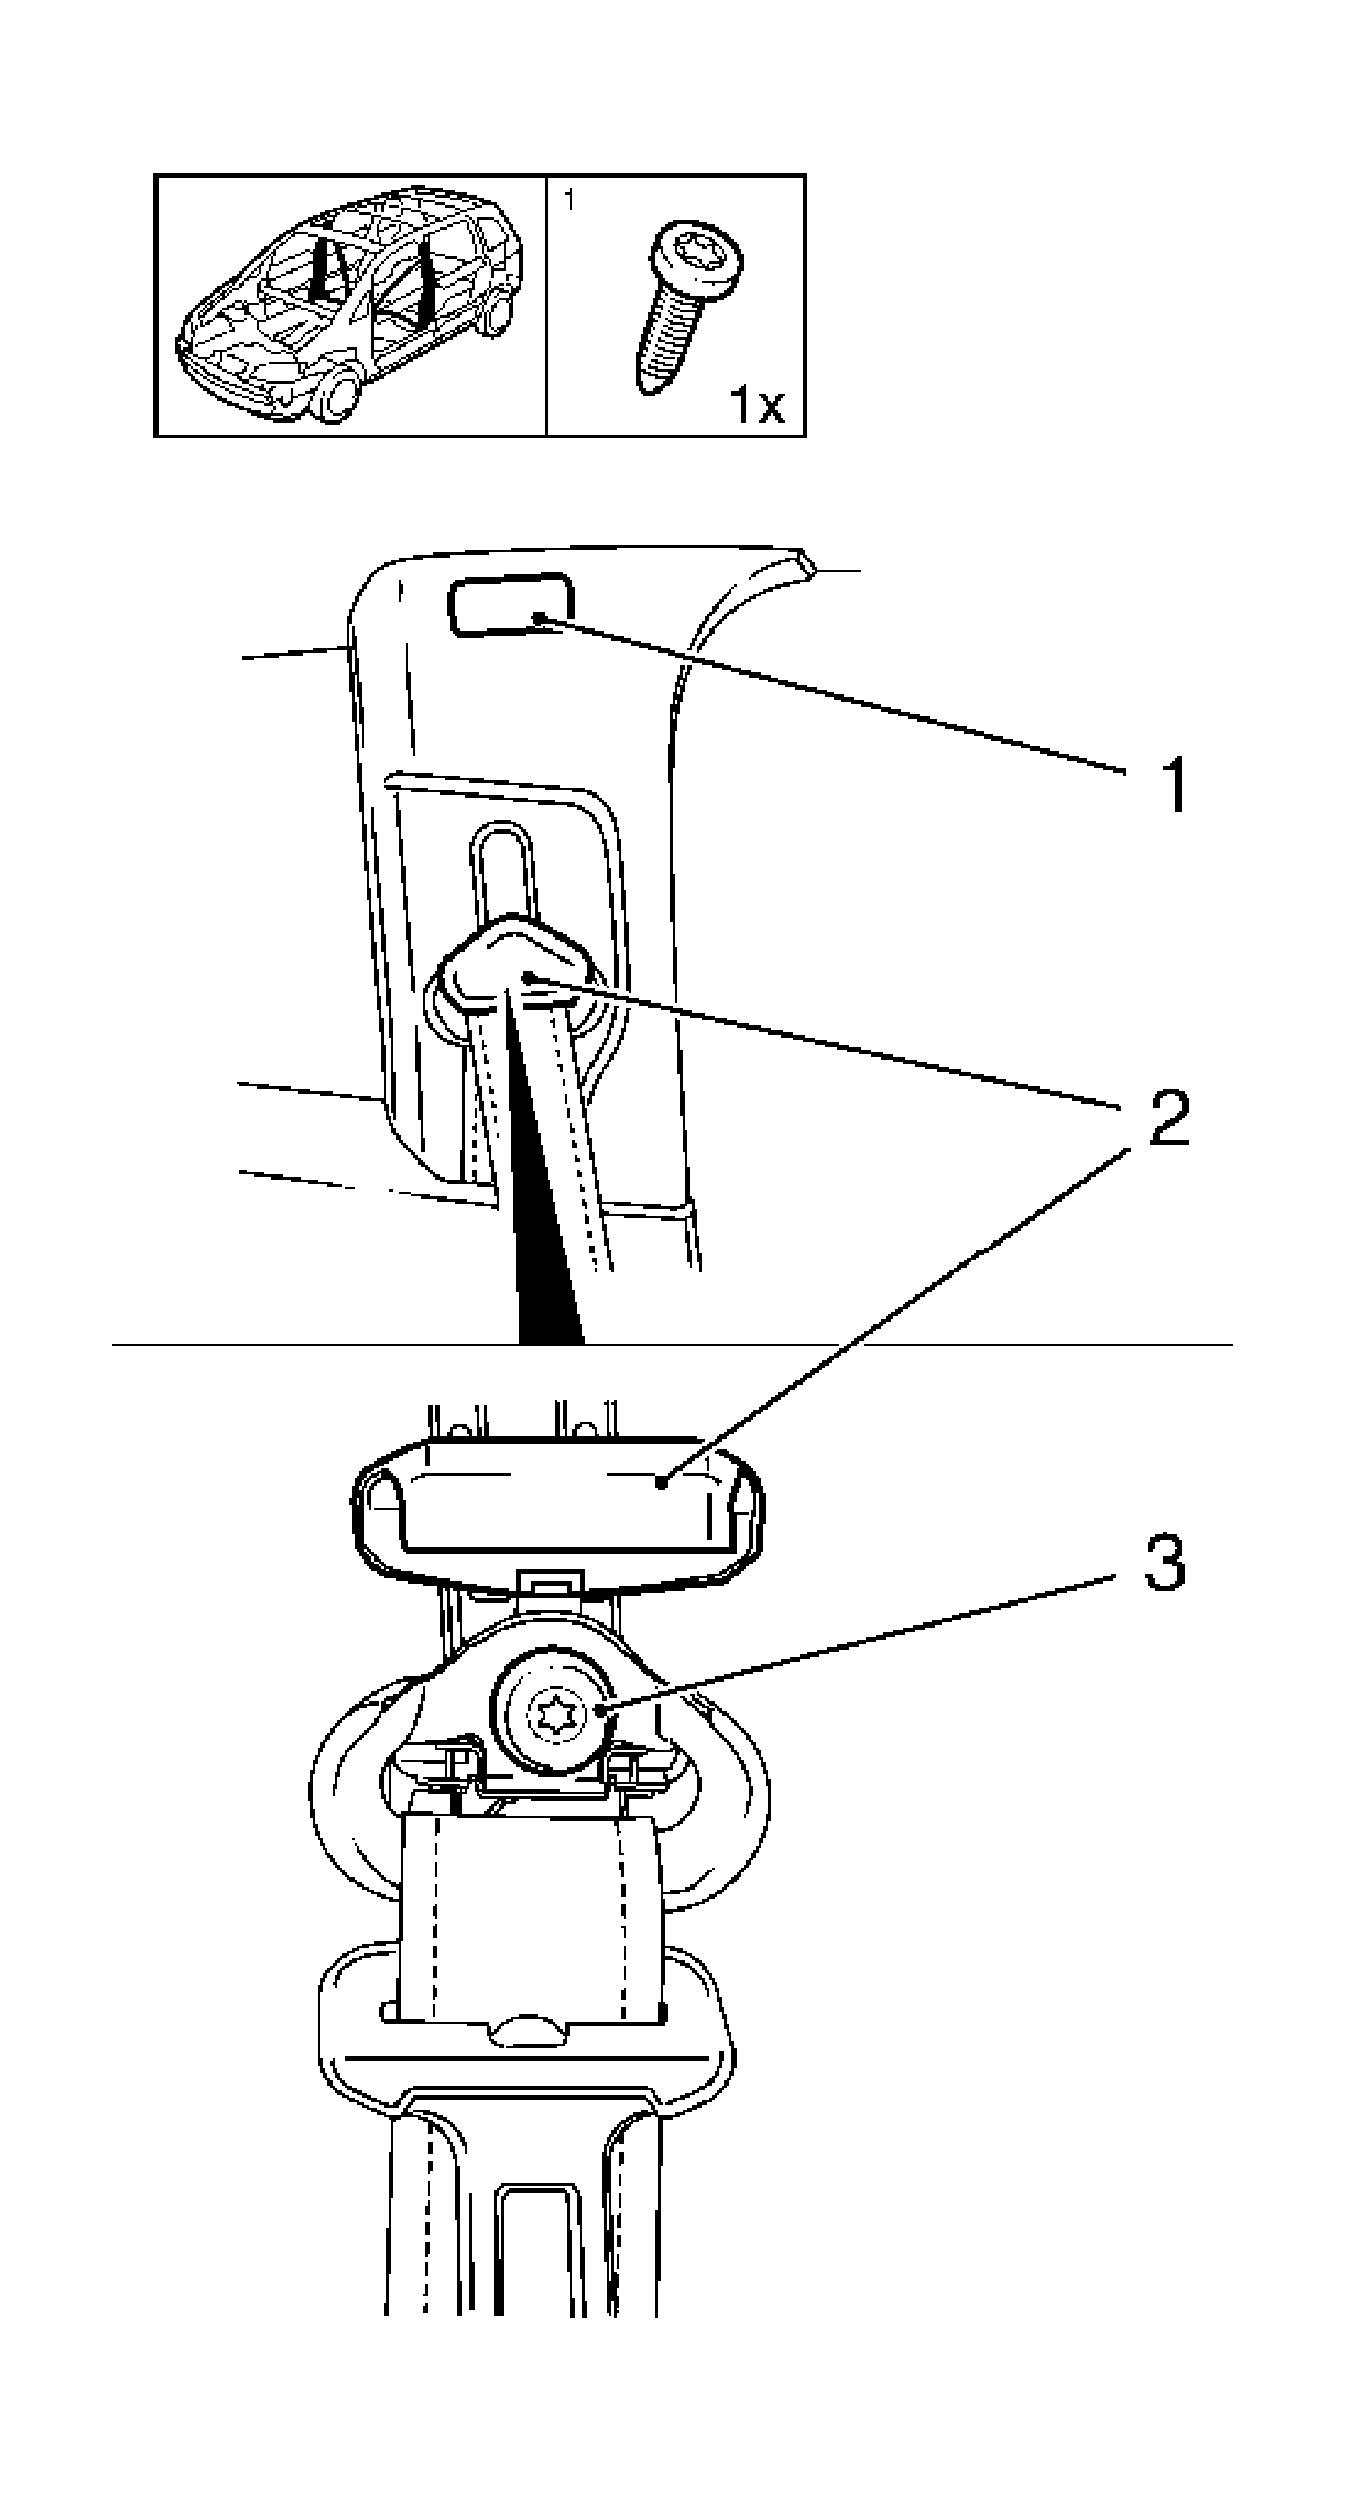
- Remove both sides of the upper center pillar molding.
| 14.1. | Pull out the plastic rivet (1) from the center pillar. |
| 14.2. | Remove with a plastic wedge. |
| 14.3. | Remove the seat belt bolts (3) from center pillar. |
| 14.4. | Release the cap (2). |
| 14.5. | Remove the upper center pillar panel upwards. |
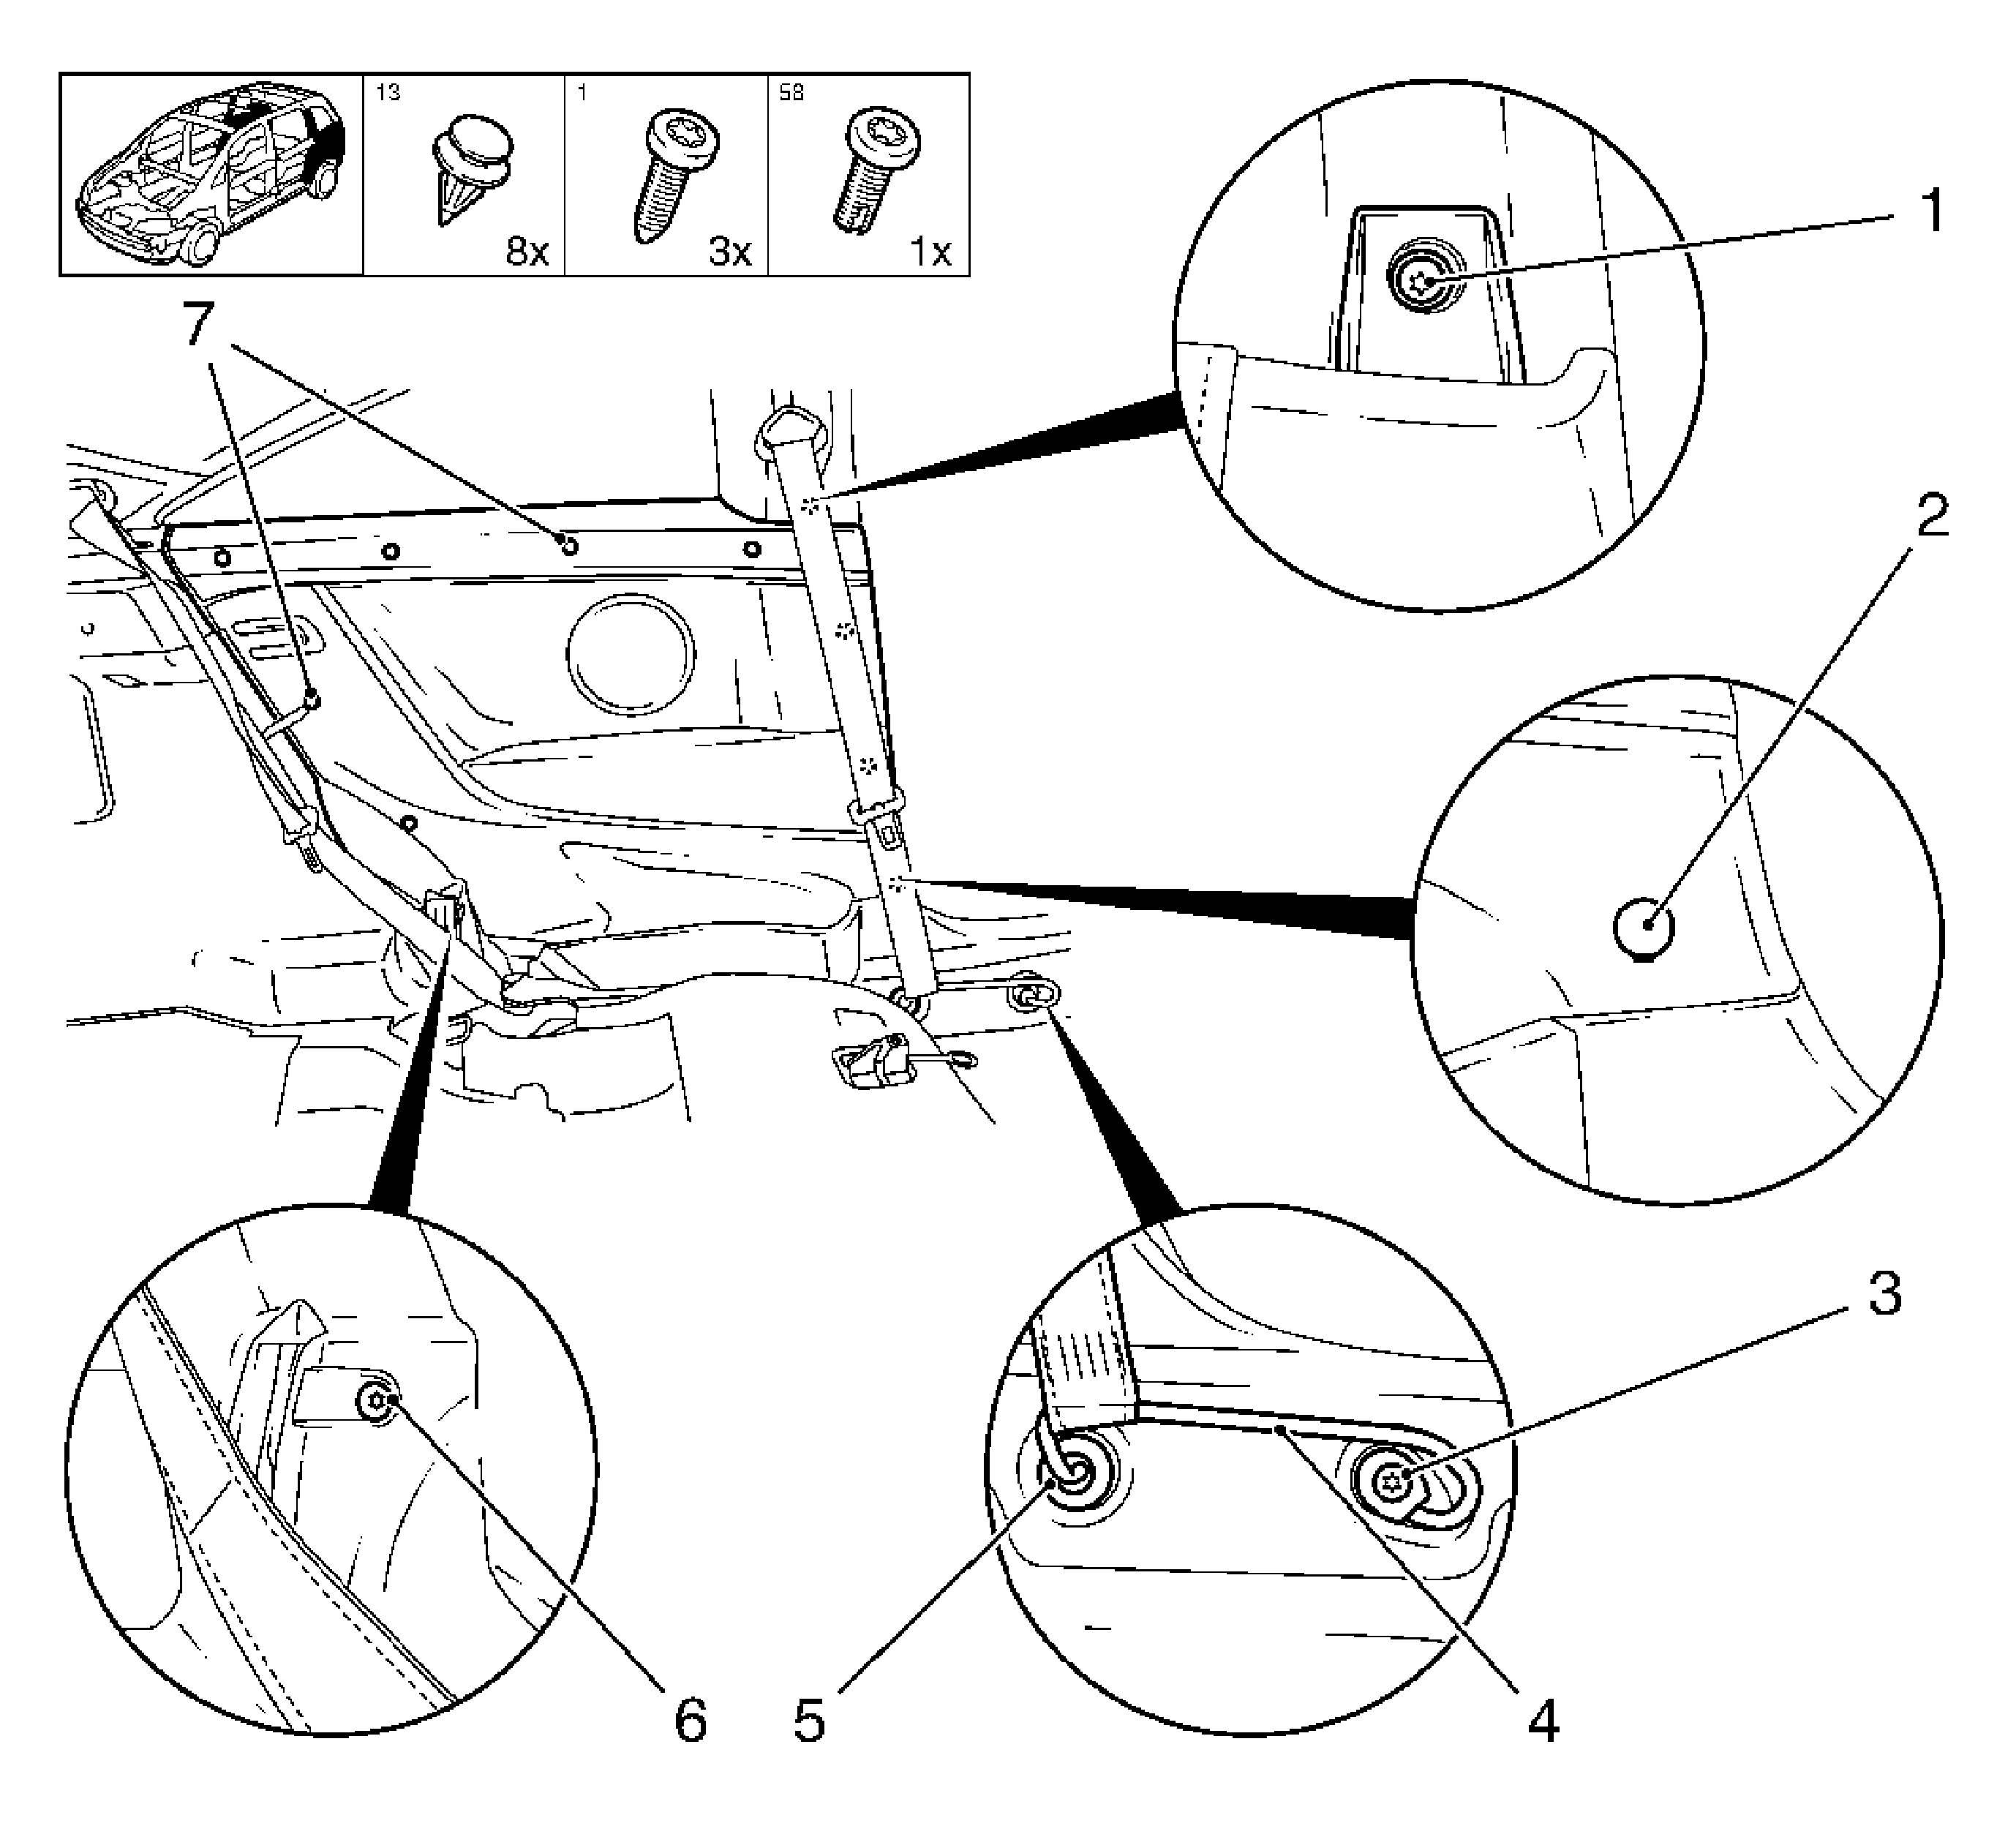
- Remove both sides of the rear quarter trim panel.
| 15.1. | Remove the lower belt fastening (3). |
| 15.2. | Remove the lower belt shackle (4). |
| 15.3. | Remove the seat belt with the striker. |
| 15.4. | Remove the seat belt striker guide bushing (5) from the rear quarter trim panel front. |
| 15.5. | Remove the rear quarter trim panel cover cap (2). |
| 15.7. | Remove the bolt (6) from rear seat backrest. |
| 15.8. | Remove the bolt (1) from upper center pillar. |
| 15.9. | Remove the front rear quarter trim panel. |
| 15.10. | Release the 8 clips (7). |
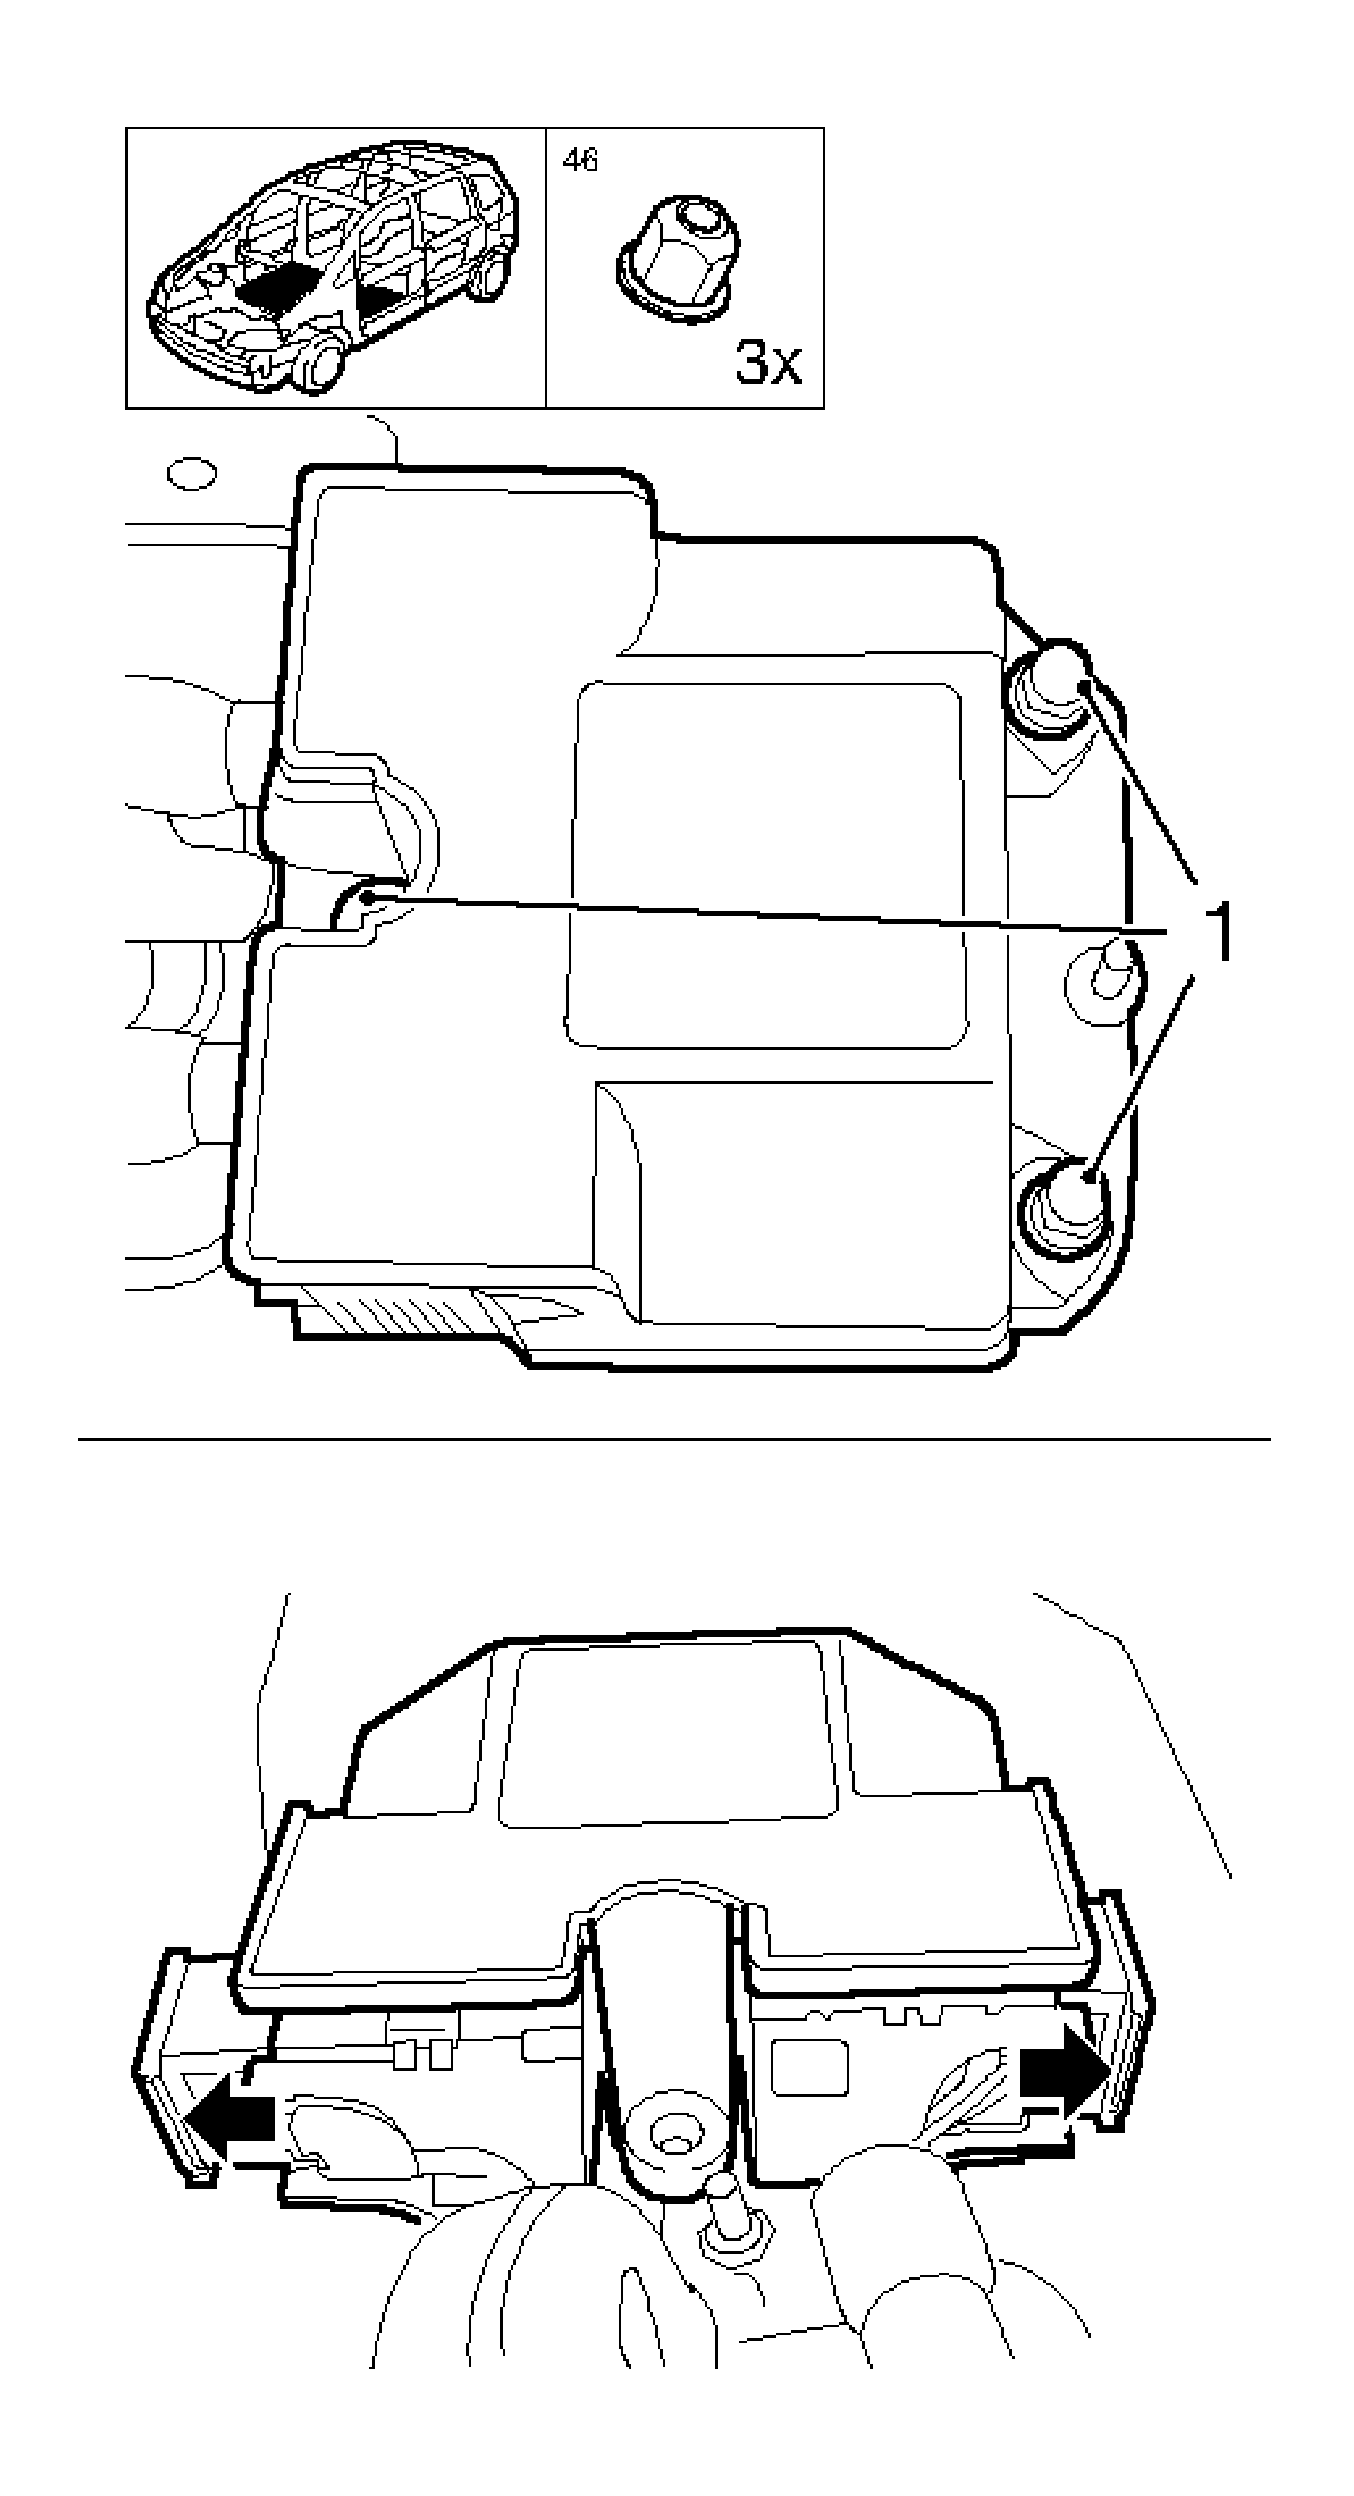
- Remove the air bag control unit.
| 16.1. | Remove the 3 nuts (1) and remove the control unit. |
| 16.2. | Release the 2 wiring harness plugs and disconnect. |
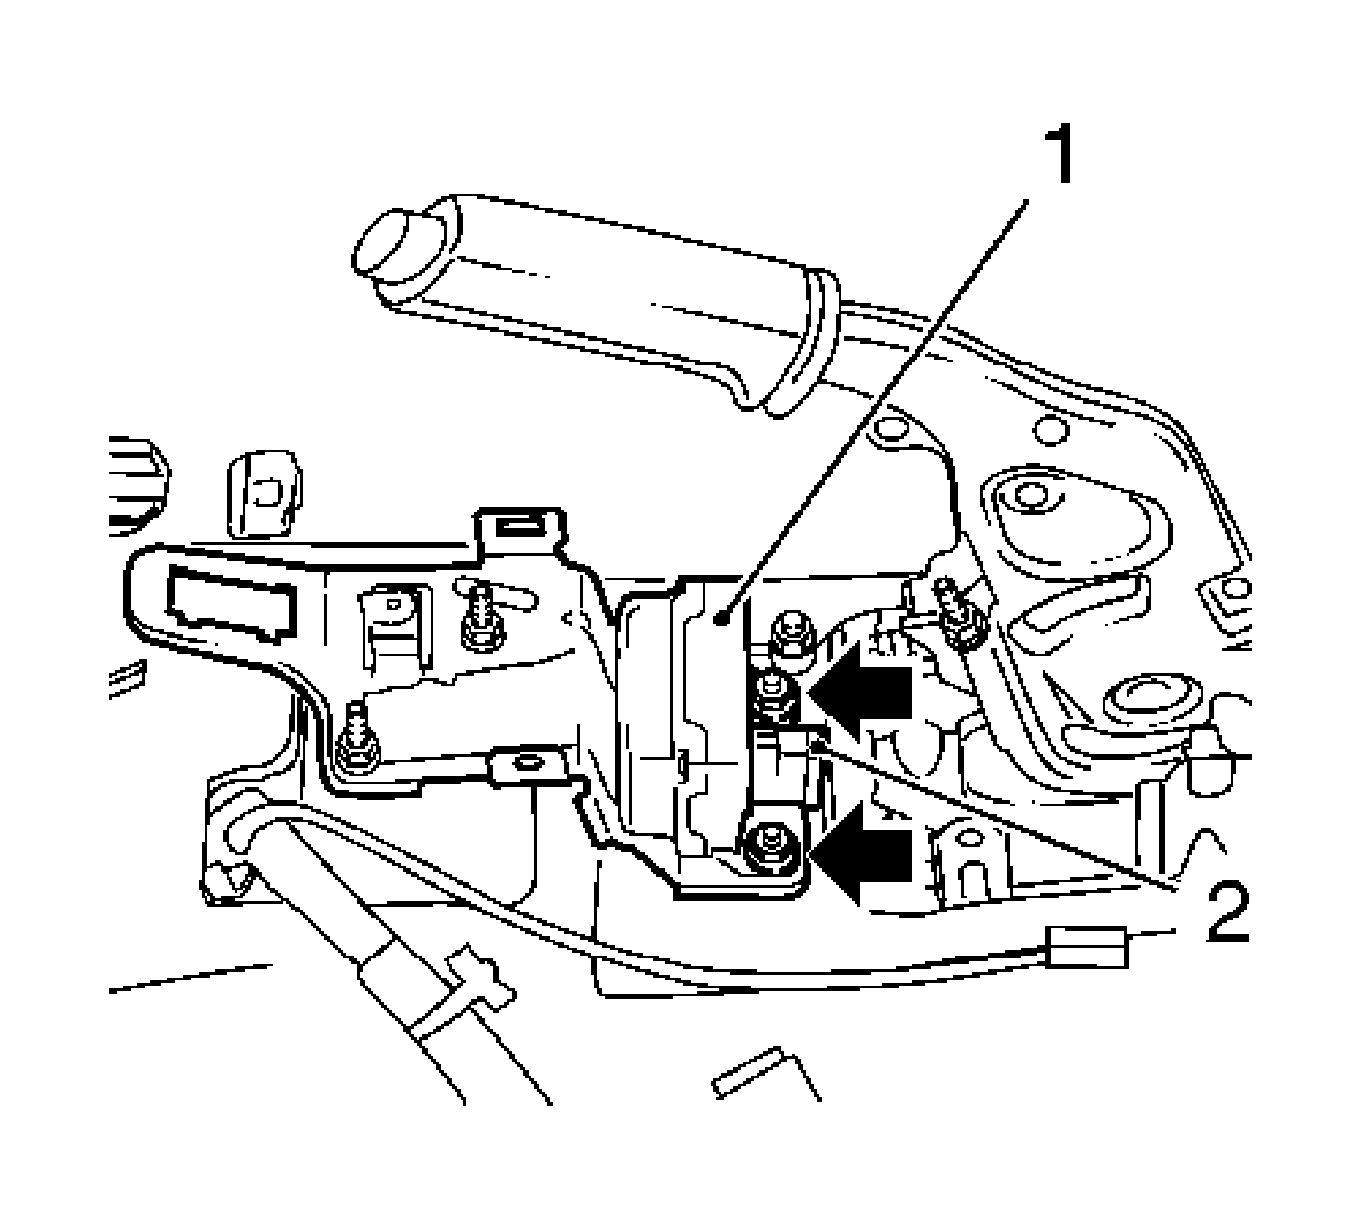
- Remove the yaw sensor (1).
| 17.1. | Remove the 2 nuts (arrows). |
| 17.2. | Disconnect the wiring harness plug (2). |
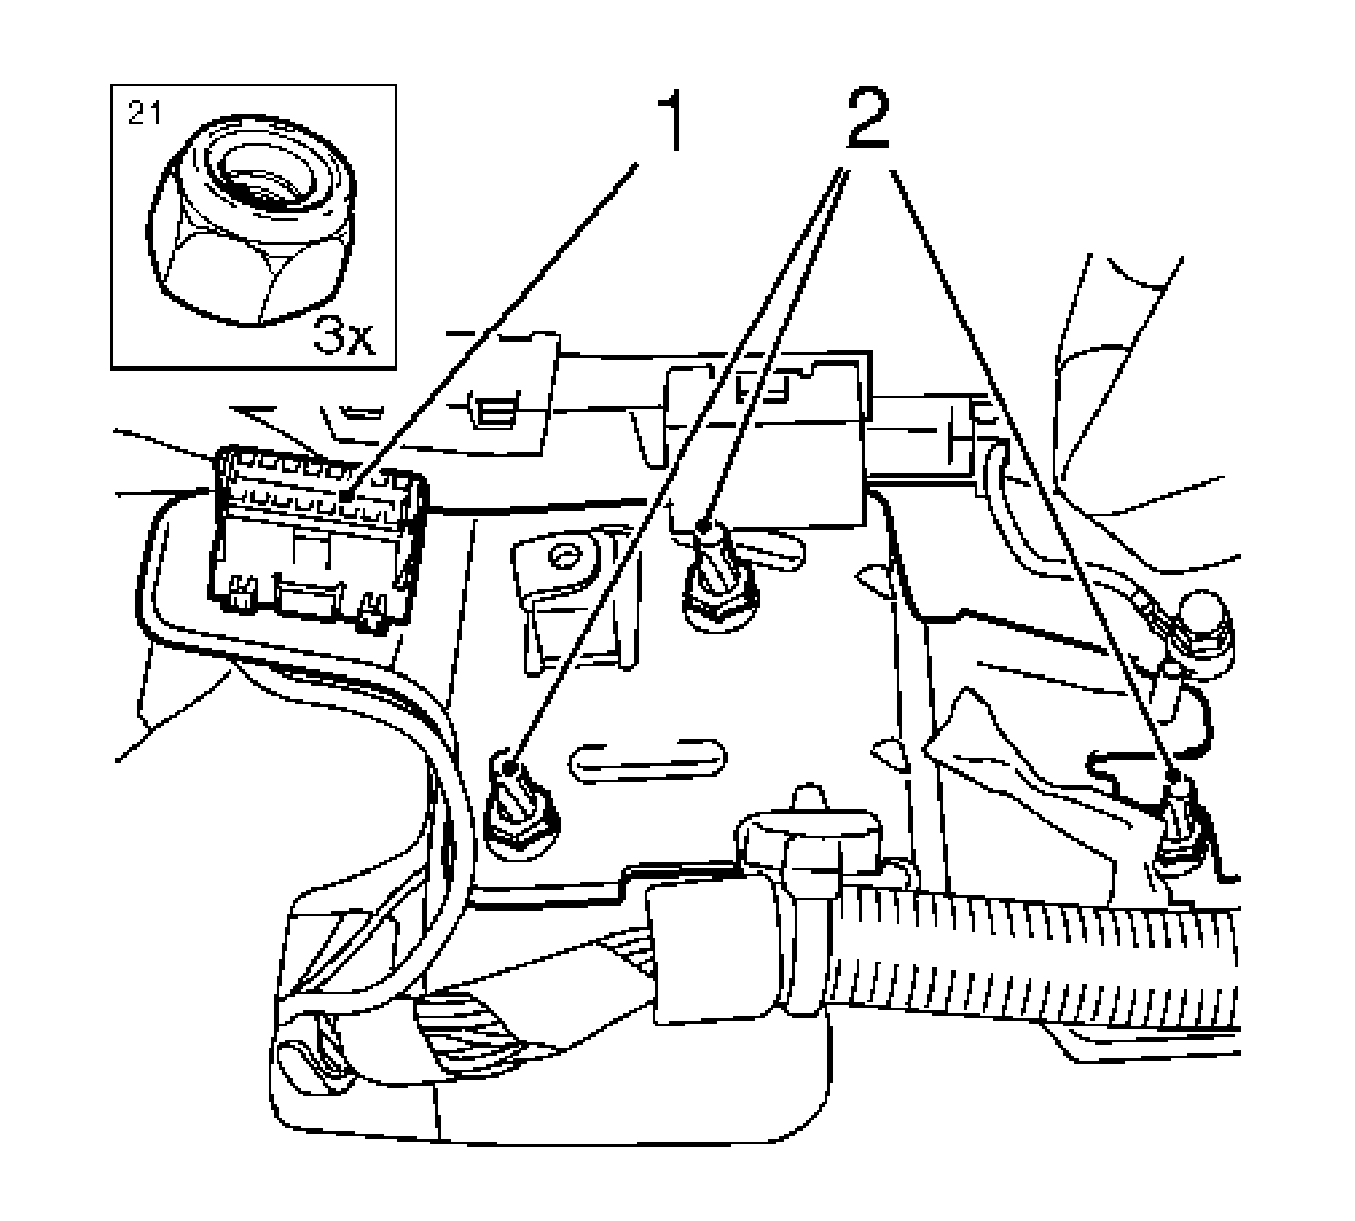
- Remove the bracket from diagnostics plug (1).
| 18.2. | Remove the 3 nuts (2). |
| 18.3. | Remove the bracket. |
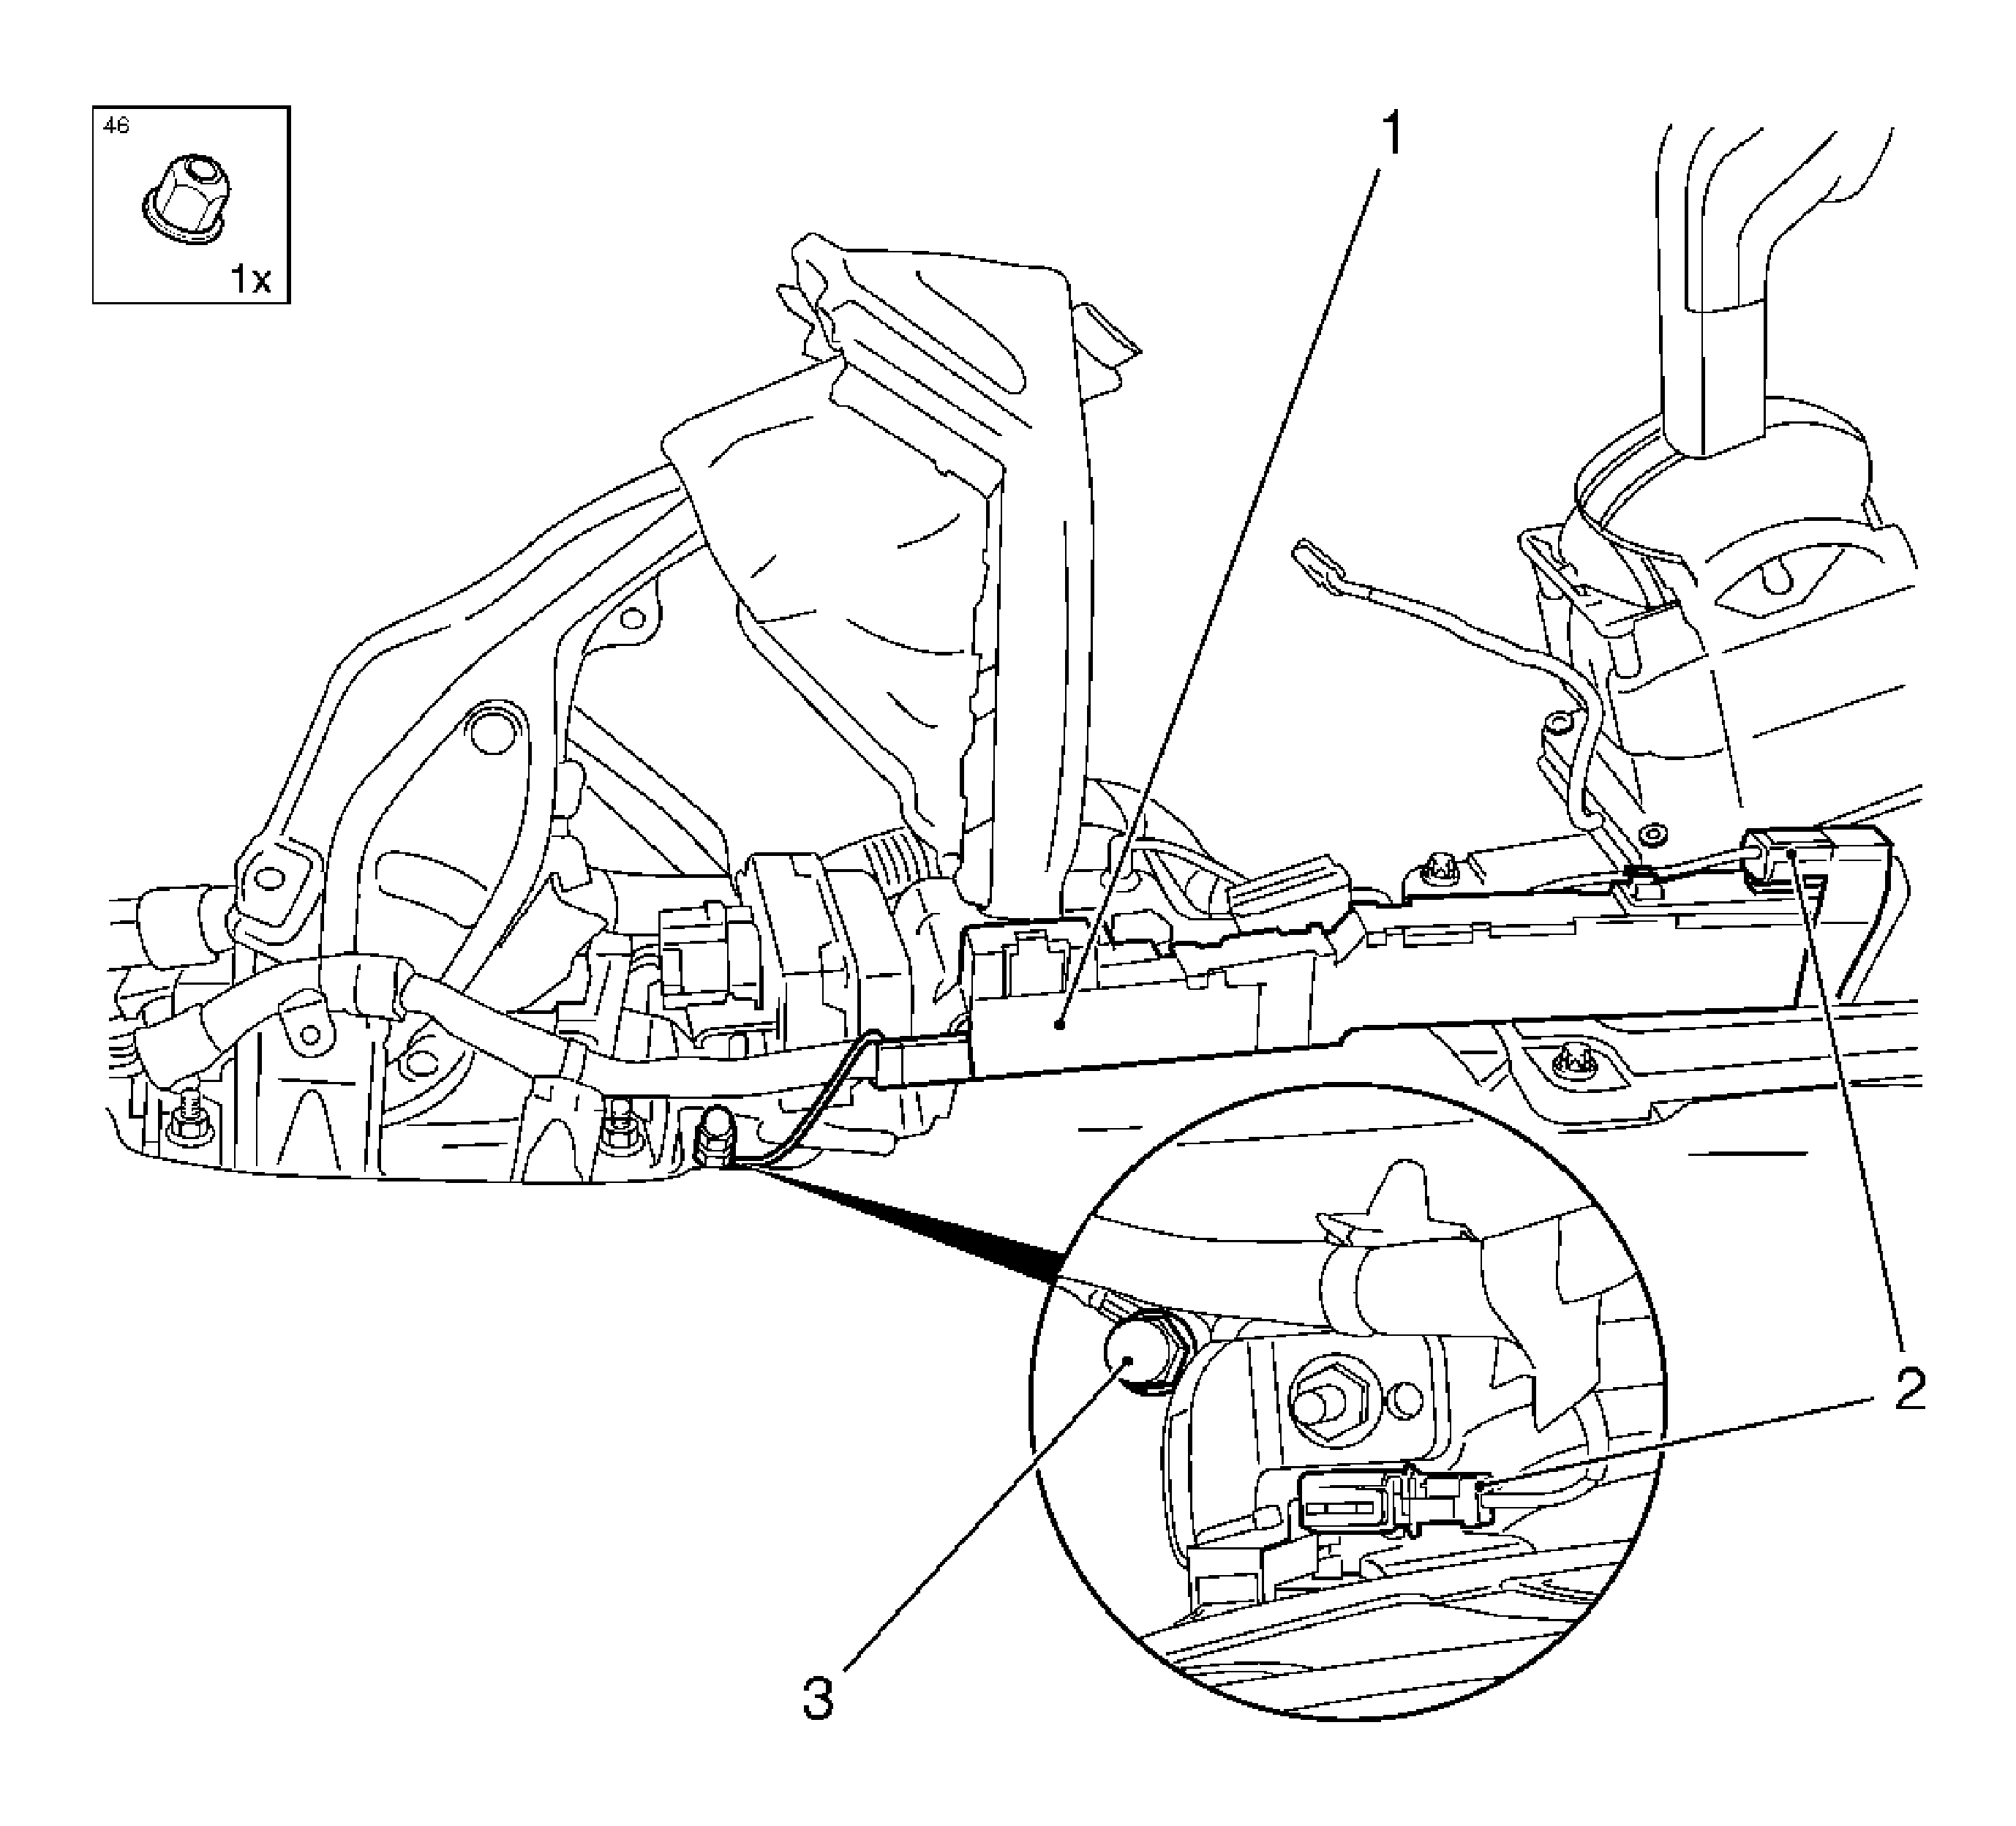
- Loosen the cable duct (1).
| 19.1. | Remove the ground strap. |
| 19.2. | Remove the nut (3). |
| 19.3. | Disconnect the 2 wiring harness plugs (2). |
- Remove the heating duct.
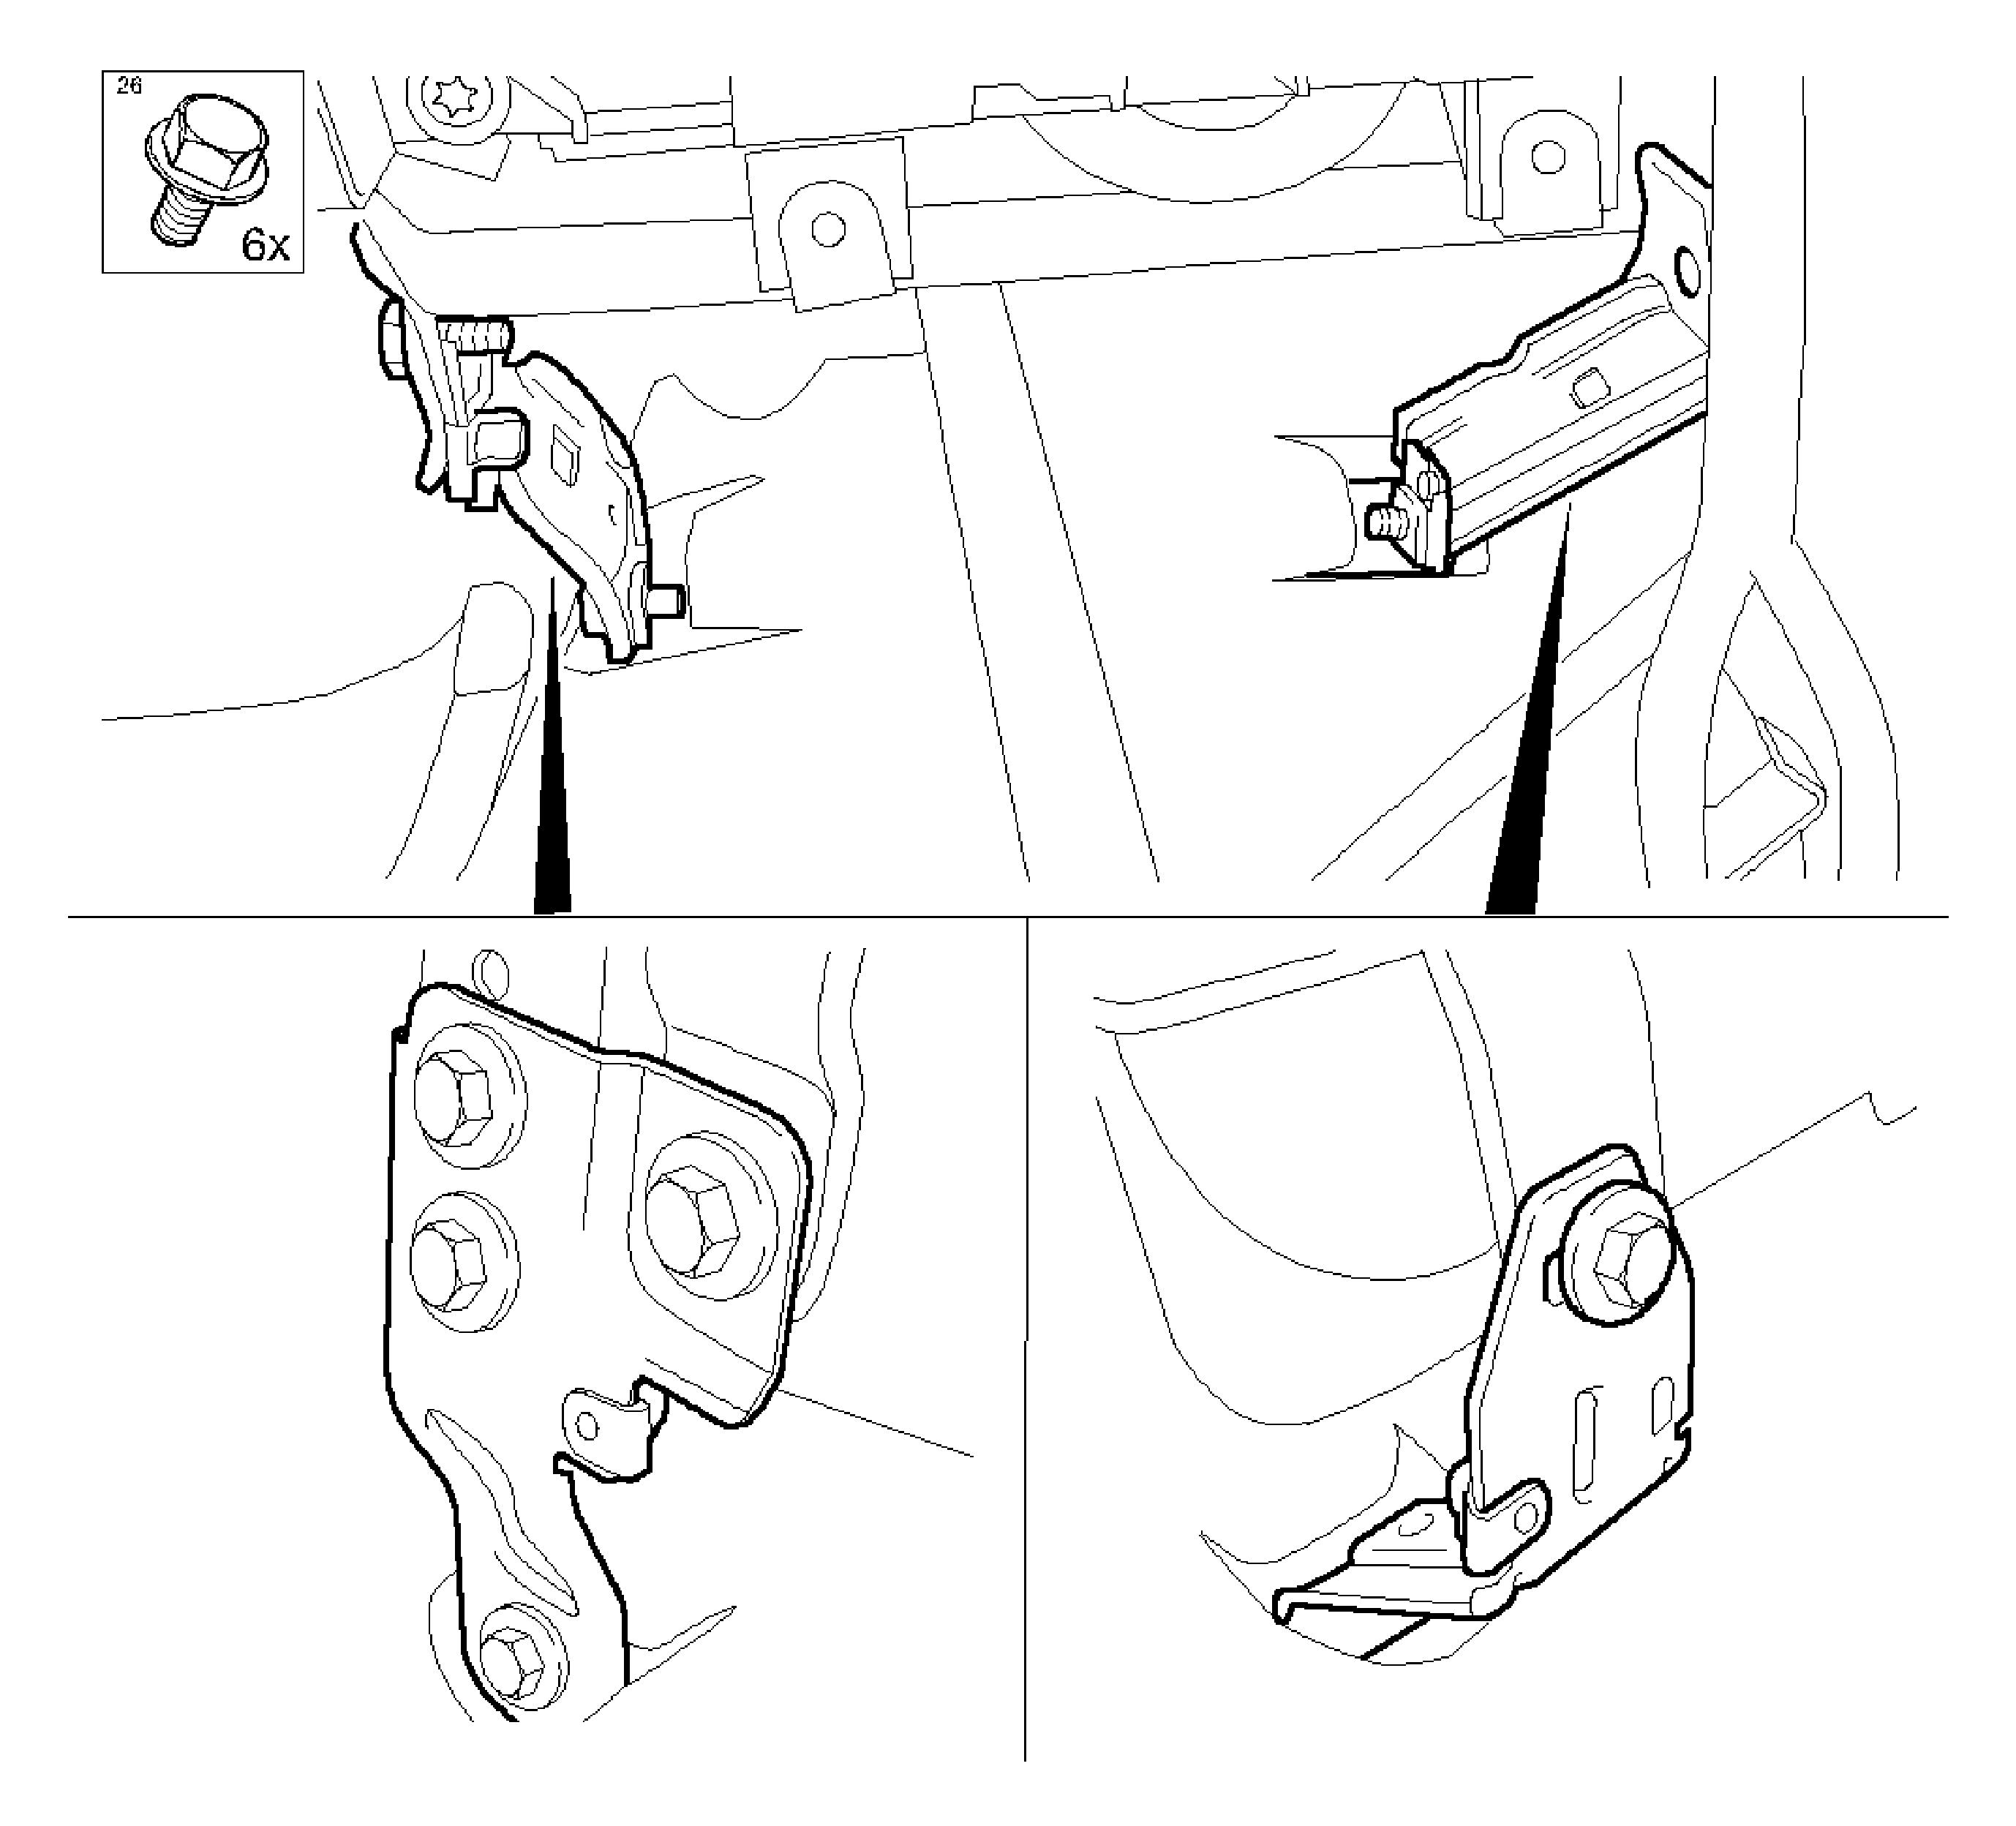
- Remove the I/P padding bracket - both sides.
Remove the 6 bolts.
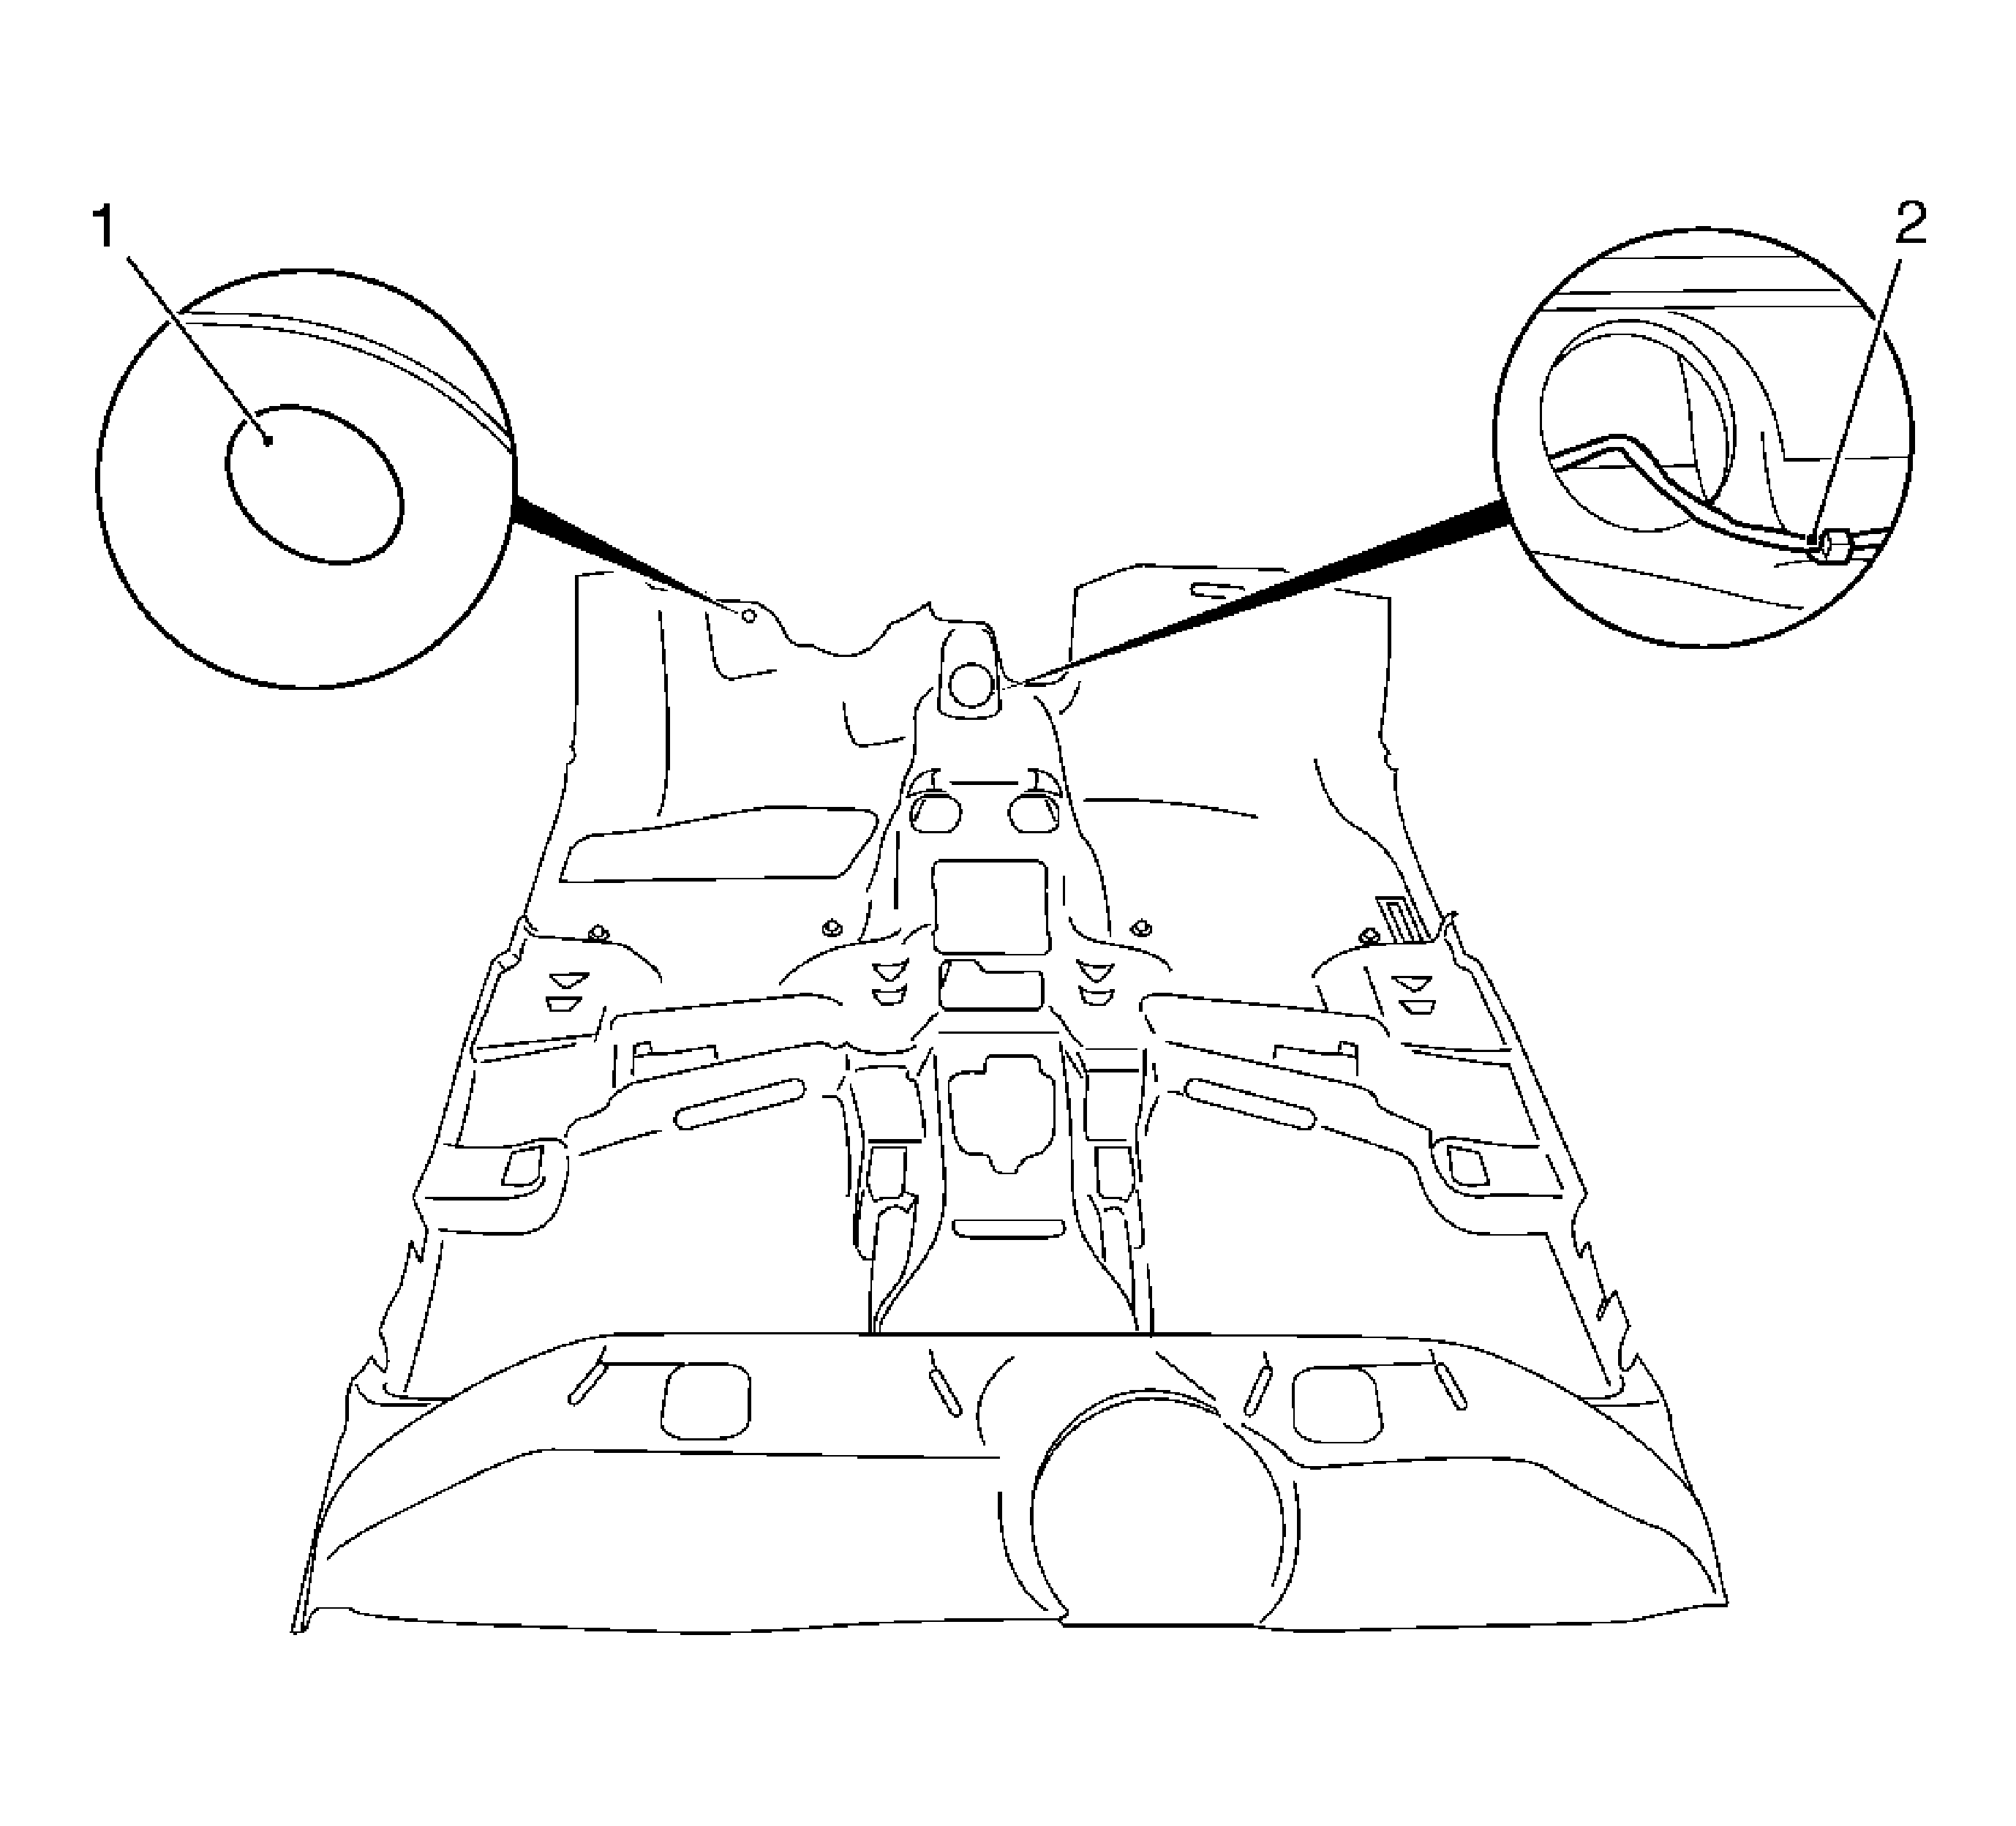
- Remove the carpet.
| 22.1. | Open the quick release fastener (1). |
| 22.2. | Disconnect the wiring harness clip (2). |
- Remove the carpet beginning from the rear.
Installation Procedure
- Install the carpet beginning at the front.
- Insert the carpet.
| 2.1. | Close the quick release fastener. |
| 2.2. | Connect the wiring harness clip. |
Caution: Refer to Fastener Caution in the Preface section.
- Install the I/P padding bracket, both sides, and tighten the 6 bolts to
13 N·m (113 lb in).
- Install the heating duct.
- Fasten the cable duct.
| 5.1. | Connect the 2 wiring harness plugs. |
| 5.2. | Install the ground strap and tighten the nut to
5 N·m (44 lb in). |
- Install the diagnostics plug bracket.
| 6.1. | Install the bracket and tighten the 3 nuts to
10 N·m (89 lb in). |
- Install the yaw sensor and tighten the 2 nuts to
6 N·m (53 lb in).
- Connect the wiring harness plug.
- Install the air bag control unit.
Connect and lock the 2 wiring harness plugs and tighten the 3 nuts to
10 N·m (89 lb in).
- Install the left and right I/P insulator panels.
| • | Insert the I/P insulator panels bracket and 2 screws on the drivers side. |
| • | Insert the I/P insulator panels bracket and 2 screws on the passengers side. |
- Install both sides of the rear quarter panel.
- Clip in the 8 rear quarter panel clips.
| • | Tighten the bolt on upper center pillar to
2.5 N·m (22 lb in). |
| • | Tighten the bolt to rear seat backrest to
40 N·m (30 lb ft). |
| • | Tighten the lower center pillar bolt to
35 N·m (26 lb ft). |
- Install the rear quarter panel cover cap front.
- Install the belt striker guide bushing to rear quarter panel front.
- Install the seat belt with striker.
- Install the lower belt striker and tighten the lower belt fastening bolt to
35 N·m (26 lb ft).
- Install both sides of the upper center pillar panelling.
| 17.1. | Guide the center pillar panelling from above in inner panelling guide front of rear quarter panel. |
| 17.2. | Clip in the upper center pillar panelling. |
| 17.3. | Press in the expanding bolt and tighten the seat belt bolt to center pillar to
35 N·m (26 lb ft). |
| 17.4. | Clip in the cover cap. |
- Install both door trim plates.
- Insert the rear seat backrest into side guide.
Note: Use the screw locking compound.
- Install the rear seat backrest and tighten the 3 rear bolts to
20 N·m (15 lb ft).
- Fold the down rear seat backrest and tighten the front 3 bolts to seat belt buckle to 20 N·m (15 lb ft).
- Install the bench seat.
| 22.1. | Install the 2 seats in the rear bracket. |
| 22.2. | Push the seat simultaneously backwards and down. |
| 22.3. | Bolt the front 2 brackets. |
- Install the front floor console. Refer to
Front Floor Console Replacement.
- Insert the driver side front seat.
| 24.1. | Connect and latch the compact connector. |
| 24.2. | Insert the seat in the front guide. |
Note: Use screw locking compound.
- Fasten the driver side front seat and tighten the 2 bolts
35 N·m (26 lb ft).
Note: Use screw locking compound.
- Insert the passenger side front seat.
| 26.1. | Connect and latch the compact connector. |
| 26.2. | Insert the seat in the front guide and tighten the 2 bolt
35 N·m (26 lb ft). |
- Connect the battery.
- For programming procedures, refer to
Control Module References.
Floor Panel Carpet Replacement Sedan
Removal Procedure
Warning: Refer to Battery Disconnect Warning in the Preface section.
- Disconnect the battery.
- Wait 1 minute for the air bag to deactivate.
- Position the seats to the forward-most position.
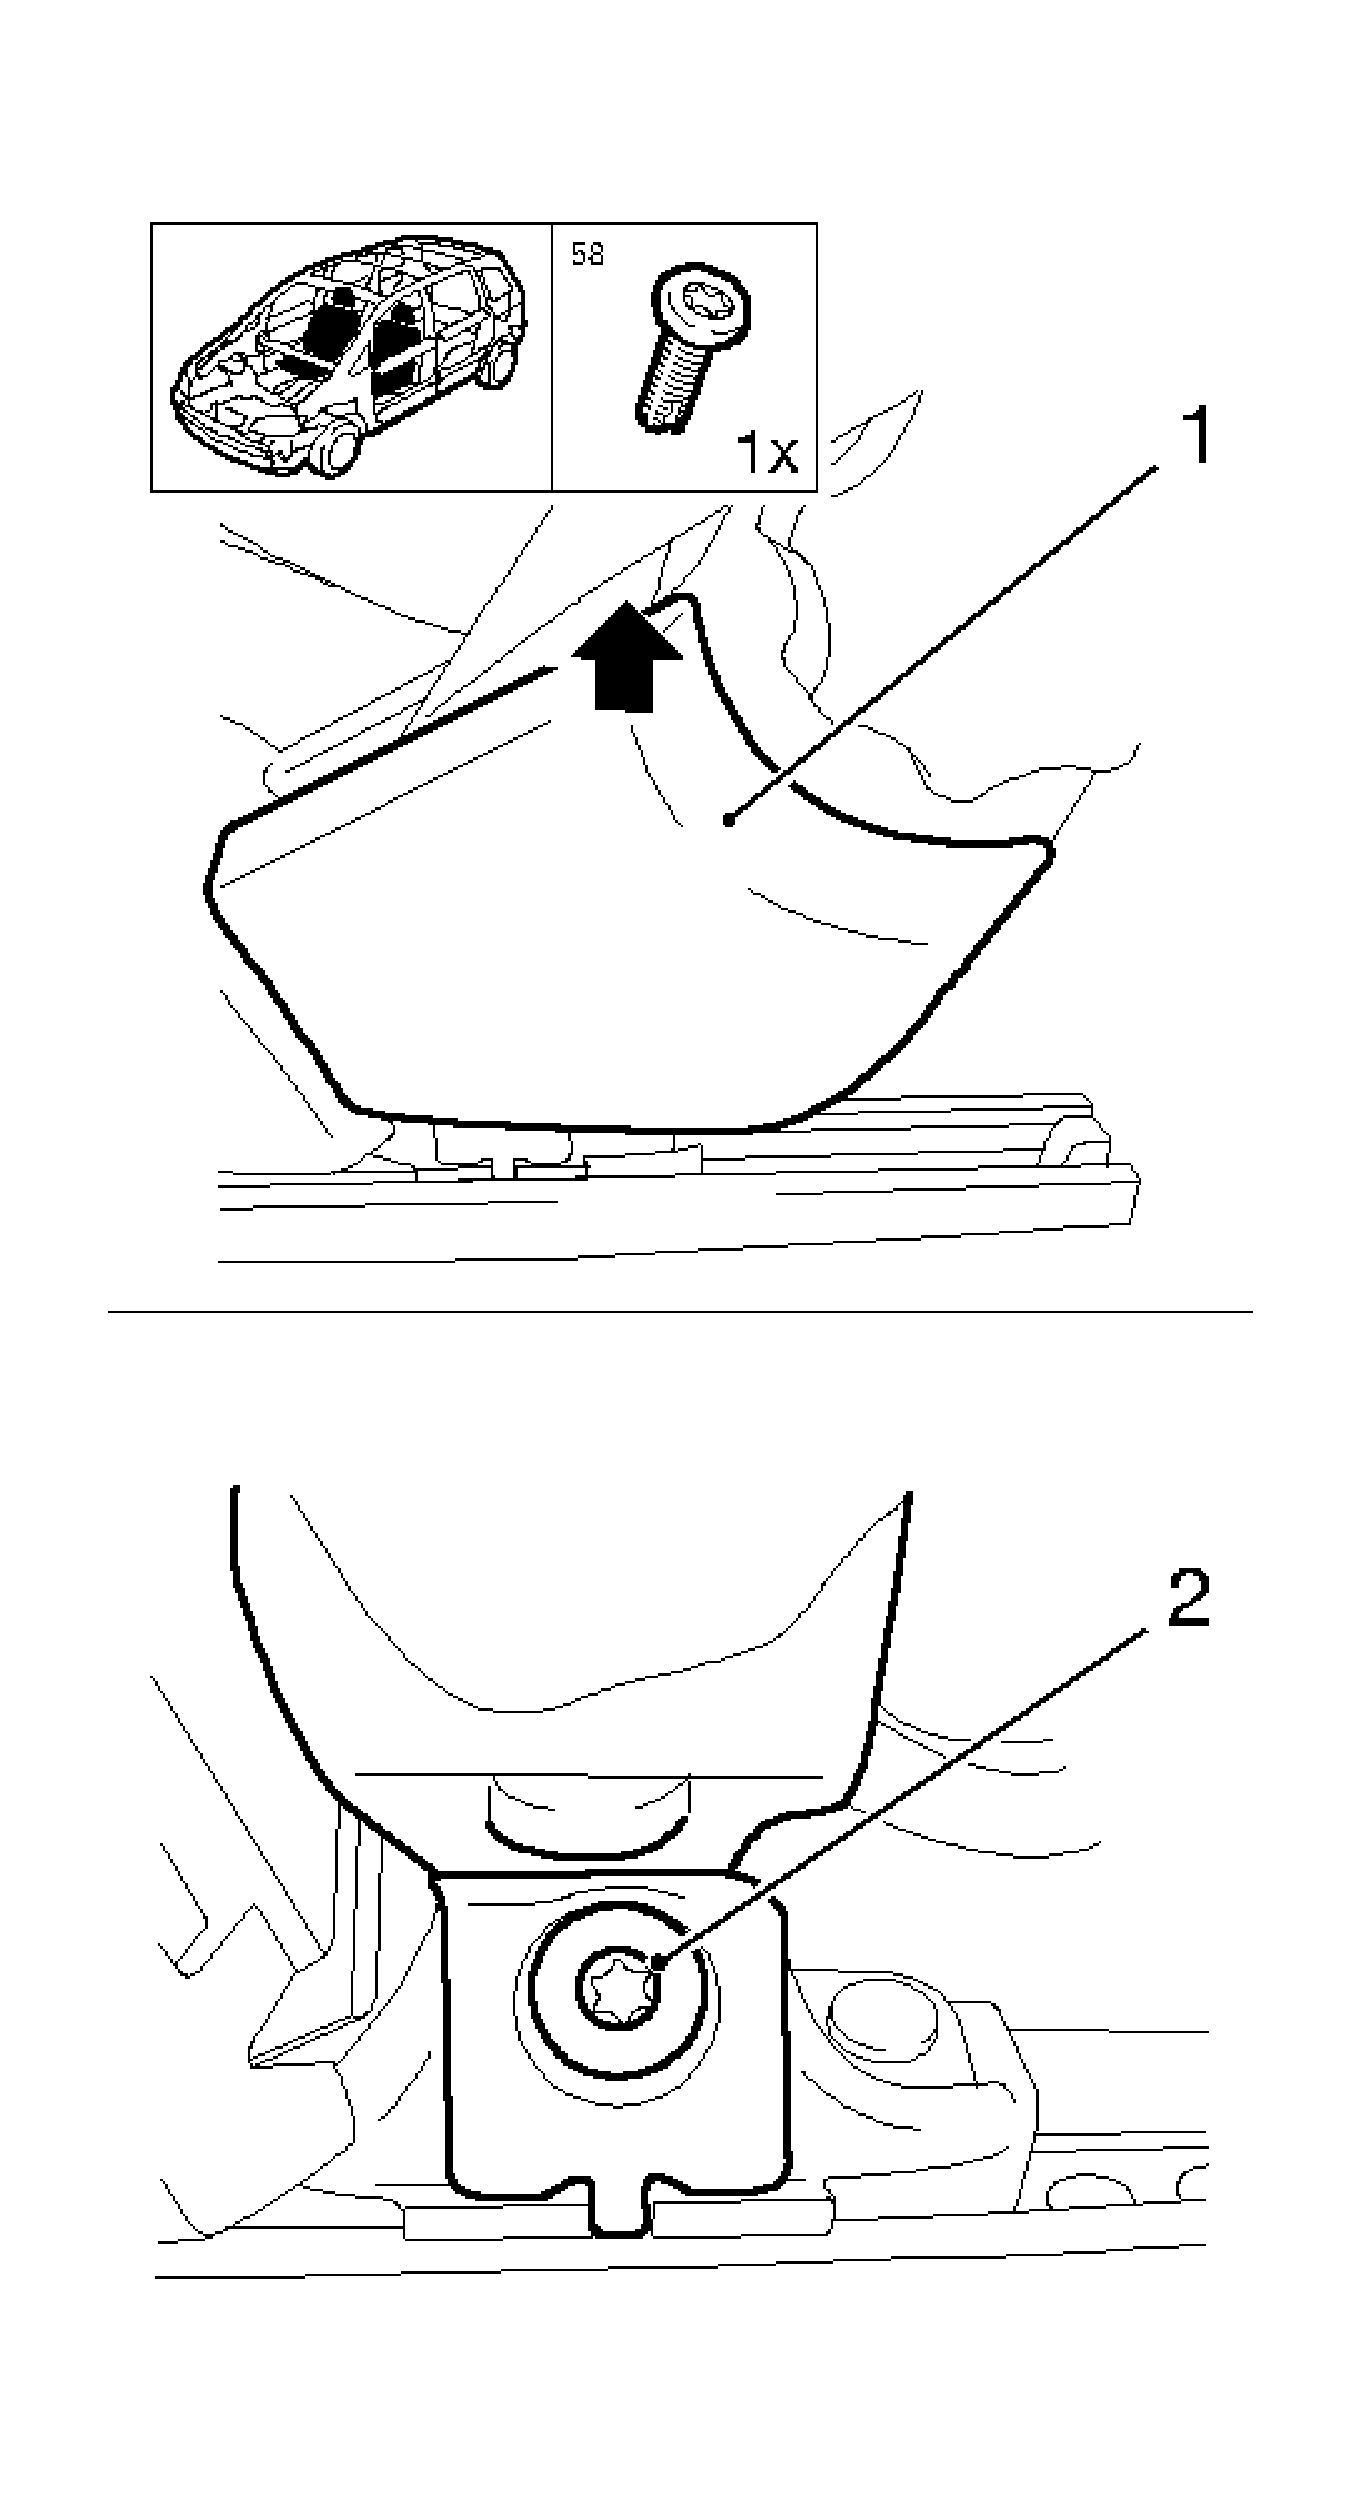
- Remove the driver side seat belt trim panel.
Remove the trim panel upwards (1).
- Remove the passenger side belt trim panel.
Remove the trim panel upwards (1).
- Remove the driver side front seat belt.
Remove the bolt (2).
- Remove the passengers side front seat belt.
Remove the bolt (2).

- Remove the driver side front seat.
| 8.1. | Remove the 2 bolts (1). |
| 8.2. | Remove from the front guide. |
| 8.3. | Release and disconnect the compact connector. |
- Remove the passenger side front seat.
| 9.1. | Remove the 2 bolts (1). |
| 9.2. | Remove from the front guide. |
| 9.3. | Release and disconnect the compact connector. |

- Remove the left and right instrument panel (I/P) insulator panel.
| • | Remove the 2 screws on the driver side and remove the I/P insulator panel from the bracket. |
| • | Remove the 2 screws on the passenger side and remove the I/P insulator panel from the bracket. |
- Remove the front floor console. Refer to
Front Floor Console Replacement.
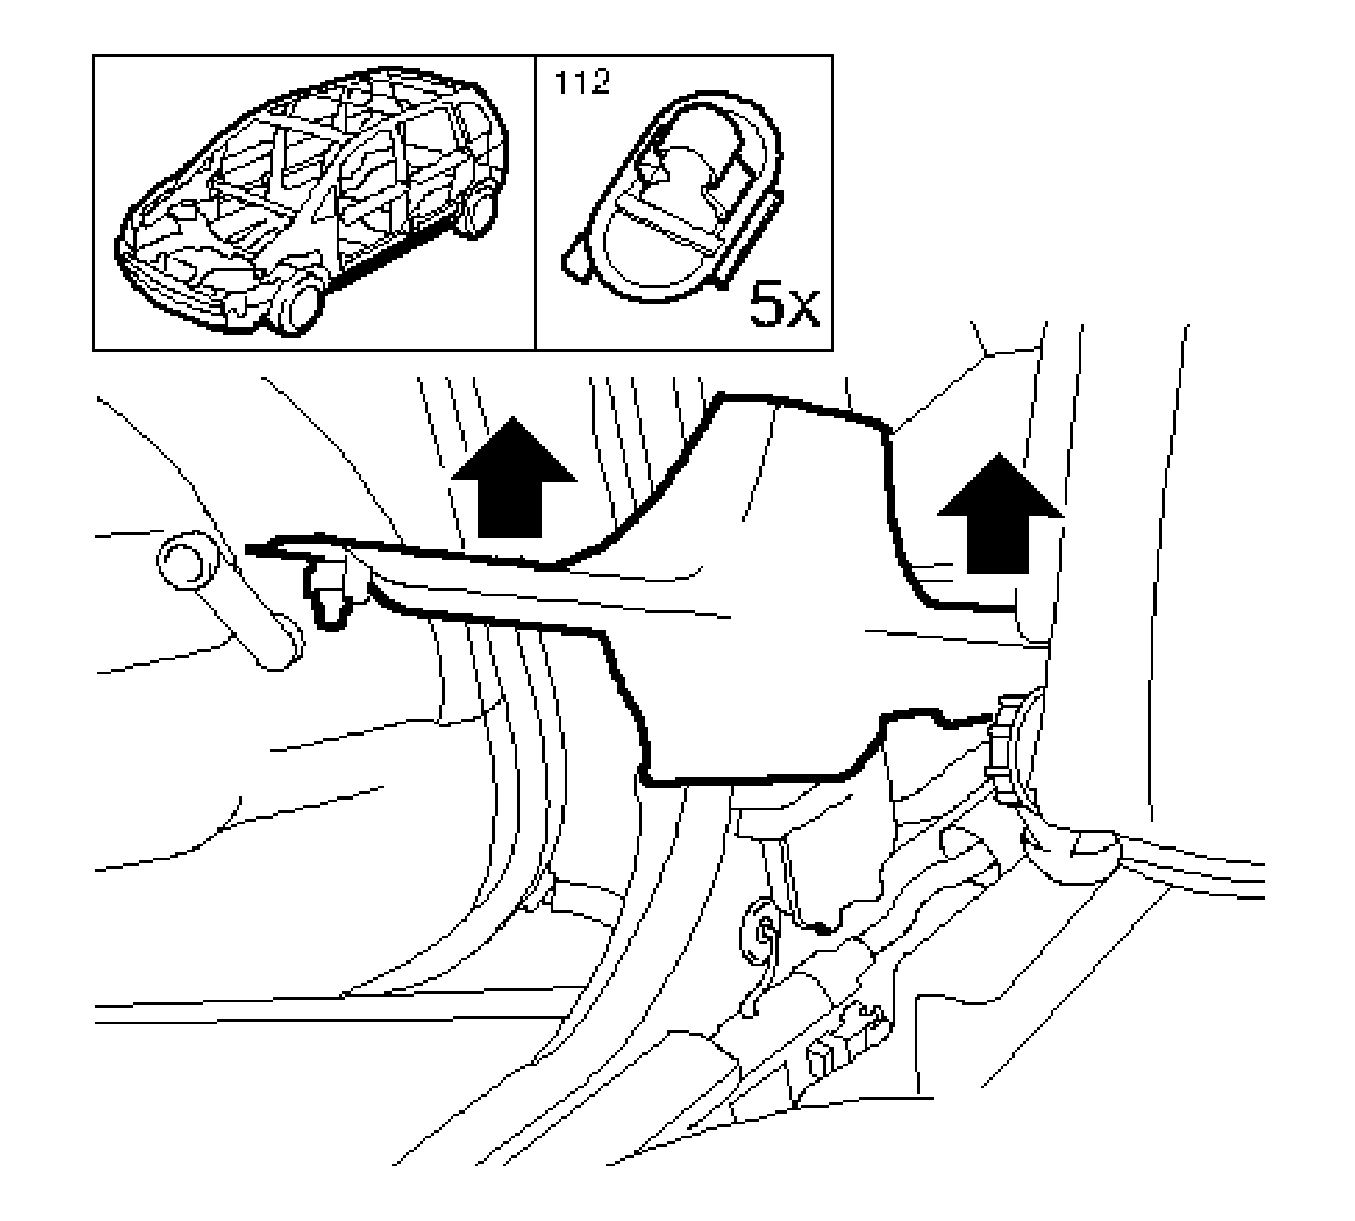
- Remove the sill door plate - both sides.
| 12.1. | Loosen the 5 clips. |
| 12.2. | Remove the door plate sill upwards. |

- Remove the I/P padding fastening retainers, both sides.
Remove the 6 bolts.
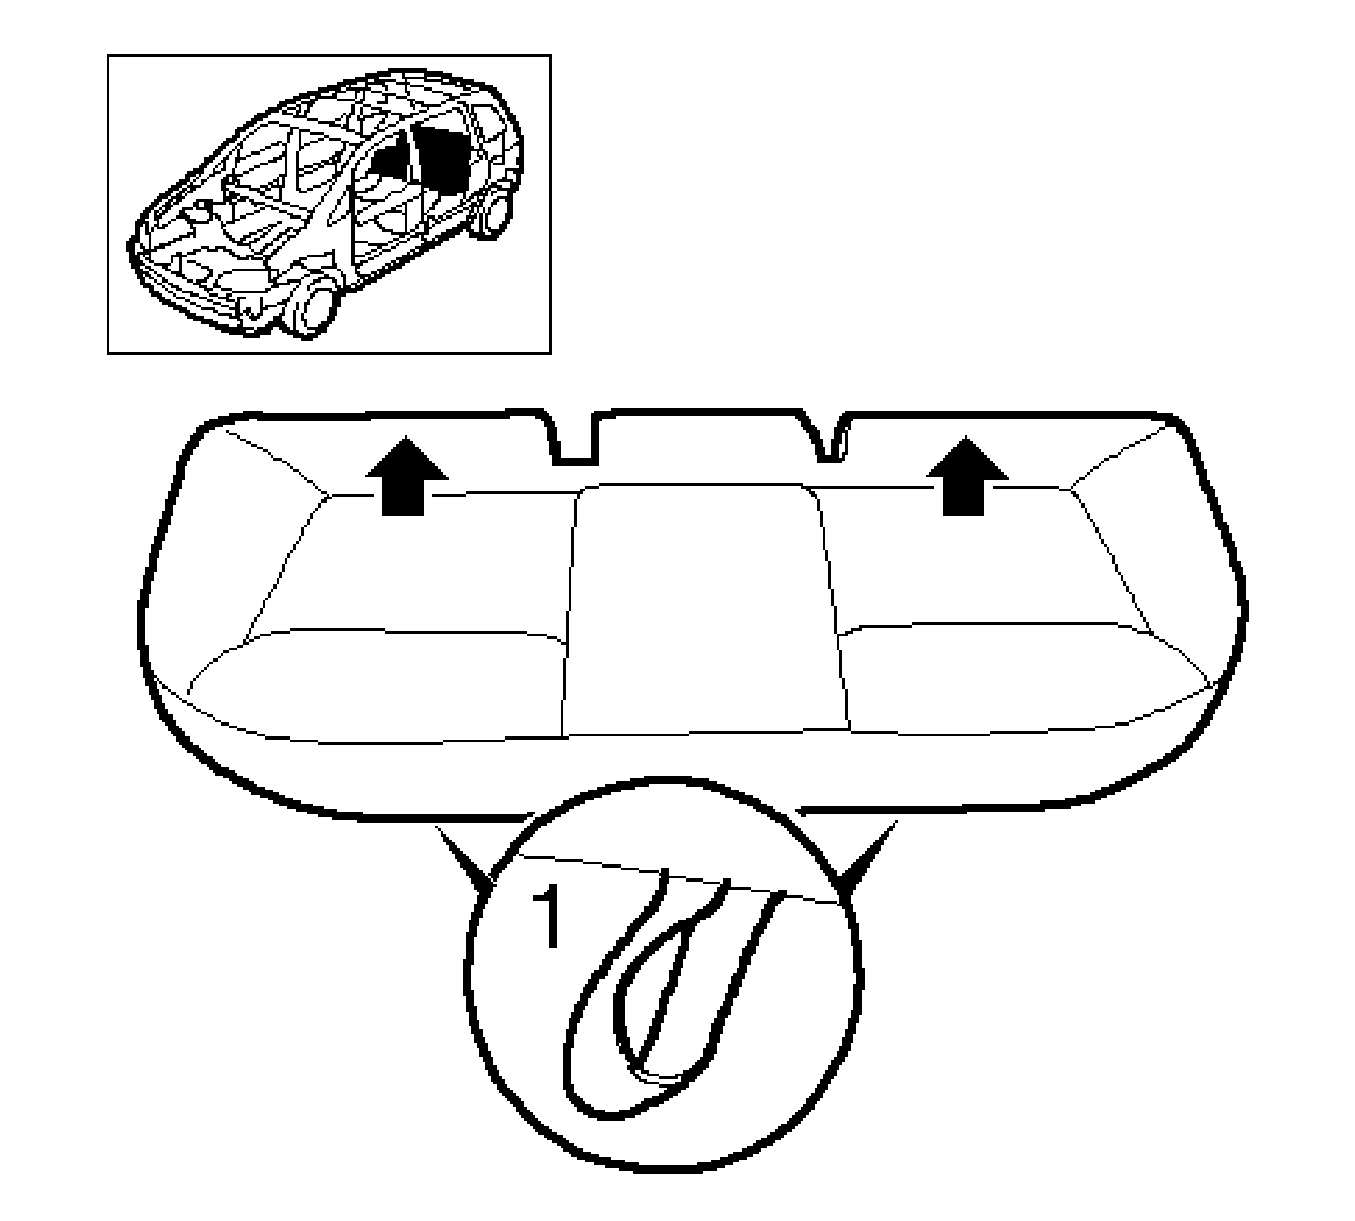
- Remove the rear seat.
| 14.1. | Disconnect at the loop (1) and support in rear area (arrow). |
| 14.2. | Remove the rear seat upwards. |

- Remove the air bag control unit.
Remove the 3 nuts (1) and remove the control unit.
- Loosen the air bag wiring harness.
| 16.1. | Release the 2 wiring harness plugs and disconnect. |
| 16.2. | Loosen the cable harness clamp. |
| 16.3. | Disconnect the hand brake wiring harness plug. |
| 16.4. | Remove the ground cable and place to one side. |
| 16.5. | Disconnect the cable duct. |
| 16.6. | Remove the diagnostics plug. |
- Remove the diagnostics plug bracket.
| 17.3. | Remove the bracket. |
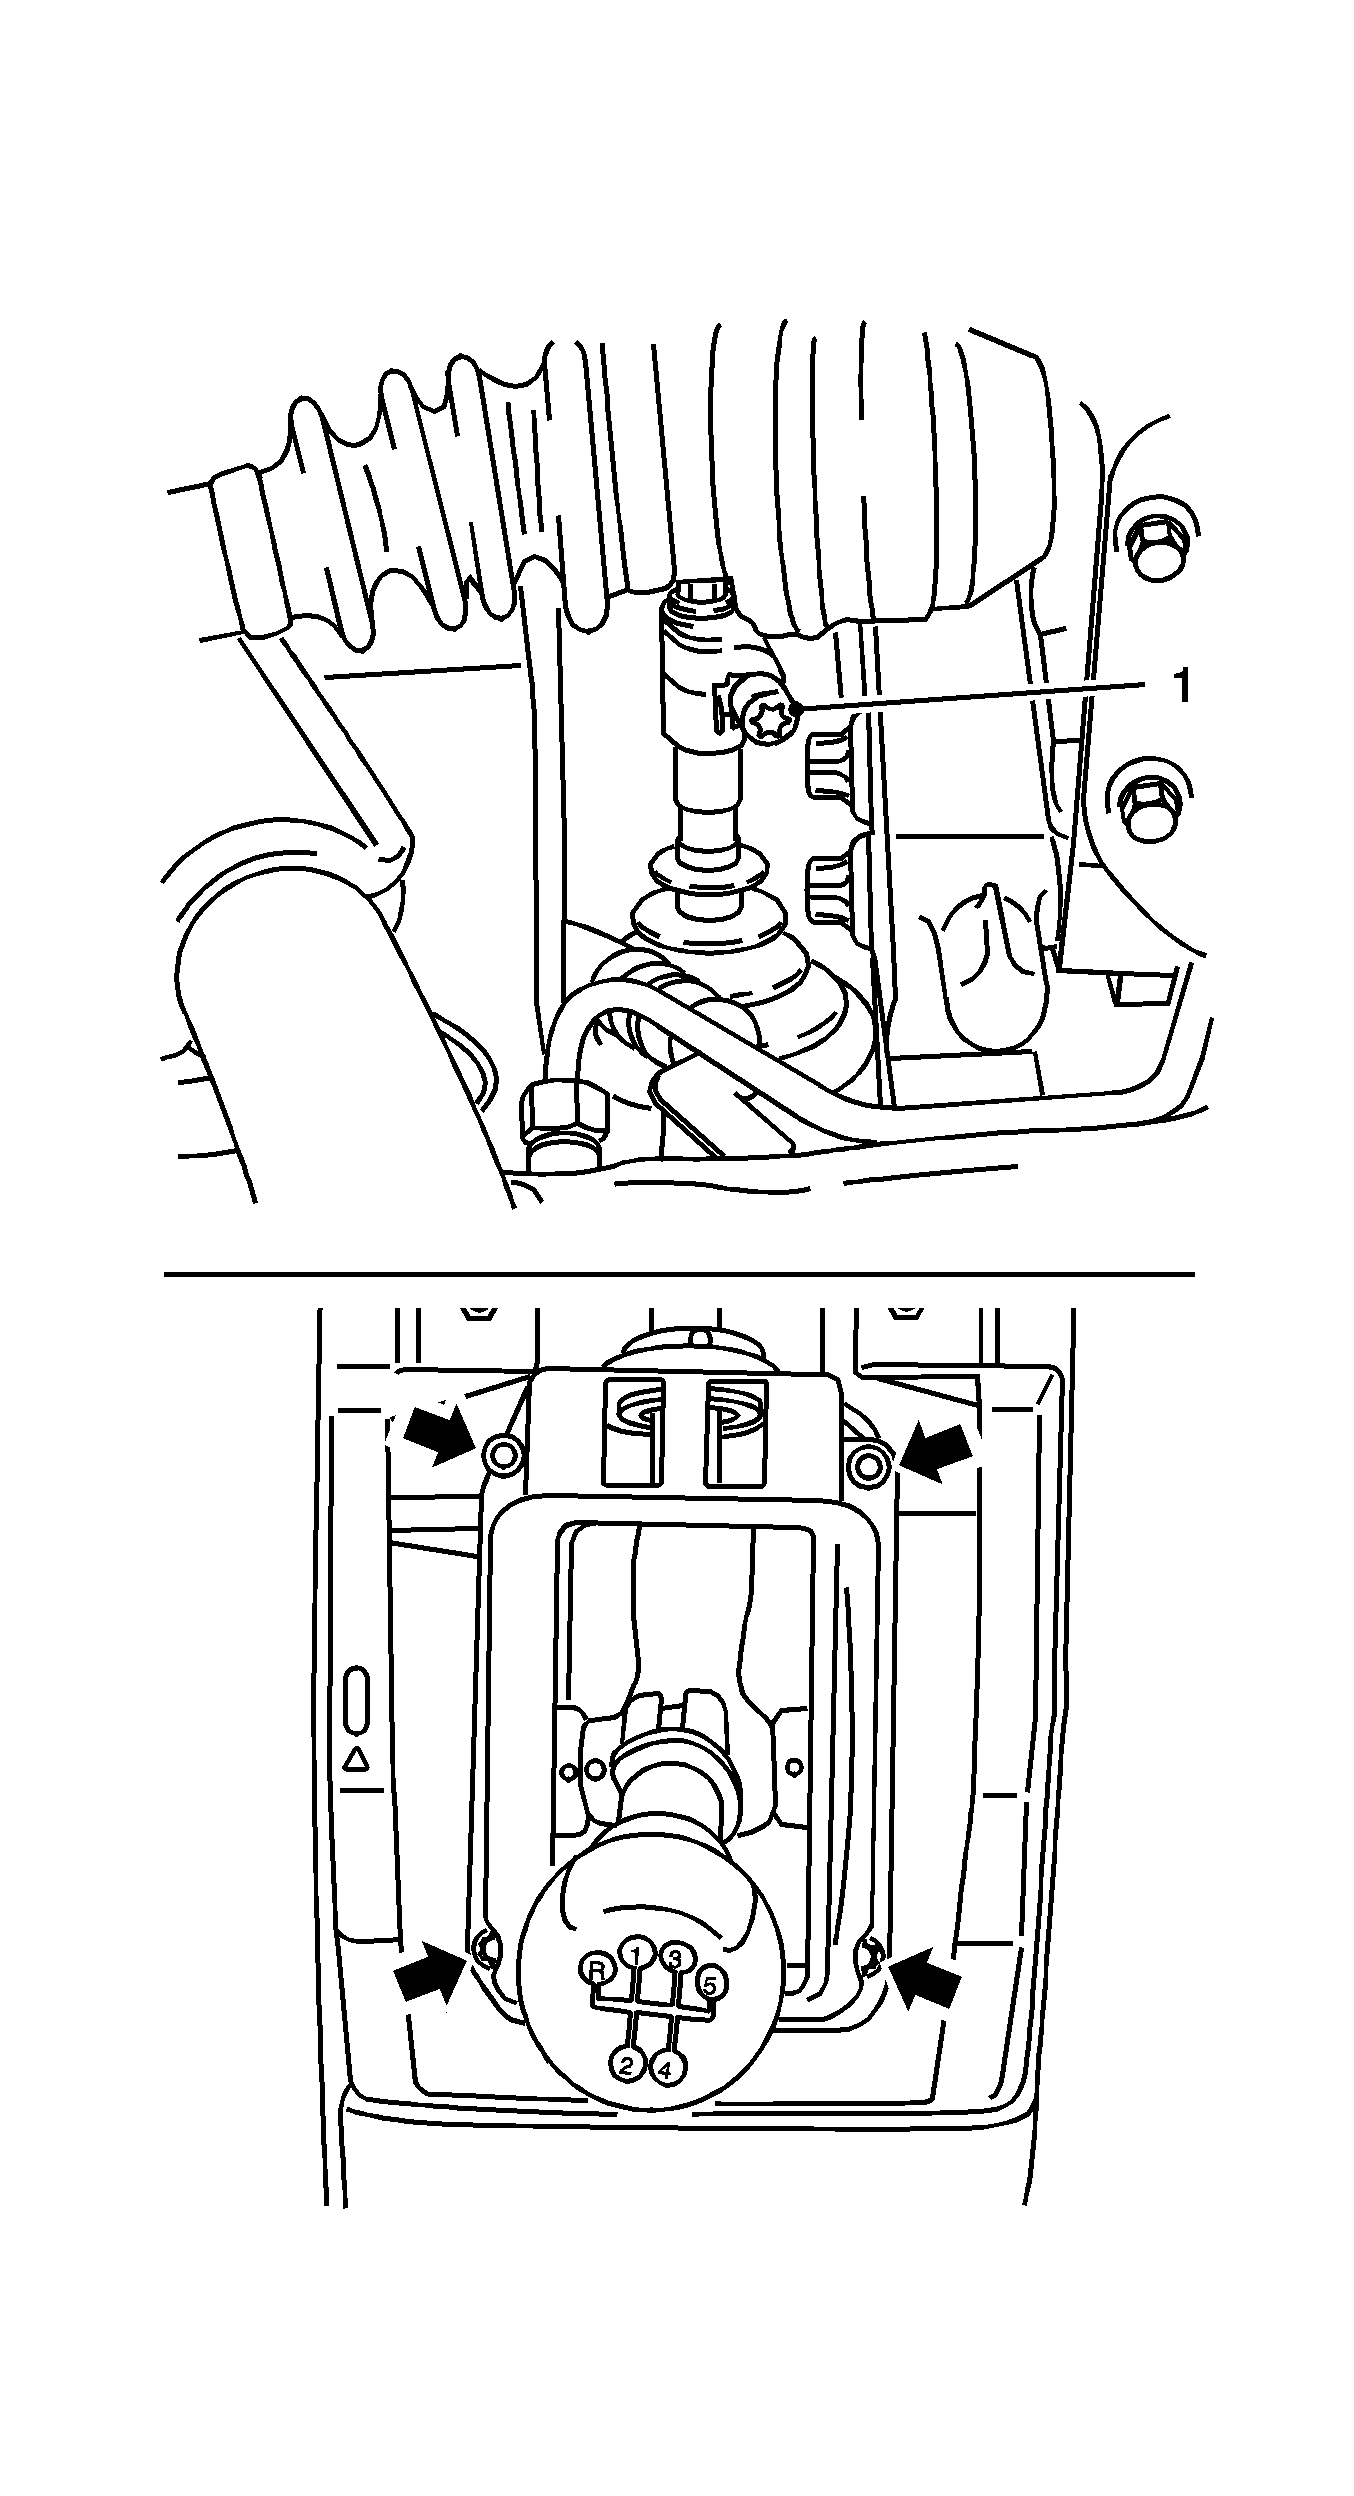
Note: Mark the installation position.
- Loosen the shifter rod in the engine compartment.
Loosen the bolt (1).
- Remove the cage.
Remove the 4 screws and remove the cage with the shifter rod.
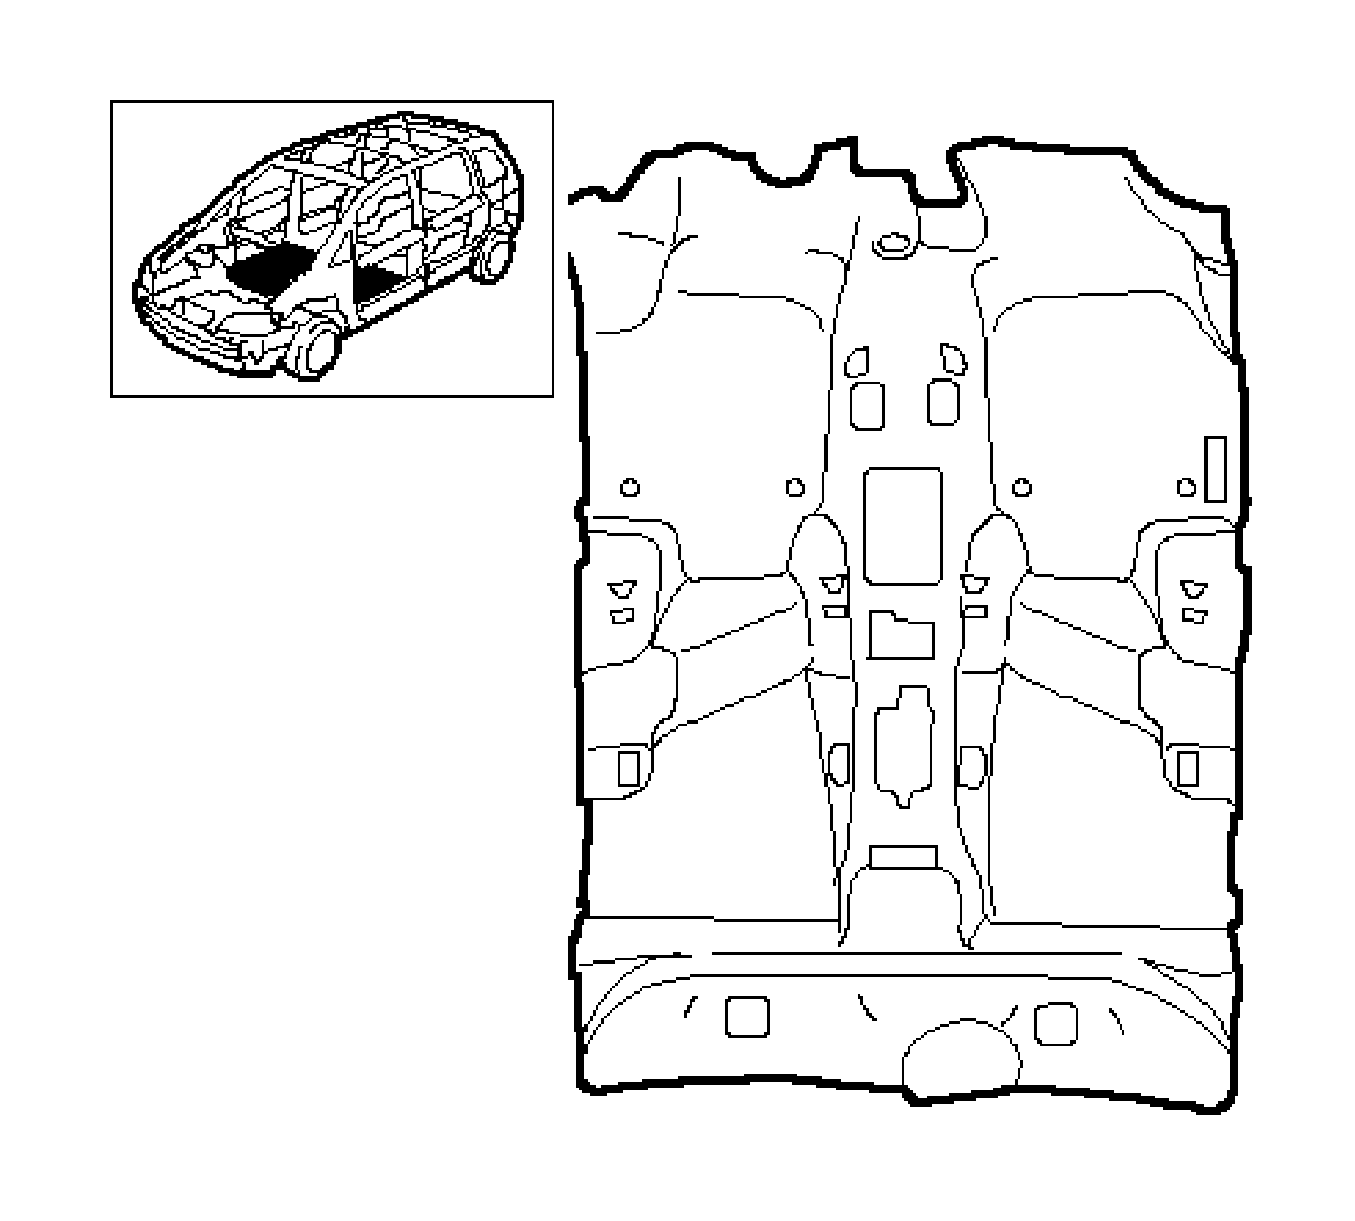
- Remove the carpet beginning from the rear.
Installation Procedure
- Install the carpet beginning at the front.
Caution: Refer to Fastener Caution in the Preface section.
- Install the cage.
| 2.1. | Insert the shifter rod. |
| 2.2. | Place the cage and tighten the 4 screws. |
Note: Observe the installation position.
- Fasten the shifter rod in the engine compartment and tighten the bolt to
12 N·m (106 lb in) plus 180-225 degrees.
- Install the diagnostics plug bracket.
| 4.1. | Install the bracket and tighten the 3 nuts to
10 N·m (89 lb in). |
- Fasten the air bag wiring harness.
| 5.1. | Fasten the cable harness clamp. |
| 5.2. | Connect the wiring harness plug and tighten the nut to
5 N·m (44 lb in). |
| 5.3. | Install the ground cables. |
| 5.4. | Install the cable duct. |
| 5.5. | Install the diagnostics plug. |
- Install the air bag control unit.
Connect the 2 wiring harness plugs and tighten the 3 nuts to
10 N·m (89 lb in).
- Install the I/P padding fastening retainers, both sides, and tighten the 6 bolts to
13 N·m (113 lb in).
- Install the I/P insulator panel, left and right.
| • | Insert the I/P insulator panel in the bracket and screw in 2 screws on the passengers side. |
| • | Insert the I/P insulator panel in the bracket and screw in 2 screws on the drivers side. |
- Install the front floor console. Refer to
Front Floor Console Replacement.
- Install the door plate sill, both sides.
Install the 5 clips.
- Insert the driver side front seat.
| 11.1. | Connect and latch the compact connector. |
| 11.2. | Insert the seat in the front guide. |
Note: Use the screw locking compound.
- Fasten the driver side front seat and tighten the 2 bolts to
35 N·m (26 lb ft).
Note: Use the screw locking compound.
- Install the driver side seat belt and tighten the bolt to 20 N·m (15 lb ft).
- Insert the driver side front seat panel.
Place the front seat in original position.
- Insert the passenger side front seat.
| 15.1. | Connect and latch the compact connector. |
| 15.2. | Insert the seat in the front guide. |
Note: Use the screw locking compound.
- Fasten the passenger side front seat and tighten the 2 bolts to
35 N·m (26 lb ft).
Note: Use the screw locking compound.
- Install the passenger side seat belt and tighten the bolt to
20 N·m (15 lb ft).
- Insert the passenger side front seat panel.
Reposition the front seat to the original position.
- Install the rear bench seat.
Insert the rear seat cushion and position.
- Connect the battery.
- For programming procedures, refer to
Control Module References.


