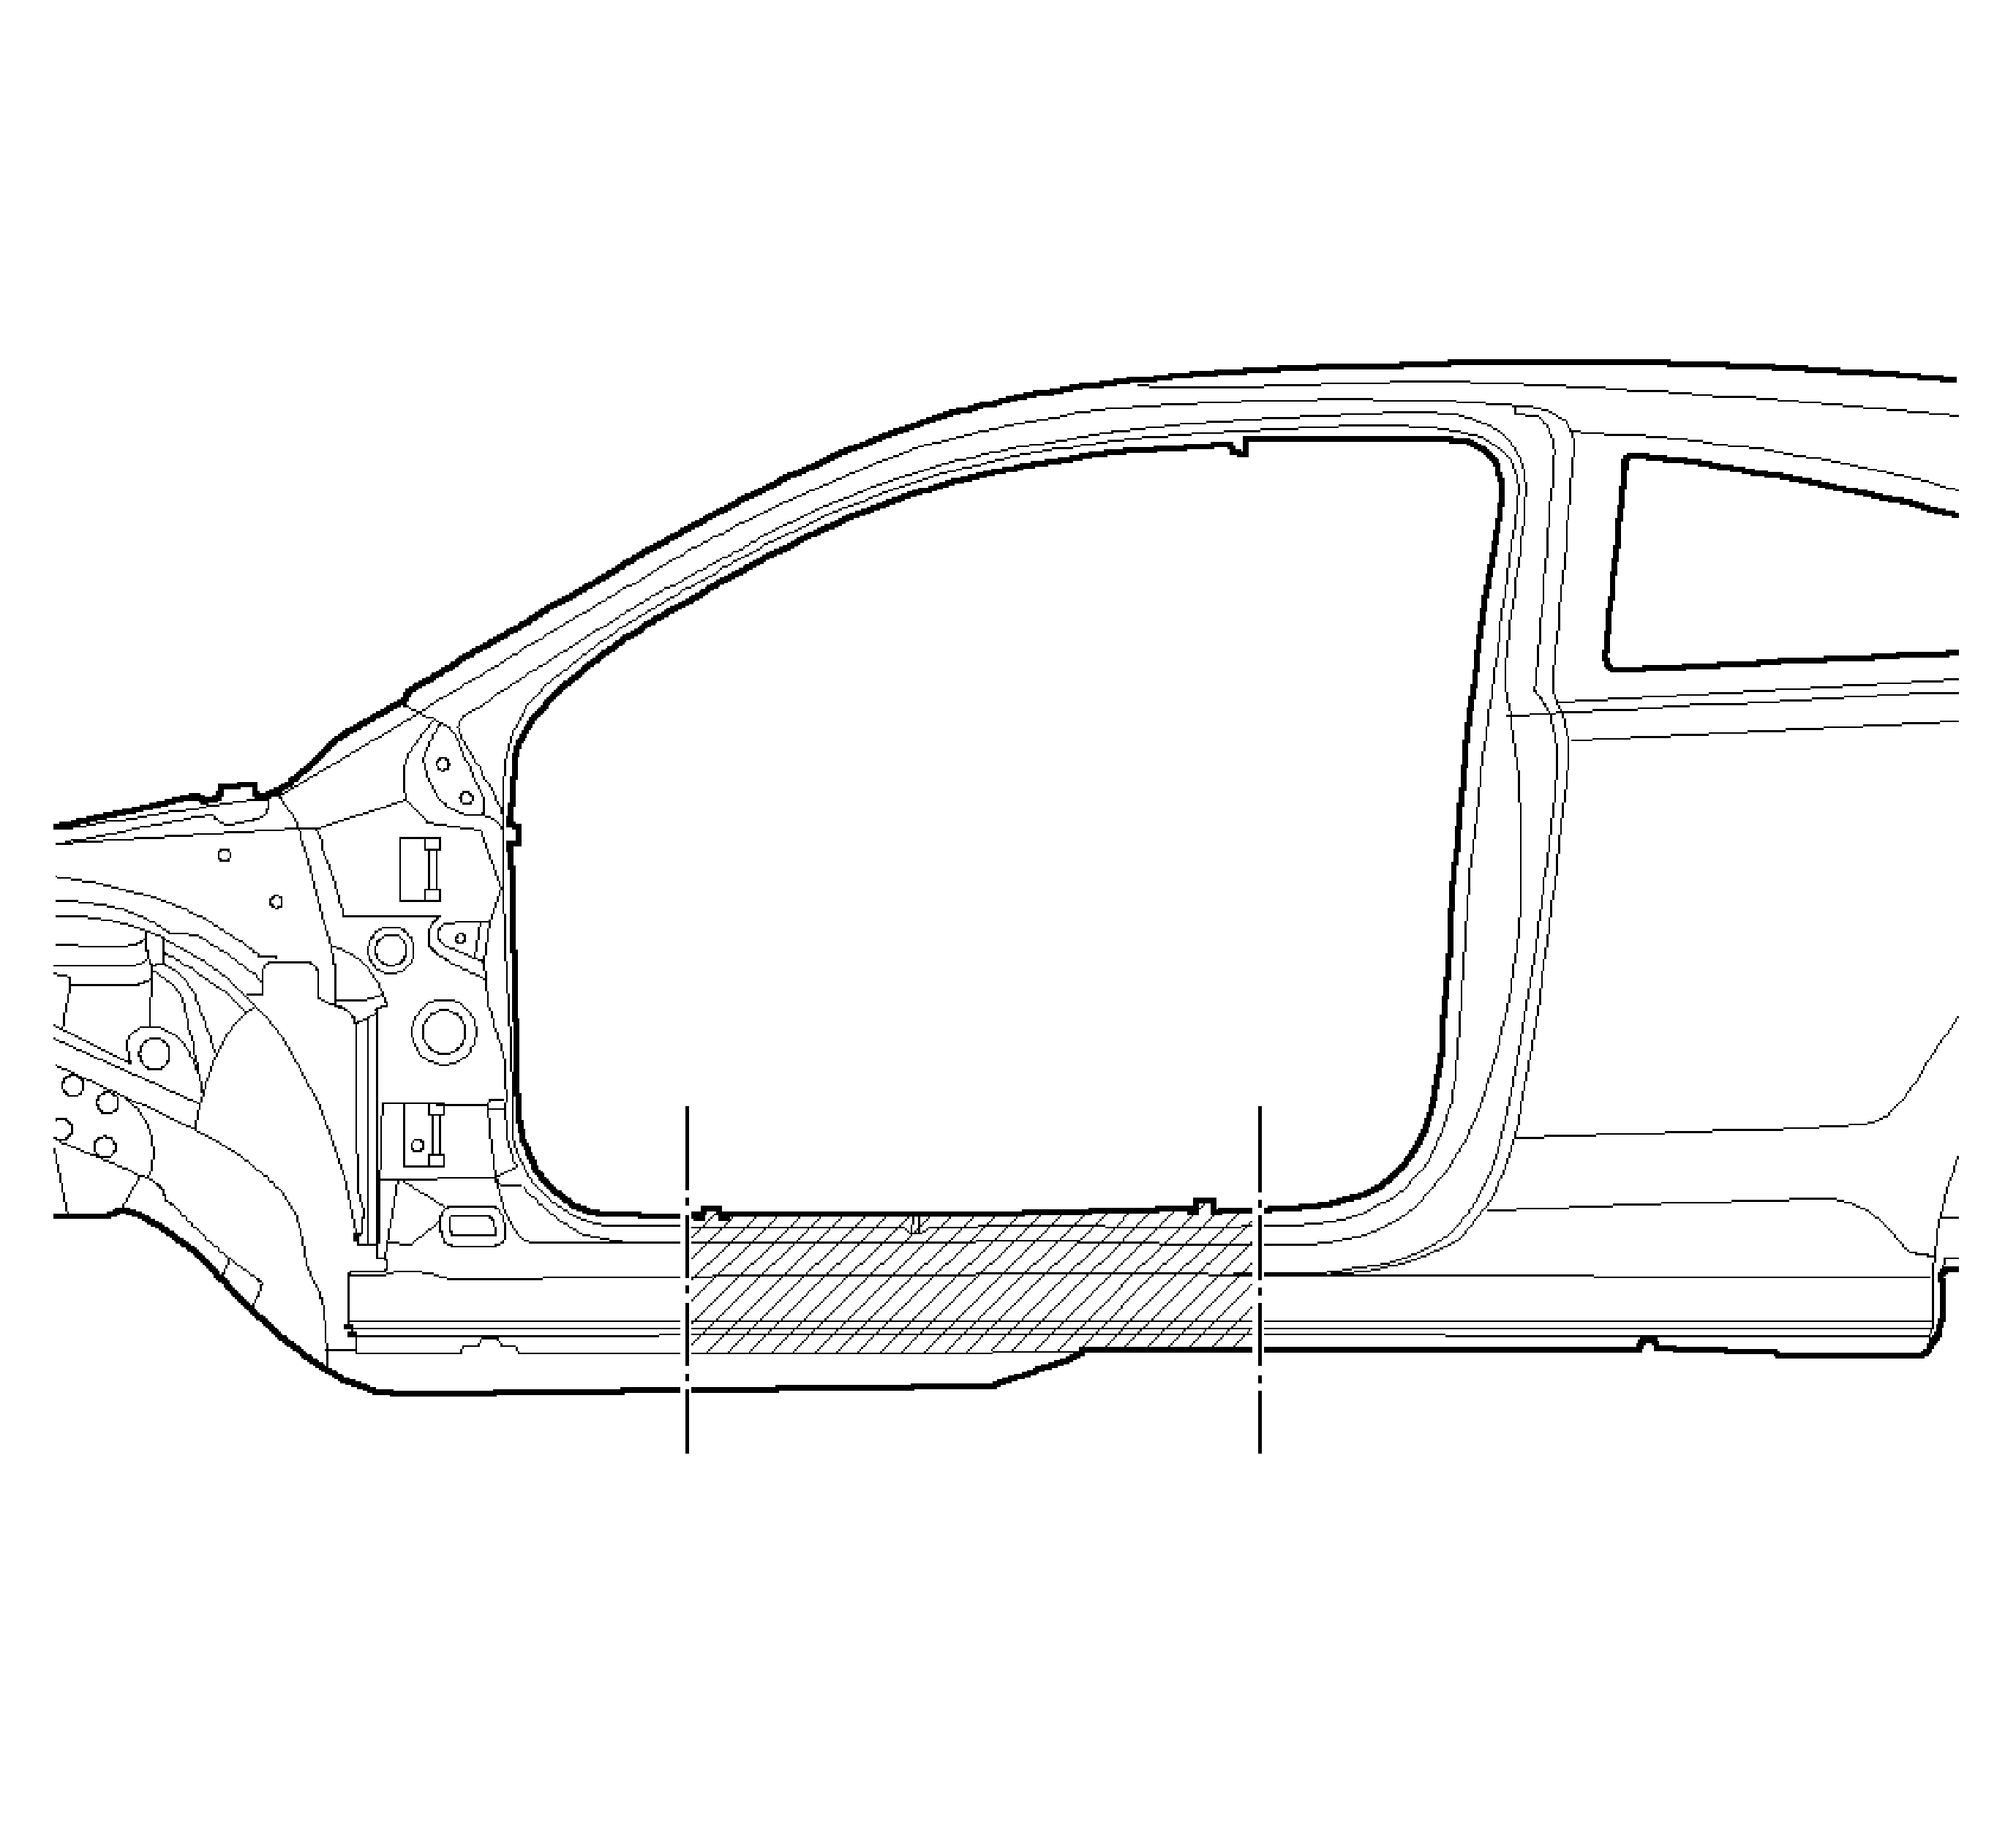
Rocker Outer Panel Sectioning Coupe
Removal Procedure
- Disable the SIR system.
- Disconnect the negative battery cable.
- Remove all related panels and components.
- Repair as much of the damage as possible to factory specifications.
- Note the locations and remove the sealers and anti-corrosion materials from repair area as necessary. Refer to Anti-Corrosion Treatment and Repair.
- Cut the panel where sectioning is to be performed.
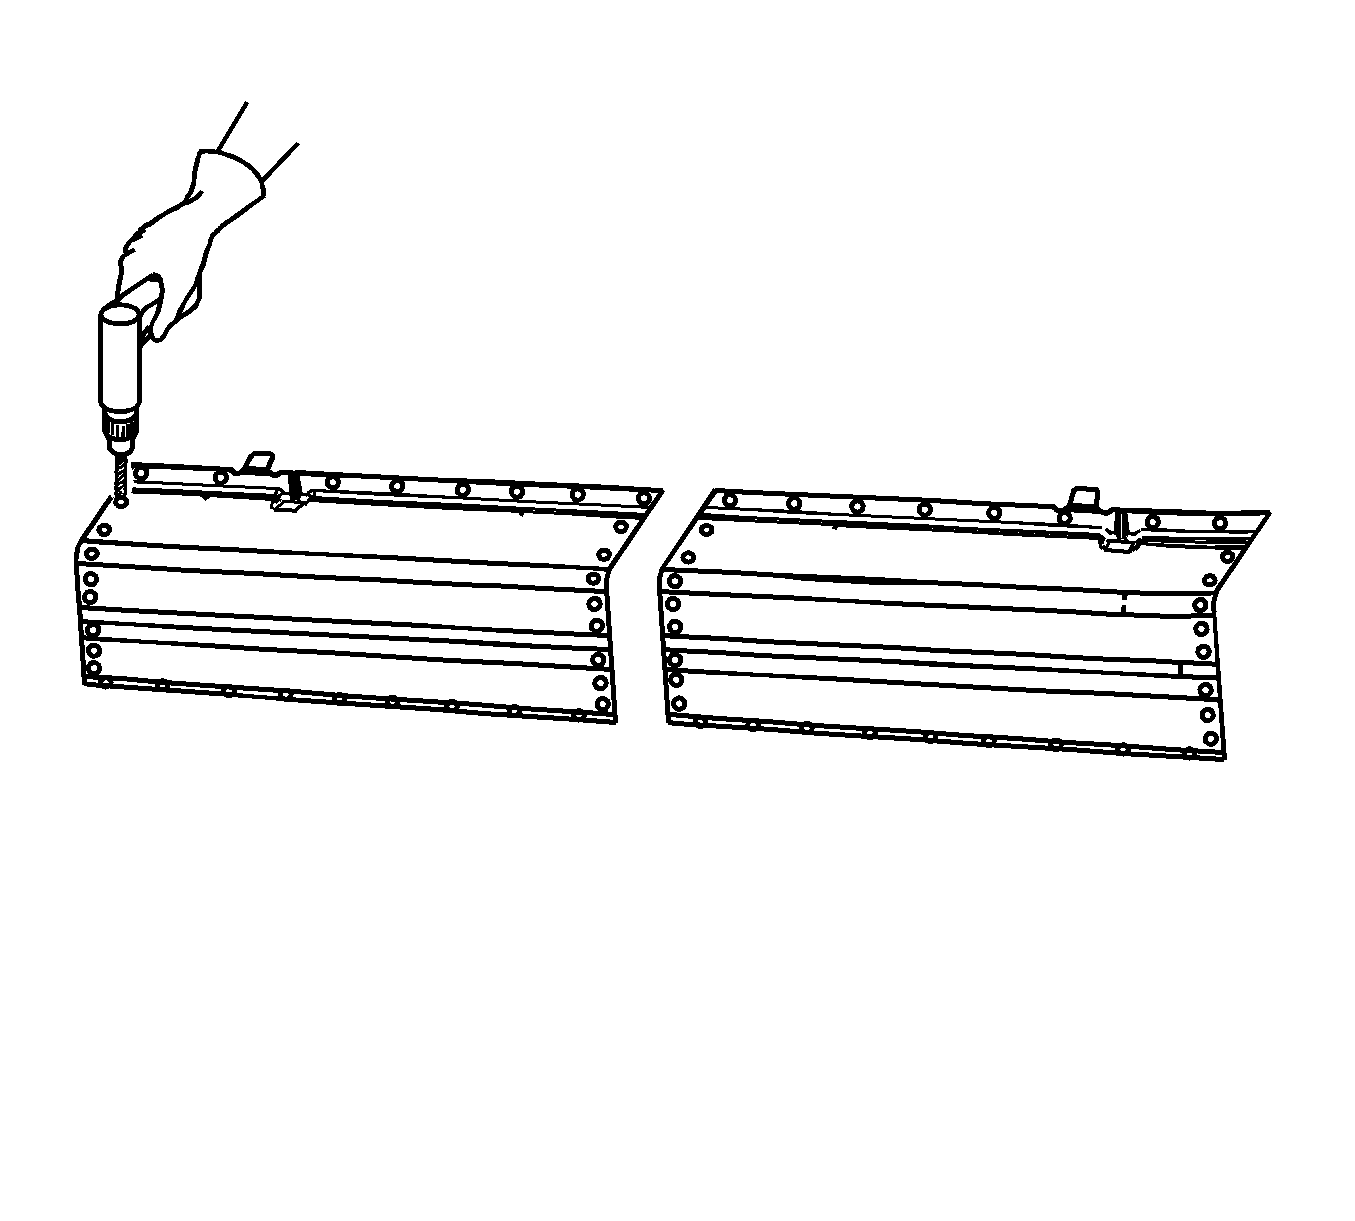
- Locate and drill out factory welds along the rocker panel flanges. Note the number and location of the welds for installation of the service part.
- Remove the damaged rocker panel.
Warning: Refer to Approved Equipment for Collision Repair Warning in the Preface section.
Note: Section in specific specified areas only. Sectioning outside of these areas may compromise the structural integrity of the vehicle.
Warning: Refer to Foam Sound Deadeners Warning in the Preface section.
Note: Do not damage any inner panels or reinforcements.
Installation Procedure
- Cut the replacement rocker panel in corresponding locations to fit the original panel. The sectioning joint(s) should be trimmed to allow 1 and ½ times the metal thickness at the sectioning joint.
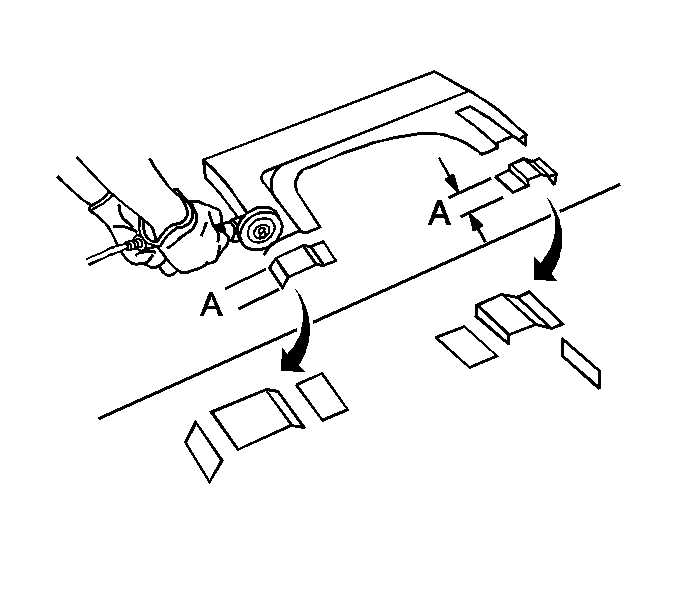
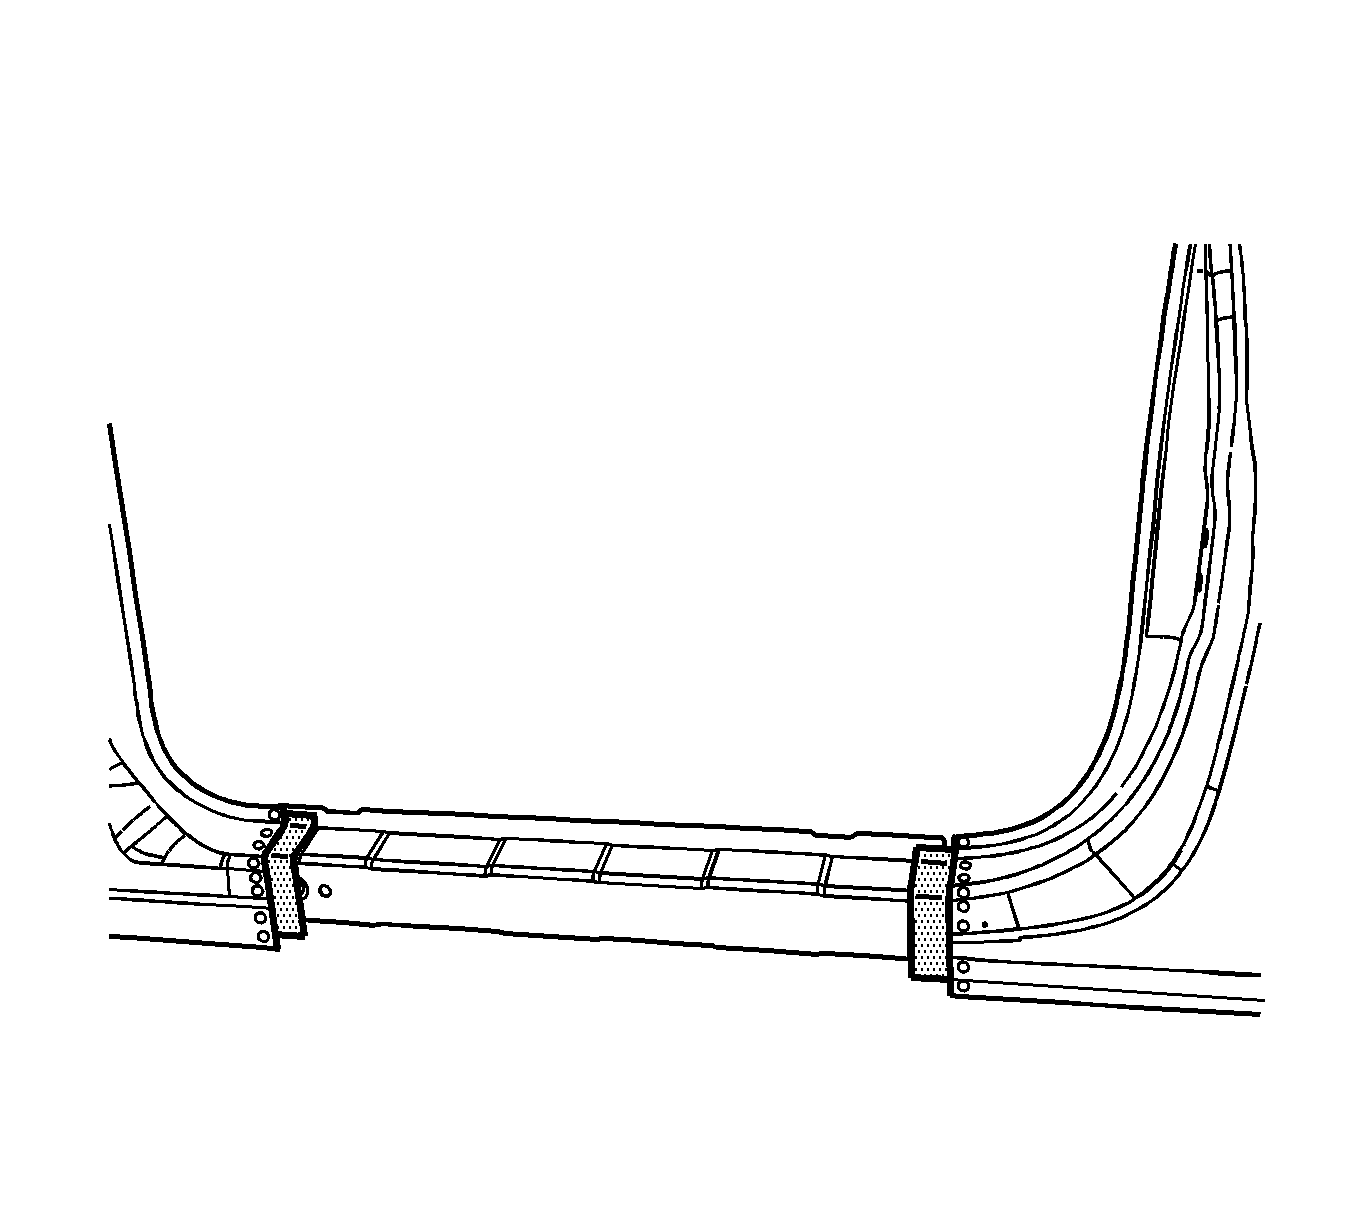
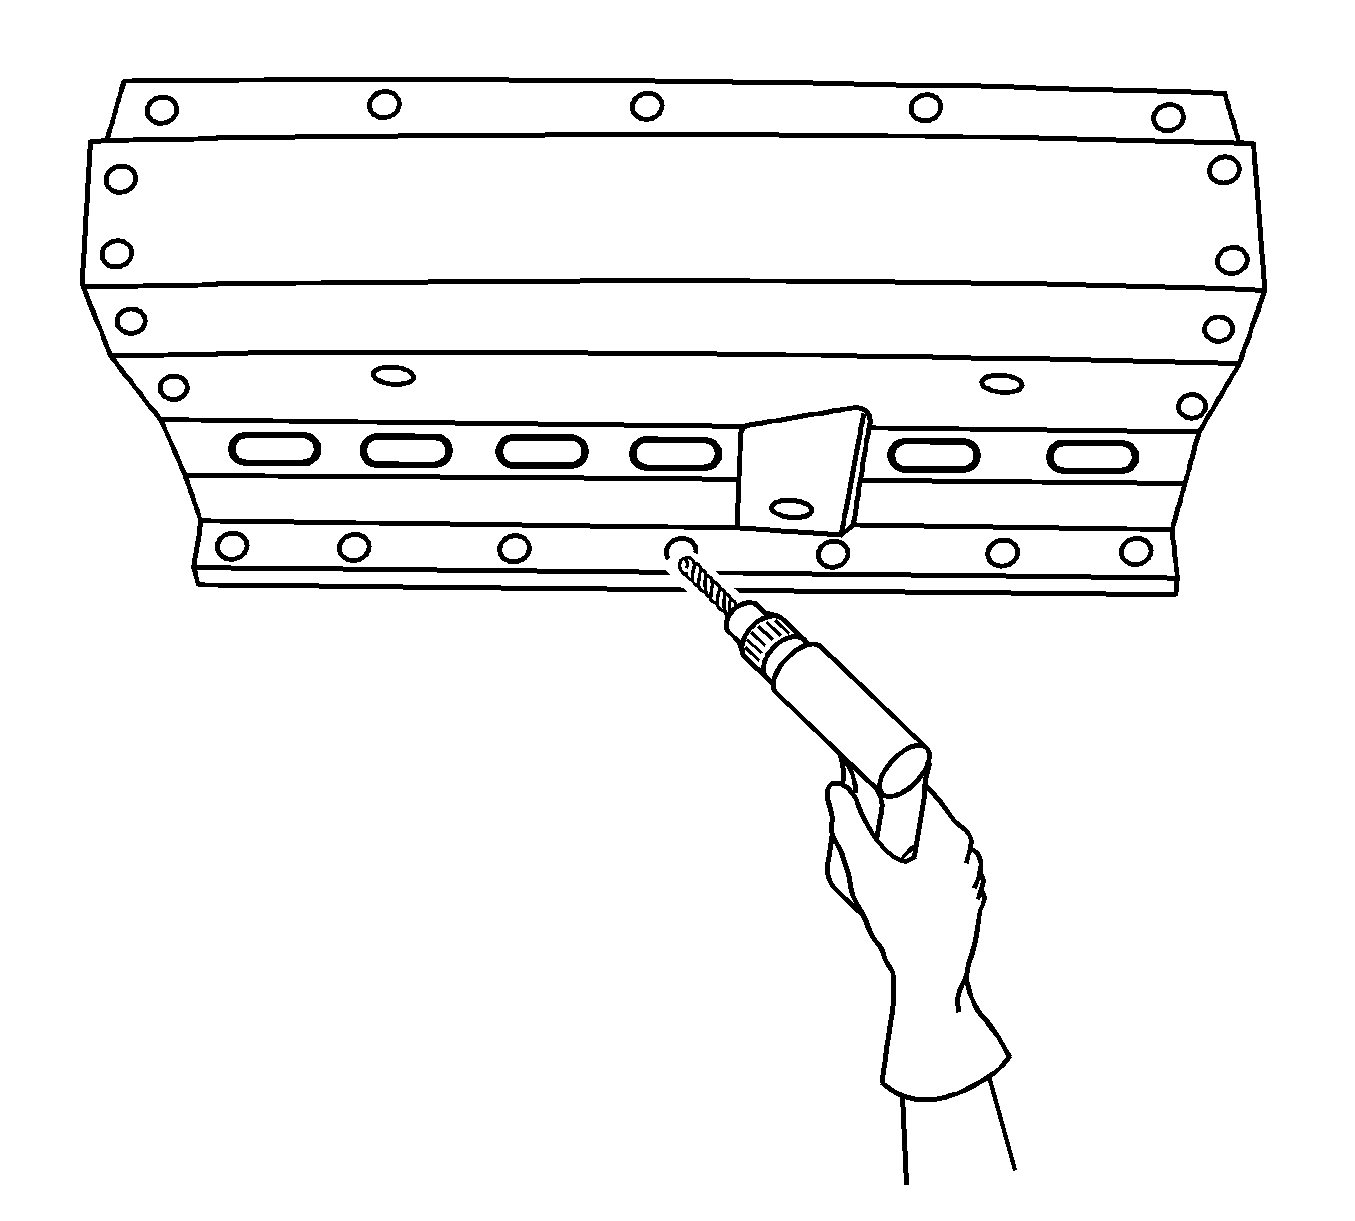
- Create a 50 mm (2 in) backing plate (A) from the unused portion of the service parts. Trim the backing plate as necessary to fit behind the sectioning joint where there are no reinforcements.
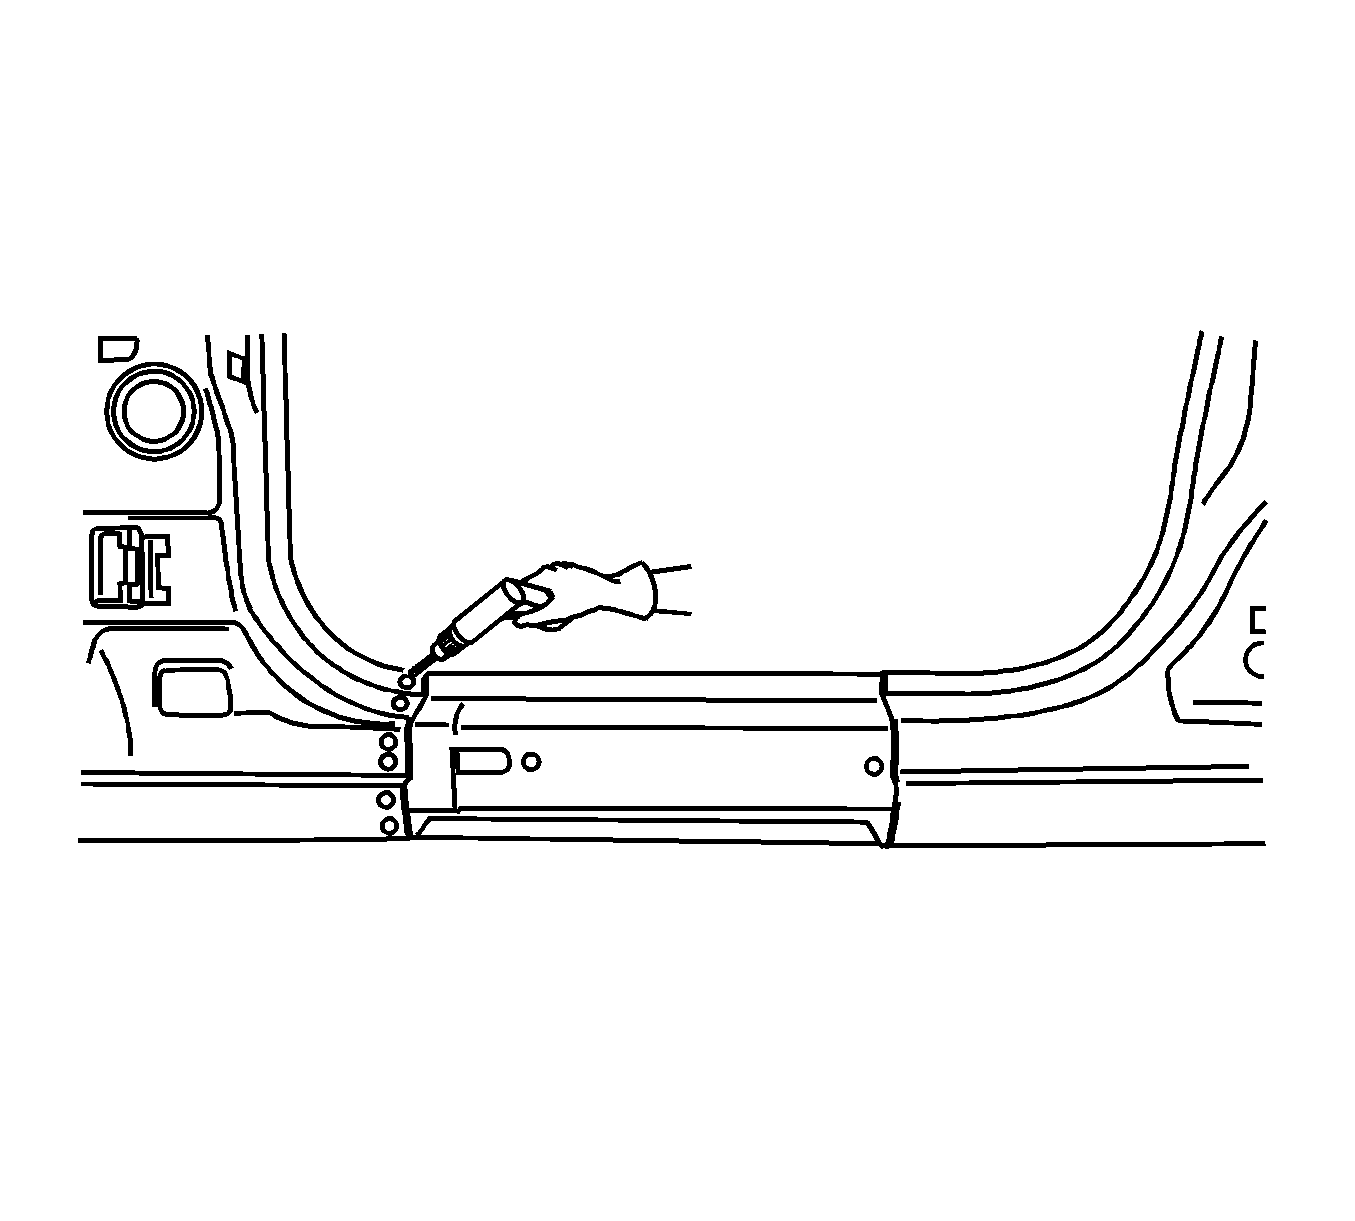
- Drill 8 mm plug weld holes along the remaining original panel. Locate these holes 13 mm (1/2 in) from the edge and spaced 40 mm (1 ½ in) apart.
- Drill 8 mm plug weld holes in the service panel as necessary in the locations noted from the original panel and along the section cut.
- Prepare all attachment surfaces an necessary.
- Apply GM approved weld-thru coating or equivalent to all mating surfaces. Refer to Anti-Corrosion Treatment and Repair.
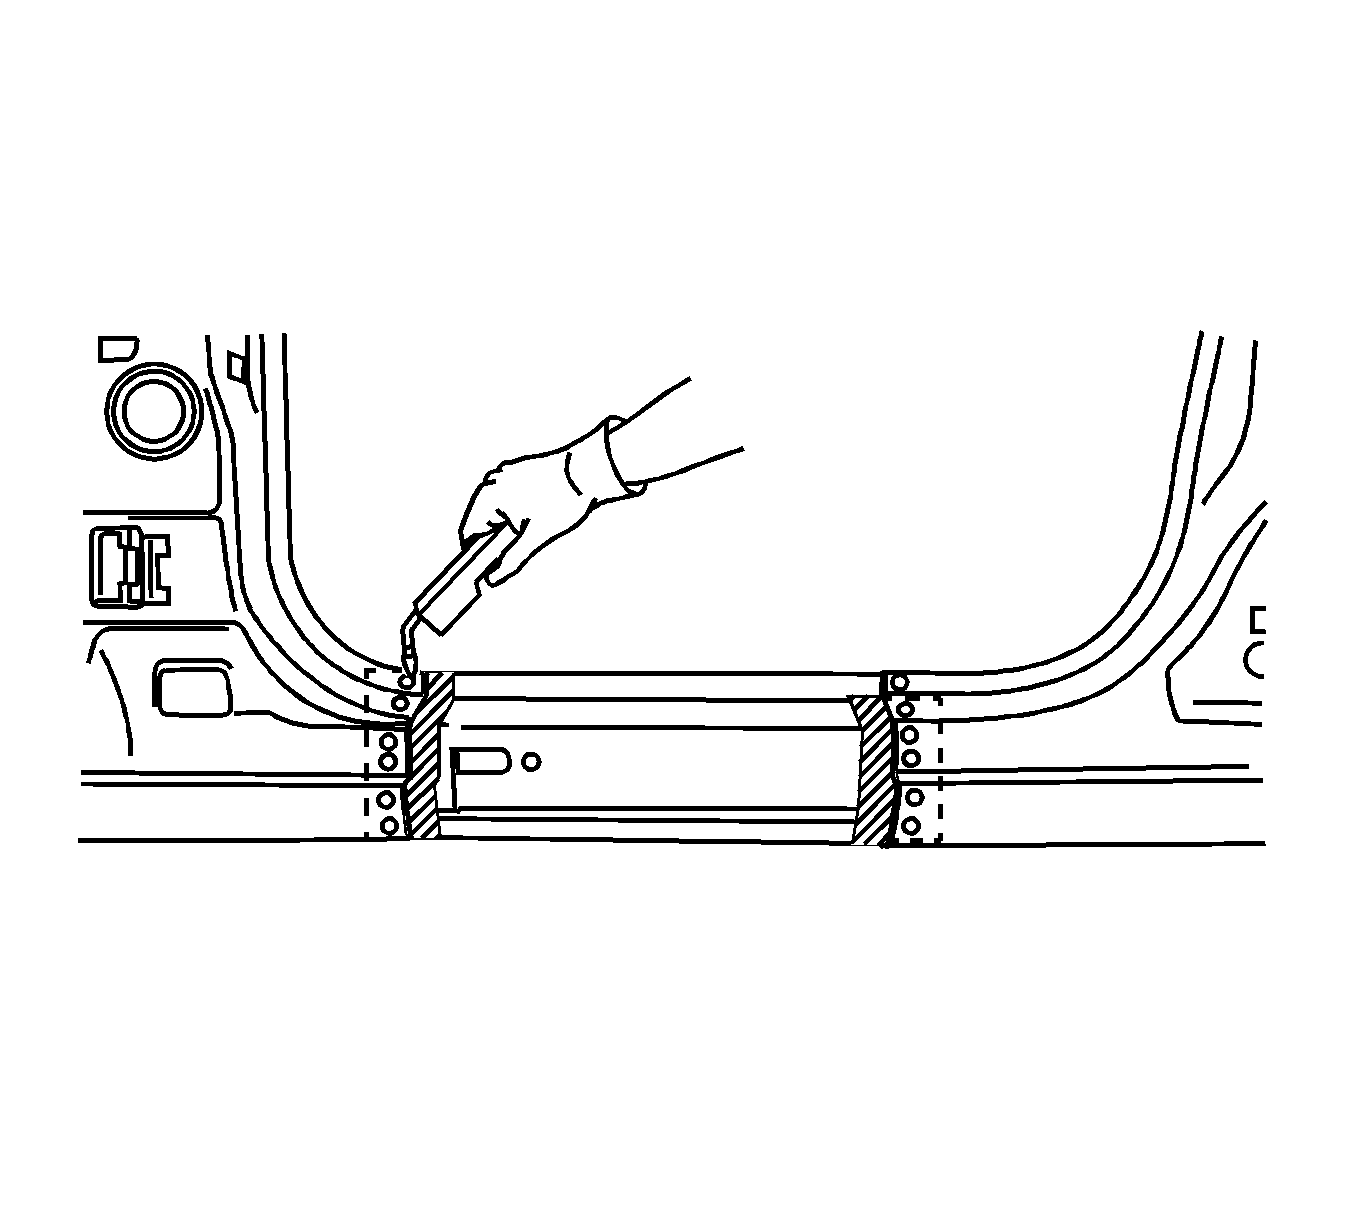
- Fit the backing plate halfway into the sectioning joint, clamp and weld in place.
- Position front service rocker section to the vehicle using 3-dimensional measuring equipment. Clamp and weld in place.
- Fit backing plate halfway into the joint between front and rear service sections. Clamp and weld in place.
- Position rear service rocker section to the vehicle using 3-dimension measuring equipment. Clamp and weld in place.
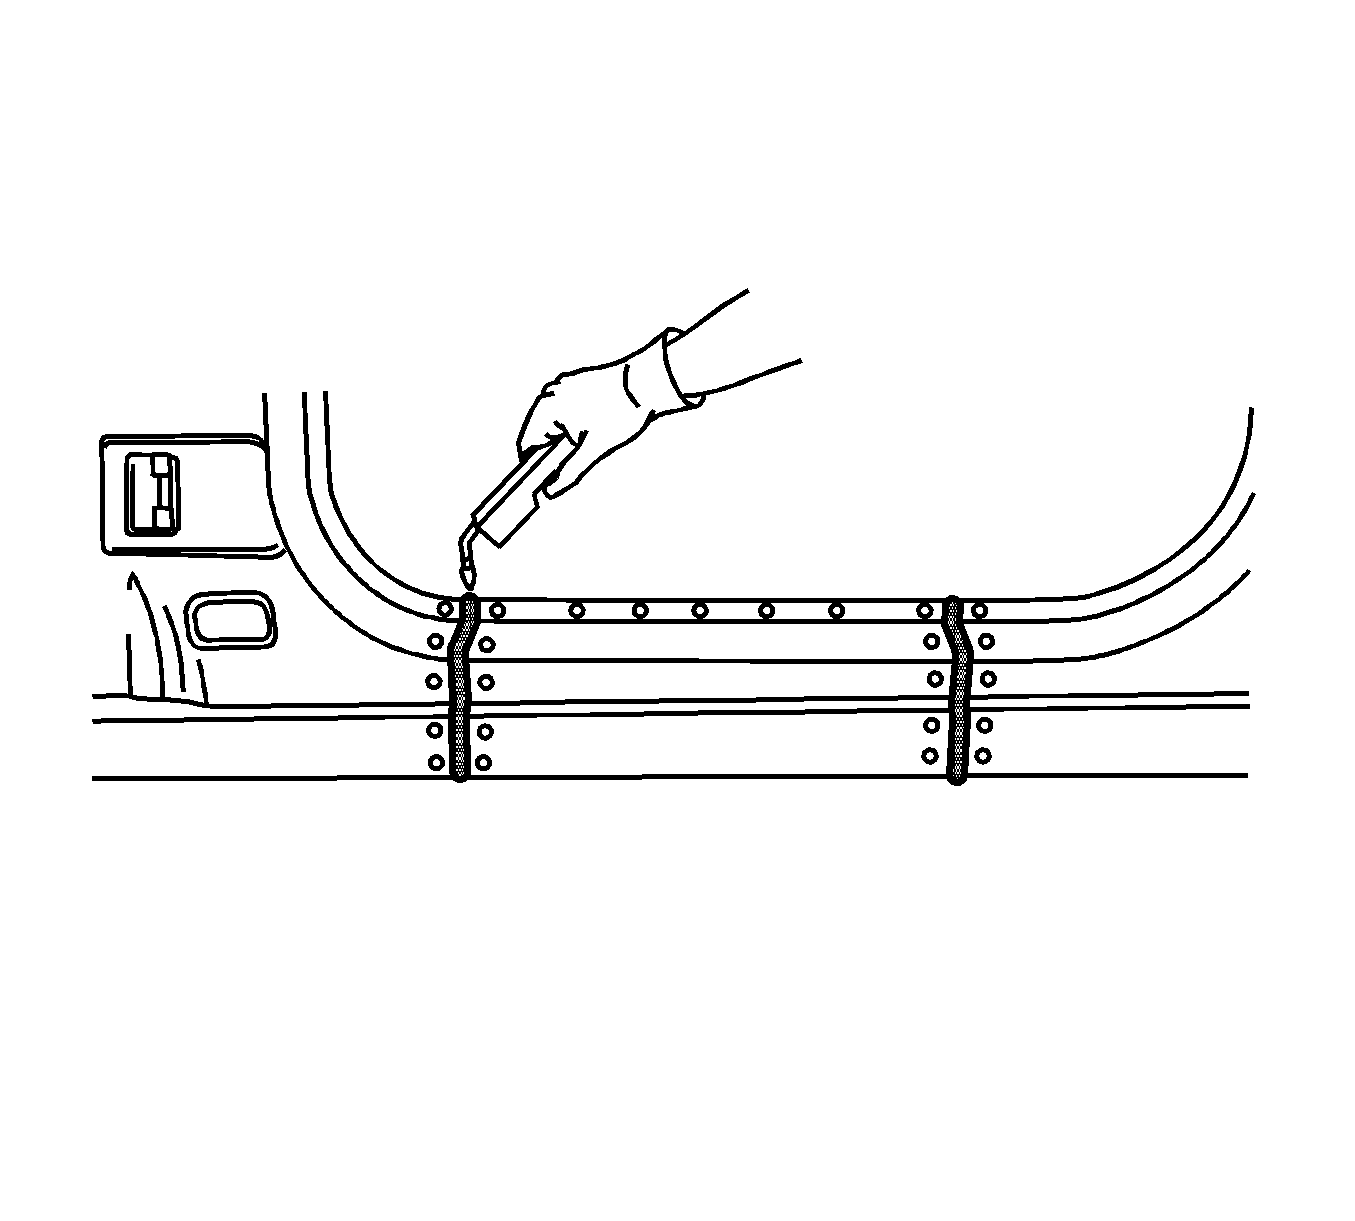
- Stitch weld the sectioning joint.
- Clean and prepare all welded joints.
- Apply the sealers and anti-corrosion materials to the repair area as necessary. Refer to Anti-Corrosion Treatment and Repair.
- Install all related panels and components.
- Connect the negative battery cable.
- Enable the SIR system.
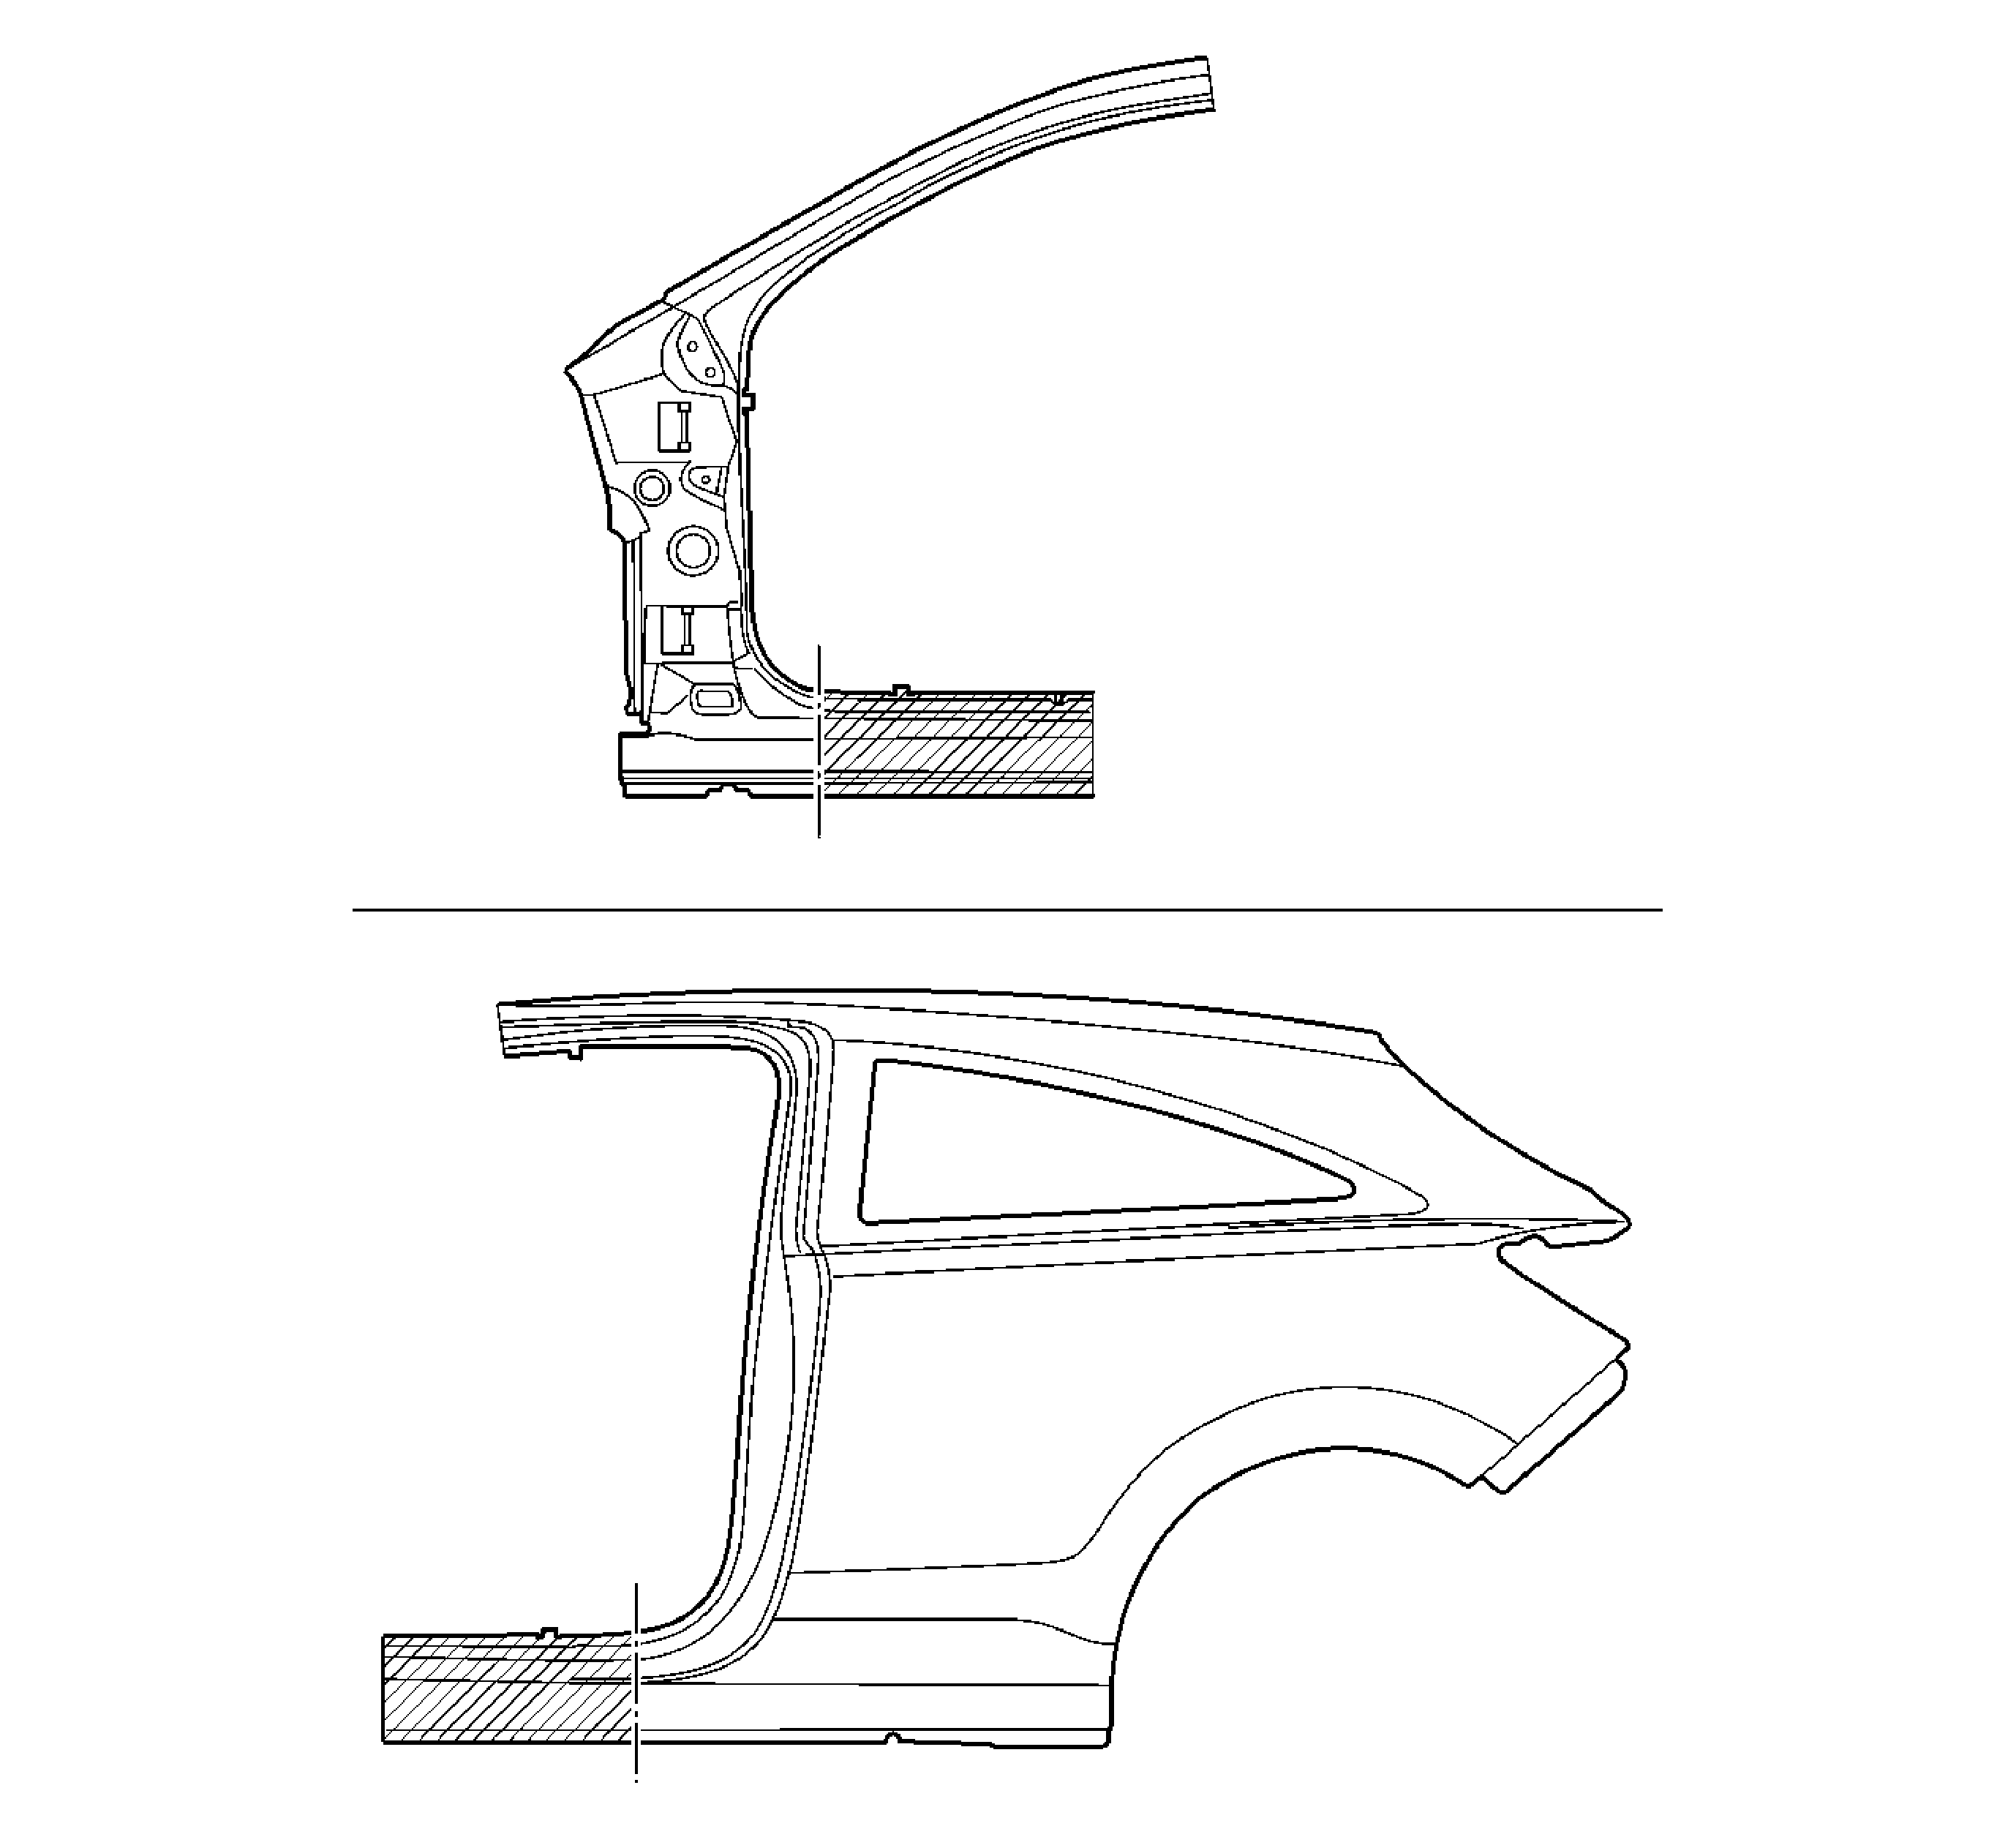
Note: The replacement rocker panel must be sectioned from the front hinge pillar and the rear quarter panel replacement parts.
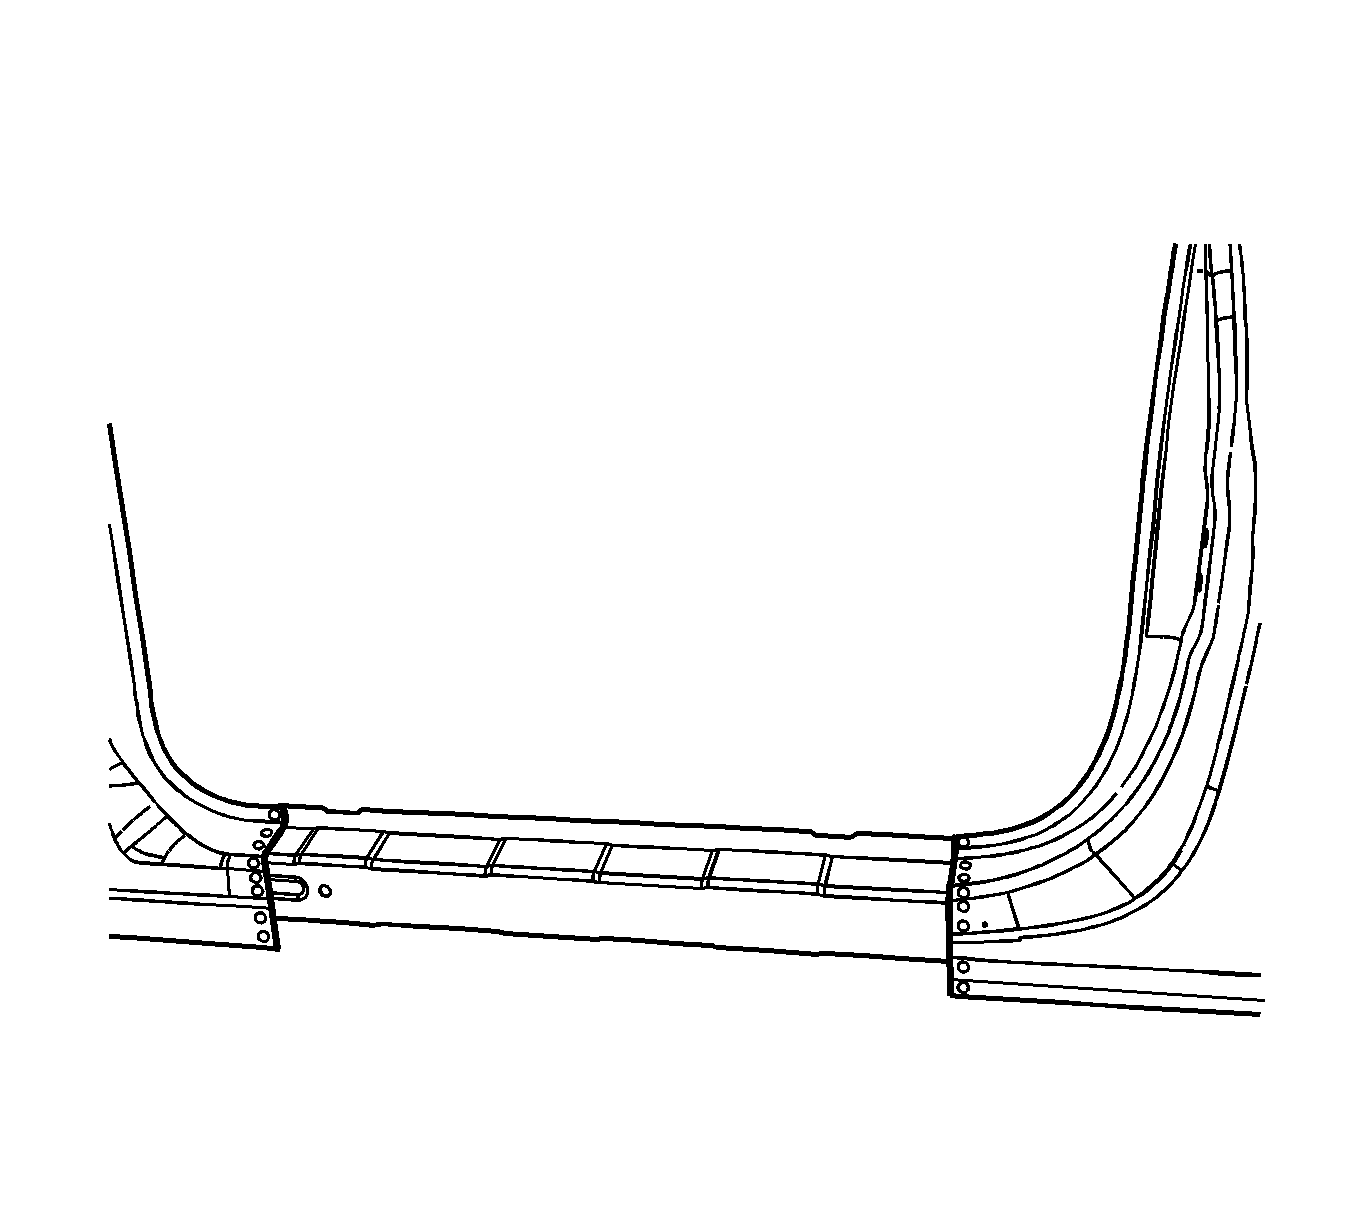
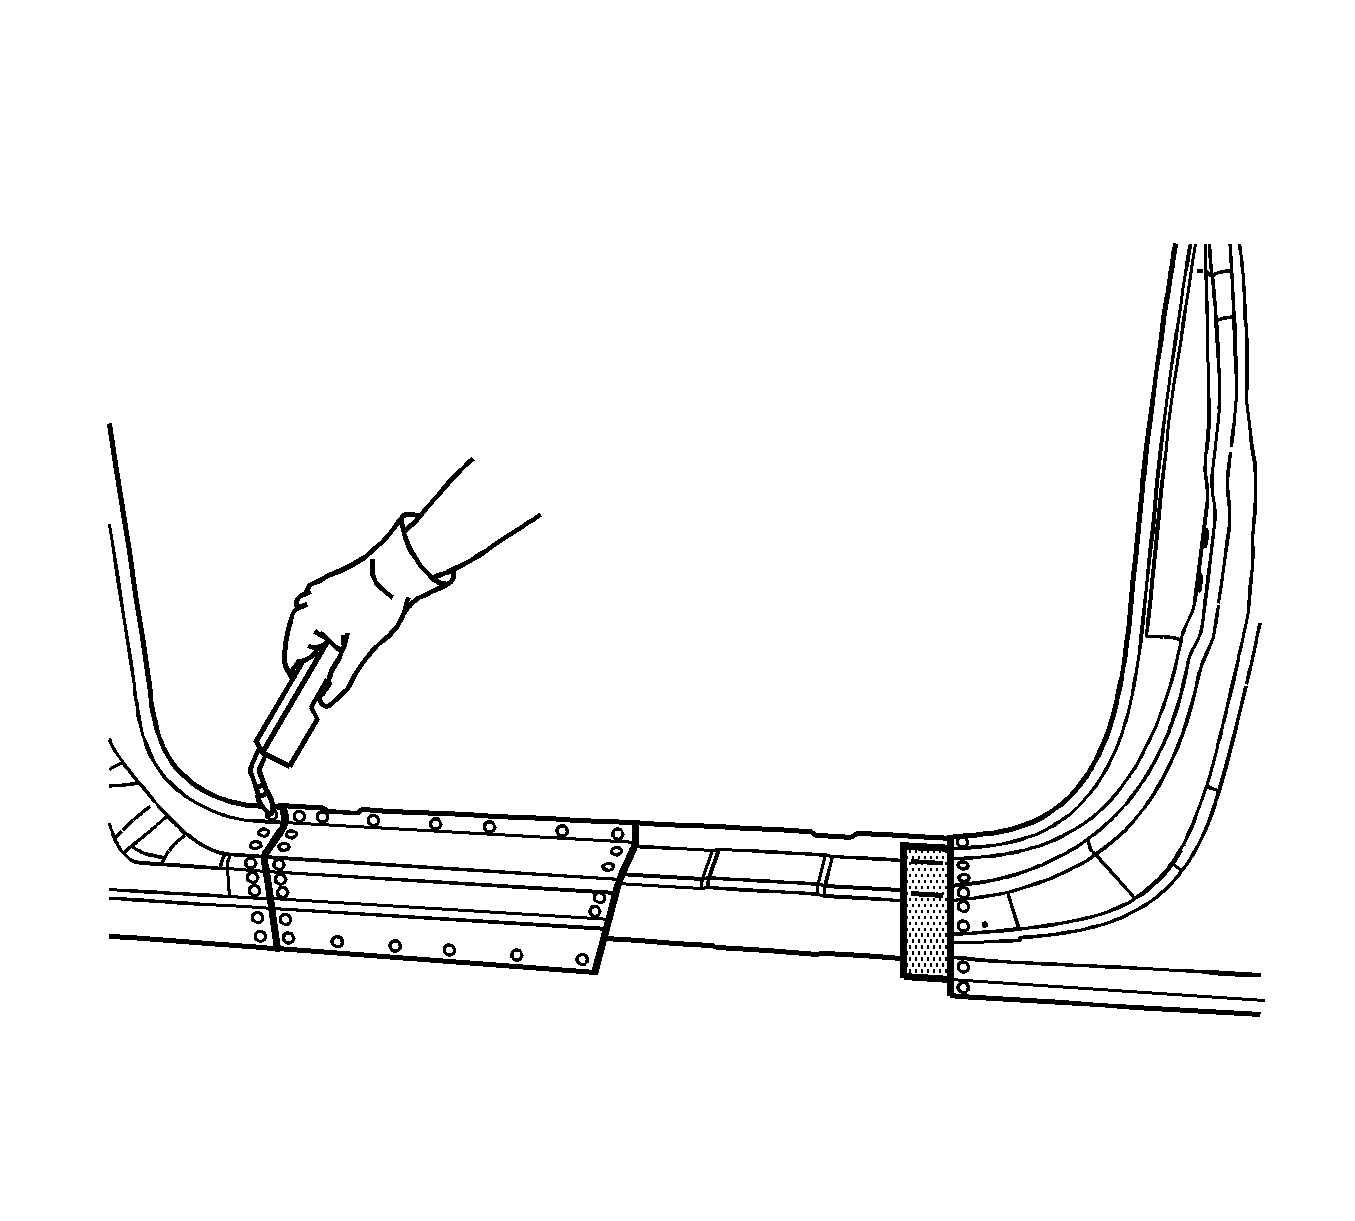


Note: To create a solid weld with minimal heat distortion, make a 25 mm (1 in) stitch welds along the seam with 25 mm (1 in) gaps between them. Then go back and complete the stitch weld joint.
Rocker Outer Panel Sectioning Sedan
Removal Procedure
- Disable the SIR system.
- Disconnect the negative battery cable.
- Remove all related panels and components.
- Repair as much of the damage as possible to factory specifications.
- Note the locations and remove the sealers and anti-corrosion materials from repair area as necessary. Refer to Anti-Corrosion Treatment and Repair.
- Cut the panel where sectioning is to be performed.
- Locate and drill out factory welds along the rocker panel flanges. Note the number and location of the welds for installation of the service part.
- Remove the damaged rocker panel.
Warning: Refer to Approved Equipment for Collision Repair Warning in the Preface section.
Note: Section in specific specified areas only. Sectioning outside of these areas may compromise the structural integrity of the vehicle.
Warning: Refer to Foam Sound Deadeners Warning in the Preface section.
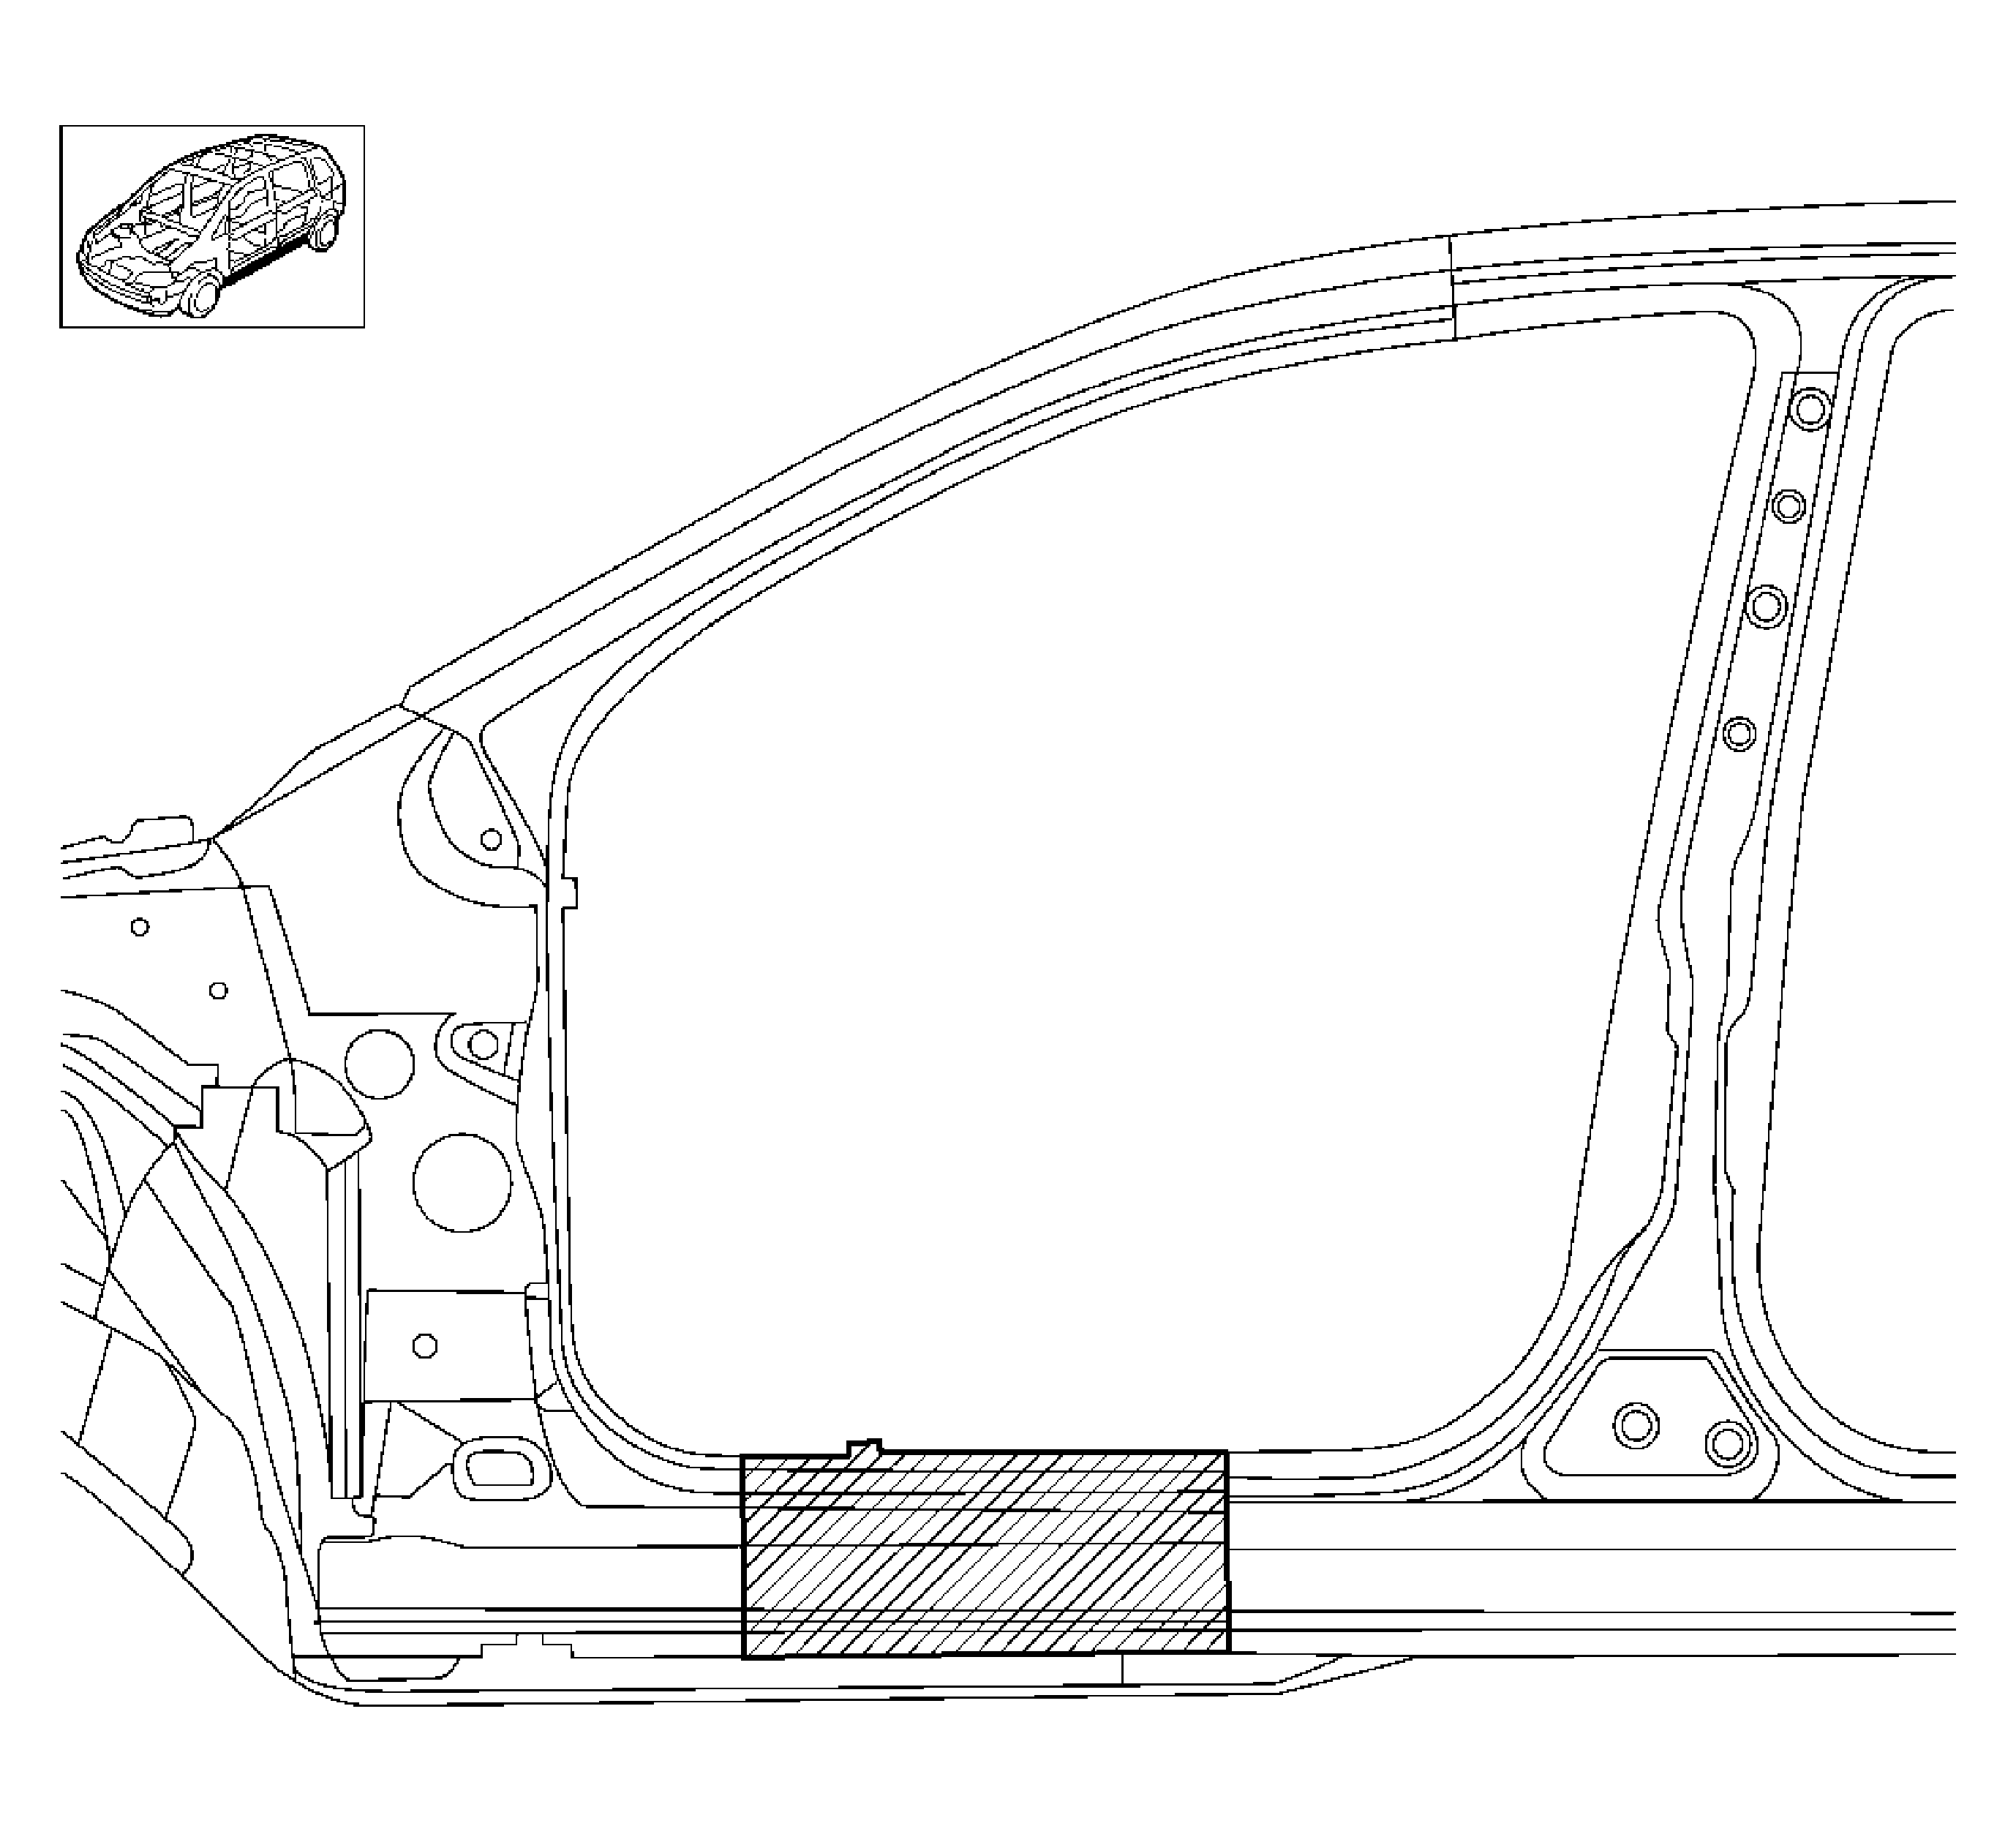
Note: Do not damage any inner panels or reinforcements.
Installation Procedure
- Cut the replacement rocker panel in corresponding locations to fit the original panel. The sectioning joint(s) should be trimmed to allow 1 and ½ times the metal thickness at the sectioning joint.
- Create a 50 mm (2 in) backing plate (A) from the unused portion of the service parts. Trim the backing plate as necessary to fit behind the sectioning joint where there are no reinforcements.
- Drill 8 mm plug weld holes along the remaining original panel. Locate these holes 13 mm (1/2 in) from the edge and spaced 40 mm (1 ½ in) apart.
- Drill 8 mm plug weld holes in the service panel as necessary in the locations noted from the original panel and along the section cut.
- Prepare all attachment surfaces an necessary.
- Apply GM approved weld-thru coating or equivalent to all mating surfaces. Refer to Anti-Corrosion Treatment and Repair.
- Fit the backing plate halfway into the sectioning joint, clamp and weld in place.
- Position front service rocker section to the vehicle using 3-dimensional measuring equipment. Clamp and weld in place.
- Stitch weld the sectioning joint.
- Clean and prepare all welded joints.
- Apply the sealers and anti-corrosion materials to the repair area as necessary. Refer to Anti-Corrosion Treatment and Repair.
- Install all related panels and components.
- Connect the negative battery cable.
- Enable the SIR system.

Note: The replacement rocker panel must be sectioned from the front hinge pillar replacement part.
Note: To create a solid weld with minimal heat distortion, make a 25 mm (1 in) stitch welds along the seam with 25 mm (1 in) gaps between them. Then go back and complete the stitch weld joint.
