For 1990-2009 cars only
Brake Master Cylinder Auxiliary Reservoir Replacement Manual Transmission
Caution: Refer to Brake Fluid Irritant Caution in the Preface section.
Notice: Refer to Brake Fluid Effects on Paint and Electrical Components Notice in the Preface section.
Removal Procedure
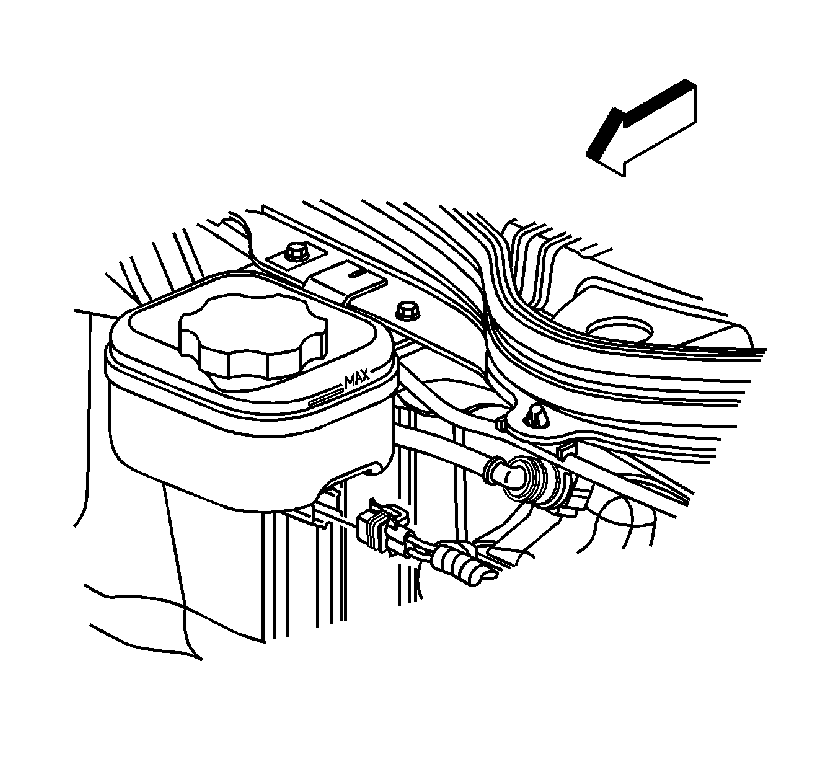
- Remove the cover from the underhood electrical center, for access to the auxiliary reservoir clutch hose connection.
- Pull back on the connector position assurance (CPA) tab of the electrical connector, then disconnect the connector from the brake fluid level sensor.
- Cover the top of the underhood electrical center with clean shop towels, to protect from any brake fluid loss.
- Place shop towels under the clutch master cylinder and under the brake master cylinder to catch any brake fluid loss.
- Remove the brake fluid from the brake master cylinder auxiliary reservoir. Discard the old fluid into an approved container.
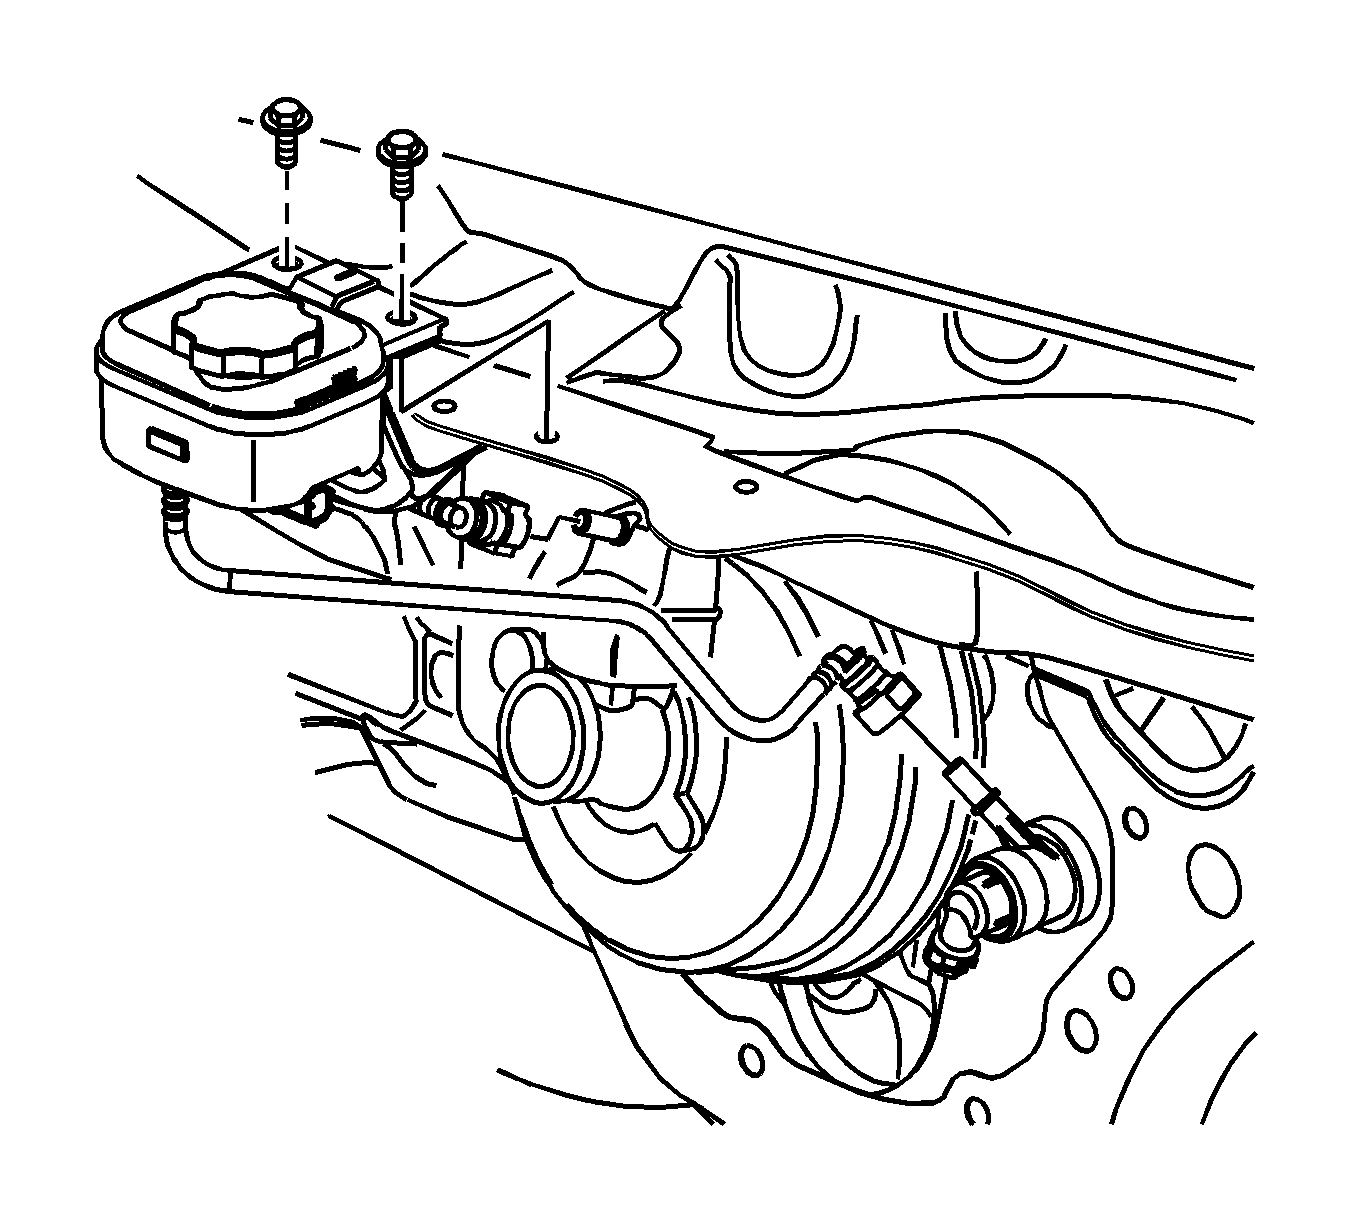
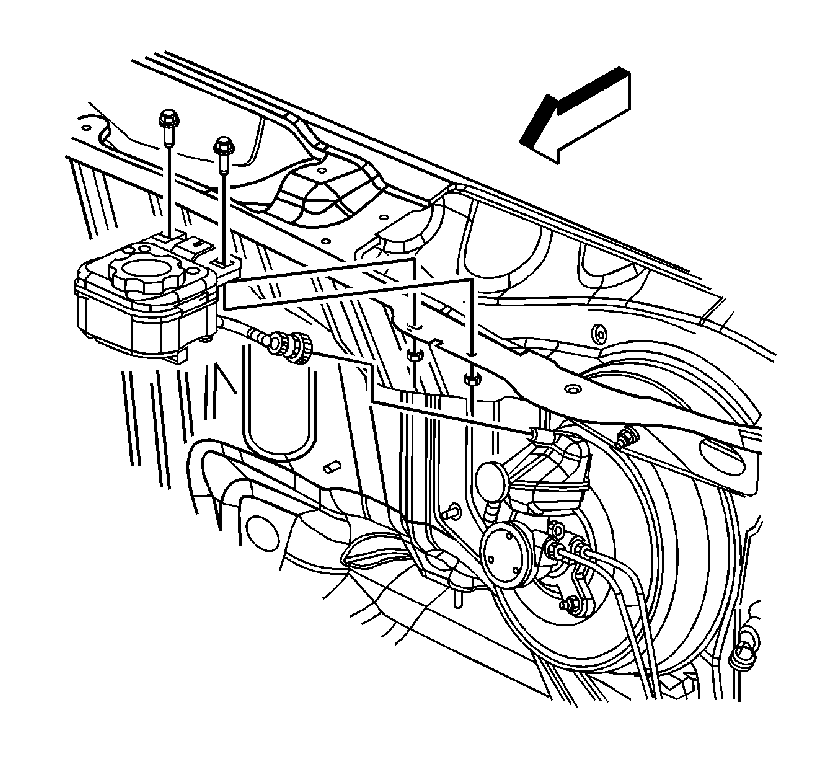
- Remove the brake master cylinder auxiliary reservoir mounting bolts.
- Disconnect the quick-connect fitting on the auxiliary reservoir clutch hose from the clutch master cylinder.
- Plug the reservoir clutch hose end to prevent fluid loss and contamination.
- Cap the nipple on the clutch master cylinder to prevent fluid loss and contamination.
- Disconnect the quick-connect fitting on the auxiliary reservoir brake hose from the brake master cylinder-mounted, or primary reservoir.
- Plug the reservoir brake hose end to prevent fluid loss and contamination.
- Cap the nipple on the brake master cylinder primary reservoir to prevent fluid loss and contamination.
- Carefully remove the auxiliary reservoir clutch hose past the electrical center.
- Remove the auxiliary reservoir from the vehicle.
Installation Procedure
- Install the auxiliary reservoir into position in the vehicle.
- Remove the cap from the nipple on the clutch master cylinder.
- Remove the plug from the auxiliary reservoir clutch hose end.
- Connect the quick-connect fitting on the reservoir clutch hose to the clutch master cylinder. Ensure that the hose is fully seated to the master cylinder.
- Remove the cap from the nipple on the brake primary reservoir.
- Remove the plug from the reservoir brake hose end.
- Connect the quick-connect fitting on the reservoir brake hose to the brake primary reservoir. Ensure that the hose is fully seated to the reservoir.
- Install the brake master cylinder auxiliary reservoir mounting bolts.
- Fill the brake master cylinder auxiliary reservoir. Refer to Master Cylinder Reservoir Filling .
- Remove the shop towels and discard into an approved container.
- Connect the electrical connector to the brake fluid level sensor, then press forward on the CPA tab of the connector to secure.
- Install the cover to the underhood electrical center.
Notice: Refer to Fastener Notice in the Preface section.
Tighten
Tighten the bolts to 10 N·m (89 lb in).
Brake Master Cylinder Auxiliary Reservoir Replacement Automatic Transmission
Caution: Refer to Brake Fluid Irritant Caution in the Preface section.
Notice: Refer to Brake Fluid Effects on Paint and Electrical Components Notice in the Preface section.
Removal Procedure
- Remove the cover from the underhood electrical center, for access to disconnect the brake fluid level sensor electrical connector.
- Pull back on the connector position assurance (CPA) tab of the electrical connector, then disconnect the connector from the brake fluid level sensor.
- Cover the top of the underhood electrical center with clean shop towels, to protect from any brake fluid loss.
- Place a shop towel under the brake master cylinder to catch any brake fluid loss.
- Remove the brake fluid from the brake master cylinder auxiliary reservoir. Discard the old fluid into an approved container.
- Remove the brake master cylinder auxiliary reservoir mounting bolts.
- Disconnect the quick-connect fitting on the auxiliary reservoir hose from the master cylinder-mounted, or primary reservoir.
- Plug the reservoir hose end to prevent fluid loss and contamination.
- Cap the nipple on the master cylinder primary reservoir to prevent fluid loss and contamination.
- Remove the auxiliary reservoir from the vehicle.
Installation Procedure
- Remove the cap from the nipple on the brake primary reservoir.
- Remove the plug from the auxiliary reservoir hose end.
- Connect the quick-connect fitting on the reservoir hose to the primary reservoir. Ensure that the hose is fully seated to the reservoir.
- Install the brake master cylinder auxiliary reservoir mounting bolts.
- Fill the brake master cylinder auxiliary reservoir. Refer to Master Cylinder Reservoir Filling .
- Remove the shop towels and discard into an approved container.
- Connect the electrical connector to the brake fluid level sensor, then press forward on the CPA tab of the connector to secure.
- Install the cover to the underhood electrical center.
Notice: Refer to Fastener Notice in the Preface section.
Tighten
Tighten the bolts to 10 N·m (89 lb in).
