Headlining Trim Panel Replacement w/o Sunroof
Removal Procedure
- Disable the SIR. Refer to SIR Disabling and Enabling and SIR Disabling and Enabling in SIR.
- Remove the coat hooks. Refer to Coat Hook Replacement .
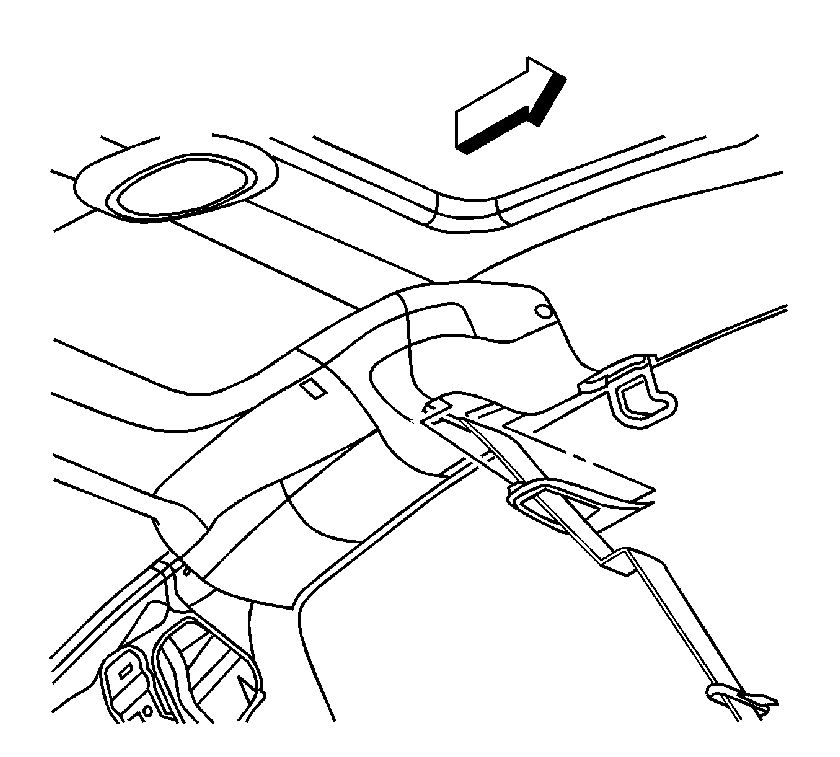
- Remove the trim panel from the high mount stop lamp by pulling at the clip locations.
- Remove the center high mount stop lamp. Refer to High Mount Stop Lamp Replacement in Lighting Systems.
- Remove the garnish molding from the upper lock pillar. Refer to Lock Pillar Upper Garnish Molding Replacement .
- Remove the rear push-in retainer.
- Remove the dome lamp. Refer to Dome Lamp Replacement .
- Remove the sunshades. Refer to Sunshade Replacement .
- Remove the sunshade retainers. Refer to Sunshade Retainer Bezel Replacement .
- Remove the windshield garnish moldings. Refer to Windshield Garnish Molding Replacement .
- On the sedan, remove the garnish molding from the upper center pillar. Refer to Center Pillar Upper Garnish Molding Replacement .
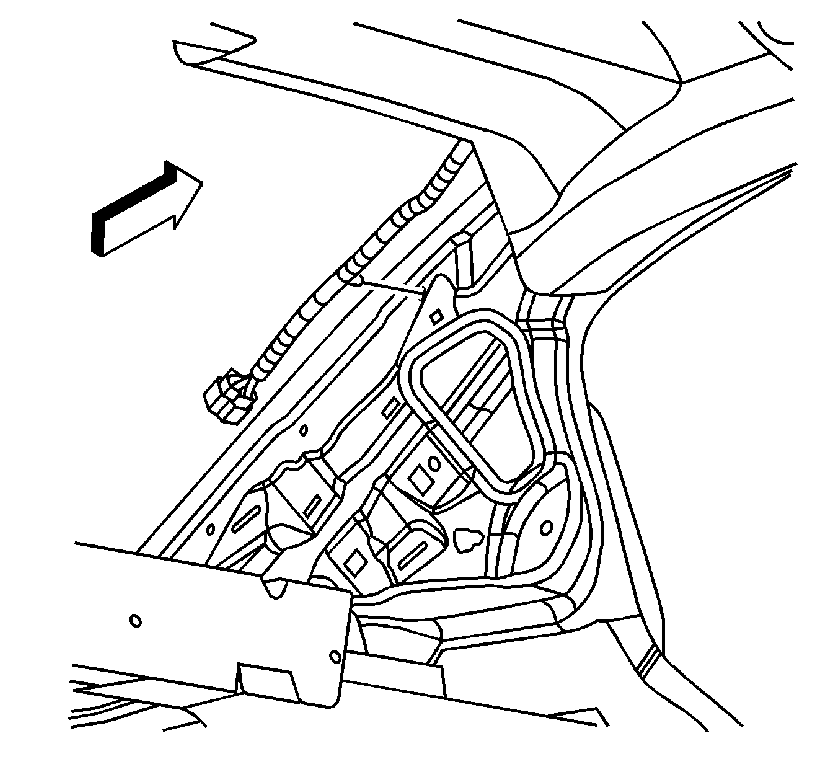
- On the coupe, remove the door striker trim by pulling on the trim.
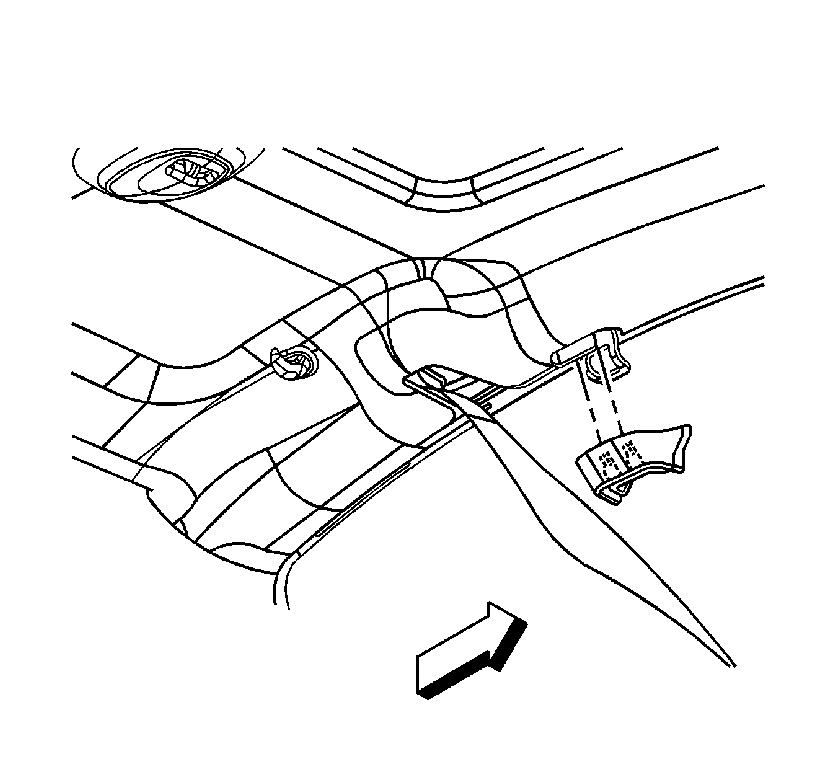
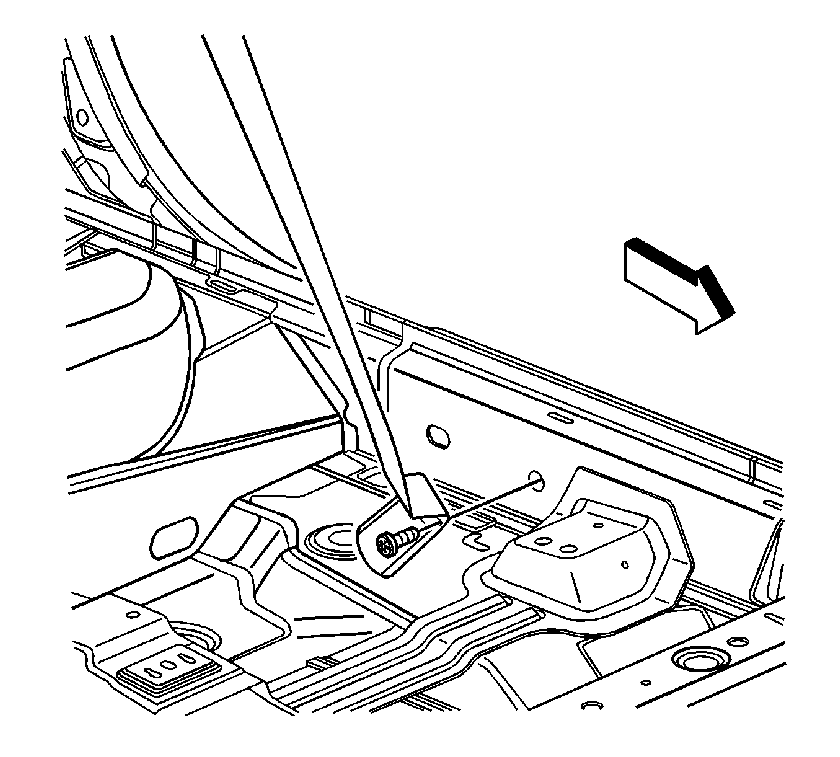
- On the coupe, remove the anchor bolts from the front seat belts.
- On the coupe, remove the seat belt webbing from the front seat head restraint webbing guides.
- Disconnect the electrical harnesses.
- Disengage any rosebud retainers which hold the wiring to the sheet metal.
- Position the front seats in the fully rearward and fully reclined positions. If equipped, fold the fold flat seat forward.
- Remove the door seals from the headliner edge.
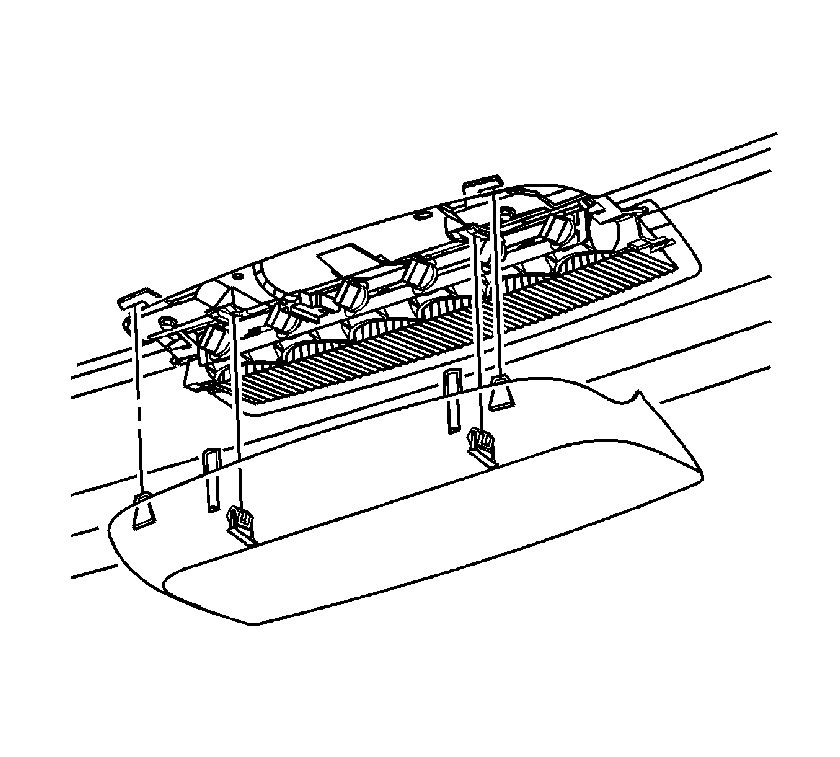
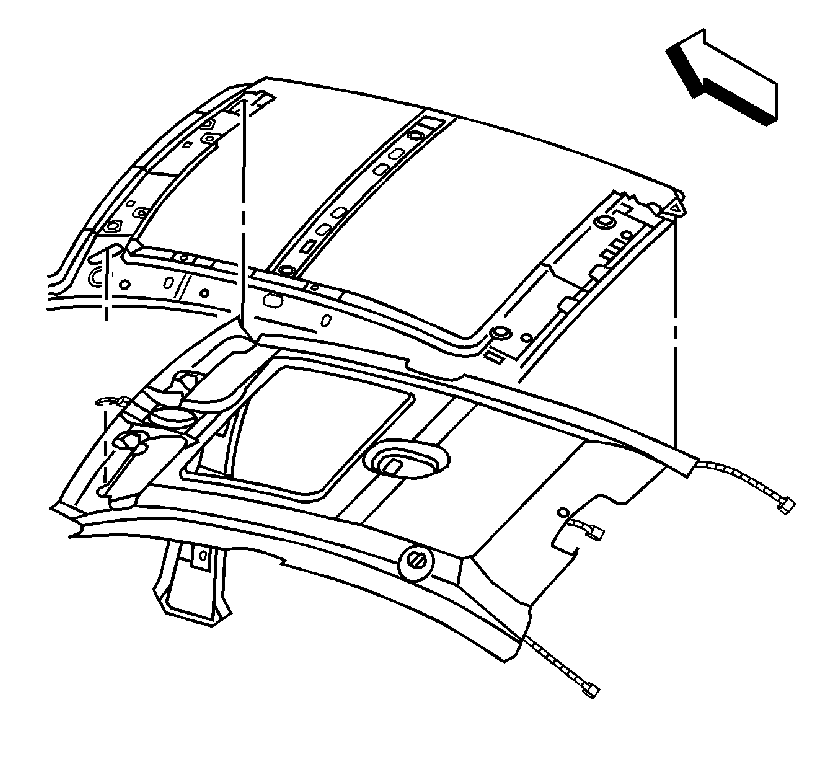
- Lower the headliner.
- On the coupe, remove the trim bezels from the headliner.
- On the sedan, remove the headliner by bringing the headliner out through the rear passenger side door.
- If equipped, remove the reading lamp. Refer to Reading Lamp Replacement in Lighting Systems.
Caution: Refer to SIR Caution in the Preface section.
Caution: Do not attempt to repair or alter the head impact energy-absorbing material glued to the headliner or to the garnish trims. If the material is damaged, replace the headliner and/or the garnish trim. Failure to do so could result in personal injury.
Notice: Use care when working around the head curtain inflator module. Sharp tools may puncture the curtain airbag. If the head curtain inflator module is damaged in any way, it must be replaced.
Notice: If a vehicle is equipped with a head curtain inflator module ensure that the inflator module and tether are undamaged. If tether or curtain airbag are damaged in any way, they must be replaced.
Notice: Do not pull on the edges of the center high-mounted stop lamp cover. Damage to the cover may result. Slide your fingers between the cover and the lamp, and carefully pull the cover down.

Notice: Use care when removing and installing the headliner. If reusing the headliner lay the headliner down flat on a clean surface. Excessive bending will damage the headliner.
Installation Procedure
- Install the reading lamp. Refer to Reading Lamp Replacement in Lighting Systems.
- Place the headliner in the vehicle.
- On the coupe, install the trim bezels on the headliner.
- While holding the headliner in place, replace the door seals over the headliner edge.
- Connect the electrical harnesses.
- Install the rosebud retainers which hold the wiring to the sheet metal.
- On the sedan, install the garnish molding to the upper center pillar. Refer to Center Pillar Upper Garnish Molding Replacement .
- Install the center high mount stop lamp. Refer to High Mount Stop Lamp Replacement in Lighting Systems.
- On the coupe, install the door striker trim by pushing until the trim clips engage.
- On the coupe, install the front seat belt anchor bolts.
- On the coupe, replace the webbing in the front seat head restraint webbing guides.
- Install the windshield garnish moldings. Refer to Windshield Garnish Molding Replacement .
- Install the sunshade retainers. Refer to Sunshade Retainer Bezel Replacement .
- Install the sunshades. Refer to Sunshade Replacement .
- Install the dome lamp. Refer to Dome Lamp Replacement .
- Install the rear push-in retainer.
- Install the garnish molding to the upper lock pillar. Refer to Lock Pillar Upper Garnish Molding Replacement .
- Position the trim panel to the high mounted stop lamp.
- Push on the panel to engage the clips.
- Install the coat hooks. Refer to Coat Hook Replacement .
- Enable the SIR. Refer to SIR Disabling and Enabling and to SIR Disabling and Enabling in SIR.
Notice: Refer to Fastener Notice in the Preface section.
Tighten
Tighten the bolt to 45 N·m (33 lb ft).
Headlining Trim Panel Replacement w/Sunroof
Removal Procedure
- Disable the SIR. Refer to SIR Disabling and Enabling and SIR Disabling and Enabling in SIR.
- Remove the coat hooks. Refer to Coat Hook Replacement .
- Remove the trim panel from the high mount stop lamp by pulling at the clip locations.
- Remove the center high mount stop lamp. Refer to High Mount Stop Lamp Replacement in Lighting Systems.
- Remove the garnish molding from the upper lock pillar. Refer to Lock Pillar Upper Garnish Molding Replacement .
- Remove the rear push-in retainer.
- Remove the dome lamp. Refer to Dome Lamp Replacement .
- Remove the sunshades. Refer to Sunshade Replacement .
- Remove the sunshade retainers. Refer to Sunshade Retainer Bezel Replacement .
- Remove the windshield garnish moldings. Refer to Windshield Garnish Molding Replacement .
- On the sedan, remove the garnish molding from the upper center pillar. Refer to Center Pillar Upper Garnish Molding Replacement .
- On the coupe, remove the door striker trim by pulling on the trim.
- On the coupe, remove the anchor bolts from the front seat belts.
- On the coupe, remove the seat belt webbing from the front seat head restraint webbing guides.
- Disconnect the electrical harnesses.
- Disengage any rosebud retainers which hold the wiring to the sheet metal.
- Position the front seats in the fully rearward and fully reclined positions.
- Remove the door seals from the headliner edge.
- Starting on the right and the left sides of the sun roof opening, carefully disengage the hook and loop fasteners which hold the headliner to the roof panel.
- Disconnect the sunroof motor wiring harness.
- Lower the headliner.
- On the coupe, remove the trim bezels from the headliner.
- For the sedan, bring the headliner out through the rear passenger side door.
- If equipped, remove the reading lamp. Refer to Reading Lamp Replacement in Lighting Systems.
Caution: Refer to SIR Caution in the Preface section.
Caution: Do not attempt to repair or alter the head impact energy-absorbing material glued to the headliner or to the garnish trims. If the material is damaged, replace the headliner and/or the garnish trim. Failure to do so could result in personal injury.
Notice: Use care when working around the head curtain inflator module. Sharp tools may puncture the curtain airbag. If the head curtain inflator module is damaged in any way, it must be replaced.
Notice: If a vehicle is equipped with a head curtain inflator module ensure that the inflator module and tether are undamaged. If tether or curtain airbag are damaged in any way, they must be replaced.
Notice: Do not pull on the edges of the center high-mounted stop lamp cover. Damage to the cover may result. Slide your fingers between the cover and the lamp, and carefully pull the cover down.

Notice: Use care when removing and installing the headliner. If reusing the headliner lay the headliner down flat on a clean surface. Excessive bending will damage the headliner.
Installation Procedure
- Install the reading lamp. Refer to Reading Lamp Replacement in Lighting Systems.
- Place the headliner in the vehicle.
- Connect the sunroof motor wiring harness.
- On the coupe, install the trim bezels on the headliner.
- Position the headliner against the roof of the vehicle.
- Press around the sunroof opening over the hook and loop locations to engage the hooks.
- While holding the headliner in place, replace the door seals over the headliner edge.
- Connect the electrical harnesses.
- Install the rosebud retainers which hold the wiring to the sheet metal.
- On the sedan, install the garnish molding to the upper center pillar. Refer to Center Pillar Upper Garnish Molding Replacement .
- Install the center high mount stop lamp. Refer to High Mount Stop Lamp Replacement in Lighting Systems.
- Install the windshield garnish moldings. Refer to Windshield Garnish Molding Replacement .
- On the coupe, install the door striker trim by pushing until the trim clips engage.
- On the coupe, install the front seat belt anchor bolts.
- On the coupe, replace the webbing in the front seat head restraint webbing guides.
- Install the sunshade retainers. Refer to Sunshade Retainer Bezel Replacement .
- Install the sunshades. Refer to Sunshade Replacement .
- Install the dome lamp. Refer to Dome Lamp Replacement .
- Install the rear push-in retainer.
- Install the garnish molding to the upper lock pillar. Refer to Lock Pillar Upper Garnish Molding Replacement .
- Position the trim panel to the high mounted stop lamp.
- Push on the panel to engage the clips.
- Install the coat hooks. Refer to Coat Hook Replacement .
- Enable the SIR. Refer to SIR Disabling and Enabling and SIR Disabling and Enabling in SIR.
Notice: Refer to Fastener Notice in the Preface section.
Tighten
Tighten the bolt to 45 N·m (33 lb ft).
