1 - Fuel Pump Operational Test - L81
If the vehicle is not operating, will not start or run, then determination must be made if the fuel pump is working and fuel under pressure is delivered to the fuel rail.
Caution: Refer to Gasoline/Gasoline Vapors Caution in the Preface section.
Caution: Refer to Relieving Fuel Pressure Caution in the Preface section.
- Verify that there is fuel in the fuel tank before starting any fuel system diagnosis.
- Remove the cap on the fuel pressure test port on the fuel rail and slightly depress the tip of Schrader valve and note whether fuel is present.
- Evaluate the fuel pump electrical circuit. Refer to Chart 3 of Engine Cranks But Won't Start in Powertrain controls section of this service manual.
| • | If fuel, under pressure, is present proceed to Test 2 - Fuel System Pressure Test. |
| • | If no is fuel present, assure that there is fuel in the tank. Check the fuel gage. |
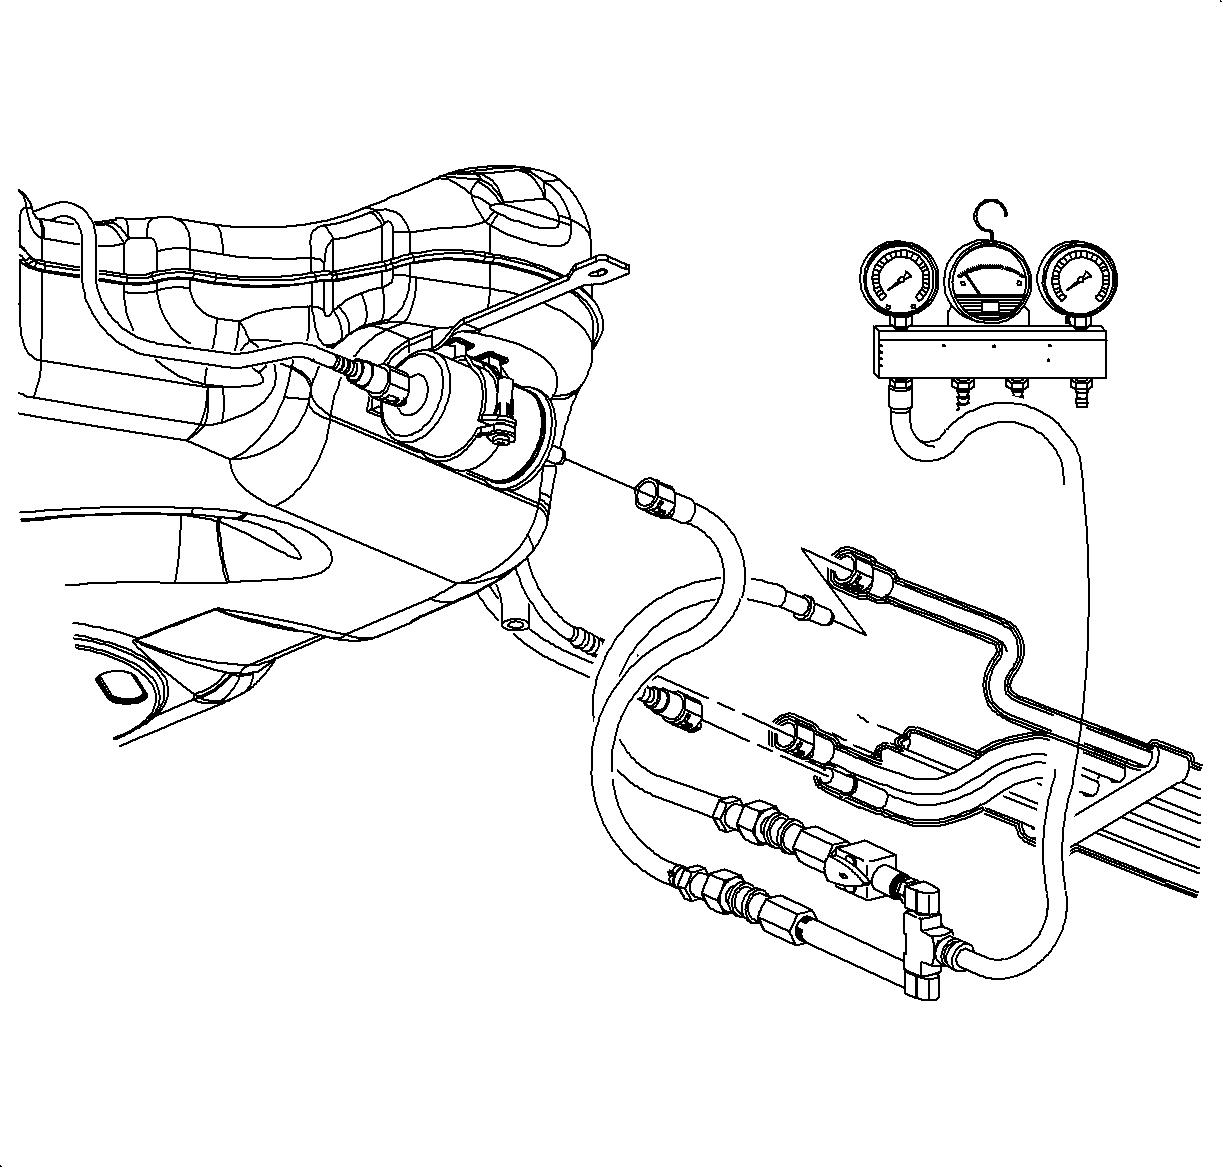
2 - Fuel System Pressure Test - L81
This test will determine whether there is adequate fuel pressure delivered to the fuel injectors to start and run the engine under low load conditions.
- Relieve the fuel system pressure. Refer to Fuel System Pressure Relief.
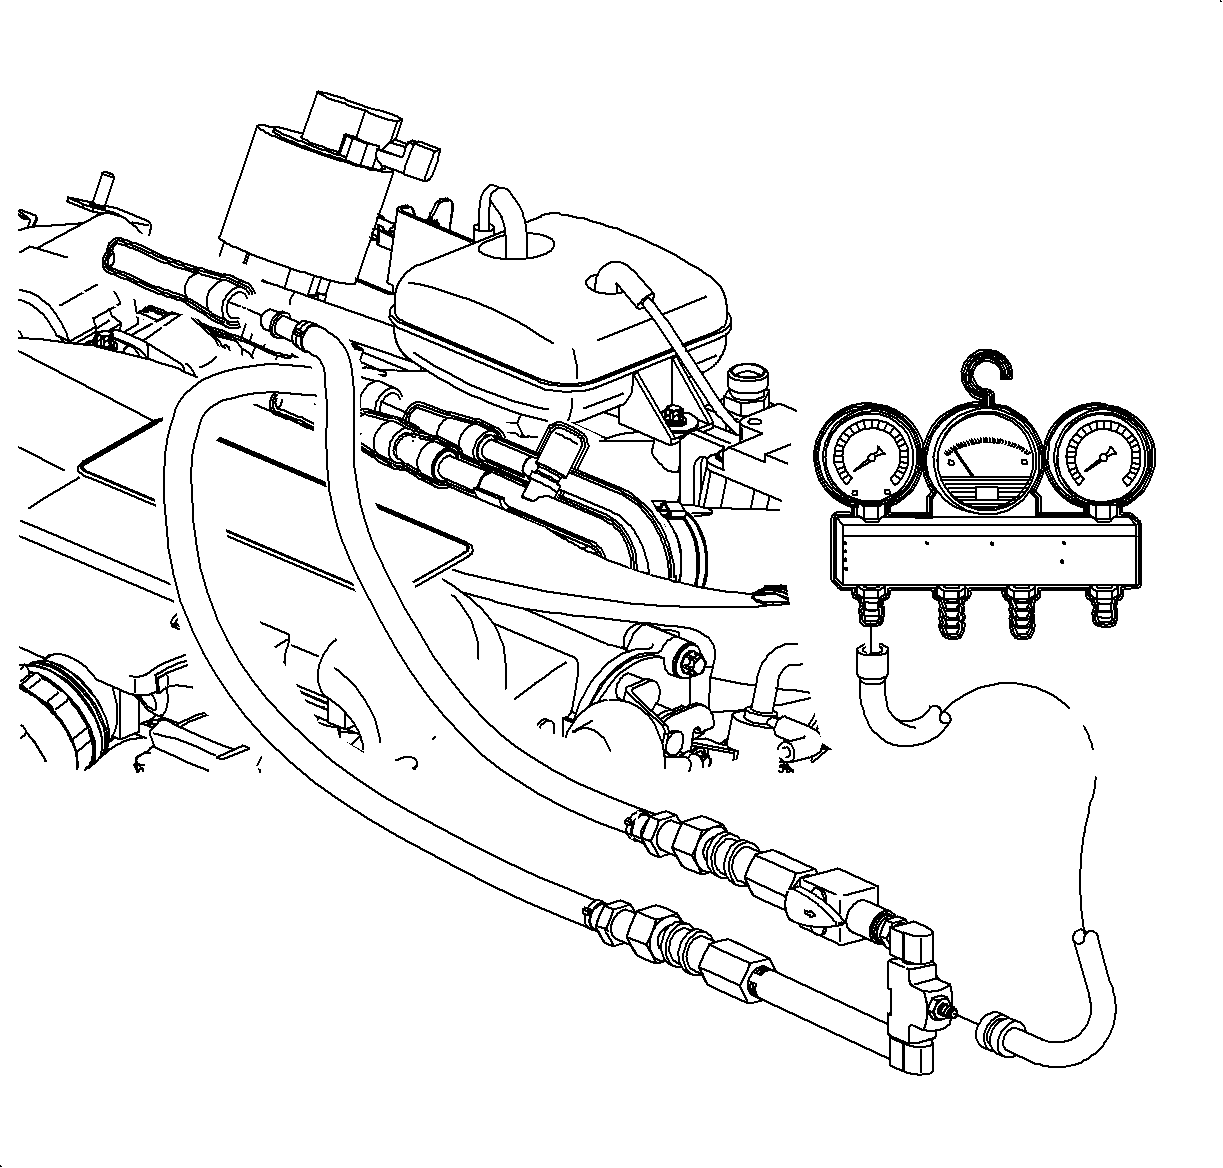
- Connect the fuel gage pressure adapter 309725 and the pressure gage to the fuel pressure test port.
- Using a scan tool, energize the fuel pump for a minimum of 10 seconds.
- While the fuel pump is energized, remove the fuel pressure regulator vacuum line and inspect both ends for liquid fuel.
- Compare the pressure recorded to the published specification.
- Return to the Fuel System Diagnostic Chart and use the test result to make an appropriate decision.
Caution: Refer to Gasoline/Gasoline Vapors Caution in the Preface section.
Caution: Refer to Relieving Fuel Pressure Caution in the Preface section.
Important: The fuel system pressure minimum is 269 kPa (39 psi). The maximum is 338 kPa (49 psi).
Important: The battery must be at a minimum of 12 volts when performing any fuel system test. Charge the battery before proceeding if below 12 volts.
| 3.1. | Record the fuel pressure. |
| 3.2. | Repeat this procedure a minimum of 2 times. |
| • | If liquid fuel is present, replace the fuel pressure regulator before proceeding. Refer to Fuel Pressure Regulator removal procedure. |
| • | If no liquid is present, proceed to step 5. |
3 - Fuel Flow/Pressure Tests - L81
These tests will determine whether the fuel system can supply an adequate volume of fuel at the desired pressure to operate the engine under full load conditions. The test is done at 4 points in the system to isolate and identify the problem component:
| • | The fuel pump |
| • | The fuel filter |
| • | The fuel injectors/rail |
| • | The fuel supply line |
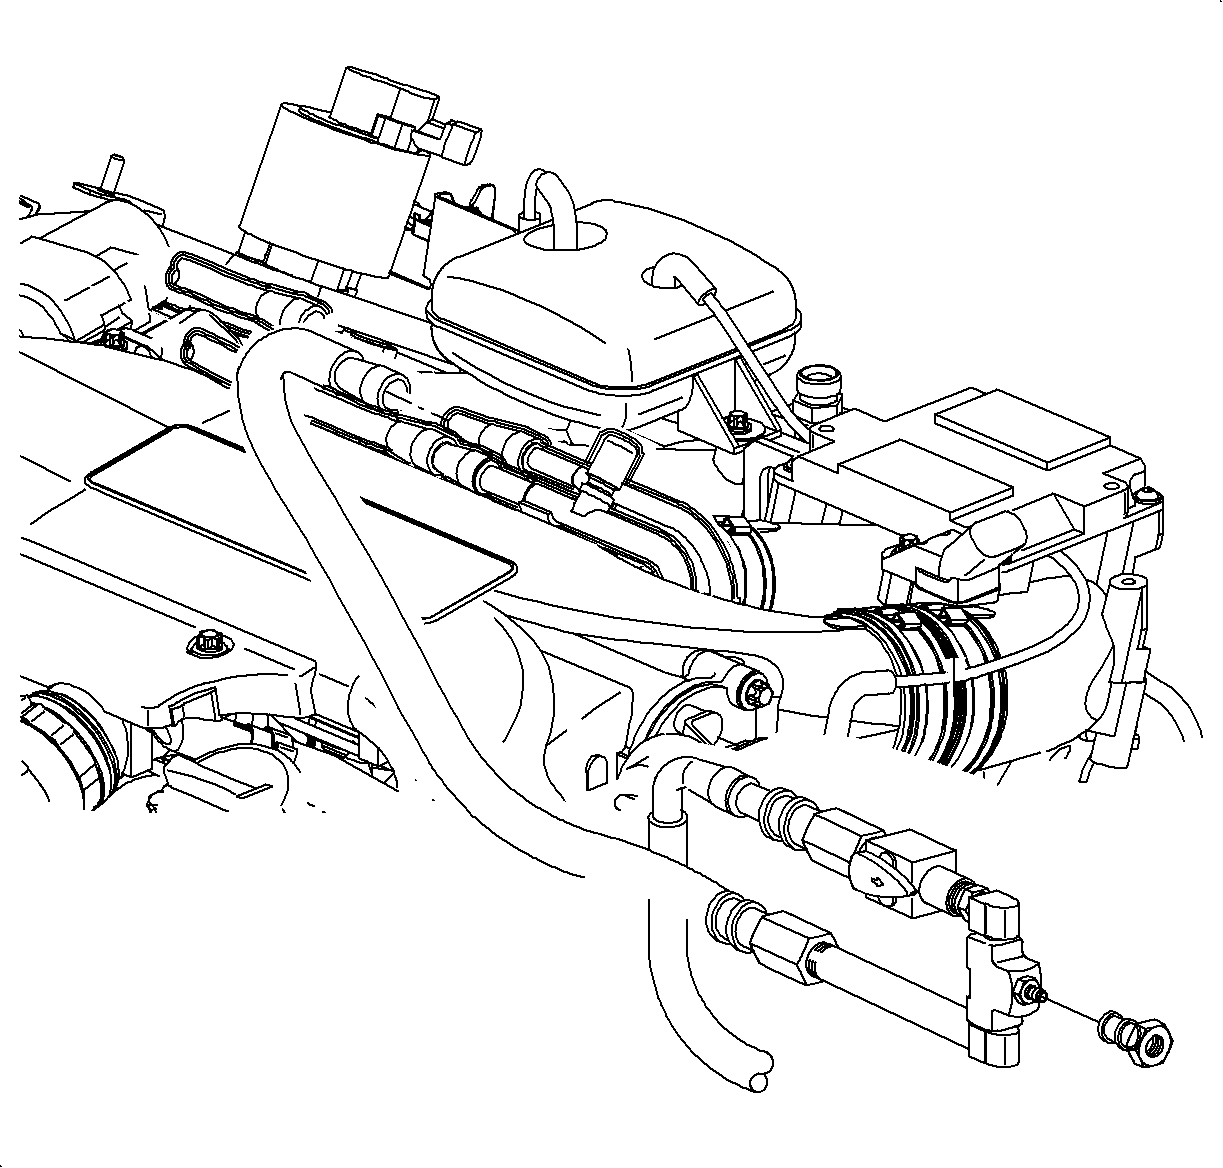
3A - Fuel Flow/Pressure Test (Fuel Injector) - L81
- Relieve the fuel system pressure. Refer to Fuel System Pressure Relief.
- Disconnect the fuel feed and return lines at the fuel rail transfer line.
- Connect the inlet side of the SA9127E-7 into the fuel feed line quick connect and make sure fitting is firmly latched.
- Connect the fuel pressure gage to the test adapter.
- Connect the SA9127E-7 outlet end to a fuel return hose and place other end of the hose into an approved container for fuel (or fill neck inlet).
- Turn the ON/OFF valve on the SA9127E-7 to ON.
- Energize the fuel pump for a minimum of 10 seconds. Refer to Energizing the Fuel Pump.
- Compare the pressure recorded to the published specification.
- Refer to the Fuel System Diagnostic Chart and use the test result to make an appropriate decision.
Caution: Refer to Gasoline/Gasoline Vapors Caution in the Preface section.
Important: The battery must be at a minimum of 12 volts when performing any fuel system test. Charge the battery before proceeding if below 12 volts.
Caution: Refer to Relieving Fuel Pressure Caution in the Preface section.
Important: To properly utilize the Fuel Flow/Pressure Test Adapter, it must always be connected with the fuel feed line on the inlet side of the adapter and the fuel return or drain line connected to the side with the flow control (ON/OFF) valve. If not connected properly, a zero pressure reading will always be read. Use the appropriately sized connector fittings to hook up the adapter to the feed and return lines.
Important: The minimum unregulated fuel pressure under flow at the fuel rail is 448 kPa (65 psi).
| 7.1. | Record the fuel pressure. |
| 7.2. | Repeat this procedure a minimum of 2 times. |
3B - Fuel Flow/Pressure Test (Fuel Pump) - L81
- Relieve the fuel system pressure. Refer to Fuel System Pressure Relief.
- Disconnect the fuel feed line at the fuel filter inlet.
- Connect the inlet side of the SA9127E-7 into the fuel feed line quick connect and make sure the fitting is firmly latched.
- Connect the fuel pressure gage to the test adapter.
- Connect the SA9127E-7 outlet end to the fuel return line or to a fuel return hose and place the other end of the hose into an approved container for fuel (or fill neck inlet).
- Turn the ON/OFF valve on the SA9127E-7 to ON.
- Energize the fuel pump for a minimum of 10 seconds. Refer to Energizing the Fuel Pump.
- Compare the pressure recorded to the published specification.
- Refer to the Fuel System Diagnostic Chart and use the test result to make an appropriate decision.
Caution: Refer to Gasoline/Gasoline Vapors Caution in the Preface section.
Important: The battery must be at a minimum of 12 volts when performing any fuel system test. Charge the battery before proceeding if below 12 volts.
Caution: Refer to Relieving Fuel Pressure Caution in the Preface section.

Important: To properly utilize the SA9127E-7 , it must always be connected with the fuel feed line on the inlet side of the adapter and the fuel return or drain line connected to the side with the flow control ON/OFF valve. If not connected properly, a zero pressure reading will always be read. Use the appropriately sized connector fittings to hook up the adapter to the feed and return lines.
Important: The minimum unregulated fuel pressure under flow at the fuel rail is 448 kPa (65 psi).
| 7.1. | Record the fuel pressure. |
| 7.2. | Repeat this procedure a minimum of 2 times. |
3C - Fuel Flow/Pressure Test (Fuel Filter) - L81
- Relieve the fuel system pressure. Refer to Fuel System Pressure Relief.
- Disconnect the fuel feed line at the fuel filter outlet.
- Connect the inlet side of the SA9127E-7 into the fuel feed line quick connect and make sure the fitting is firmly latched.
- Connect the fuel pressure gage to the test adapter.
- Connect the SA9127E-7 outlet end to the fuel return line or to a fuel return hose and place the other end of the hose into an approved container for fuel (or fill neck inlet).
- Turn the ON/OFF valve on the SA9127E-7 to ON.
- Energize the fuel pump for a minimum of 10 seconds. Refer to Energizing the Fuel Pump.
- Compare the pressure recorded to the published specification.
- Refer to the Fuel System Diagnostic Chart and use the test result to make an appropriate decision.
Caution: Refer to Gasoline/Gasoline Vapors Caution in the Preface section.
Important: The battery must be at a minimum of 12 volts when performing any fuel system test. Charge the battery before proceeding if below 12 volts.
Caution: Refer to Relieving Fuel Pressure Caution in the Preface section.
Important: To properly utilize the SA9127E-7 , it must always be connected with the fuel feed line on the inlet side of the adapter and the fuel return or drain line connected to the side with the flow control ON/OFF valve. If not connected properly, a zero pressure reading will always be read. Use the appropriately sized connector fittings to hook up the adapter to the feed and return lines.
Important: The minimum unregulated fuel pressure under flow at the fuel rail is 448 kPa (65 psi).
| 7.1. | Record the fuel pressure. |
| 7.2. | Repeat this procedure a minimum of 2 times. |
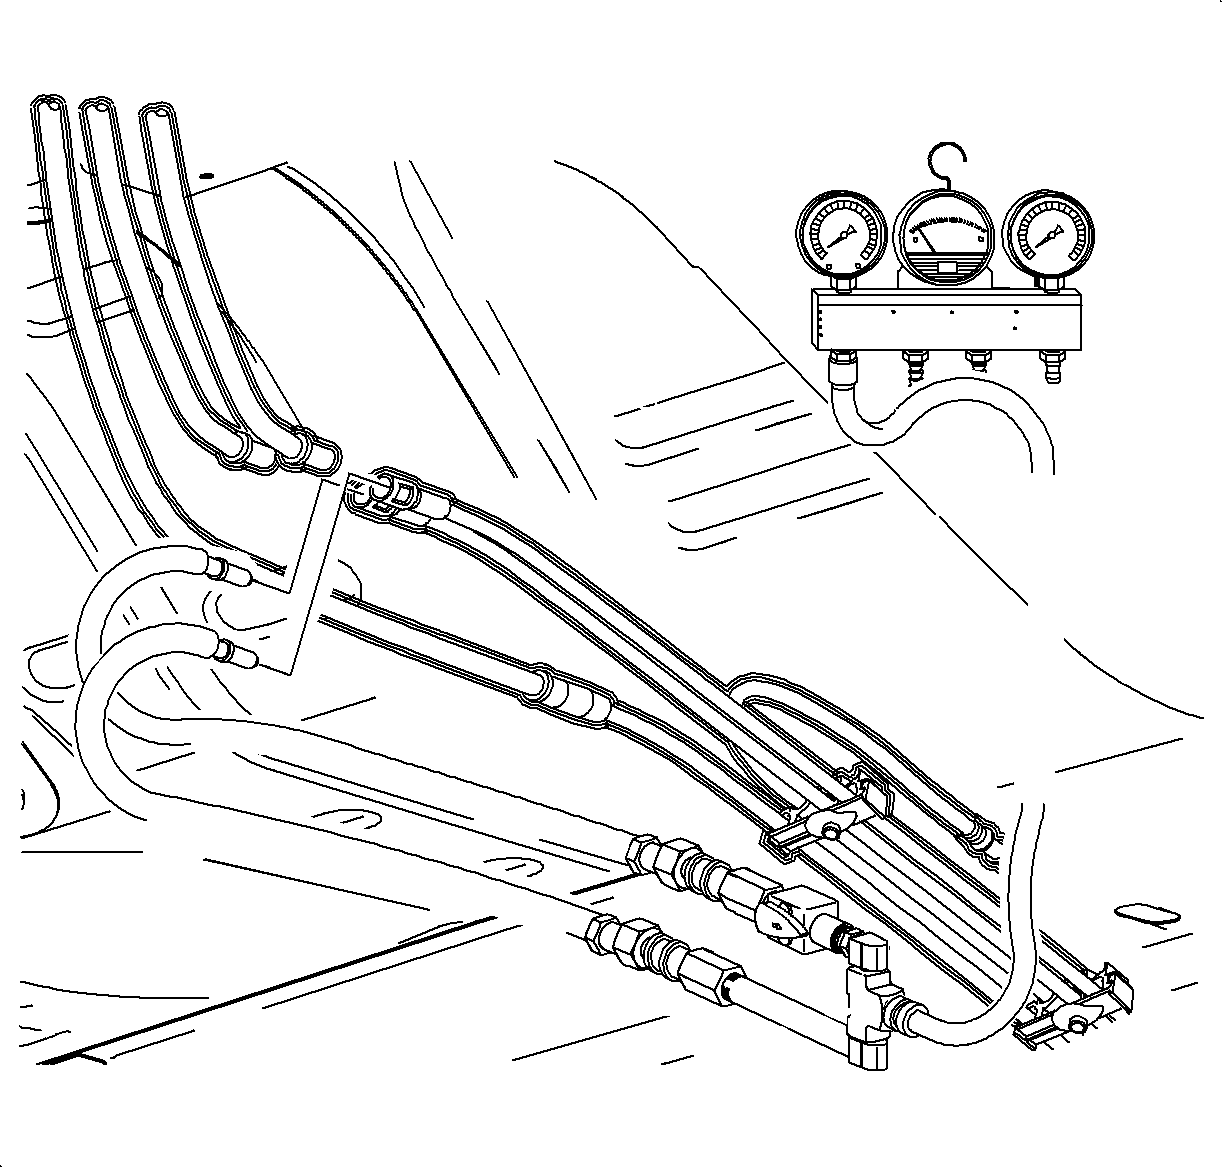
3D - Fuel Flow/Pressure Test (Fuel Feed Lines) - L81
- Relieve the fuel system pressure. Refer to Fuel System Pressure Relief.
- Disconnect the fuel feed line between the chassis bundle and the front fuel feed line at the passenger side front wheel well.
- Connect the inlet side of the SA9127E-7 into the fuel feed line quick connect and make sure the fitting is firmly latched.
- Connect the fuel pressure gage to the test adapter.
- Connect the SA9127E-7 outlet end to the fuel return line or to a fuel return hose and place the other end of the hose into an approved container for fuel (or fill neck inlet).
- Turn the ON/OFF valve on the SA9127E-7 to ON.
- Energize the fuel pump for a minimum of 10 seconds. Refer to Energizing the Fuel Pump.
- Compare the pressure recorded to the published specification.
- Refer to the Fuel System Diagnostic Chart and use the test result to make an appropriate decision.
Caution: Refer to Gasoline/Gasoline Vapors Caution in the Preface section.
Important: The battery must be at a minimum of 12 volts when performing any fuel system test. Charge the battery before proceeding if below 12 volts.
Caution: Refer to Relieving Fuel Pressure Caution in the Preface section.
Important: To properly utilize the SA9127E-7 , it must always be connected with the fuel feed line on the inlet side of the adapter and the fuel return or drain line connected to the side with the flow control ON/OFF valve. If not connected properly, a zero pressure reading will always be read. Use the appropriately sized connector fittings to hook up the adapter to the feed and return lines.
Important: The minimum unregulated fuel pressure under flow at the fuel rail is 448 kPa (65 psi).
| 7.1. | Record the fuel pressure. |
| 7.2. | Repeat this procedure a minimum of 2 times. |
4 - Fuel Pressure Regulator and Return Line(s) Integrity Tests - L81
These tests will determine whether the fuel pressure regulator, fuel pump housing, or fuel return lines are operating to engineering specifications. The fuel system pressure in these tests are always measured at the fuel system pressure port, on the fuel rail, regardless of which test is being done (4a, 4b, or 4c).
For some of these tests, the vehicle will be raised on a hoist and a means of controlling the fuel pump from under the vehicle will be required. The scan tool readily provides this function. Refer to Energizing the Fuel Pump.
4A - Fuel Pressure Regulator and Return Line(s) Integrity Test (Fuel Pressure Regulator) - L81
- Connect the scan tool to vehicle and turn the ignition to ON.
- Relieve the fuel system pressure. Refer to Fuel System Pressure Relief.
- Disconnect the fuel return line at fuel rail.
- Connect the SA9127E-7 inlet to the fuel rail return line.
- Connect the outlet side of the test adaptor to a fuel return hose or place the other end of the return hose into an approved container for fuel (or fill neck inlet).
- Cap the SA9127E-7 pressure test port with the J 43936 .
- Connect the fuel pressure gage to the fuel pressure test port, on the fuel rail, using special tool 309725. Ensure the valve is closed.
- Turn the ON/OFF valve on the SA9127E-7 to ON.
- Energize the fuel pump for a minimum of 10 seconds.
- Compare the pressure recorded to the published specification.
- Refer to the Fuel System Diagnostic Chart and use the test result to make an appropriate decision.
Caution: Refer to Gasoline/Gasoline Vapors Caution in the Preface section.
Important: The battery must be at a minimum of 12 volts when performing any fuel system test. Charge the battery before proceeding if below 12 volts.
Caution: Refer to Relieving Fuel Pressure Caution in the Preface section.
Important: To properly utilize the SA9127E-7 , it must always be connected with the fuel feed line on the inlet side of the adapter and the fuel return or drain line connected to the side with the flow control ON/OFF valve. If not connected properly, a zero pressure reading will always be read. Use the appropriately sized connector fittings to hook up the adapter to the feed and return lines.
Important: Do not connect the SA9127E-7 outlet to the return line.
Important: The maximum fuel pressure under flow on the fuel rail is 517 kPa (75 psi).
| 9.1. | Record the fuel pressure. |
| 9.2. | Repeat this procedure a minimum of 2 times. |
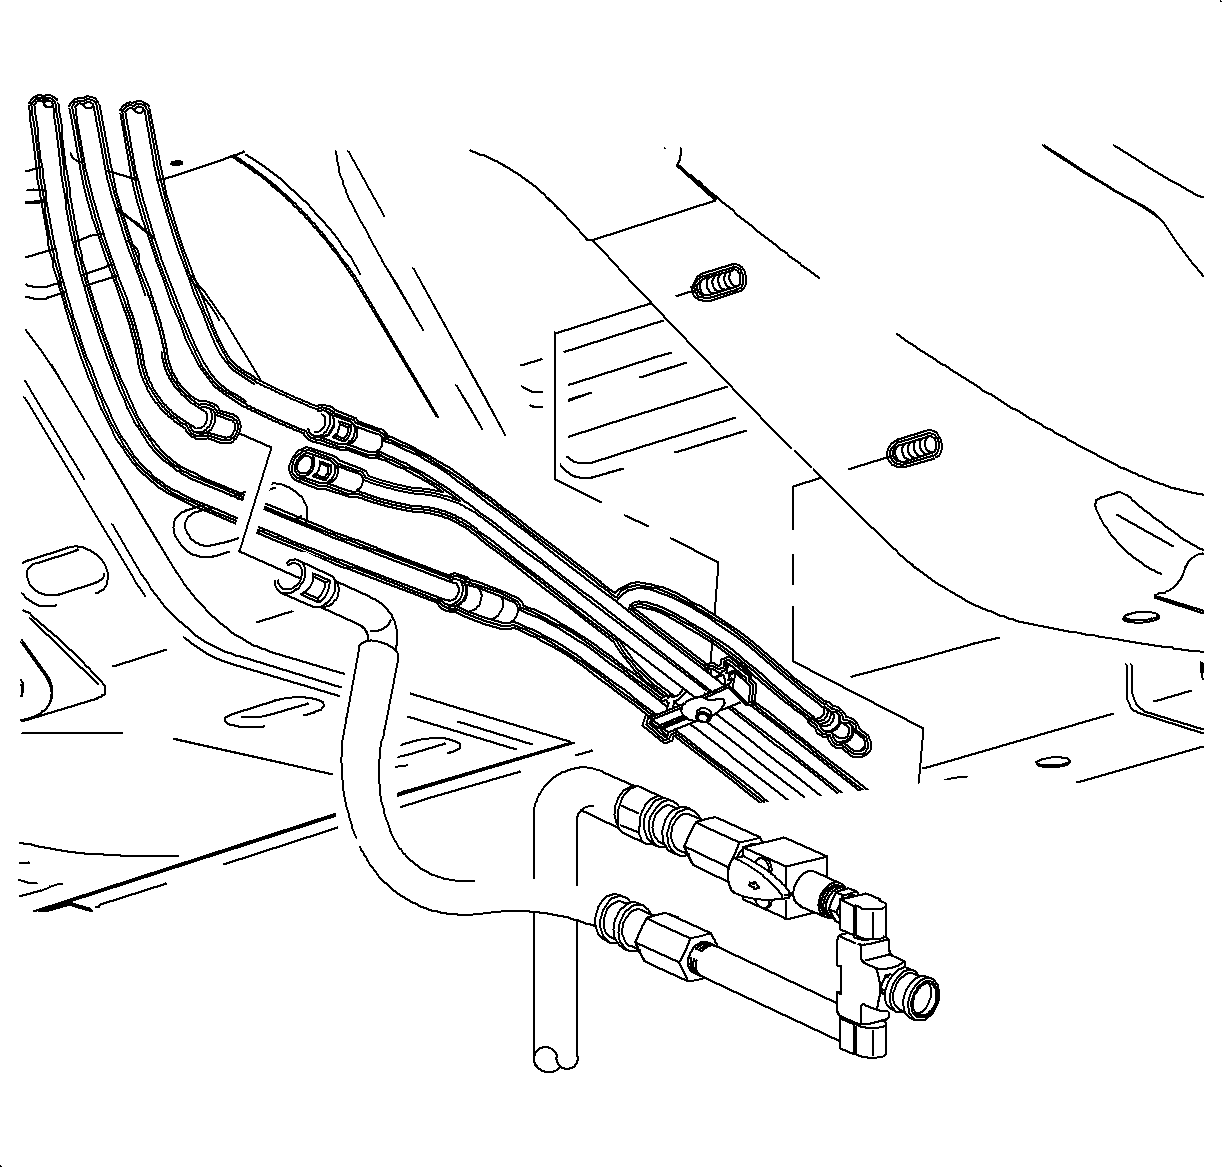
4B - Fuel Pressure Regulator and Return Line(s) Integrity Tests (Fuel Rail Return Line) - L81
- Connect the scan tool to the vehicle and turn the ignition to ON.
- Relieve the fuel system pressure. Refer to Fuel System Pressure Relief.
- Raise the vehicle to a comfortable working position.
- Disconnect the fuel return line between the front fuel return line and the chassis fuel return line at the passenger side front wheel well.
- Connect the SA9127E-7 inlet to the fuel rail return line.
- Cap the SA9127E-7 pressure test port with the J 43936 .
- Connect the fuel pressure gage to the fuel pressure test port on fuel rail using special tool 309725. Ensure the valve is closed.
- Turn the ON/OFF valve on the SA9127E-7 to ON.
- Energize the fuel pump for a minimum of 10 seconds.
- Compare the pressure recorded to the published specification.
- Refer to the Fuel System Diagnostic Chart and use the test result to make an appropriate decision.
Caution: Refer to Gasoline/Gasoline Vapors Caution in the Preface section.
Important: The battery must be at a minimum of 12 volts when performing any fuel system test. Charge the battery before proceeding if below 12 volts.
Caution: Refer to Relieving Fuel Pressure Caution in the Preface section.
Important: To properly utilize the SA9127E-7 , it must always be connected with the fuel feed line on the inlet side of the adapter and the fuel return or drain line connected to the side with the flow control ON/OFF valve. If not connected properly, a zero pressure reading will always be read. Use the appropriately sized connector fittings to hook up the adapter to the feed and return lines.
| 5.1. | Connect the outlet side of the test adaptor to a fuel return hose. |
| 5.2. | Place the other end of the return hose into an approved container for fuel (or fill neck inlet). |
Important: The maximum fuel pressure under flow on the fuel rail is 517 kPa (75 psi).
| 9.1. | Record the fuel pressure. |
| 9.2. | Repeat this procedure a minimum of 2 times. |
4C - Fuel Pressure Regulator and Return Line(s) Integrity Tests (Fuel Return Line and Fuel Pump Housing) - L81
- Connect the scan tool to the vehicle and turn the ignition to ON.
- Relieve the fuel system pressure. Refer to Fuel System Pressure Relief.
- Raise the vehicle to a comfortable working position.
- Disconnect the fuel return line between the chassis bundle and the fuel tank return line.
- Connect the SA9127E-7 inlet to the chassis bundle return line.
- Cap the SA9127E-7 pressure test port with the J 43936 .
- Connect the fuel pressure gage to the fuel pressure test port, on the fuel rail, using the special tool 309725. Ensure the valve is closed.
- Turn the ON/OFF valve on the SA9127E-7 to ON.
- Energize the fuel pump for a minimum of 10 seconds.
- Compare the pressure recorded to the published specification.
- Refer to the Fuel System Diagnostic Chart and use the test result to make an appropriate decision.
Caution: Refer to Gasoline/Gasoline Vapors Caution in the Preface section.
Important: The battery must be at a minimum of 12 volts when performing any fuel system test. Charge the battery before proceeding if below 12 volts.
Caution: Refer to Relieving Fuel Pressure Caution in the Preface section.

Important: To properly utilize the SA9127E-7 , it must always be connected with the fuel feed line on the inlet side of the adapter and the fuel return or drain line connected to the side with the flow control ON/OFF valve. If not connected properly, a zero pressure reading will always be read. Use the appropriately sized connector fittings to hook up the adapter to the feed and return lines.
| 5.1. | Connect the outlet side of the test adaptor to a fuel return hose. |
| 5.2. | Place the other end of the return hose into an approved container for fuel (or fill neck inlet). |
Important: The maximum fuel pressure under flow on the fuel rail is 517 kPa (75 psi).
| 9.1. | Record the fuel pressure. |
| 9.2. | Repeat this procedure a minimum of 2 times. |
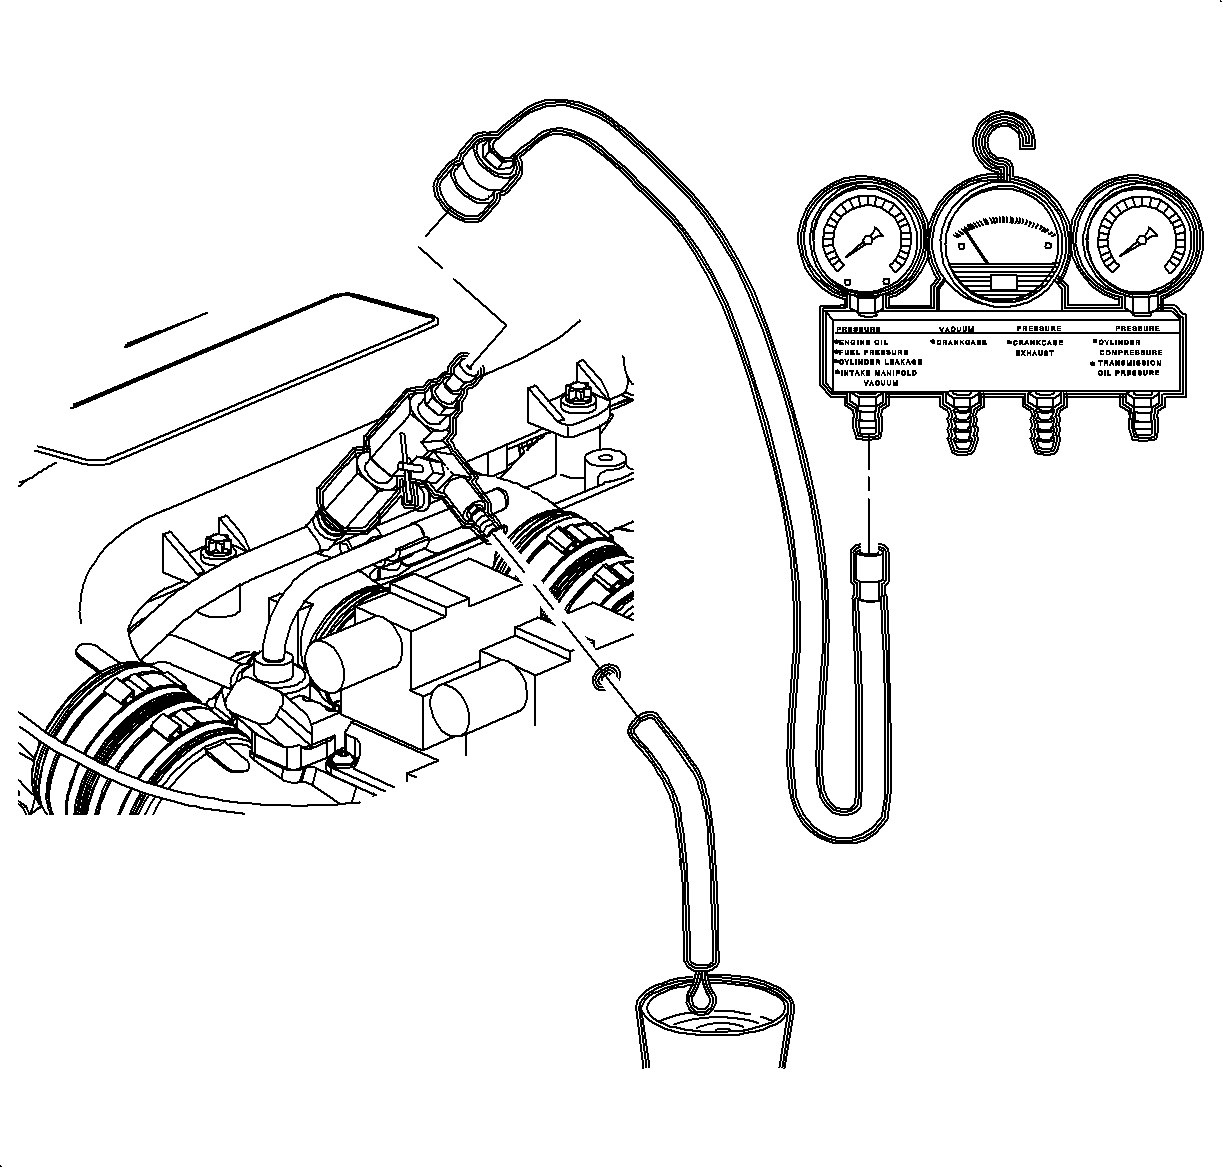
5 - Fuel System Leakdown Tests - L81
The fuel system leakdown tests will determine if the fuel system is able to hold fuel pressure when the fuel pump is not operating. The system must hold pressure to ensure that the fuel supply circuit (fuel lines, filter, pressure regulator, lines, and fuel rail) is full of fuel. When the fuel supply is completely charged, fuel will be available at the injectors as soon as the ignition is turned ON.
5A - Fuel System Leakdown Test - L81
- Relieve the fuel system pressure. Refer to Fuel System Pressure Relief.
- Connect the SA9127E to the fuel pressure test port.
- Energize the fuel pump for a minimum of 10 seconds. Refer to Energizing the Fuel Pump.
- Record the fuel pressure and subtract from the pressure recorded in step 3. Repeat this procedure a minimum of 2 times.
- Compare the pressure loss (decay) to the published specification.
- Refer to the Fuel System Diagnostic Chart and use the test result to make an appropriate decision.
Caution: Refer to Gasoline/Gasoline Vapors Caution in the Preface section.
Caution: Refer to Relieving Fuel Pressure Caution in the Preface section.
Important: The battery must be at a minimum of 12 volts when performing any fuel system tests. Charge the battery before proceeding if below 12 volts.
| 3.1. | Record the fuel pressure. |
| 3.2. | Shut the fuel pump OFF. |
| 3.3. | Wait 5 minutes. |
Important: During the fuel system leakdown test, the maximum pressure decay after 5 minutes is 55 kPa (8 psi).
5B - Fuel System Leakdown Test (Fuel Pump) - L81
- Relieve the fuel system pressure. Refer to Fuel System Pressure Relief.
- Disconnect the fuel feed and return line at the fuel rail.
- Connect the SA9127E-7 inlet to the fuel feed line and the SA9127E-7 outlet to the fuel return line.
- Energize the fuel pump for a minimum of 10 seconds. Refer to Energizing the Fuel Pump.
- Record the fuel pressure and subtract from the pressure recorded in step 3. Repeat this procedure a minimum of 2 times.
- Compare the pressure loss (decay) to the published specification.
- Refer to the Fuel System Diagnostic Chart and use the test result to make an appropriate decision.
Caution: Refer to Gasoline/Gasoline Vapors Caution in the Preface section.
Caution: Refer to Relieving Fuel Pressure Caution in the Preface section.
| 3.1. | Close the valve on the outlet side of the tool. |
| 3.2. | Connect the pressure gage to the SA9127E-7 . |
Important: The battery must be at a minimum of 12 volts when performing any fuel system tests. Charge the battery before proceeding if below 12 volts.
| 4.1. | Record the fuel pressure. |
| 4.2. | Shut the fuel pump OFF. |
| 4.3. | Wait 5 minutes. |
Important: During the fuel system leakdown test, the maximum pressure decay after 5 minutes is 55 kPa (8 psi).
5C - Fuel System Leakdown Test (Fuel Pressure Regulator) - L81
- Relieve the fuel system pressure. Refer to Fuel System Pressure Relief.
- Disconnect the fuel return line from fuel rail.
- Connect the SA9127E-7 inlet to the fuel rail return side and the SA9127E-7 outlet to the front fuel return line.
- Energize the fuel pump for a minimum of 10 seconds. Refer to Energizing the Fuel Pump.
- Record the fuel pressure and subtract from the pressure recorded in step 3. Repeat this procedure a minimum of 2 times.
- Compare the pressure loss (decay) to the published specification.
- Refer to the Fuel System Diagnostic Chart and use the test result to make an appropriate decision.
Caution: Refer to Gasoline/Gasoline Vapors Caution in the Preface section.
Caution: Refer to Relieving Fuel Pressure Caution in the Preface section.
| 3.1. | Close the valve on the outlet side of the tool. |
| 3.2. | Connect the pressure gage to the SA9127E-7 . |
Important: The battery must be at a minimum of 12 volts when performing any fuel system tests. Charge the battery before proceeding if below 12 volts.
| 4.1. | Record the fuel pressure. |
| 4.2. | Shut the fuel pump OFF. |
| 4.3. | Wait 5 minutes. |
Important: During the fuel system leakdown test, the maximum pressure decay after 5 minutes is 55 kPa (8 psi).
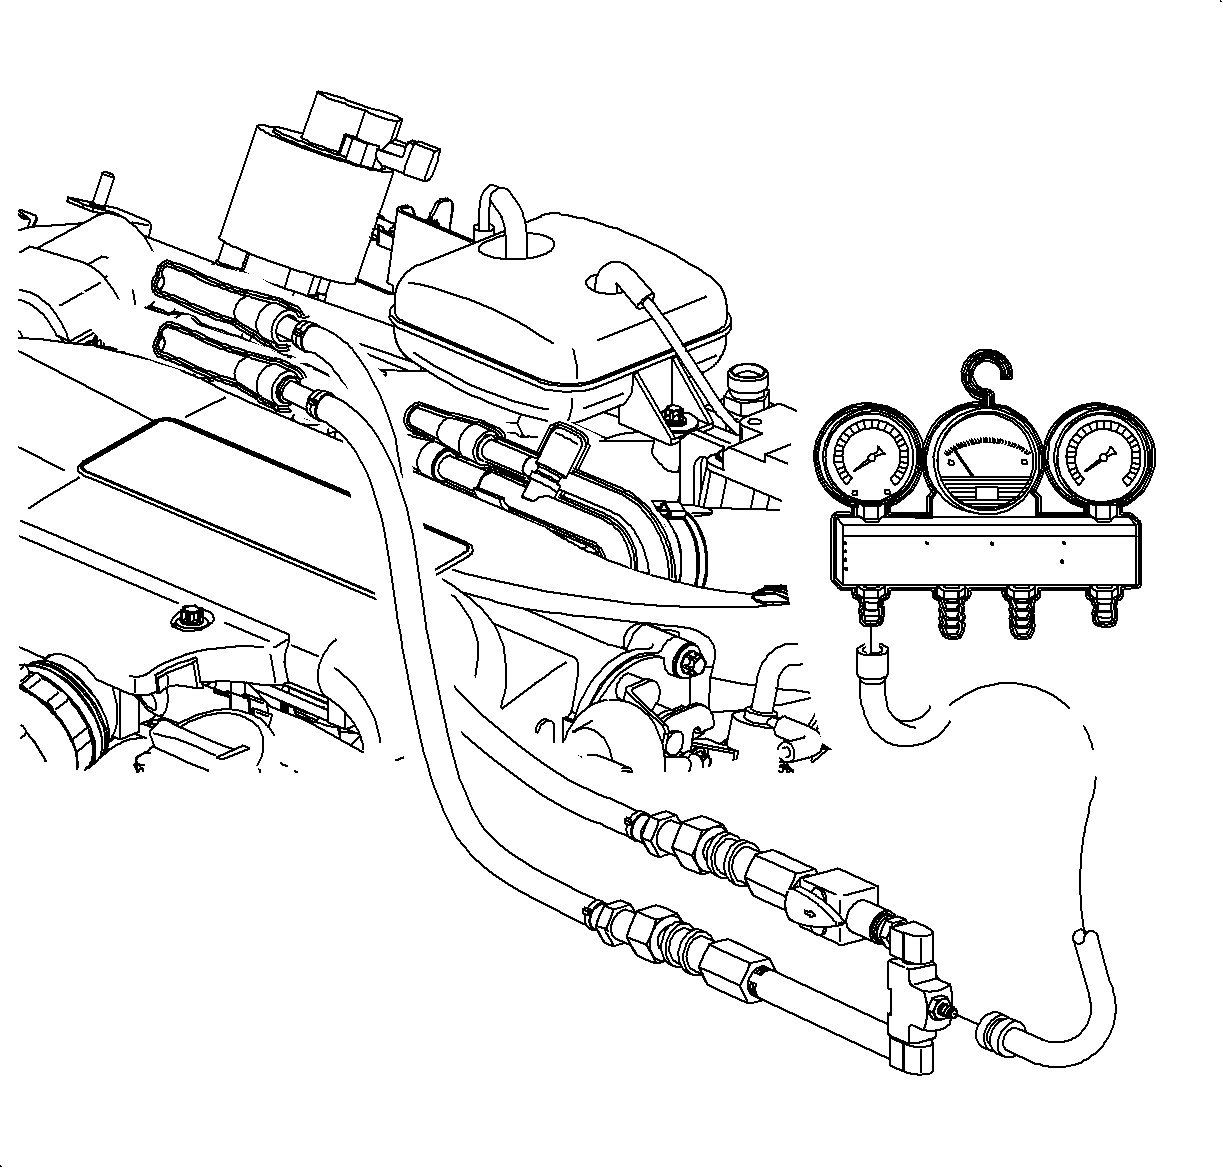
6 - Fuel Supply Pressure Tests - L81
These tests will determine whether the fuel system, fuel pump, fuel filter, and fuel pressure regulator can supply fuel at adequate pressure.
6A - Fuel Supply Pressure Test (Regulator) - L81
- Relieve the fuel system pressure. Refer to Fuel System Pressure Relief.
- Disconnect the fuel feed and return lines at the fuel rail.
- Connect the inlet side of SA9127E-7 into the fuel feed line.
- Connect the outlet side of the SA9127E-7 into the fuel return line.
- Connect the fuel pressure gage to the test adapter.
- Turn the ON/OFF valve on the SA9127E-7 to ON.
- Energize the fuel pump for a minimum of 10 seconds. Refer to Energizing the Fuel Pump.
- Compare the pressure recorded to the published specification.
- Refer to the Fuel System Diagnostic Chart and use the test result to make an appropriate decision.
Caution: Refer to Gasoline/Gasoline Vapors Caution in the Preface section.
Important: The battery must be at a minimum of 12 volts when performing any fuel system tests. Charge the battery before proceeding if below 12 volts.
Caution: Refer to Relieving Fuel Pressure Caution in the Preface section.
Important: To properly utilize the SA9127E-7 , it must always be connected with the fuel feed line on the inlet side of the adapter and the fuel return or drain line connected to the side with the flow control ON/OFF valve. If not connected properly, a zero pressure reading will always be read. Use the appropriately sized connector fittings to hook up the adapter to the feed and return lines.
Important: The minimum regulated fuel pressure under flow at the fuel rail/pressure adapter is 448 kPa (65 psi).
| 7.1. | Record the fuel pressure. |
| 7.2. | Repeat this procedure a minimum of 2 times. |
6B - Fuel Supply Pressure Test (Fuel Pump) - L81
- Relieve the fuel system pressure. Refer to Fuel System Pressure Relief.
- Disconnect the fuel feed at the fuel filter inlet and fuel return line at the front of the fuel tank.
- Connect the inlet side of the SA9127E-7 into the fuel feed line.
- Connect the outlet side of the SA9127E-7 to the tank fuel return line.
- Connect the fuel pressure gage to the test adapter.
- Turn the ON/OFF valve on the SA9127E-7 to ON.
- Energize the fuel pump for a minimum of 10 seconds. Refer to Energizing the Fuel Pump.
- Compare the pressure recorded to the published specification.
- Refer to the Fuel System Diagnostic Chart and use the test result to make an appropriate decision.
Caution: Refer to Gasoline/Gasoline Vapors Caution in the Preface section.
Important: The battery must be at a minimum of 12 volts when performing any fuel system tests. Charge the battery before proceeding if below 12 volts.
Caution: Refer to Relieving Fuel Pressure Caution in the Preface section.
Important: To properly utilize the SA9127E-7 , it must always be connected with the fuel feed line on the inlet side of the adapter and the fuel return or drain line connected to the side with the flow control ON/OFF valve. If not connected properly, a zero pressure reading will always be read. Use the appropriately sized connector fittings to hook up the adapter to the feed and return lines.
Important: The minimum unregulated fuel pressure under flow at the fuel rail/pressure adapter is 448 kPa (65 psi).
| 7.1. | Record the fuel pressure. |
| 7.2. | Repeat this procedure a minimum of 2 times. |
7 - Fuel Injector Tip Leakage Test - L81
- Relieve the fuel system pressure. Refer to Fuel System Pressure Relief.
- Connect the SA9127E-7 to the fuel pressure test port.
- Remove the fuel rail assembly. Refer to Fuel Rail Removal.
- Connect the SA9127E to the pressure adapter.
- Wipe the tips of the fuel injectors free of any fuel or debris.
- Connect the scan tool and turn the ignition ON.
- Energize the fuel pump. Refer to Energizing the Fuel Pump.
- Observe the fuel injector tips for leakage of fuel. If one or more of the white towels becomes wet with fuel after 5 minutes, replace the faulty fuel injector. Refer to Fuel Injector Removal.
- Test the assembly a minimum of 2 times.
- Install the bleed hose from the pressure test adapter 309725 into an approved container.
- Open the valve to bleed the system pressure.
- Remove the fuel pressure adapter from the fuel pressure test port.
- Install the fuel pressure test port cap.
- Lubricate the injector O-rings with clean engine oil and install the fuel rail assembly. Refer to Fuel Rail Assembly Installation.
- Start the engine and check for leaks.
Caution: Refer to Gasoline/Gasoline Vapors Caution in the Preface section.
Caution: Refer to Relieving Fuel Pressure Caution in the Preface section.
Caution: Lay shop towels on the intake manifold and cam cover to collect any fuel.
Caution: Make sure the injectors are positioned to prevent fuel from being sprayed onto the engine. Make sure that the injector retaining clips are properly installed.
| 3.1. | Pull the fuel rail back far enough so that the nozzles of the injectors are visible but still in ports. |
| 3.2. | Attach the fuel rail to the intake manifold with a wire. |
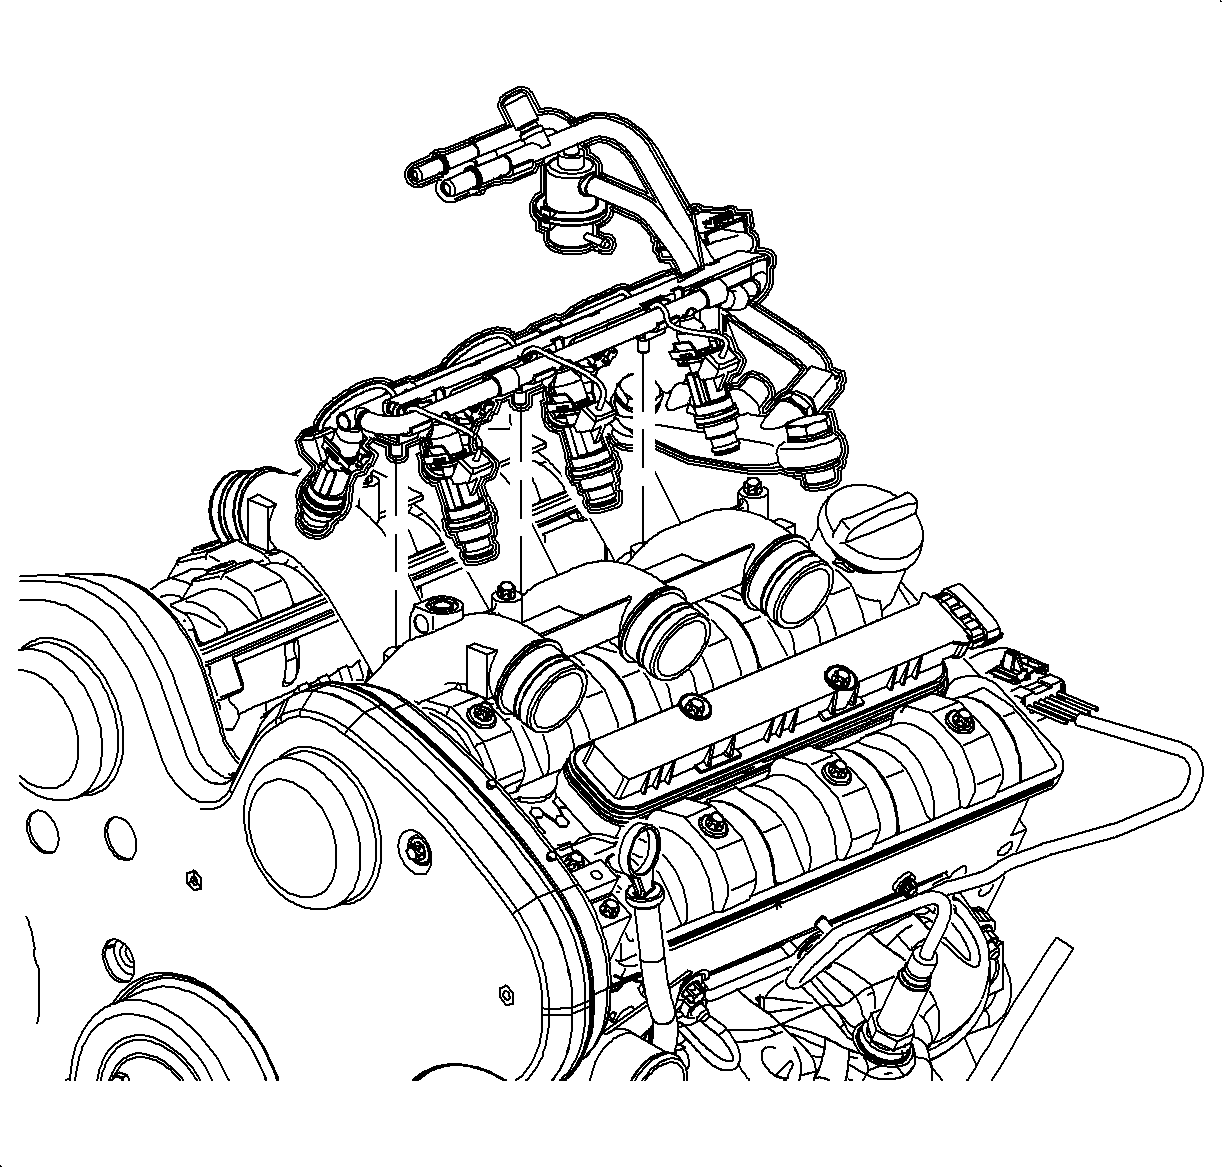
| 5.1. | Place a clean, white towel directly under the fuel injectors. |
| 5.2. | Ensure that the towel lightly contacts each fuel injector tip. |
Important: The battery must be at a minimum of 12 volts when performing any fuel system tests. Charge the battery before proceeding if below 12 volts.
Important: The pressure gage reading should be approximately 276-345 kPa (40-50 psi).
Important: Replace plastic fuel line retainers whenever the fuel supply or return line is disconnected at the fuel rail. Install the new retainer into the female cavity of the connection. Care must be taken to ensure that the locking tab is centered in the window of the female cavity. Firmly press the female connection onto the male end until a click is heard, then pull back to confirm engagement. Pinched, kinked, or damaged fuel lines must be replaced.
