Tools Required
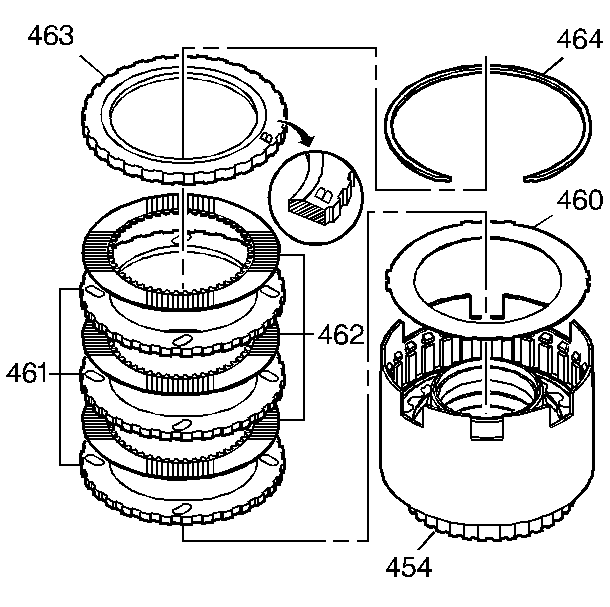
- Remove the reverse clutch
snap ring (464).
- Remove the reverse clutch plates (one backing plate (463),
three steel plates (461), three fiber plates (462), and a waved
plate (460).
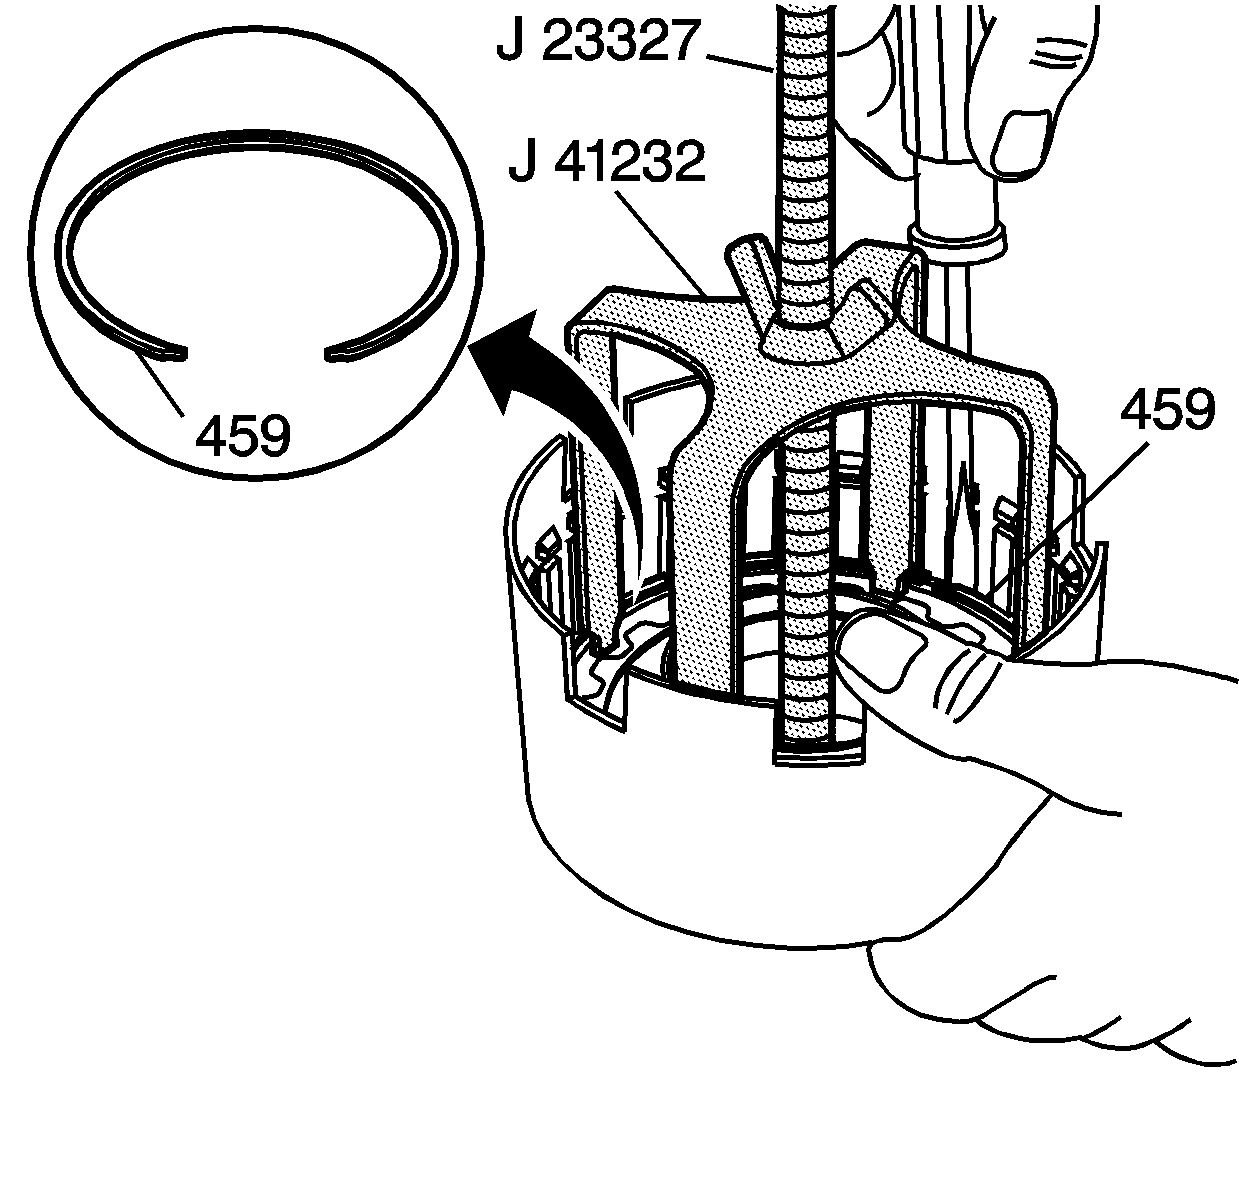
- Compress the reverse clutch
return spring. Use the J 41232
and J 23327
.
- Remove the reverse clutch return spring and the retainer snap
ring (459).
- Remove the J 41232
and J 23327
.
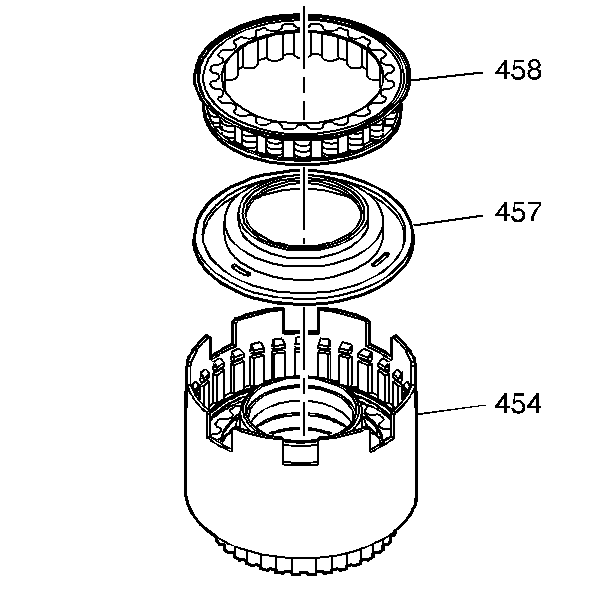
- Remove the reverse clutch
return spring and retainer assembly (458).
- Remove the reverse clutch piston and seal assembly (457).
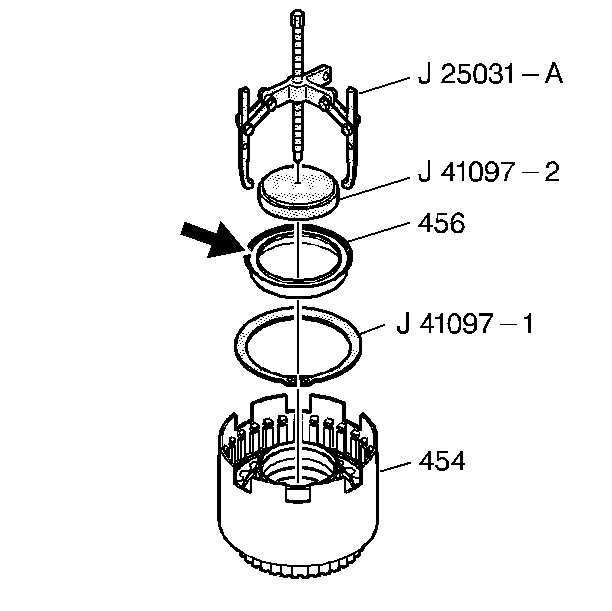
Important: If the seal assembly is not damaged do not remove the seal assembly.
- Inspect the reverse clutch inner seal (456).
- If the seal assembly is damaged, perform the following procedure
in order to remove the seal assembly:
| 9.1. | Use the J 4646
or
equivalent in order to install the J 41097-1
under the outer lip of the reverse clutch inner seal (456). |
| 9.2. | Place the J 41097-2
on the inner hub of the reverse clutch housing (454). |
| 9.3. | Use the puller J 25031-A
in order to remove the seal. |
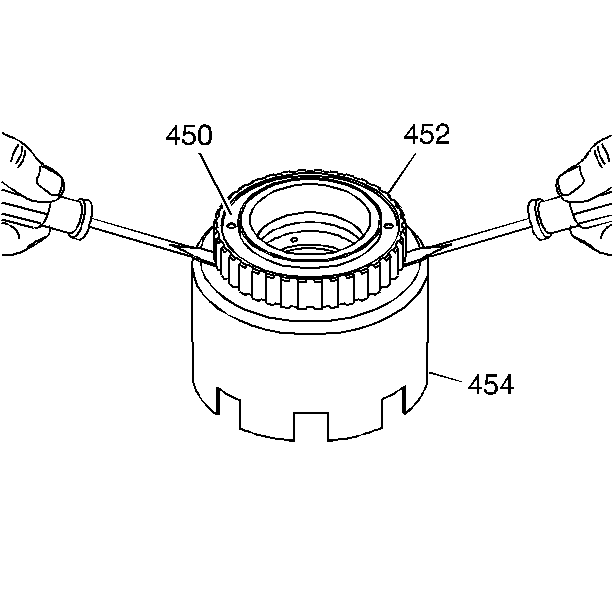
Important: Be careful when removing the second roller clutch not to score the roller
clutch inner race with the screwdrivers.
- Remove the 2nd roller clutch (452) and roller clutch retainer (450)
by prying up on the roller clutch assembly with two screwdrivers. The second
roller clutch retainer is pressed onto the reverse clutch housing (454)
and is not reusable after removal.
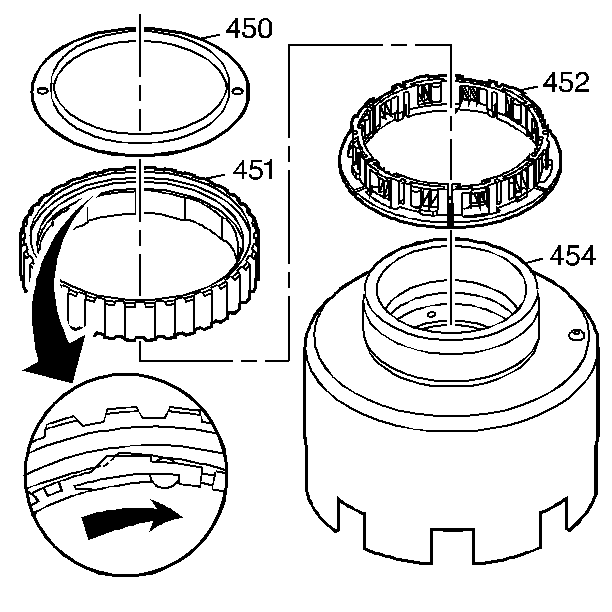
Important: In order to remove the 2nd roller clutch (452), rotate the roller
clutch clockwise until indexed with the roller clutch cam (451) ramps.
- Remove the 2nd roller clutch (452) from the inside of the roller
clutch cam (451).
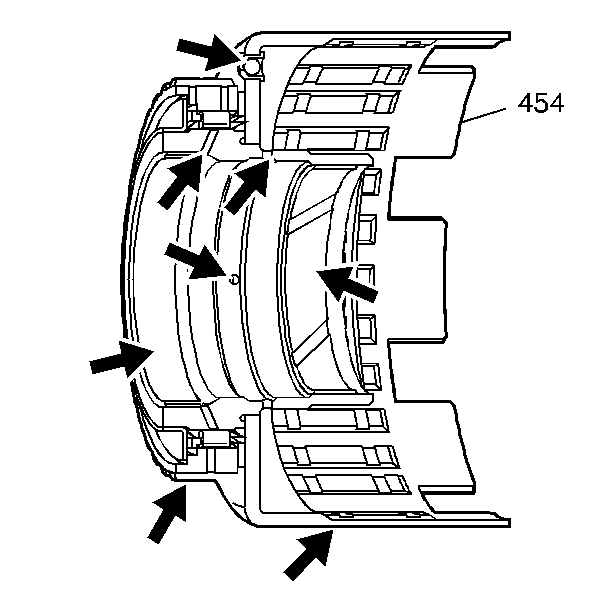
- Inspect the reverse housing
(454) for excessive band wear and damaged splines.
- Inspect the retainer and ball capsule for damage or clogging.
- Inspect the fluid feed holes for proper opening.
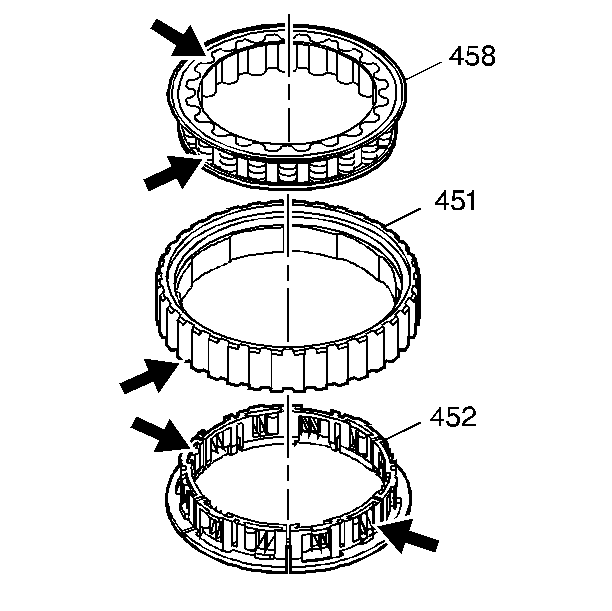
- Inspect the roller clutch
for excessive wear (451 and 452).
- Inspect the spring assembly for dislocated or damaged springs (458).
- Inspect all components for damage and excessive wear.
- Clean and dry each of the components.
Tools Required
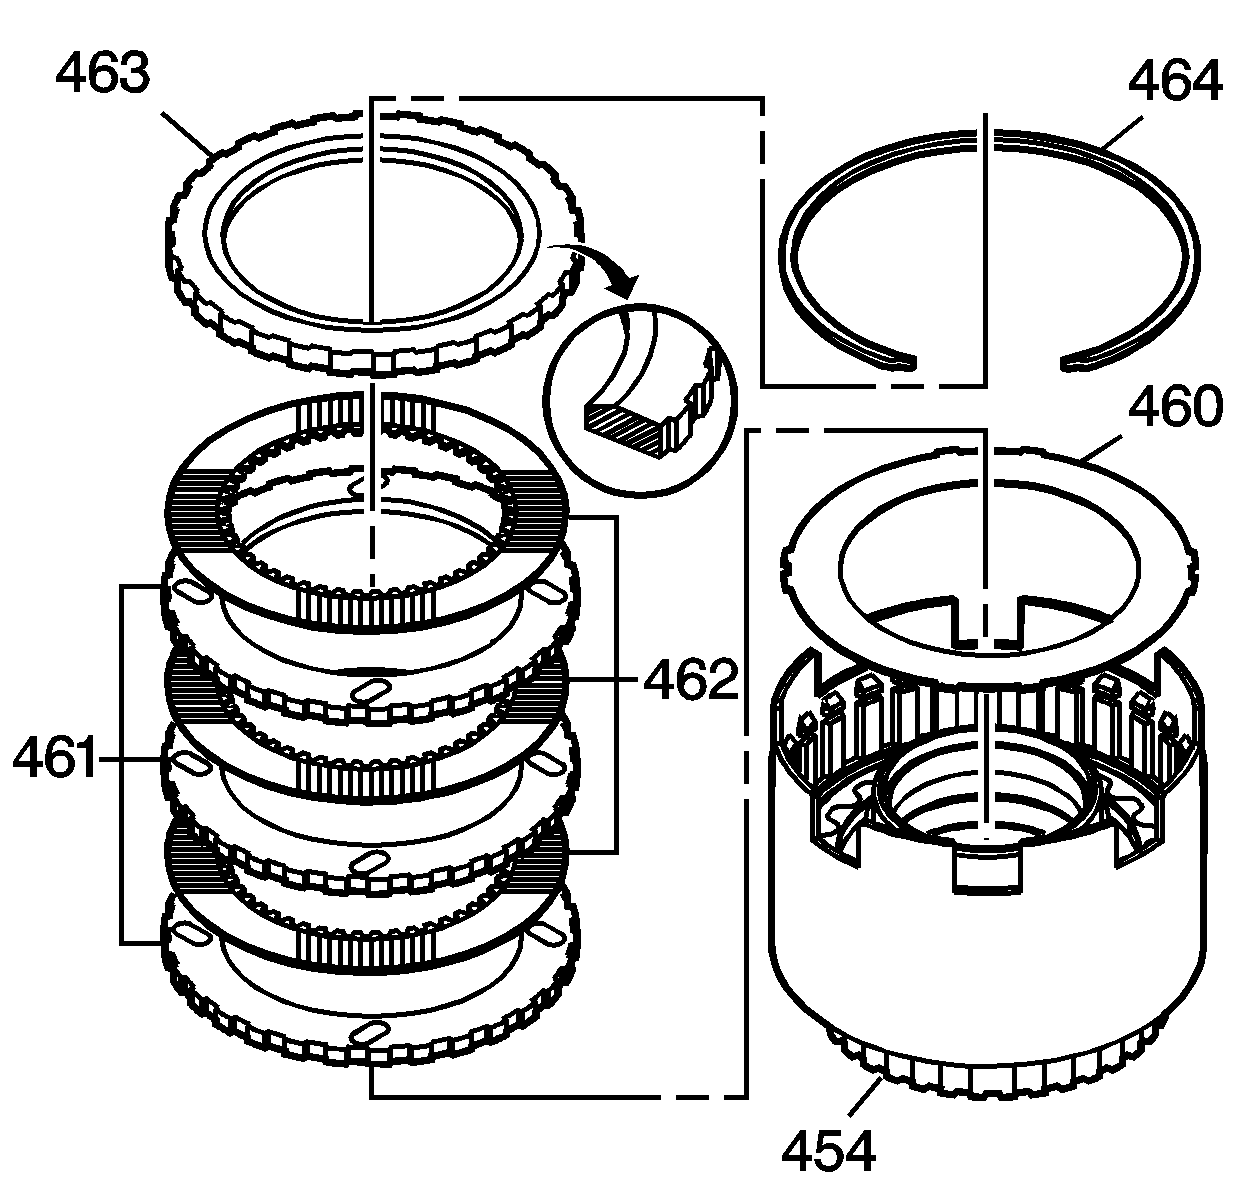
- Remove the reverse clutch snap ring (464).
- Remove the reverse clutch plates (one backing plate (463), three steel plates (461), three fiber plates (462), and a waved plate (460).

- Compress the reverse clutch return spring.
Use the
J 41232
and
J 23327
or equivalent.
- Remove the reverse clutch return spring and the retainer snap ring (459).
- Remove the
J 41232
and
J 23327
.

- Remove the reverse clutch return spring and retainer assembly (458).
- Remove the reverse clutch piston and seal assembly (457).

Important: If the seal assembly is not damaged do not remove the seal assembly.
- Inspect the reverse clutch inner seal (456).
- If the seal assembly is damaged, perform the following procedure in order to remove the seal assembly:
| 9.1. | Use the
J 4646
or equivalent in order to install the
J 41097-1
under the outer lip of the reverse clutch inner seal (456). |
| 9.2. | Place the
J 41097-2
on the inner hub of the reverse clutch housing (454). |
| 9.3. | Use the puller
J 25031-A
in order to remove the seal. |

Important: Be careful when removing the second roller clutch not to score the roller clutch inner race with the screwdrivers.
- Remove the 2nd roller clutch (452) and roller clutch retainer (450) by prying up on the roller clutch assembly with two screwdrivers. The second roller clutch retainer is pressed onto the reverse clutch housing (454) and is not reusable
after removal.

Important: In order to remove the 2nd roller clutch (452), rotate the roller clutch clockwise until indexed with the roller clutch cam (451) ramps.
- Remove the 2nd roller clutch (452) from the inside of the roller clutch cam (451).

- Inspect the reverse housing (454) for excessive band wear and damaged splines.
- Inspect the retainer and ball capsule for damage or clogging.
- Inspect the fluid feed holes for proper opening.

- Inspect the roller clutch for excessive wear (451 and 452).
- Inspect the spring assembly for dislocated or damaged springs (458).
- Inspect all components for damage and excessive wear.
- Clean and dry each of the components.


