Placement of Vehicle Model Badges on Decklid Applique or Liftgate

| Subject: | Placement of Vehicle Model Badges on Decklid Applique or Liftgate |
| Models: | 2002 - 2003 Saturn L-Series vehicles |
| Due to the addition of 2003 model year vehicle badge placement procedures, this bulletin has been revised and supersedes bulletin 01-T-36, which should be discarded. |
Purpose
The purpose of this bulletin is to provide installation procedures necessary for correct placement of model badges on rear decklid or liftgates.
Installation Procedure
The following steps are common to both sedan and wagon models and must be performed before beginning emblem installation.
The model designation emblems ie. L100, LW200 etc. will be placed on the left hand side of the decklid applique or liftgate. The V6 emblem, on those models equipped, will be placed on the right side of the decklid applique or liftgate.
- Wash the applique or liftgate with mild soap and water solution and dry thoroughly.
- Wash the areas where the emblems are to be bonded using a 50/50 mixture of isopropyl alcohol; (rubbing alcohol) and water, and dry thoroughly. Proceed to appropriate emblem procedure to complete installation.
Important: Do not use solvent type cleaning agents on decklid appliques. Exposure to these solvents may cause damage to the applique.
Emblem Placement Sedan Models 2002 Model Year
- Cut a piece of 25 mm (1 in.) masking tape approximately 254 mm (10 in.) long.
- Place the masking tape so the bottom edge of the tape is aligned with the horizontal feature line molded in the applique approximately 3 mm above the chrome strip.
Important: Do not substitute 25 mm (1 in.) masking tape with other dimensions. This will cause a misplacement of the emblem. Tape with 25 mm (1 in.) dimension is available locally at home building centers or paint supply stores.
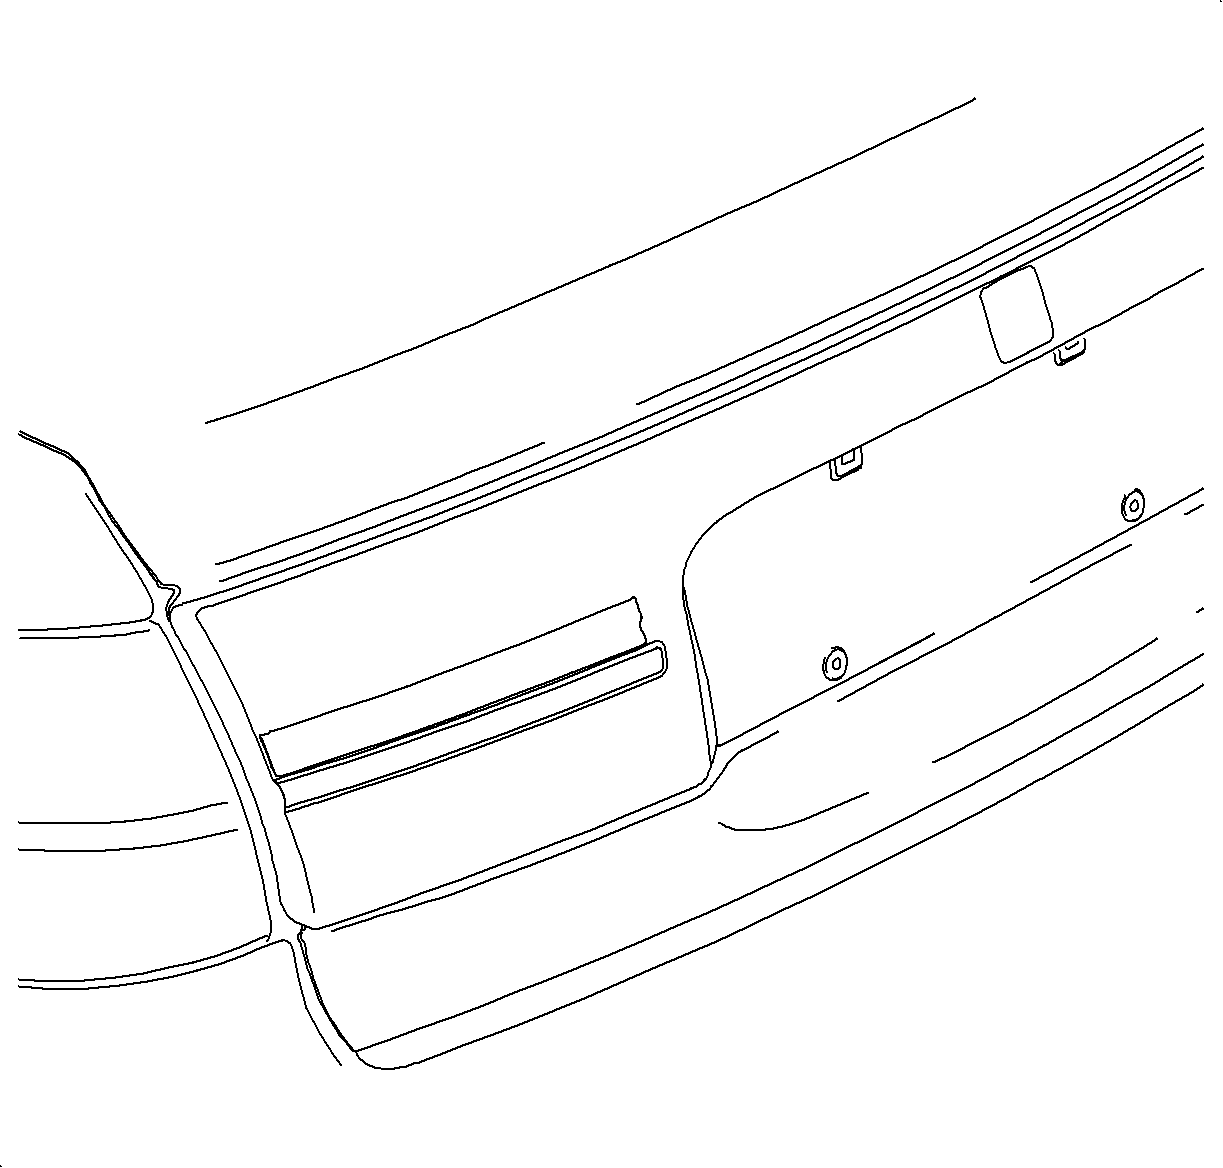
Important: Due to the difference in size between the L100 emblem and the L200 and L300 emblems, follow the appropriate steps below.
L100 Emblem Placement Sedan Models 2002 Model Year
- Using a measuring tape, measure along the top edge of masking tape from the left hand edge of the applique and make a vertical reference line at a distance of 75 mm (3 in.).
- Remove white protective tape from back side of the emblem, being careful not to loosen the clear adhesive tape on the front of the emblem.
- Carefully align the emblem so the left edge of the "L" is aligned with your vertical reference line, and the bottom of the emblem is aligned with the top edge of the masking tape.
- Using your hand, apply medium hand pressure to each individual character for a minimum of three seconds. This will ensure the emblem bonds properly to the applique.
- Remove the clear protective tape from the front of the emblem.
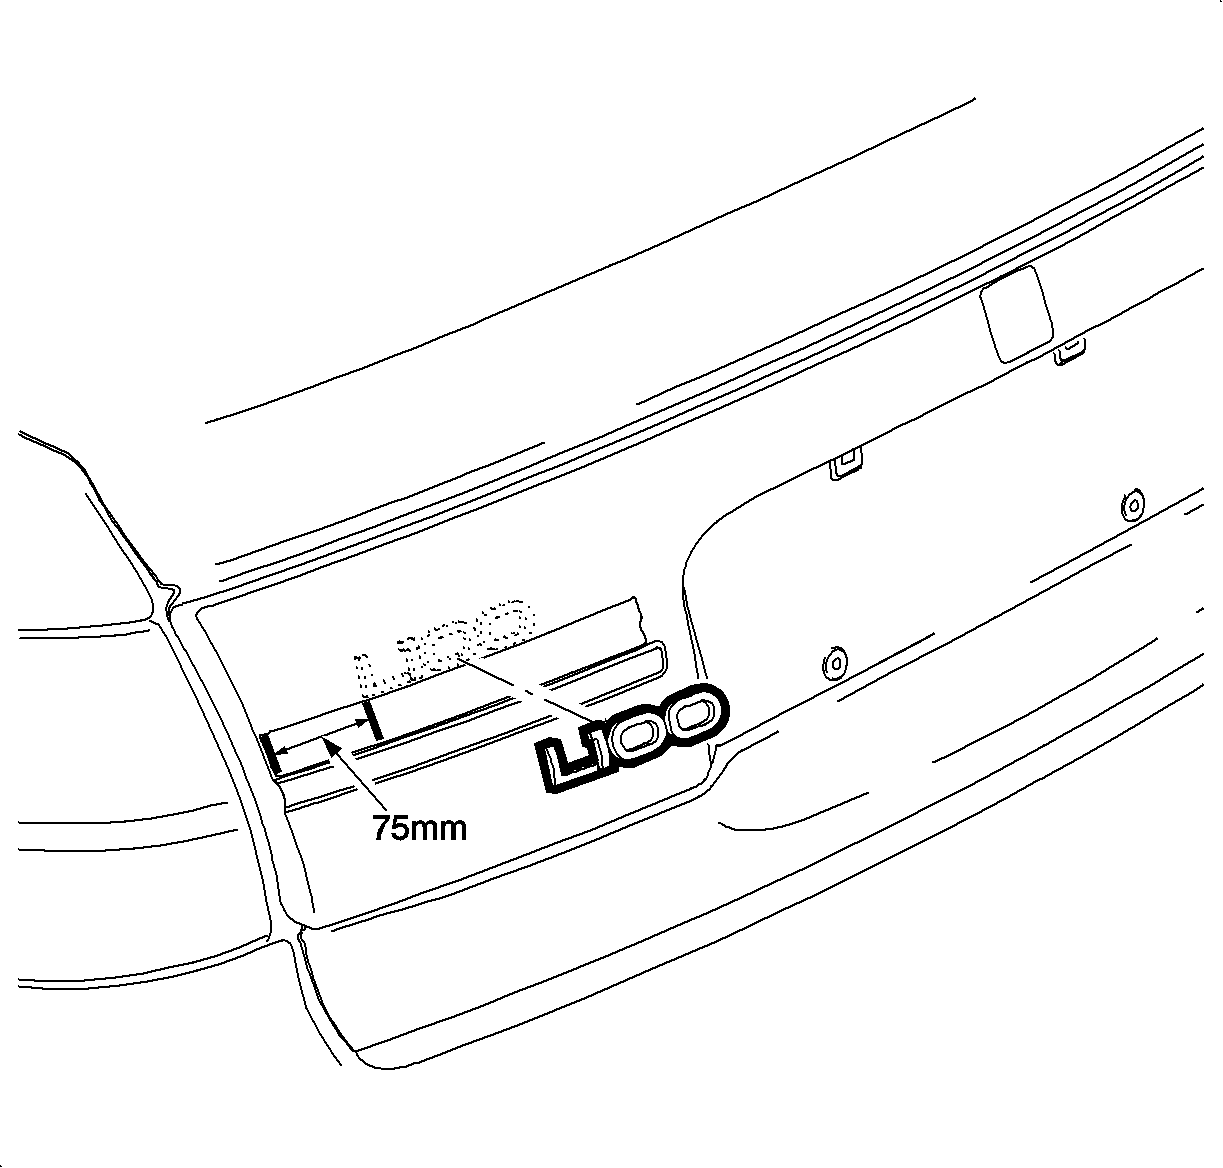
Important: Do not remove the clear protective tape from the front of the emblem. This tape is used to maintain the alignment of the individual characters during the installation process.
L200 and L300 Emblem Placement Sedan Models 2002 Model Year
- Using a measuring tape, measure along the top edge of masking tape from the left hand edge of the applique and make a vertical reference line at a distance of 65 mm (2 1/2 in.).
- Remove white protective tape from back side of the emblem, being careful not to loosen the clear adhesive tape on the front of the emblem.
- Carefully align the emblem so the left edge of the "L" is aligned with your vertical reference line and the bottom of the emblem is aligned with the top edge of the masking tape.
- Using your hand, apply medium hand pressure to each individual character for a minimum of three seconds. This will ensure the emblem bonds properly to the applique.
- Remove the clear protective tape from the front of the emblem.
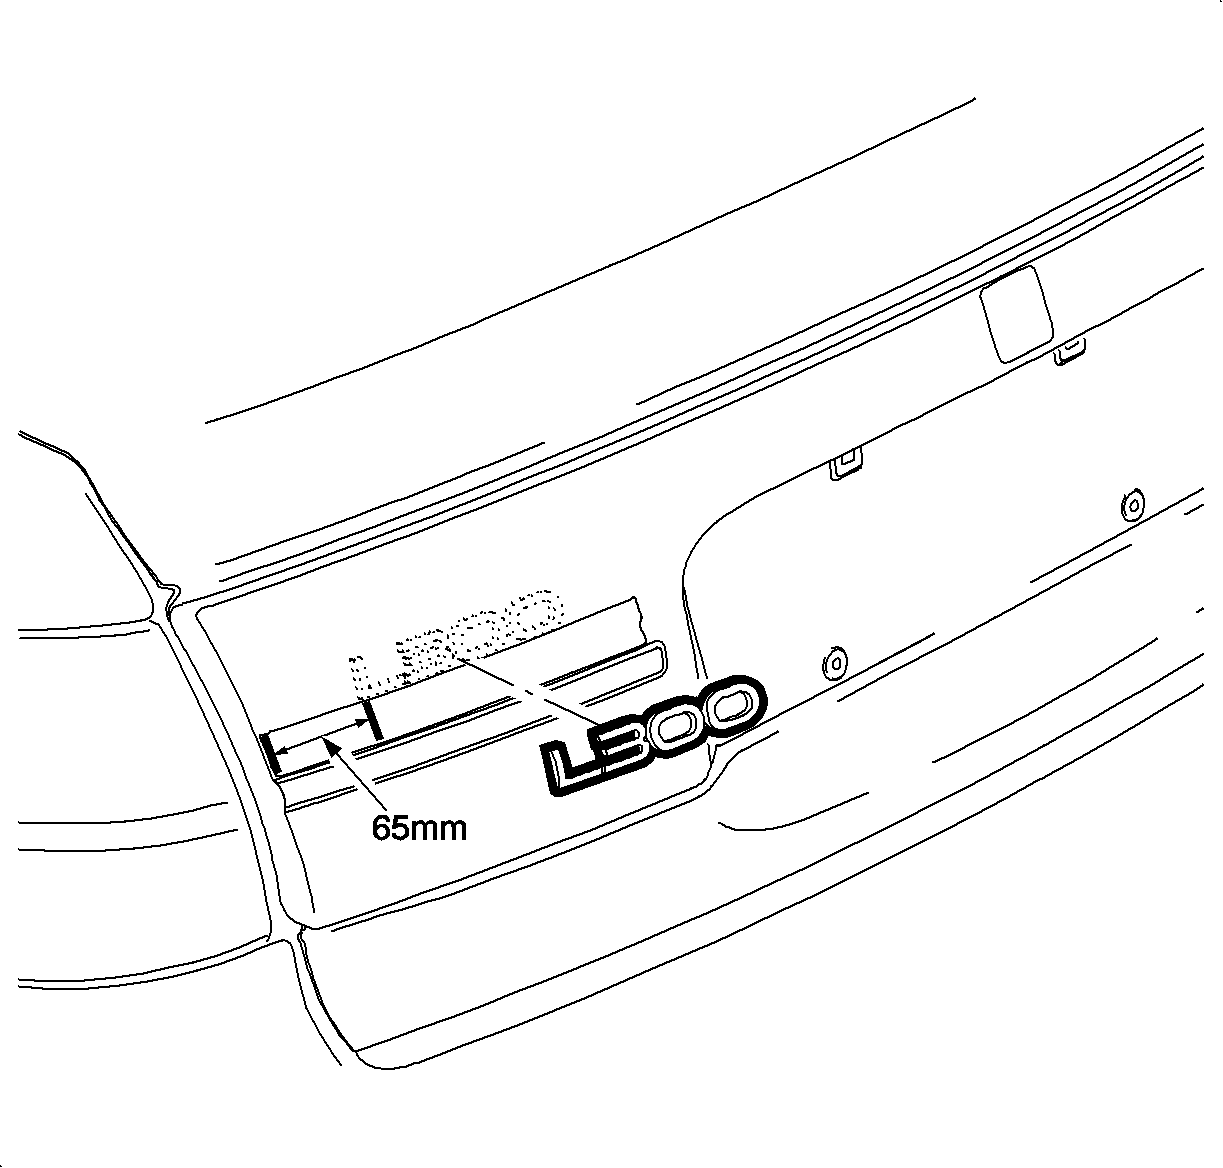
Important: Do not remove the clear protective tape from the front of the emblem. This tape is used to maintain the alignment of the individual characters during the installation process.
V6 Emblem Placement Sedan Models 2002 Model Year
- Cut a piece of 25 mm (1 in.) masking tape approximately 254 mm (10 in.) long.
- Place the masking tape so the bottom edge of the tape is aligned with the horizontal feature line molded in the applique approximately 3 mm (1/8 in.) above the chrome strip.
- Using a measuring tape, measure along the top edge of the masking tape from the right hand edge of the applique and make a vertical reference line at a distance of 100 mm (4 in.).
- Remove white protective tape from backside of the emblem, being careful not to loosen the clear adhesive tape on the front of the emblem.
- Carefully align the right hand edge of the "6" on the emblem with the vertical reference line and the bottom edge of the emblem with the top edge of the masking tape.
- Using your hand, apply medium hand pressure to each individual character for a minimum of three seconds. This will ensure the emblem bonds properly to the applique.
- Remove the clear protective tape from the front of the emblem.
Important: Do not substitute 25 mm (1 in.) tape for tapes with other dimensions. This will cause a misplacement of the emblem. Tape with the 25 mm (1 in.) width dimension is available locally at home building centers or paint supply stores.
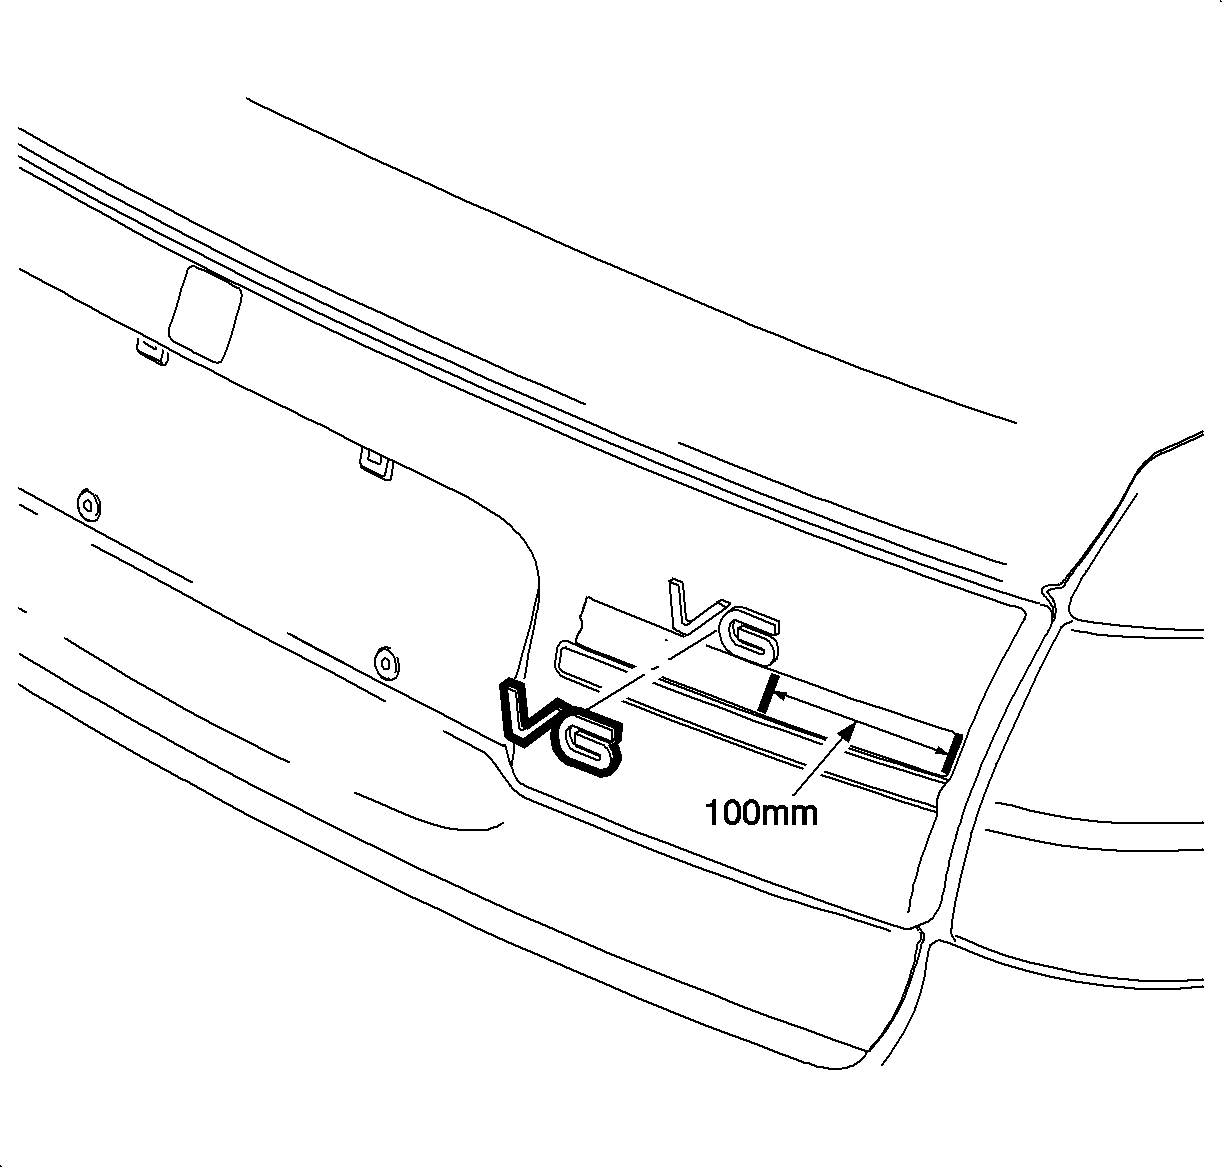
Important: Do not remove the clear protective tape from the front of the emblem. This tape is used to maintain the alignment of the individual characters during the installation process.
LW200 and LW300 Emblem Placement Wagon Models 2002-2003 Model Year
- Cut a piece of 76 mm (3 in.) masking tape to approximately 279 mm (11 in.) long.
- Align the top edge of the tape with the bottom edge of the liftgate upper feature line.
- Using a measuring tape, measure along the bottom edge of the tape from the left edge of the liftgate and make a vertical reference line at a distance of 93 mm (3 1/2 in.).
- Remove white protective tape from backside of the emblem, being careful not to loosen the clear adhesive tape on the front of the emblem.
- Carefully align the emblem so the left edge of the "L" is aligned with your vertical reference mark and the top of the emblem is aligned with the bottom edge of the masking tape.
- Using your hand, apply medium hand pressure to each individual character for a minimum of three seconds. This will ensure the emblem bonds properly to the liftgate.
- Remove the clear protective tape from the front of the emblem.
Important: Do not substitute 76 mm (3 in.) masking tape with other dimensions. This will cause a misplacement of the emblem. Tape with 76 mm (3 in.) dimension is available locally at home building centers or paint supply stores.
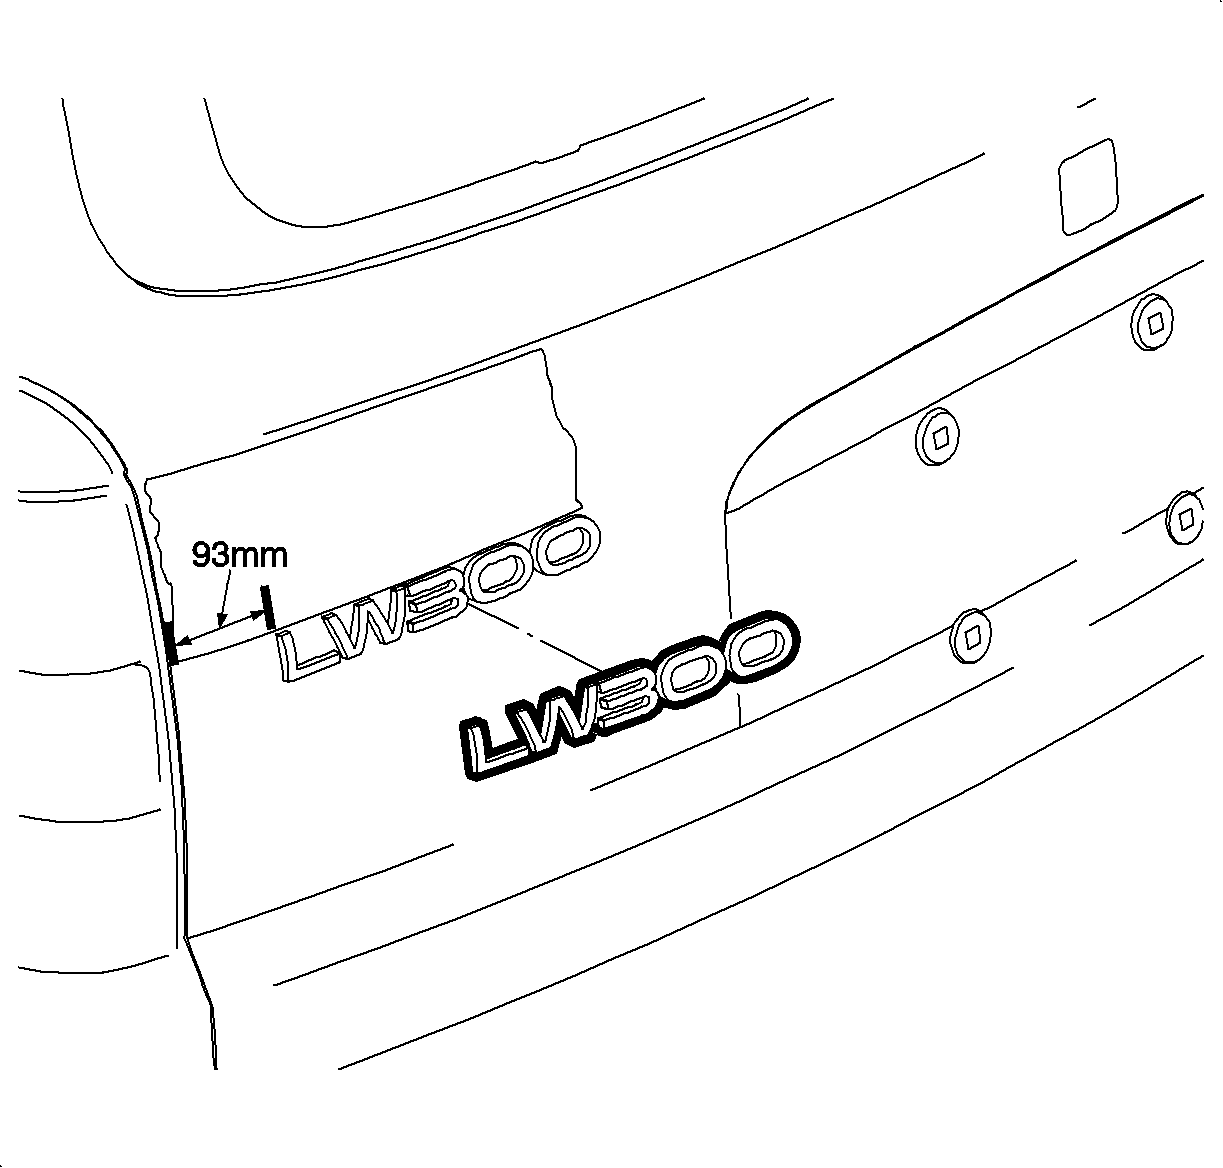
Important: Do not remove the clear protective tape from the front of the emblem. This tape is used to maintain the alignment of the individual characters during the installation process.
V6 Emblem Placement on Wagon Models 2002-2003 Model Year
- Cut a piece of 76 mm (3 in.) masking tape approximately 279 (11 in.) inches long.
- Align the top edge of the tape with the bottom edge of the liftgate upper feature line.
- Using a measuring tape, measure along the bottom edge of the masking tape from the right edge of the liftgate and make a vertical reference mark at a distance of 146 mm (5 3/4 in.).
- Remove white protective tape from backside of the emblem, being careful not to loosen the clear adhesive tape on the front of the emblem.
- Carefully align the right hand edge of the "6" on the emblem with the vertical reference mark and the top edge of the emblem with the bottom edge of the masking tape.
- Using your hand, apply medium hand pressure to each individual character for a minimum of three seconds. This will ensure the emblem bonds properly to the liftgate.
- Remove the clear protective tape from the front of the emblem.
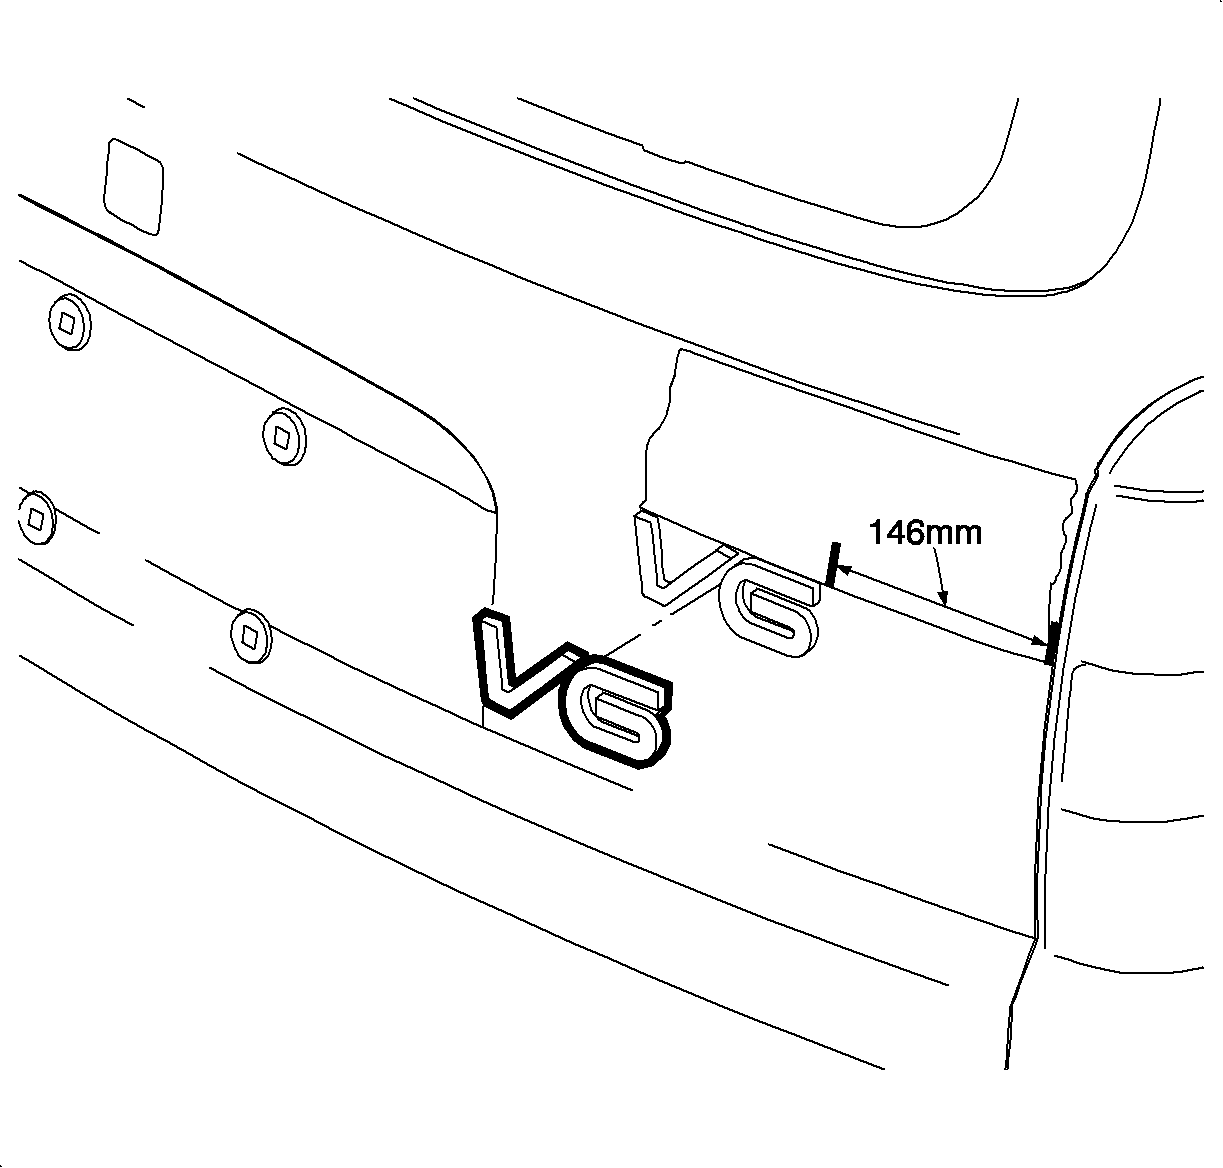
Important: Do not remove the clear protective tape from the front of the emblem. This tape is used to maintain the alignment of the individual characters during the installation process.
L200 and L300 Emblem Placement 2003 Model Year
- Install a 254 mm (10 in.) piece of (3/4 in.) masking tape. Align the upper edge of the masking tape with the lower edge of the deck lid applique chrome strip.
- Install a second 254 mm (10 in.) piece of (3/4 in.) masking tape. Align the upper edge with the lower edge of the previously installed piece.
- Using a tape measure, measure from the edge of the deck lid along the bottom edge of the tape and make a vertical reference mark at 60 mm (2 1/4 in.).
- Remove the white protective tape from the back of the emblem, being careful not to loosen the clear adhesive tape on the front of the emblem.
- Carefully align the emblem so the left edge of the "L" is aligned with the vertical reference mark and the top edge of the emblem is aligned with the bottom edge of the masking tape.
- Using your hand, apply medium hand pressure to each individual character for a minimum of three seconds. This will ensure the emblem bonds properly to the applique.
- Remove the clear protective tape from the front of the emblem.
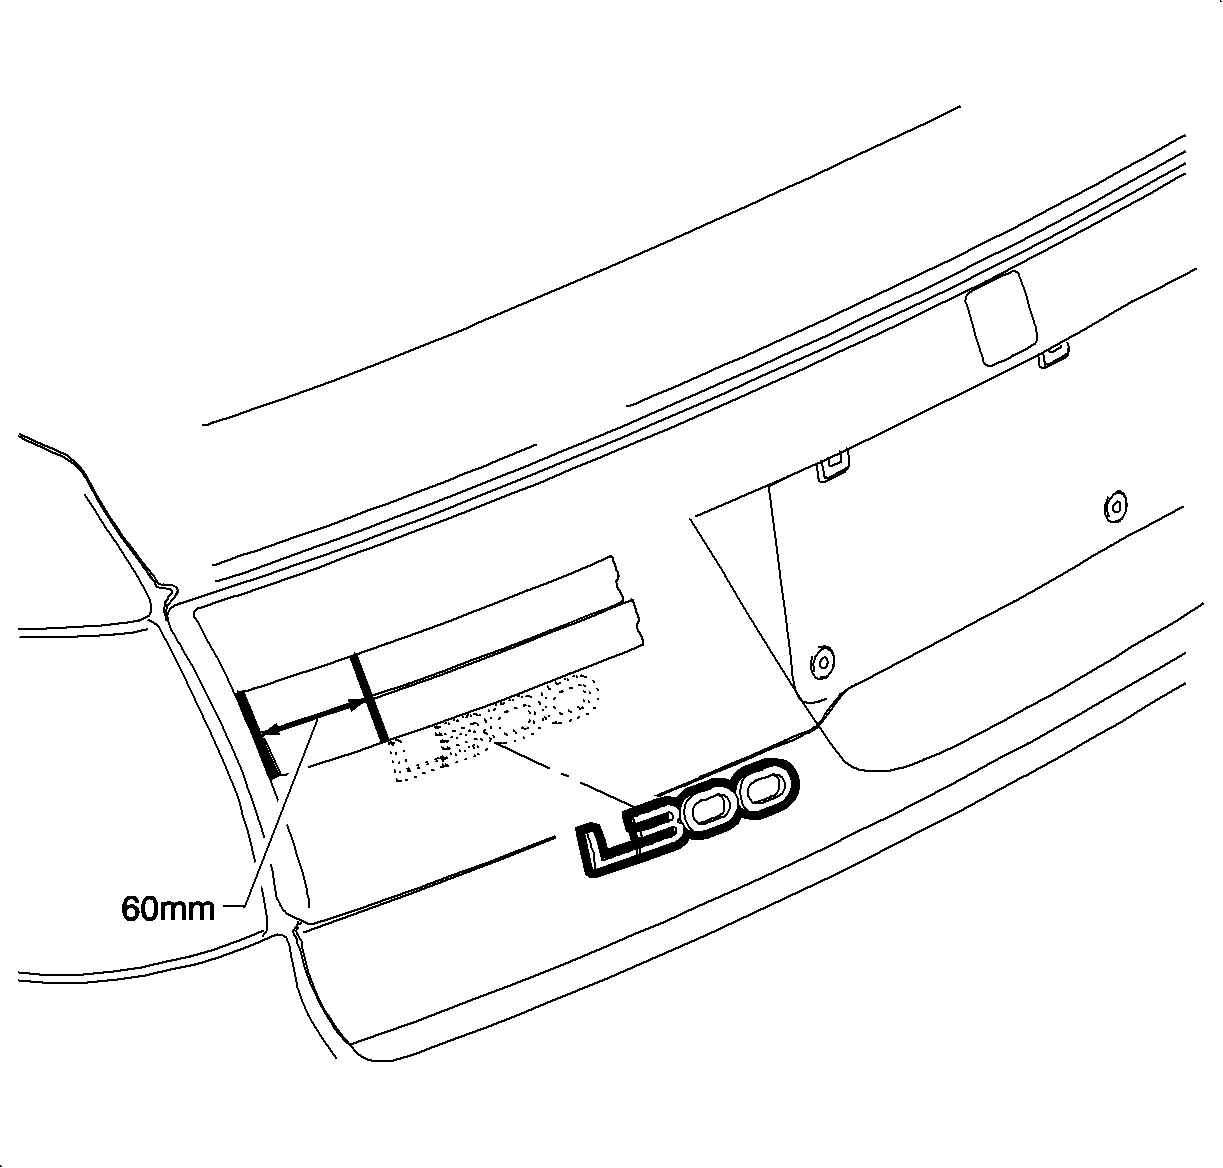
Important: Do not remove the clear protective tape from the front of the emblem. This tape is used to maintain the alignment of the individual characters during the installation process.
V6 Emblem Placement on Sedan Models 2003 Model Year
- Install a 254 mm (10 in.) piece of (3/4 in.) masking tape. Align the upper edge of the masking tape with the lower edge of the deck lid applique chrome strip.
- Install a second 254 mm (10 in.) piece of (3/4 in.) masking tape. Align the upper edge with the lower edge of the previously installed piece.
- Using a tape measure, measure from the edge of the deck lid along the bottom edge of the tape and make a vertical reference at 102 mm (4 in.).
- Remove the white protective tape from the back of the emblem, being careful not to loosen the clear adhesive tape on the front of the emblem.
- Carefully align the emblem so the right edge of the "6" is aligned with the vertical reference mark and the top edge of the emblem is aligned with the bottom edge of the masking tape.
- Using your hand, apply medium hand pressure to each individual character for a minimum of three seconds. This will ensure the emblem bonds properly to the applique.
- Remove the clear protective tape from the front of the emblem.
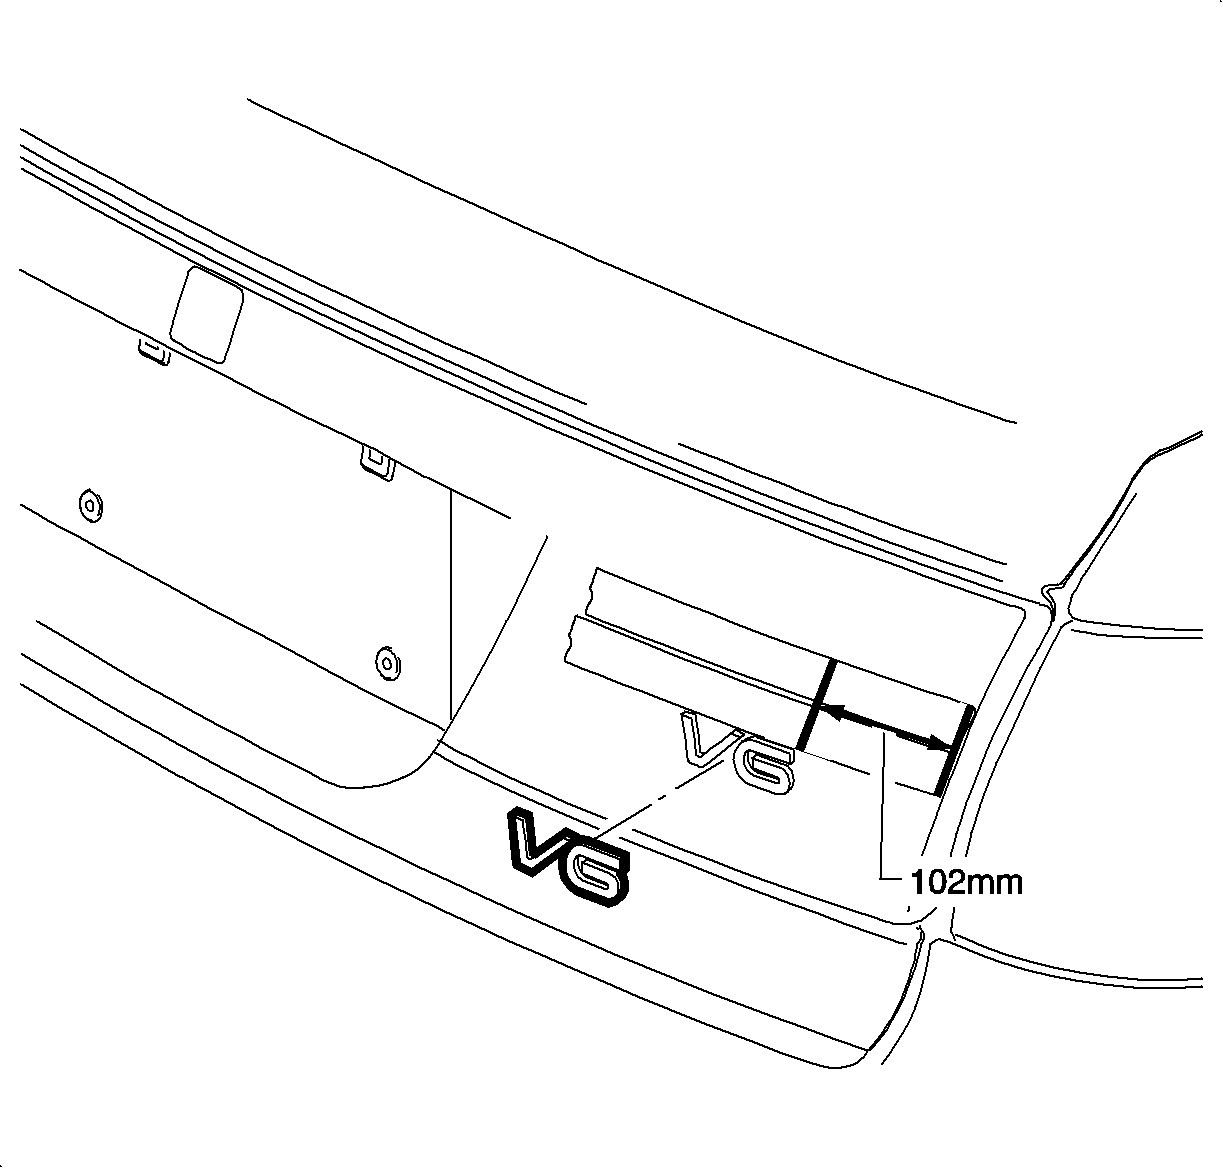
Important: Do not remove the clear protective tape from the front of the emblem. This tape is used to maintain the alignment of the individual characters during the installation process.
Parts Requirements
Part Number | Description |
|---|---|
22691563 | PLATE ASM-R/CMPT LID NA, L100 |
22691564 | PLATE ASM-R/CMPT LID NA, L200 |
22691565 | PLATE ASM-R/CMPT LID NA, L300 |
22691566 | PLATE ASM-L/GATE NA, LW200 |
22691567 | PLATE ASM-L/GATE NA, LW300 |
22691568 | PLATE ASM, V6 |
Claim Information
To receive credit for this repair during the warranty coverage period, submit a claim through the Saturn Retailer System for B8700 (Emblem and/or Name Plate, Rear End Panel - Replace).
